Curtain (furnishings) tape is a braid, along the entire length of which cords are laid to create folds and holes or loops for attaching the product. Such fittings make it easier to sew window textiles, eliminating the need to create loops and folds directly on the fabric. It is not difficult to sew curtain tape of any size to curtains, the main thing is to make the correct calculations and follow the step-by-step instructions.
Types of curtain tapes
Curtain tape is a fabric strip that is sewn to the back of products. The width of the material is conveniently adjusted with cords located in the ribbons.
Thanks to the braid, you can create a chic drapery for any fabric. This eliminates the need to sew additional loops for such hooks. The threads on the sides are sewn together as quickly as possible, the total sewing time is reduced several times.
There are several types of curtain tapes that are used in practice by designers:
- When using adhesive tape with loops everything is secured to the cornice.
- If you use hot irons for gluing.
- Involving the use of sewing machines.
- With assembly coefficients from 1.5 to 3. The number determines how many folds there will be on the product.
- When there are a lot of draw-out pockets for hooks, or vice versa.
- With the formation of bows.
- With tucks.
- Wide up to 15 centimeters.
- Narrow.
The following elements are often included with curtain tape:
- Cords for tie.
- Fastening with hooks and pockets.
- Sealing elements.
- Ring parts for eyelets.
The size of the folds determines the length of products such as tulle on curtain tape.
Some ways to fix the length of your drapes
You can correct the length of the curtains manually or using a machine using thread and a needle or adhesive tape. There are also alternative options, for example, making folds or securing the bottom with magnets. How to hem curtains correctly?
Hemming by hand
This is a rather long process that will require attention and concentration. The fact is that when sewing by hand, the seamstress will need to adjust the length of the stitch, the distance between them and the straightness of the seam.
You can even shorten curtains by hand
The step-by-step procedure is as follows:
- It is necessary to lay the fabric on a flat surface and straighten it;
- Apply all necessary marks with special chalk or a dry piece of soap;
- Cut off excess fabric or immediately fold it, securing with thin pins;
- Carefully, slowly, hem, leaving small pieces of thread (2-3 cm each) along the edges;
- When finished, you need to tie knots using the remaining threads.
We use the machine
A sewing machine makes sewing much faster and easier, since you don’t have to watch the seam. If the work is not performed by a master, but by a beginner, it is worth watching several lessons in advance in order to better understand the process.
It is best to use a seam length of 0.3-0.7 cm; a straight stitch or a small zigzag stitch will do. The second one will be invisible on the front side, but sewing with it is a little more difficult than with a straight seam.
Working with the machine is simpler and faster
- The fabric must be folded and secured with pins or a large stitch;
- Place under the foot and stitch, leaving a few threads around the edges;
- Tie the remaining threads with knots.
If the fabric frays a lot, its edge must first be overlocked and secured, then folded and stitched.
Step-by-step instructions: how to sew tulle onto ribbon?
The number of laces running through the tape also often becomes a determining factor when choosing. This parameter determines how many folds there will be.
Compared to the length of the tulle itself, it is recommended to buy braids 25-30 centimeters longer, with some margin.
The step-by-step instructions are not so complicated, even a beginner can cope with its implementation:
- First, cut off the excess length.
- The edges of the tulle are folded and selected by hand.
- Everything that was basted earlier is stitched using a special machine. The main thing is to create long enough stitches.
- Threads cannot be fastened at the ends of lines. It is enough to connect the parts with each other.
- The last steps involve joining the braid and tulle. The strip must be applied so that the loops are on the outside. Then there are fewer problems when connecting to the cornice.
- For those wondering how to sew ribbon to tulle, the final step will be removing the running stitches.
Note!
Curtains for windows - TOP 120 photo and video examples. Styles and shapes of curtains, their differences. Advantages and disadvantages of window curtains- Tulle in the interior: types of tulle, pros and cons of the material. Selection of colors, lengths, quantities and patterns of tulle for different interiors (photo + video)
- DIY curtains - instructions for sewing curtains with your own hands. Types of fabrics, colors and patterns for curtains. 120 photos + video reviews
The sides of the tape must be stitched. The laces on the braid are tied on one side, and on the other they are all pulled together as needed. Assemblies are formed.
The laces should not be affected by the stitching, especially when the stitches go in the middle. This will complicate the workflow.
After completing the previous work, you can hang the finished product on hooks. In the case of a ceiling cornice, the following order is followed:
- The loops of the ribbon are connected to the hooks. The width of the pulled tulle must be divided by the number of hooks. The result is the distance that must be maintained between these elements.
- They hang one hook at a time on one cornice, with tulle in their hands.
- The plug closes the eaves passage.
If the cornice is window, the hooks are already included, and the tulle is placed on them.
Options for tying curtains
Not all housewives know how to tie curtains beautifully, and what material is best to choose for tying them. If you choose the right decor, you can successfully solve two functional problems at once: make the garters functional and decorative. With the help of a variety of hairpins, magnets, and curtain clips, you can make positive changes to the boring appearance of the window and transform old curtains.
Tiebacks will help create beautiful folds on the curtains, making the curtains the “calling card” of the room.
Attention! When choosing a tieback, it is important to take into account the style direction chosen for the room, the texture and color of the curtains.
For example, in Provence or country, holders made of braid, lace, and hairpins in the form of bows are appropriate. For high-tech, it is better to limit yourself to the selection of metal or plastic curtain clips.
It is difficult to imagine a classic style without the use of luxurious fabric garters, complemented with lace or glass beads, as well as without massive cords with decorative tassels.
Tulle mesh
A translucent nylon ribbon will be the best choice in this situation. This solution will reduce the visibility of the ribbon. The color is chosen so that it matches the overall tone of the fabric. The total width of the strip is up to a maximum of 6 centimeters.
The process begins with preparing the tulle and ribbon themselves:
Note!
- Photos of curtains: design of curtains of different sizes and lengths. Color range, types of materials, patterns and curtain fastenings (photo + video)
- Organza tulle: advantages and disadvantages of the material. Varieties of tulle and fastenings. Tips for sewing and installation (photo + video)
Tulle design - TOP 130 photos + video reviews of tulle designs. Features of choosing fabric, length, quantity and type of tulle
- On each side leave 3-4 centimeters near the braid.
- The fabric is left with approximately the same lengths.
- The main thing is that the fabric and threads are not stretched too tightly. Anyone can figure out how to sew ribbon to tulle.
Next, the step-by-step instructions take the following form:
- Iron the entire tulle completely. 1 centimeter of fabric is folded over the top and ironed.
- The curtain tape is placed on the fabric that was folded earlier. A 5mm margin from the edge is required.
- The tape is secured to the fabric with thread.
- Next comes straight stitching on the machine. The laces and ribbons should be equal to each other, in terms of quantity.
- The tape is cut so that the edge is at least one and a half centimeters shorter than the fabric.
- The fabric has two folds. First, this is done completely, then only on part of the surface.
- Sew the edges of the fabric. In this case, there should be no cords in the gateway.
- The tulle is pulled together until suitable indicators are achieved.
It is better to use special clothespins; in this case, there will be fewer problems with attaching the tulle.
Preparation of material
Before you start sewing a curtain, you need to calculate exactly how much fabric and textile accessories we will need. And then properly prepare the material for sewing.
Algorithm of actions:
- We calculate the dimensions of the curtains and braid.
- We add a margin to level out the bevels and shrinkage of the material.
- We check the material for shrinkage.
- We prepare threads to match the fabric, tailor's tape, chalk, sharp needles, pins, scissors, and iron.
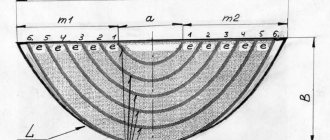
We calculate the sizes
The width of the planned curtain is equal to the width of the cornice, multiplied by the “K” factor, plus 15-25 cm for bending the sides and shrinkage.
For example, a cornice is 150 cm, braid parameter K=2.
150 * 2 + 25 = 3.25 meters.
Add 12 cm to the length of the curtain for hem:
- 2 cm for the hem of the top of the curtain;
- 10 cm - on the bottom.
Length of the braid = the sum of the width of the folded curtain plus 50 cm for shrinkage/safety.
Checking for bevels and shrinkage
We are considering the material for the future curtain, whether it is cut evenly when purchasing. A canvas with a pattern is easier to align. Plain fabric is aligned so that the edge is strictly perpendicular to the grain thread. The bevels are cut off. We carry out the check by securing the cut vertically and looking for any distortions or tension on the side up.
It is necessary to buy fabric with a margin of 15-20 cm. We take textile accessories 50 cm longer.
Avoiding the consequences of shrinkage
- The straightened piece of fabric should be washed without powder in warm water, dried and ironed. After this operation, the material will not shrink.
- Wet and dry the tape before sewing to avoid the effects of shrinkage.
Setting up the machine correctly
- Adjust the thread tension. To make the seam beautiful, you need to adjust the degree of thread tension. We carry out the test on a small piece of matter. The stitching should be even and the threads should not stick out.
- Adjust the presser foot pressure on the fabric. Strong pressure from the foot crushes the material and tightens it. It is impossible to iron such a seam with an iron. Therefore, it is necessary to adjust the presser foot pressure according to the type of fabric, especially when sewing organza and voile.
Preparing the curtain
The SL is hemmed onto an already prepared curtain.
- First, we cut off the factory edges on the fabric. When folded, they tighten the fabric.
- At a distance of 1.5 cm from the edge, pull out the vertical thread. We make a cut along the formed line and bend the side edge. We carefully stitch it, followed by steaming.
- Fold the bottom, stitch, steam.
- We process the top of the curtain. We make a 2 cm hem, iron it delicately, avoid deformation, and sweep it away.
- Only after this we sew on the textile strip and form the drapery.
Wide curtain tapes, creating folds
It is better to make tulle from transparent fabric. Then it will not shine through and will not spoil the overall appearance of the structure.
Next, calculate the length needed for the tape:
- The length of the ribbon is proportional to the length of the tulle.
- They rely on the size of the window opening, adding 10-15 centimeters in reserve.
- Example - for 1 meter of window they take 2 or 3 meters of tulle.
The process of sewing ribbon to tulle itself should also not cause much trouble:
Note!
- Gray tulle: nuances of using gray tulle in the interior. Suitable gray fabric materials. 150 photos + video examples
- Small curtains: TOP-180 photos + video of design options for small curtains. Features of small curtains in the interior. Types of curtains, fabrics and colors
Curtains for the hall: requirements for choosing curtains for the hall. Selecting the length, material and shade of fabric for curtains in the living room (photo + video)
- First of all, the parts are stitched from the bottom and sides.
- 3 centimeters is the maximum turn-up on the top edge. Next, the bend is smoothed.
- 1 centimeter of indentation from the edge at the top is needed when connecting the tape from the wrong side and the base. Then comes the attachment of the tape to the tulle. It is permissible to use pins and needles, basting.
- The tape is stitched along the edges at the bottom and at the top when everything is ready. This must be done near each cord if the design is quite complex.
Types of drapery
An important parameter of curtain tape that influences the calculation of its length when purchasing is what shape of folds it creates after sewing. The choice of draperies depends on the type of fabric, as well as the style of window decoration:
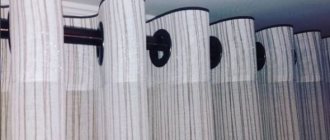
- “Columns” are evenly distributed folds. Their number and frequency are determined by how much you tighten the cord near the tape. This drapery is suitable for a modern interior.
- “Pencil” (assembly factor 2-3.5) is the simplest, classic assembly option. Suitable for any style, does not attract attention with its simplicity.
- “Buffs” (coefficient – 1.5-2.5) form folds reminiscent of waffles. Suitable for classic or other interiors where jacquard fabrics, velvet, and satin are used in the decor.
- French assembly (“fan”). The fabric forms tucks in the form of small fans. Drape factor 2.5.
- Bow folds (2.5-3). When pulled together, you get small folds in the form of bows, which look cute in a child's room.
- “Glasses” (2-3) are the most voluminous drapery option. The appearance of the folds resembles the shape of glasses.
The choice of draperies depends on the type of fabric, as well as the style of window decoration
Instructions for sewing narrow items
Narrow curtain tapes go well with transparent fabrics.
- Here the rules are the same as for other situations - they start with calculating the elements. Curtain tape and tulle are taken with the same length, and 25 centimeters are added to them.
- The length of the window opening will also affect the calculation and its results. 1 to 3 is a standard ratio for those who like a large number of folds.
- The coefficient decreases if there are few folds.
- All sides of the tulle are overcast and stitched. Only on the upper side do they bend by 1-2 centimeters.
- The fold is ironed well when the work is almost done. The process is almost finished. Almost everyone will be able to figure out how to properly sew curtain tape onto tulle.
- The distance from the edge at this stage is 0.5 centimeters; curtain tapes and surfaces are applied to each other. Then they baste by hand.
- All that remains is to stitch the tape from the top and bottom edges.
Loops
Allows you to hang curtains directly on the curtain. Sometimes there are various options with several rows of loops. In this case, we will be able to adjust the height of the curtains.
Combined. The most common option is a combination of Velcro and loops.
Tips for beginners while working
Having a sewing machine greatly simplifies the work. Especially for those who do not yet have the skill. All that remains is to take measurements, and then simply cut off everything that will be superfluous.
If necessary, use needles or pins, the stitches should always remain low enough. The hem is ironed well when the basting is completed. Thanks to such actions, the fold line itself remains as straight as possible. Then use the sewing machine again for processing.
The end and beginning of each line do not require securing threads. Their close connection with each other is enough when the work is completed. All that remains is to connect the tulle with the curtain tape.
Advantages and disadvantages
The biggest benefit of using curtains is that they block sunlight in the morning and during the day, and electric light at night. During the day, especially in the heat, curtains save us by creating the desired shade. At night, they help produce sufficient quantities of the sleep hormone melatonin. They create coziness and complete the interior decor of our home.
On a note! The disadvantage of this accessory is the large accumulation of dust. Therefore, they should not be hung in rooms where small children and people with allergies live.
It just so happened that curtain tape has become a convenient device used by housewives for fabrics of various textures. Sewn correctly, it helps to decorate the window in an original way and drape with soft waves. This is a simple and quick way to liven up a light tulle or a heavy curtain. The variety of types allows you to create an infinite number of combinations to implement the most daring decisions.
How do you like the article?
Tips for creating pleats
The ability to form draperies and folds is another important function of curtain tape, which you definitely shouldn’t forget about during work.
Before creating such elements, it is recommended to tightly tie the laces together, which tighten the material. After such a tight tie, the tulle can be washed even when folded. You can watch the video; after that, sewing the ribbon to the tulle will not be difficult.
The formation of correct warehouses is only possible if the fittings are sewn correctly and accurately. On the wrong side, you can sew secret pockets from excess pieces.
We take proper care
As a rule, curtain and tape materials have different textures with their own properties and characteristics. With the same wash, they can react differently to it, where each material will shrink differently. To avoid this, wash the braid in the washing machine before stitching, dry it, and only then start manipulating it.
An important point will be the correct operation of the product. When forming folds, pull the threads on both sides at the same time, not just one.
Consider the material from which the tape is made. It may have its own temperature setting for the iron, and the use of the washing machine only in a gentle mode, which imposes its own characteristics when washing occurs together as a single, finished product.
Types of curtain hooks
For fastening other parts, a large number of elements sold on the market are offered.
Here are just some of the most common examples:
- Rings with hooks. A widely used option. Initially distributed with curtain rod kits.
- Kuliski. This is the name given to the pocket located at the top of the cornice. Easily accommodates round shaped items.
- Crocodiles. They resemble the shape of a clothespin with several teeth. It is not recommended to hang heavy fabrics on them, otherwise the products will only be damaged.
- Clips. Almost like crocodiles, only without teeth.
- Fabric loops. Made from the same fabrics as curtains.
What to replace
An alternative to ribbon, if you couldn’t buy it or make it yourself, can be a thick “Iris” thread. It can replace braid with hooks and alligator clips.
Instead of braid, which has eyelet rings, you can limit yourself to one longitudinal solid pocket, with an internal diameter equal to the diameter of the pipe cornice. The top of the curtains is folded and stitched along the entire length.
We hang a lambrequin on a curtain tape
The case is similar to ordinary curtains, there should be no problems. The work requires the following equipment:
- Braid.
- Duct tape.
- Cornice.
The principle of fastening has much in common with ordinary curtains. Only the ribbon remains need to be cut off, which is also done with laces. Sometimes glue serves as an additional fixative.
Installing curtains only at first glance seems like a complicated process. Even if various additional devices are used. The main thing is to determine decorative solutions from the very beginning. Only then do you select the appropriate fasteners.
When to use it
Surprisingly, the use of tape is not limited to just assembling the curtain at the edge of the window. Although this is logically convenient, when in order to slightly “curtain” the windows, you only need to untie the braid. You can achieve the necessary folds in several places at once and even at the very top of the curtain.
Making decorative ribbons yourself can be quite problematic, but the housewife can make the simplest options.