It’s not difficult to make a window-sill table with your own hands, and to implement this option, you can choose both a small and a large room (kitchen, children’s room). In fact, there are now many design solutions, but which option to choose will directly depend on the specific interior, configuration and area of the room, as well as the thickness of the main wall and the personal preferences of the owner of the house/apartment.
Design Features
Transforming a window sill in the kitchen into a table is a great idea for any room, especially small ones, such as a Khrushchev-era apartment. The shape and design are selected individually for each case. The types of countertops may differ significantly, but the advantages and disadvantages of these designs are identical.
Positive characteristics of such a solution:
- saving usable space;
- the width of the table is determined by individual preferences;
- natural lighting for the work area;
- additional surface for placing household appliances;
- a stylish and original element in the kitchen interior;
- the possibility of arranging an area with a sink near the window;
- organizing free space under the windowsill for storing household utensils.
The negative aspects of the product include:
- shutting down the heating system;
- wide countertops make it difficult to access the window;
- due to a draft, it is not always convenient to sit at the table with the door open, and during the heating season, hot radiators also cause discomfort;
- the structure located above the battery may become an obstacle to air circulation.
If the table covers the heating system, it is recommended to make holes for better ventilation.
What will change if you install a wide window sill - a desk?
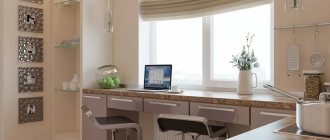
Photo 1 – Desk – DIY window sill
The illumination of such a design is not only greater, but also much better quality, which is very important for schoolchildren, students and other people working at their desks at home. A table lamp is needed extremely rarely and only in the dark.
It should also be noted that the battery under the window not only does not interfere with the free position of your legs, but also warms them in the cold season. It is impossible not to mention the saving of free space, which in most modern apartments is very small.
Using your own ideas or using the services of a designer, you can create not just an ordinary window sill-table, but an interesting object that will decorate the room and at the same time retain its functionality.
Photo 2 - The best lighting for the table window sill is natural light
Purpose
A tabletop instead of a window sill can be used as a dining table or as an extension of the work area. Both options are actively used in modern apartments. To make a continuation of the working area from the window sill, it is necessary to install in its place a surface of the required width, matching the height with the tabletop. This piece of furniture can be used to store electrical appliances and dishes. It's convenient to cook here.
Assortment of kitchen islands with dining table, advantages of furniture
If you move the sink under the window, the process of washing dishes will be much more enjoyable. However, it should be taken into account that splashes of water will fall on the glass and slopes. It is also necessary to first calculate all the nuances in order to make a countertop of the correct dimensions. Often the space under the window sill is filled with drawers, open or closed shelves, thereby organizing additional space for storing food and kitchen items.
It makes sense to build a sink into a window-sill table if the communications are installed correctly. Otherwise, frequent blockages and inconvenience in use are possible.
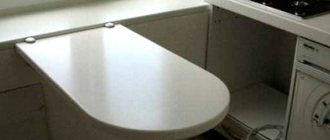
The best option is to make a table for eating from the windowsill. This model can come in different sizes and shapes. Often, in small-sized kitchens, folding tables are installed, which are assembled partially or completely and do not take up much space. Window sills in the form of bar counters look very interesting. They can also replace a full-fledged kitchen table; it is convenient to sit or dine at them. A whole family of four can fit behind a small counter.
Meal table
Continuation of the working area
Under the sink
For storing food and kitchen items
In the form of a bar counter
Tabletop on the window sill on the balcony
As a rule, a window sill on a beam is replaced when installing a window structure, and this can be considered the best moment to completely change the interior and apply a modern approach. For example, if the additional space was originally planned as an office, then you can install a type of countertop that will be an excellent continuation of the bedside table or desk. A corner model will look very original, where the connection is made from the end, and not along the entire length of the balcony. To create unusual solutions, you can raise or even lower the window sill.
Also, when choosing a material, you should always take into account the characteristics of the room. In terms of performance characteristics, the best option would be plastic, including acrylic coated, and also artificial stone. The use of wooden analogues from ash, beech, oak and cherry is not excluded. Such a tabletop-window sill will fit well into the interior if there is no window or door to the balcony, and it was installed instead of a window sill in the room. In this case, it must be in harmony with the design of the room and the balcony in particular.
Manufacturing materials
When choosing a window sill-countertop for the kitchen, you should take into account not only external data and the allocated budget, but also the quality characteristics of the product. Service life, resistance to mechanical damage, temperature changes, and high humidity depend on the material from which such a piece of furniture is made. A wide range of raw materials are used to produce modern products:
- plastic;
- tree;
- MDF;
- laminated chipboard;
- natural and artificial stone.
One of the most budget options is a table made of plastic. The material is UV resistant and easy to care for. Plastic products can be given any shape and color. Among the disadvantages, it is worth noting instability to moisture, temperature changes, and mechanical damage. This stand should not be subjected to heavy loads, and paints should not come into contact with the surface.
A table made of solid wood will go well with the classic design of the room. Despite the fact that the material is environmentally friendly and expensive, it is susceptible to scratches, cracks, stains during operation, deformation due to humidity, and impacts. A wooden product is easily flammable, and it also needs to be constantly looked after and treated with special compounds to prevent the appearance of mold fungi.
Advantages of a transformable kitchen table for a small kitchen
The most popular are countertops made of stone: natural (granite, marble), artificial (acrylic, polyester, cast marble). Natural raw materials are environmentally friendly. The artificial analogue is the most popular because it can withstand heavy loads and is less fragile compared to the natural one. Stone countertops are “afraid” of temperature changes, as well as the effects of acids. The products are heavy, so they will look very massive in a Khrushchev-era kitchen.
If the stone surface is damaged, you will have to replace the entire countertop, since the material cannot be partially restored.
Another relatively inexpensive option is tables made of MDF and laminated chipboard. Easy-to-care materials come in different colors; if desired, the surface can be given a different texture. It is preferable to choose countertops made of MDF, as they are more wear-resistant and can better withstand a humid environment and temperature changes. During operation, any of these materials is subject to deformation and damage.
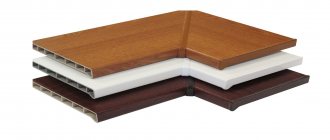
Plastic
Tree
MDF
laminated chipboard
Stone
Making a bar counter
Step 1. The first step is to make a tabletop, if it was not made to order according to the specified dimensions. You need to cut out the desired shape of a part from a material (for example, MDF), be sure to sand the edges, and then cover them with veneer, gluing it to cover the unsightly cuts.
Sanding the table top
Step 2. Next, you need to make marks on the wall at the level at which the countertop will be located. Marks are necessary to determine where the rack mounts are fixed.
The installation location is marked
Another photo of the process
Step 3. Then you need to drill holes for the tabletop fastenings and insert plastic dowels into them.
Holes are drilled
Step 4. You need to take a metal pole and, placing it on the floor near the wall, make a mark on it parallel to the fastenings on the wall. It will help you navigate where the tabletop will be fixed on the pole.
Marking a metal pole
Step 5. You need to attach fasteners to the side of the tabletop that will be fixed to the wall. It is also worthwhile to immediately thread the bar pole itself through the hole in the tabletop.
Fastenings are installed
Step 6. You need to screw the fasteners on the tabletop to the wall using self-tapping screws.
The mount is screwed to the wall
Step 7. Then you need to level the tabletop, focusing on the building level.
Tabletop leveling
Step 8. Be sure to secure the pole at the top near the ceiling and at the bottom in the floor. To do this, you can use special rings with holes for self-tapping screws, placed on the pole.
Pole attachment
Step 9. It is also important to secure the tabletop to the pole using two more rings, top and bottom. The rings need to be screwed to the pole with self-tapping screws.
The rings are screwed on with self-tapping screws
Our bar counter is almost ready
Advice! At the junction of the horizontal surface of the counter and the wall, you can make a decorative trim. It will not allow debris to fall between the wall and the countertop.
Shape and design
In order for the product to fit harmoniously into the design of the room, preserving its usable area, it is also worth thinking about the shape of the future furniture. A straight table-window sill is a classic option for the kitchen. It can be used both for eating and for storing household items if you fill the lower part with shelves, drawers, and roll-out racks. For small-sized kitchens, a corner installation is suitable, when the table is mounted as an extension of the countertop set.
If your family is large and you need a spacious table, it is recommended to install a folding option. In this case, the tabletop is equipped with a mechanism thanks to which it is laid out for lunch and then assembled. The shape of the structure can be different - rectangular, oval, with rounded edges.
Assortment of kitchen islands with dining table, advantages of furniture
For spacious rooms, a stylish solution would be to transform the window sill into a bar counter using a countertop. It can be located along the window or perpendicular to it. U-shaped designs are also popular, when a straight tabletop is installed along the window, connecting to a kitchen unit, and on the other side to a bar counter or table.
Window sill tables are made not only in traditional shapes, but also in unusual designs:
- rounded corners;
- wavy countertops;
- surface in the form of a semicircle;
- radius designs.
The window sill should be combined with the countertops and the main table in material, design and texture.
Straight
Angular
U-shaped
Rounded corners
wavy
Radial
Step-by-step instructions for installing countertops made of chipboard and ceramic tiles
- Purchase of material.
To make such a window sill table top, you need to buy the following devices: chipboard, ceramic tiles, silicone, tape, ready-made table legs, polyurethane foam.
When you have all the necessary tools and materials, you can begin work.
- Marking.
The table should be installed immediately after installing the new window. If the window and window sill have already been installed, you will have to first remove the old products. Dismantling is simple and only requires the use of male physical strength. When the dismantling work is completed, you need to measure the length of the concrete base near the window and determine the width.
If you want a small table that will only hang slightly over the concrete base, then legs will not be needed.
- Preparing the board.
Chipboard must have a thickness of at least 12 mm. The board must be cut exactly to measurements. Accuracy must be maximum, so it is better to make markings first and check everything several times.
Sand the edges and entire surface of the tabletop with a plane and sandpaper (grit no less than 60).
- Surface treatment.
The ends of the board must be treated with silicone in two layers, and the bottom surface must be covered with packing tape.
Be sure to check the plane using a building level.
- Installation.
After installing the slab, all holes must be sealed with foam. When installing, do not forget about the level. The window table top must be level. If it has legs, they need to be screwed in advance.
Wait until the foam sets and foam the seams between the slopes and the window sill.
- Facing.
The countertop can be finished with ceramic tiles. It should be laid with minimal gaps. The gaps can then be painted to match the color of the slabs.
As you can see, installing a countertop with your own hands is quite simple.
In total, the work takes several hours. Installing a product made of marble or stone is even easier, because they come ready-made. They just need to be installed on a concrete base near the window and carefully secured.
Tips for small kitchens
If organizing the interior for a large room does not cause difficulties, then for a small area there are a number of nuances. A table installed on the windowsill in the kitchen should be as functional as possible, without cluttering up the space. In order not to disturb comfort and preserve the structure for a long time, you should follow some recommendations:
- plastic countertops are combined with kitchen units made of chipboard and MDF;
- for a small kitchen you should not choose massive stone installations;
- the window sill table must be made of a monolithic slab so that there are no joints;
- the dimensions of the table must correspond to the dimensions of the room;
- options for dining or cooking can be equipped with drawers;
- if the countertop is installed above the heating system, additional grilles are installed or the batteries are moved to another area;
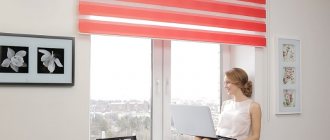
- It would be correct to choose short curtains for the window or use blinds.
The window sill table will harmoniously fit into any style of kitchen interior. Thus, it will be possible not only to organize the space, but also to add originality to the design of the room. Among the variety of types, you can choose both high-quality, expensive and interesting, budget models.
Do not choose massive installations made of stone
The dimensions of the table must correspond to the dimensions of the room
Equip furniture with drawers
Use blinds or short curtains
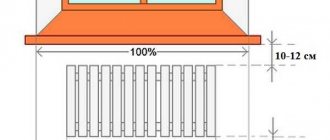
What to do with the battery
Usually there is a heating radiator under the table in the kitchen. It will not be possible to cover it with furniture facades, because laminate or wood quickly deforms. To ensure that heat can escape freely, it is important to make holes in the countertop. This will help the air circulate freely. A more difficult option is to move the battery, but this may negatively affect the air temperature of your neighbors.
Holes for heat escape in the countertop
Transformable table for the kitchen
This is a fairly popular book-table on wheels. When assembled, it takes up incredibly little space. With the help of specially installed wheels, you can easily move it to any free space. If you are getting together with the whole family, then such a table will become a real lifesaver for you - just a few seconds and your table will be the required size. The advantages of this type of furniture are practicality and mobility.
Transformable tables include sliding tables. Additional sections are located under its tabletop. When assembled, the extendable table looks quite compact. Such a table can be placed in the corner of the kitchen, because it will not disturb you there. A folding table allows you to free up maximum space in a small kitchen, because when assembled it takes up minimal space, but for guests you can arrange it in such a way that there is room for everyone. For the most convenient use, be sure to pay attention to the table’s configuration, as well as the difficulty of folding and unfolding. Such a table should fold quickly and easily. For such a table, it is best to choose folding chairs. If you do not need such chairs temporarily, you can store them folded in the pantry or on the balcony.