At first glance, it may seem that step-by-step instructions will not help you make curtains with eyelets yourself. Eyelets are round fasteners on the top of the curtain, they look so neat that it seems as if they could only be fastened with special equipment .
In reality, this is, of course, not true: knowing the subtleties and having enough patience, you can get the result no worse.
Eyelets - round fasteners on the top of the curtain, look so neat that it seems as if they could only be fixed with special equipment
It will definitely be worth the effort and time spent, since the rings are much more convenient than the usual hooks and clips for curtains for several reasons:
- When used, the fabric deteriorates much more slowly than with other types of fastening.
- With the help of eyelets, the easiest way is to create a perfect wave that will not be disturbed even after washing.
With the help of eyelets, the easiest way is to create a perfect wave that will not be disturbed even after washing.
- Curtains with eyelets fit well into almost any interior, but look especially good in a minimalist setting or in a high-tech interior.
- The pleasant rustling sound when moving the curtains is more of a pleasant little thing, however, many who have curtains with such fastening consider this point to be an advantage.
Important! Before starting work, it is important to choose the right materials and study the intricacies of making curtains with eyelets, without which it will be more difficult to achieve the desired result.
Types of eyelets
Eyelets are simple round-shaped fasteners that are used as openings in the fabric for curtains. They consist of two parts that are attached to each other, which frame the hole in the canvas.
Over a long period of time, a classification of fasteners has appeared on the market:
- Shape – the basic shape of eyelets is oval and round, in the form of triangles
- By size - the size of the eyelets depends on the density of the fabric and the cornice.
- Material: common plastic and metal fasteners.
By design - in the form of a triangle, stars, round, with rhinestones, etc.
Metal or plastic rings, which is better?
The word “grommet” came from Europe, as it was the name given to ship openings through which ropes and other gear were passed. They have been used as accessories for curtains not so long ago, but they have gained many adherents of this type of fastening.
Not only do they look aesthetically pleasing, without requiring masking with a baguette, but the tulle on the eyelets is laid in uniform wave folds.
Structurally, these are double bushings in the form of rings, produced from different materials:
- metal (steel, aluminum, bronze, copper);
- hardwood;
- colored plastic.
Each option has its own advantages. Stainless steel rings are selected from the same metal as the cornice. A prerequisite is that there must be a match in the shade of the metal (chrome plating, gold plating, blackening).
Plastic variations are good because it is easier to find a complete match in the color of the curtain. Wooden accessories are ideal for cornices made of natural wood or its imitation.
The internal hole is always round, but of different diameters - the rings should be larger than the cross-section of the cornice. External geometry varies, there are round, square, 6-sided and even triangular bushings.
You won’t be able to make them at home - the internal shape is such that after fixing, the grommet must snap tightly into place.
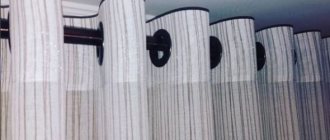
Simple devices for attaching curtains can be purchased in specialized departments for needlework. The eyelets are attached to a double strip of fabric and strung onto a cornice rod, as in the photo.
Roman style
In the Roman style, accents are placed on the central part of the rooms, usually surrounded by corrugated furniture and luxurious carpets.
The room looks like an arena, in the center of which all events take place. This style is also characterized by symmetry, which is very suitable for curtains with eyelets.
Pros and cons of self-tailoring
It is not very difficult to sew curtains with eyelets with your own hands, but before you get down to work, you should weigh the pros and cons so as not to be disappointed and not give up halfway.
Disadvantages of self-tailoring:
- you will have to make measurements and calculations;
- you should take time to select the ideal material and the necessary eyelets;
- spend time and effort sewing window decorations and attaching eyelets.
If such a prospect does not seem very frightening, then it is worth emphasizing the advantages:
- the finished product will be one and only;
- You should be proud of such curtains;
- You can always show off your skills;
- economic benefit - sewing it yourself will cost much less than purchasing ready-made curtains or ordering from a studio.
The eyelets must be combined with the cornice, with the material of the curtains and with other fittings
Japanese style
Japanese style with its tranquility will appeal to everyone. Nothing extra from furniture, calm, but always with a wall pattern. And light twilight can create blinds made from natural materials. Curtains made of natural fabrics with eyelets fit perfectly into this interior.
So, FIRST step
cut
the canvas is cut in half lengthwise. We received two doors.
Immediately process four side seams
, since curtain fabric, if it is synthetic, quickly crumbles. Hem seam with closed cut.
Sew the side sections of the curtains
USEFUL NOTE. Before processing, check where your front and back sides are. The wrong side is easy to determine by the holes on the longitudinal edge of the fabric (edge). The needle is pierced from the front side to the back side. This means that the holes on the edge from the inside will look more convex.
Regular styles
Conventional styles are also not lacking in their appeal. Well-arranged furniture, cozy coffee tables, soft sofas and a cup of tea will always soothe our soul after a long day of work. Curtains with grommets will add coziness and comfort to such an interior.
There are so many styles, so many curtain solutions, the main thing is to choose the right fabric, gain enthusiasm and get to work.
FOURTH STEP
The simplest and shortest.
What we have ironed needs to be stitched.
This way we will hide the glued grommet tape inside. (And we won’t tell anyone about this!)) Now you understand why the top cut, as I wrote above, should already be processed. So as not to disturb the freshly glued fabric once again and nothing will come off there.
I have an edge. And I didn't process it.
We attach, retreating 0.5 cm from the edge.
Don't forget to walk along the top side too! (Experienced seamstresses can hide it inside, like on the waistband of trousers or skirts, for example. I’m already starting to get dirty).
Attaching the top of the curtain
USEFUL NOTE. The glued eyelet tape tightens the fabric, so the fabric may ripple above and below it. Iron as much as you can. The remaining folds will have to be attached carefully, but symmetrically to the pattern. Try)
Master class on how to make curtains with eyelets
Before conducting master classes from experienced craftswomen on sewing unique curtains with eyelets, you need to prepare the necessary things for work.
List of materials:
- Curtain fabric
- Curtain or cornice
- Fastening eyelets
- Adhesive, wide tape or can be replaced with a non-woven base.
- Threads for sewing curtains
- Needles, scissors, chalk and hammer.
LiveInternetLiveInternet
Curtains occupy a very important place in interior design. Today we will learn how to sew curtains with eyelets.
Installing eyelets on curtains allows you to achieve several effects at once.
Easy and silent sliding along the curtain rod, beautiful even folds, careful fastening of the fabric - these are the advantages that curtains with grommets have. In addition, eyelets or rings made of plastic or metal will also be a decoration and are stylish. Sewing curtains with eyelets is a little more complicated and painstaking than sewing ordinary classic curtains. However, the result will more than pay for all your efforts, because the curtains with grommets are very beautiful, modern and unique in their own way.
The market today offers a wide variety of different types of curtains from all possible materials. And this may require considerable financial investment. But there is still an opportunity to save a little money by decorating the windows - sewing the curtains yourself.
Simple curtains with eyelets, placed directly on the rod of the cornice, look very nice on the windows. And sewing them will not be difficult for any person who knows what a sewing machine is and how to thread a needle.
Moreover, in the store you can buy a ribbon with punched rings prepared in advance for sewing curtains. This makes our task much easier.
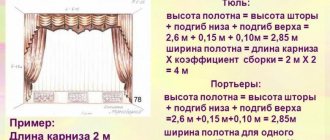
First, let's determine the length of the curtain. If you already have a cornice installed, you need to measure by placing a meter slightly higher than the rod (approximately five centimeters), since your cornice will be at the same height as the hole in the ring, and the top will be 2.5-3 centimeters higher.
The width of the fabric will be determined by the width of the window, multiplied by two to create beautiful folds.
Allowances for hemming the product depend on what kind of curtain you want to make. If you need a curtain up to the window sill, leave 10-15 cm for the hem; for a curtain touching the floor, the allowance should be about 20 cm; for a curtain lying on the floor, 2-3 centimeters is enough.
Now the ribbon with the rings. The number of rings on it should be even so that the folds at the edges turn towards the wall. The length of the tape is equal to the length of the fabric minus five centimeters on both sides, for a total of minus 10 cm. The fabric will bend, and its length should be greater.
If you want to sew a curtain from different materials, sew the panels first.
If the fabric is uniform, iron the hem line at the top of the curtain and apply the tape just above the edge of the hem. Baste the ring tape or pin it with the label facing up. Sew two seams to the fabric at the top and bottom. If the fabric you prepared for the curtain is thin, then it is better to make the hem larger. Then you need to attach the tape over the entire hem area so that the rings fall on several layers of fabric.
Fold the fabric over the sides twice and sew with a straight stitch, trying to catch the right and left edges of the ring tape. Can be hemmed with a hidden seam.
Now comes the fun part - carefully trim the fabric inside the rings. Turn it over onto your face and insert the rings, tucking the edges of the fabric under them.
There is very little left to do - to process the bottom edge of the curtain. If you plan to make a floor-length curtain, it is better to use drapery weights so that the fabric hangs evenly without warping.
So, first press the entire hem with an iron, unfold it, and iron it in half again, forming a double hem. Pin and sew with a straight seam or blind stitch. Now our curtain is ready. You can hang it on a cornice by threading the rod into the rings.
Master class on sewing curtains with eyelets
1.First of all, we cut the fabric. In order to sew curtains with eyelets, you need to correctly calculate the height of the future curtains. Using a tape measure, measure the height from the top of the curtain rod to the floor. Let's say we got it - 255 cm. We add 3 cm to this figure - this is the top of the curtain, it will be located above the curtain rod. And we subtract 1.5 cm, this is so that the curtains are slightly higher than the floor and do not drag along it. So: 255 + 3-1.5 = 256.5 cm - this is the height of the finished curtains. Now we need to add fabric allowances. 256.5+10 cm (bottom allowance) + 12.5 cm (top allowance) = 279 cm. If you have high ceilings, then when buying fabric, keep in mind that quite a lot of fabric is spent on height allowances, so choose fabric with the appropriate height.
We calculated the height, measure the required length with a tape measure and cut off the excess fabric. The easiest way is to pull out the thread and cut the fabric along the resulting path.
2. Iron the bottom of the curtain with an allowance for the bottom of 10 cm on the wrong side. 3. Fold the open edge of the fabric inward, towards the ironed fold, so that you get a double hem of 5 cm. Pin it with pins.
4. Iron along the top of the curtain to the wrong side, first 2 cm, then another 10.5 cm, so that the ironed seam allowance of 2 cm is inside between the two layers of fabric.
5. We open the narrowed top, the wrong side of the fabric looks at us. We place the grommet tape on the fabric to the ironed fold, departing 4 cm from the side edge of the curtain. 6. The grommet tape should also not reach 4 cm to the other side cut. 7. Cover the grommet tape with an ironed seam allowance of 10.5 cm and iron it thoroughly. The eyelet tape should stick to both layers of fabric: front and back. We pin at the bottom with pins.
8. Iron the side allowances - 4 cm on the wrong side. And we bend them inward, so that we get a double hem of 2 cm. We pin the side sections with pins. 9. Sew the bottom and side seams using a machine, retreating 1 mm from the inner fold. 10. Sew the top of the curtain with grommet tape, also retreating 1 mm from the inner fold. 11. Let's get to the most interesting part - installing the eyelets. First, install the outer eyelets on the right and left of the curtains. We retreat 4 cm from the edge, apply a grommet and trace the inner circumference of the grommet. In this case, there should be 3 cm from the top of the curtain to the inner hole of the grommet.
12. Using small sharp scissors, cut out the outlined circle, but not along the contour, but a little wider, 2 mm outside the circle. 13. The eyelet has 2 halves: one part with a protrusion along the inner diameter of the circle, the second part with small spikes. We take the first part (in the photo below), insert it into the hole, cover it with the second half of the grommet and press until it clicks. Many eyelets are a little tight to fasten, so you may have to struggle a little. If the eyelet refuses to close, you may have cut the hole too small. Cut another 1-2 mm along the inner diameter. 14. After the rightmost and leftmost eyelets are installed, you need to calculate the required number of eyelets for the curtain. To do this, take a tape measure and measure how many cm from the center of the first eyelet to the center of the last eyelet. Let's say we get 138 cm. We divide this number by the distance that should be between the eyelets, usually 15-20 cm. 138:20 = 6.9 This number indicates the number of distances between the eyelets, round to 7. Now again divide 138 cm by 7 = 19.7 cm. This distance will be between the eyelets, from center to center. Using a ruler and pencil, mark these distances on the curtain. We apply the grommet, trace the inner circumference, cut out the excess and fasten the grommets to the fabric. Ready! Curtains with eyelets are ready. For beauty, you can sew some beautiful braid or fringe directly under the grommet tape.
Installing eyelets
Master class on sewing curtains with organza eyelets
Fabric consumption: width of the cornice multiplied by 2.5 Pull out the thread, cut off the excess Sew up the side seams Width of trim (cuffs) 25 cm Mark the middle
Apply the grommet tape to the marked line
Glue the tape through the ironing iron
We bend it over to the glued side along the grommet tape and iron it. On the side where the grommet tape is glued, iron the seam allowance onto the tape
Iron the second seam allowance onto the right side of the cuff.
We sew the ends of the cuff
Turn out the end sides of the cuff
We lay the curtain in the cuff, putting 2 cm in the middle so that the glued side is on top (on the face) and the edging of 1 mm is on the bottom. We lay a line. Iron the cuffs Now we will install the eyelets From the top of the cuff I set aside 4 cm Mark the centers of the eyelets
Trace the inner diameter of the eyelets
Cut holes 2 mm larger from the intended line Place grommets in the holes
Insert the correct part with a click
The curtain with eyelets is ready
Master Class:
You have seen for yourself that sewing curtains yourself is not at all an impossible task. And by decorating the window with your own hands, you will also save money from the family budget.
Based on materials: pro100m2.ru, vse-o-shtorah.com, subscribe.ru
We sew curtains with our own hands:
Lambrequin "BUF"
Ribbon curtains
What you will need
Sewing original curtains is easy if you first stock up on the necessary tools and materials.
To make the curtains itself you will need:
- textile;
- sharp tailor's scissors;
- a narrow piece of dry soap or chalk;
- pins, needles;
- tape measure or ruler;
- threads;
- sewing machine.
To install eyelets you will need:
- even number of bushings;
- hammer;
- rubber gasket;
- special adhesive tape.
To avoid problems with fastening parts, you need to carefully consider the choice of eyelets.
Which grommets to use for sewing curtains
Metal and plastic components are available on sale. Each option has advantages and disadvantages:
- Plastic. Well suited for light fabrics, they glide along the curtain rod almost silently. After washing they leave no traces of rust. The bushings are easy to install; no special equipment or physical effort is required. But such details are short-lived.
- Metal. They look impressive and can withstand the weight of heavy curtain materials. However, when the fabric gets wet, the eyelets oxidize, a process that leads to the appearance of yellow spots. The movement of the curtain is often accompanied by an unpleasant creaking sound.
Metal bushings
For sewing curtains, eyelets with a diameter of 1.5 - 6 cm are used. Regardless of the choice, buy bushings 1.5 - 2 cm larger than the coverage of the cornice.
Why do you need a special tape?
There are 2 options:
- Textile. Used to seal fabric in fold areas that are subject to wear. Sew to the base by hand or using a sewing machine.
- Glue. The best choice when installing grommets. For a strong adhesion, simply apply it to the desired area of the material and iron it with a hot iron.
A tape 7–8 cm wide is suitable for installing eyelets.
Fabric selection
It all depends on the interior and the preferences of the designer. To create deep folds, it is better to buy thick fabric that holds its shape well. You can use light cotton materials that are simply starched during washing. Eyelets look great even on tulle.
Exceptions:
- Velor and velvet. Soft and heavy fabrics are easily deformed in the places where the bushings are attached and do not form clear folds.
- Tulle with large cells. It is difficult to install eyelets on such material.
When purchasing, take into account the size of the future curtain. The cut should be 1.5 - 2 times wider than the cornice. The height of the curtain is determined by the owner of the apartment, but it is necessary to take it with reserve:
- to process the lower part you need an allowance of 2 cm;
- for the top 10 – 20 cm.
Having prepared all the tools and materials, they begin to create an original composition.