Beautiful window decor is important in any interior. Standard curtains or fabric roller shutters can be purchased at any textile store. But it’s much more pleasant to create your own unique design that fits perfectly into the decor of the room. To do this, just choose the right material and study a suitable master class on how to sew curtains with your own hands. Most technologies can be easily mastered by any housewife.
The huge range of curtains is divided into just a few basic types, differing in the subtleties of design. Having mastered the basic rules of tailoring, you can create original curtains for the living room, bedroom, and children's room. Even a simple curtain, created using your own pattern, can create a cozy atmosphere and fill the room with warmth.
Materials and tools for sewing curtains with your own hands
It is not difficult to prepare the necessary set of tools and materials for lovers of cutting and sewing. It will definitely be on your desktop. Craftswomen who are just taking their first steps and who want to learn an interesting hobby will need to stock up on some items for easy sewing. These will be the following tools:
- Rulers. It is convenient to work with several measuring elements at once (20 cm, 50 cm, 1 m). It's best to choose clear or metal rulers with clear divisions, as you may need to measure fabric to the nearest millimeter.
- Pattern. Curvilinear tools will be required to correctly draw rounded, oblique sections. You can purchase a set of patterns or work with a universal option (suitable only for experienced seamstresses).
- Chalk or a piece of soap. Used for making patterns. You need to stock up on colorful pointed pieces.
- Tape measure. Needed to take measurements. It is better to choose material with double-sided markings. The starting point on both sides should be from zero.
- Scissors. You will need a special purpose tool - for cutting fabric. The lower blade should not lift the fabric. Small, sharp scissors are also useful for cutting threads and preparing patterns.
- Pins. Used for preliminary fastening of parts. It is better to choose pins with bright, large heads that will be easily visible on any fabric.
- Sewing needles for handmade work. Each needle in the set has its own number, according to size, and is designed to work with a specific type of fabric. Small ones are used for hand stitches, large ones for basting.
- Machine needles. The thickness and shape of the tip are chosen depending on the density of the fabric. Rounded bottoms are intended for knitwear, jersey, pointed ones work with teak, brocade, velvet.
- Threads. You will need several types - one skein to match the product, for seams, the second - for overcasting, in a bright color.
- Seam ripper. Useful for cutting loops and ripping out bad seams.
- Thimble. Necessary for beginning seamstresses to safely push the needle into the thickness of the fabric, especially when working with dense fabrics.
- Sewing machine. It could be an ordinary old device or a new machine equipped with many useful devices. The main thing is that she can perform at least one type of stitch without chewing the thread.
Ideas for sewing curtains yourself
Having decided to sew curtains yourself, you need to decide on a design and create a miniature layout. The type of model will depend on the purpose of the product. These can be functional, high-quality curtains or decorative curtains. It is important to foresee all the nuances in advance - take measurements from the window, determine the most convenient level for the opening. Sewing ideas can be drawn from history and modern magazines. Making a model yourself involves the implementation of any idea.
With lambrequin
Complex multilayer structures on windows will look elegant and can change them beyond recognition. Curtains with lambrequin are suitable for any room. The decorative textile element completely hides the cornice and all fastening systems, giving it a festive, complete look.
There are several varieties of lambrequins, differing in the complexity of tailoring. Selecting a suitable model should take into account the overall style of the room. The product must be in harmony in shape, design, and material with the rest of the textiles. The classic simple one is a piece of fabric assembled like an accordion, draped with curtain tape. Soft lambrequins with a tie, dejabo are suitable for the living room and bedroom, allowing you to create a fantasy image. Rigid products give the window majesty and volume. This could be a bandeau, openwork elements with a thick lining.
Roman style
For tailoring, noble types of fabric are used - satin, muslin, jacquard. They can have any texture, be plain or with a large geometric pattern. In order for a Roman blind to have an attractive appearance in any condition, it must be made from wrinkle-resistant material.
You can make such a curtain for a miniature window from a small piece of fabric. The product can be whole or consist of several pieces. It will organically fit into almost any interior of the kitchen, bathroom, library. Practical Roman blinds take up little space and allow you to fully use the window sill. Sewing yourself will be very economical.
The denser and stiffer the fabric, the better the curtains sewn in the Roman style will hold their shape.
In English style
For sewing you will need thick material with a suitable print. The basis of English curtains is a long straight linen with various geometric patterns. The original and simple decor for the window has a manual or automatic lifting mechanism. The movement of the canvas is ensured by nylon cords threaded through rings on a special tape. When the rope is pulled, the fabric gathers into folds and forms a soft garland.
The best material for English curtains is linen, voile, rep, chenille. The fabric should be dry, moderately stiff and opaque. Any shades with classic London decor (checks, stripes) will do. A win-win option is to match the pattern with the wall decoration.
Classic style
The simplest option involves the presence of two identical panels on the cornice. It is always elegant, beautiful, dignified. You can diversify the classics with the help of fasteners. Curtains with loops, ties, eyelets, and drawstrings will look completely different. To decorate the top part, you can use a lambrequin. Modern classic models may differ in shape, style, and color. They are united by the following factors:
- When sewing, you should follow the established rules, the same for all models;
- They are always wide and pompous, no simplicity or minimalism;
- Only multilayer structures;
- Draped, dense fabrics are used;
- Maximum number of decorative elements (beads, beads, volumetric embroidery).
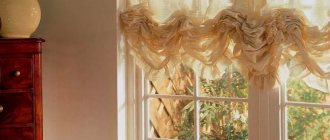
French curtains
The peculiarity of such curtains is the presence of airy draperies. The material, assembled like an accordion, forms narrow ornamental stripes along its entire length with a downward pattern. To create the product you will need a delicate, elastic fabric - organza, tulle, veil, satin. The material must be pliable. The shape and appearance of the drapery will depend on its features. Lush gathers will be on light and stiff fabric. Smooth waves will be provided by a soft fabric with a dense texture.
Decorative pompous “awnings” have a cascade-lifting mechanism. They can be hung either on a special profile or on a regular cornice in the hall. Sewing them will be difficult since you will have to make vertical sections. Unlike classic models, “awnings” are assembled upward, rather than moving apart. Their number is selected individually, depending on the size of the window and personal preferences.
French curtains go well with lambrequins, heavy curtains and other window textiles. A large number of lush folds will enliven even the smallest window.
What styles can be mastered without sewing equipment?
There are several stages in sewing curtains, but the most important thing is not to make mistakes in the measurements. It happens that there is a piece of beautiful tulle or a ready-made lambrequin, but it is not enough for a whole window. Or there are curtains from another room that have to be reformatted to fit another window opening. You have to use your imagination and experiment with what you have.
When thinking about how to sew curtains with your own hands from existing fabric, it is important to decide on the style. Japanese curtains do not require special skill - it is important to equip narrow curtains with a movable mechanism purchased from sewing accessories departments.
For smooth screened panels you need a special electrically driven cornice. Any workshop will help you cut off the edges and overlay the edges of the panels.
In a similar way, you can solve the issue with roller blinds. A special lifting mechanism that winds a strip of fabric onto a roller is easy to find in a specialized store - the package includes instructions for assembly and fastening. All that remains is to cut out the suitable fabric and take it to the studio to process the seams.
In some cases, it is not necessary to have sewing skills, but it is good to know how to crochet. A curtain made using the fillet technique, where the pattern is formed by alternating empty and filled windows, will decorate a kitchen or a child’s bedroom window.
Using a crochet hook from leftover yarn, you can make rope or thread curtains yourself, decorating them with beads, pom-poms or tulle balls.
A curtain with wide hinges is the same rectangular panel, processed along the edges by a craftsman from the studio. Loops can be sewn from thick satin ribbon in the color of the fabric at a certain interval. This mount fits directly onto a rounded plastic or metal curtain rod, creating a light wave-like assembly.
There is nothing difficult about how to sew curtains with eyelets with your own hands. These are rings through which a rounded cornice is threaded. To do this, the curtain fabric on top is folded into a wide strip, on which through holes are made for fastenings.
Note! Eyelets come in different sizes and shapes and are made of wood, plastic or metal. You can choose the most suitable version for your cornice, the main thing is that the rod of the cornice passes through the internal holes of the original fastening.
Selection and consumption of fabric - what to consider when purchasing
In order to choose the right material for curtains, it is necessary to identify the main criteria that they must meet. You should definitely take into account the purpose of the room, the height of the ceiling and the size of the window, the style of the interior, whether the product will be functional or decorative. Each individual model requires a different amount of fabric, so before buying fabric for sewing, you need to carefully calculate its consumption.
Competent measurements
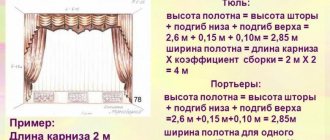
Since each handmade product is unique, there is no single cutting formula. Calculation of the required amount of fabric must be carried out for each textile element. The main parameters that require special attention are the width of the canvas and the direction of the pattern. When choosing fabric, you need to take into account its type and possible shrinkage. If the curtain has drapery, the gathering factor should be taken into account. It can be determined by multiplying the width of the fabric by the value corresponding to the type of fabric - curtain - 1.7, smooth tulle - 3, patterned - 2.
It is necessary to take measurements for future curtains from an already installed cornice. Only in this case can you get accurate numbers. To calculate the height, you need to measure the distance from the fixation element to the floor. The width of the curtains will be equal to the distance between the outer hooks.
Tulle in roll
Most fabrics are sold by cutting them from a whole roll. The width of the skein may vary. For tulle it starts from 2.8 m. In order not to miscalculate the size and buy a suitable piece, you need to take measurements at home. The following indicators will help determine the correct fabric consumption:
- Width of cornice. Using a tape measure, you need to measure the functional guide strip along which the hook will move.
- Height. Determined by measuring the distance from the fastening element to the required length (to the floor, 2 cm to the floor, with an overlap of +10 cm).
- Tulle filling. The smallest recommended filling is 1:1.5. For example, for 3 meters of width you need 4.5 meters of fabric.
- Availability of assembly. The curtain will be gathered with threads pulled from the braid, creating interesting patterns. The fabric should be at least 2.5 times wider than the cornice.
- Fold. Full folding is carried out only with triple filling.
- Density. The denser the fabric, the less padding it requires.
- Drawing. Larger designs require less fabric. A small print will stand out well in frequent folds.
Fabric for curtains in a roll
Curtain fabrics differ not only in density, texture, presence of patterns, but also in width. You can buy fabric of 1.4 m, 2.8 m, 3 m. The variety of options allows you to sew a curtain of any model, resorting to minimal manipulation. It is very convenient and easy to work with material from 2.8 meters wide, especially if the direction of the pattern goes from edge to edge. You can calculate the required size by multiplying by the assembly factor (for curtains - 1.7).
If the patterns are located along the edge, and the width of the available skein is 1.4 meters, sizing will follow a different pattern. The loss of matter during stitching and pattern alignment will be taken into account. More fabric will be needed per report.
Direction of the pattern on the roll
On most factory-made rolled fabrics, the pattern is perpendicular. This allows you to sew a curtain of any width, but limited height. To create a long floor-length product, you will need more fabric, since you will have to combine the pattern. The overlap allowance is also taken into account.
If you need a narrow curtain, up to 2.8 meters wide, you should choose a material with a pattern along the direction of the fabric. This will significantly simplify the work and reduce material costs. The pattern of such materials is always regular. When processing them, the repetition step should be taken into account. For example, when sewing classic curtains with a pattern, you should align it at the junction of the meeting halves. When calculating, you will need to take into account a margin equal to one span of the pattern.
What to do if there is an error in measurements?
A common mistake made by beginning seamstresses is “under-measuring,” which became obvious when the curtains and drapes were already hanging. In this case, the fabric may not be enough in width or length.
The money has been spent, but the solution to the issue of decorating the window opening remains stuck.
The problem with the length of the canvas can be solved in different ways:
- Finish the curtain at the bottom with a wide border or frill made of a similar fabric, but with a pattern or figured bottom.
- Decorate it in an original way on top, where the panel is attached to the cornice, decorating it as part of the decor.
- Lower the cornice slightly or replace the ceiling version with a wall-mounted model if altering is not possible.
- Cutting the bottom with an arch or along an oblique line (diagonally), decorating it with a satin trim is a good option for a window opening with a balcony door. All sewing supply stores offer ready-made bias tape in all colors.
- Sew fringe or other original decor on the bottom.
How to sew curtains for the bedroom with your own hands if there is not enough fabric?
The lack of fabric along the width of the window opening can be easily compensated for with colored blocks on the sides or an unusual insert in the center. This can be thread muslin or a shortened decorative piece with gathers at the bottom.
A good option is to combine curtain styles of different lengths, for example, an Austrian curtain or a French “awning” in the center of the composition with long curtains lying on the floor.
Fabric preparation and cutting
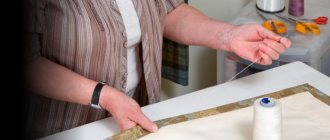
Having prepared the tools, decided on the type of curtains, and chosen the fabric, you can get to work. The process begins with drawing up a sketch according to which cutting will be carried out. Afterwards, it is necessary to inspect the canvas for defects and perform preparatory work before cutting.
Most fabrics, except pile ones, require special treatment. To do this, they are decatified, i.e. moisten with steam or hot water to prevent the textile from shrinking in the future. Colored, multi-colored options with patterns and designs must be checked for dye fastness and ironed through wet gauze.
Cotton and linen fabrics are moistened in hot water, wrung out, but not twisted, and hung evenly until partially dry. Then the cotton is ironed from the wrong side. Woolen ones, as well as those mixed with different fibers, are laid out in an even layer on a slightly dampened sheet, both layers are rolled into a roll, covered with film, and left for several hours. Afterwards the workpiece is dried a little and ironed.
The cutting will depend on the type of curtain model chosen. Initially, the textile is folded in half with the front side inward and laid on a flat plane. Templates are laid out on top of it and attached to the canvas with pins. The contours of the patterns are outlined with chalk, all control points are marked, after which the cardboard blanks are removed and the parts begin to be cut out.
Making your own drawing
In practice, both the appearance of the curtain and its practicality matter. Work on sewing curtains should be carried out in strict accordance with a pre-prepared drawing. The following parameters are displayed on paper:
- Dimensions of the future canvas.
- The presence of folds and their type (triple, eyelets).
- Seam allowances and their size.
All additional decorative elements must also be indicated on the diagram.
Types of seams and fabric hems
The variety of a particular seam is used depending on the type of fabric, the lining hemmed from the reverse side of the fabric, the skills and preferences of the craftsman performing the work. There are two main types:
- Hand stitch: buttonhole, backstitch, goat stitch, French, hemming, overlock, dotted, basting, blind.
- Machine seam: connecting (stitch, overhead, sewing); finishing (stitching, invoice, turning); edge, narrow edge (zigzag, Moscow, hem).
The production of curtains for windows is completed by folding the edges, and also processing the corners, giving the finished product a finished look. In this case, the corners are cut before the hem begins, the height of which depends on the density of the fabric and its size. You can fold textiles in several ways:
- Single. The best option for dense matter.
- Double. The method is applicable to thin subtypes of textiles.
- One and a half. The method is used to hide cut edges for medium weight fabric.
Methods of joining fabrics
There are times when it is necessary to sew together several pieces of the same material, to combine fabrics that are different in type, color, density, texture. This will give the product a certain style. There are many options for connecting segments, the main ones include:
- vertical;
- horizontal;
- double;
- short curtains over long ones;
- with edging around the perimeter;
- with a corset.
Depending on the type of connection, a method is selected by which several parts of the material can be sewn together. There are two main bonding methods:
- Using a triple seam. To do this, two parts are connected with the wrong sides. Stepping back 5 mm from the edge, a stitch is made. The remaining small allowances of the two parts are folded towards the seam, ironed, after which another line is made along the very edge. The resulting edge is ironed to one side, after which it is stitched to the fabric along its edge.
- Decoration with ribbon. All the same steps are performed as in the first option, only on the front side, after which the edge is hidden under the decorative tape.
General rules for sewing at home
Sewing curtains yourself is not as difficult as you might think at first. Because there are only 10 main styles on which the other varieties are based. Moreover, many of them are similar and differ from each other only in minor design nuances.
When adding additions to one of the basic options, designers create a new type of curtains, which in fact turns out to be an improved type of base.
Knowing the nuances of choosing fabric and style and general sewing rules will allow you to independently and quickly make an accessory for your home in accordance with your own tastes.
The effect of curtains on room size
Incorrectly selected curtains may not decorate, but, on the contrary, ruin the interior. In addition, they can visually change the room.
To prevent this from happening, you need to be aware of several nuances:
- Dark shades visually reduce the size of the room, while light shades make the room larger.
- Vertical stripes on the fabric will help make the ceilings visually higher, and vertical stripes will expand the space.
- The material for the curtains should be either darker or lighter than the color of the walls, since the same shade will create a feeling of enclosed space and make the room look like a box. This must be remembered when choosing fabric for curtains for small rooms.
Choosing fabric for sewing
When choosing a suitable fabric, you need to consider what room the curtains are intended for.
There are different options for different rooms:
- Kitchen. For this room, you need to take fabrics that absorb little odors and wash well. The best options are linen and cotton.
- Bedroom. The fabric should be thick so that the curtains help darken the room not only at night, but also during the day. Velvet, thick silk, furniture fabric are suitable if the curtain rod is reinforced with fasteners and can withstand the heavy weight of such curtains.
- Children's room. For this room you should choose curtains made from natural fabrics in bright colors.
- Living room. In such a room, double curtains would look good, made from 2 different types of fabric, with a lambrequin, etc. Everything that suits the interior will be appropriate in the living room. The choice is limited only by which side the room's windows face. If it is facing south, then you need to take into account the fact that under strong sun the curtains will fade, so it is better to make them with a lining.
Consumption of materials
It is impractical to determine the size of a future curtain without a cornice. First you need to install this element, and only then take measurements.
To calculate, you need to take into account the following parameters:
- Length. This is the distance from the curtain rod hooks to the floor (or to the battery, depending on the type of curtain). To the resulting dimensions add the width of the tape multiplied by 2, on which the curtain will be assembled, plus 2-3 cm for the side above it. You can add another 10 cm to the length if you want the curtains to lie on the floor.
- Width taking into account the assembly coefficient (KS). This distance is equal to the width of the cornice, multiplied by 2 (for the left and right halves). The KS depends on how you want the curtain tails to look. For heavy fabrics this parameter is 1.5-2. That is, for example, with a calculated width of 2 m, you need to buy 3 m of material for one curtain (with a coefficient of 1.5). For thin fabrics, a coefficient of 2.5 to 4 is used.
- Allowances for processing the top and bottom or side edges are 2 cm on each side.
- Allowance taking into account shrinkage - up to 10% of the calculated length.
In addition, when choosing a material with a symmetrical pattern, the percentage of waste must be taken into account.
Types of seams used
When sewing, the threads are matched to the material. When adjusting the stitch, follow a simple rule: the denser the material, the longer the needle pitch needs to be adjusted. According to technology, the permissible range is from 1.5 to 5 mm. The most commonly used length is 2.5-3 mm.
There are 5 main types of seams used when stitching and finishing edges:
- sewing;
- roller;
- Moscow, or “American”;
- processing with trim;
- zigzag.
The latter is more often used by home craftswomen, while professionals prefer the “American” one.
How to fold fabric correctly
In order for the processed side edges and bottom of the product to look neat, you need to learn how to fold the fabric correctly.
This is done as follows:
- First you need to fold half of the seam allowance to the wrong side. If it was 6 cm, fold the edge 3 cm. To make it more convenient and not make a mistake, you can draw a border on the inside with chalk and use it as a guide when working.
- Pin the folded material together.
- Steam.
- Remove pins.
- Fold again 3 cm.
- Sweep away.
- Steam with an iron.
How to make a pattern yourself
To cut out the main panels, patterns are not required. You need to know the exact dimensions and take into account seam allowances and joint allowances. The fabric is laid out on the floor with the wrong side up, and the main lines are drawn on it. If the material is narrow and several pieces are supposed to be sewn together, cut out the required number of sheets, which must first be basted and then sewn. In cases where the fabric has a symmetrical pattern, each element of the curtain must be cut out taking it into account.
If you decide to make original curtains, then you will need a pattern for additional elements. It can be difficult for a beginner to create templates on their own. Then you need to find a drawing of a suitable option in craft magazines or on the relevant websites, and then, using it as a template, draw a life-size pattern on paper (for example, old wallpaper), and then transfer it to cardboard - make patterns.
All comes with experience. For beginners, there are many video tutorials that describe in detail the process of creating patterns. It is better to practice on simpler options first, and then move on to complex ones. But sometimes economy class curtains look no worse than elaborate, intricate products.
Difficulties in cutting yourself
If a model of a particular curtain is being cut for the first time, you need to be especially careful during the process. Everything needs to be done on a hard surface, and to avoid mistakes, it is better to lay out the patterns on the front side and attach them with pins. This makes it easier to imagine what the model will look like on the window. To keep fewer marks on the fabric, it is recommended to use pieces of soap rather than chalk. In addition, you need to remember about seam allowances.
You should start cutting only after you are completely sure that everything has been done correctly.
Stitching elements
Before stitching items on a machine, they need to be basted, then ironed and only then sewn. It is not recommended to rush, so as not to spoil the parts. It's better to do it slowly but carefully. Afterwards, you can pull out the basting and iron the finished product again.
Many training workshops give good advice: to make sure that everything is done correctly, you can assemble the stitched parts on the back of the sofa. And even better - on the carpet, pinning them to it with pins.
Side processing of edges
Finishing the edges of curtains with a roller stitch or trim at home is difficult to do. If you need a beautiful seam, it is recommended to use “American”.
To perform Moscow seam processing, you must follow the following algorithm:
- Fold the seam allowance to the wrong side.
- Iron.
- Place the seam closer to the folded edge.
- Trim the excess next to the stitching.
- Bend it again.
- Sew as close to the first seam as possible.
You can also use a simpler option:
- Fold half of the seam allowance to the wrong side (if 2 cm is left on it, fold 1 cm).
- Bend again - 1 cm.
- Sweep away.
- Iron.
- Sew.
- Secure the seam by going back 2-3 cm.
In addition, products look good if the sides or bottom are decorated with fringe, decorative ribbons with beads or stones, etc. This option will help both decorate the curtains and make the process of decorating the edges of the products less labor-intensive.
Pulling and weighting the edges
Weighting agents are used to give the curtains their shape. The most common types include cords and plates. The former are used for light, thin fabrics, the latter are used to ensure that heavy curtains have the best appearance. Any models of different loads can be purchased at specialized retail outlets or made with your own hands.
Among the purchased options are: elongated, round weights with holes, slats and strips, cords. Homemade ones can be made from any available materials, for example, old coins, any flat metal elements and chains covered with textiles, wooden slats, steel pins, pieces of thick wire.
You can attach weights in several ways:
- sew the strip into the bottom hem;
- sew the weight to the side;
- sew voluminous embroidery, fringe, lace onto the canvas;
- make several compartments (pockets) in heavy curtains;
- for lightweight materials, it is enough to make a volumetric bend at the bottom.
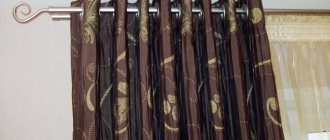
Step-by-step master class on sewing curtains with hinges
A simple model with hinges is the best option for beginners. Provided the material is selected correctly, it will look no worse than complex structures. By following the step-by-step steps described below, you can make your own original curtain for a standard window in the house, which will not reach the floor. The following master class will help with this:
- At the first stage we prepare the fabric. Fabric 150 x 280 cm must be ironed and laid out on a flat surface. Using a centimeter, mark the middle and draw a longitudinal line. Cut the fabric into two parts.
- Now we mark the necessary allowances. It's better if there are two of them. This will ensure that the fabric will not fray during use. We bend the curtains according to the markings and hem them.
- You can move on to sewing loops. Draw a 12 x 15 cm rectangle on the fabric, fold it in half and make hems. The result is a loop 7 cm wide. Thus, we prepare 17 elements and sew along the edge. Turn the loops right side out and iron.
- We place the loops on the canvas with the cuts facing up and temporarily secure them with pins. We put a strip on top of them and stitch them. Fold the strip of fabric to the wrong side and baste it.
How to decorate curtains?
Decorating a curtain and using hand-made curtain tiebacks will be very economical and beautiful. The tiebacks can be made of the same fabric as the curtain itself or be partially present in their design.
A strip twenty centimeters wide and sixty centimeters long is cut out of a similar material, the pattern is folded in half with the wrong side out.
The result is a strip ten centimeters wide and thirty centimeters long. The adhesive interlining is cut out in the same shape and glued on, ironing it. The edges are sewn, the product is turned right side out. The tie can be decorated with decorative braid or ribbon.
Master class on sewing curtains with ribbon
The model is specially designed for drapery and is attached to curtain hooks. The decorative effect of a simple design is ensured by selecting fabric, colors, patterns, and accessories. You can quickly make an original curtain with a ribbon by following the detailed step-by-step instructions of the master class:
- We cut the canvas prepared in advance to size into two parts.
- We process the edges so that the material does not crumble.
- Lay out the fabric wrong side up. Apply the tape to the top edge and turn it in 3 cm.
- We retreat 0.5 cm from the fold and make a line, on the upper and lower parts separately.
- We turn the side edges of the fabric 2 cm, stitch, and thread the braid.
- We tighten the cords, forming uniform folds along the entire length.
- We hang the products on the cornice and assemble each curtain in the center without tension with a ribbon
Hem
In order for curtains made of light fabrics to look neat, you should first hem their bottom edge, and then trim the sides. To prevent the seams from being visible on the front side, you can use a hand blind stitch or a machine stitch.
The bottom edge is folded 7.5 cm and smoothed out. Then the fabric is folded again by 7.5 cm and ironed. After this, the edge can be hemmed. The sides are folded with a double fold of 2.5 cm and smoothed out. The weights are sewn to the bottom edge under the side hem allowance. Next, the side hem is sewn on.
Hem hemmed on a sewing machine The edge of the lining should be 12.5 cm above the raw edge of the piece.
The side edges of the curtain and lining are seamed together; the seam must be finished 23 cm from the bottom edge of the curtain. A double hem of 2.5 cm is folded to the wrong side and the bottom of the lining is smoothed. The hem is hemmed and also smoothed.
The curtain hem is folded and smoothed 5 cm at the bottom edge. The fabric is folded back again by 7.5 cm and secured with pins. The bottom edge will be ironed.
Oblique corner joint. To form an oblique joint, the first fold is folded, and the edge is folded at an angle of 45 so that the base of the fold coincides with the edge of the side hem. The fold is smoothed out. The weight is sewn to the side allowance and covered with a layer of hemming. The final hem is folded back.
Hem hem. The hem is hemmed with hidden bias stitches, including the bias corner joints.
Making a jumper. To connect the curtain hem and the lining, jumpers are needed along the intersection line. 4 stitches 2-3 cm long are made, with the needle alternately inserted into the hem of the curtain and the lining. As a result, a column is formed, which must be overcast with a buttonhole stitch and the thread secured.
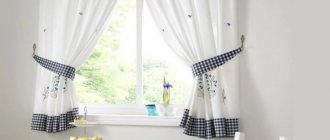
Ideas and materials for curtain tiebacks
A small item can add originality to any interior. Tiebacks will revive any curtains, even those that have been in use for many years. You don’t have to go to the store in search of a useful accessory; you can easily make one yourself. You can use absolutely any parts lying around in a drawer or on the balcony. The following products will look beautiful:
- Textile tiebacks are suitable for kitchen curtains. You can use a ribbon decorated with beads, buttons, or flowers.
- Curtains in the nursery will be decorated with soft toys. You can hang several toys on a tight rope at once or use separate bunnies or bears with legs connected by an elastic band.
- Magnetic tiebacks are suitable for light fabrics in the bedroom. You can decorate them with beads, paper, fabric flowers.
- Tulle in the living room will be enlivened by tiebacks made of wooden rings, textile tassels, plastic pins, and various wire structures.
Choosing a cornice
A unique curtain, created with your own hands, deserves to hang only on the best curtain rod. It should be in harmony with textiles, emphasize originality, and enhance the visual effect. It must be a reliable and practical product. You should pay attention to the following types of cornices:
- Round pipe with plugs. The most popular of the options presented. Can be made of wood or plastic. Will withstand curtains of any density.
- String cornice. A simple, inconspicuous design without a single hint of decor. Suitable for light, elegant tulle.
- Aluminum profile. A practical product that can take any shape. A universal option suitable for any type of curtains.
- Baguette. Designed for living rooms and bedrooms. It is particularly decorative. It can be made of natural wood or high-quality artificial materials. Curtains made of velvet, organza, and brocade look great on it.
- Forged Products. They can be rough and powerful or subtle with many openwork elements. Suitable for roller blinds, light curtains, heavy curtains.
Making curtains with eyelets
The grommet device greatly facilitates the process of hanging drapes and curtains. The new solution fits perfectly into the laconic interior styles. You can sew curtains with rings for hanging at home.
- Seal a piece of material where the metal or plastic rings will be located. To do this you will need adhesive fabric.
- Fold and sew the area with the grommet tape.
- Cut holes where the rings will be attached.
- Snap the products onto the curtain.
Ready-made curtains can be hung: reliable fastenings of the rings do not deform throughout their entire service life. Sewing curtains yourself with such convenient devices means saving a lot of time in the future.
Methods for attaching curtains
There are many options and devices with which textiles are fastened. This or that type is selected taking into account the density, texture, color of the canvas, interior design, and the preferences of the owners. Let's look at the main types of fasteners:
- Hooks. A popular, convenient fastening element. They can withstand any fabric, with the exception of heavy curtains. They are characterized by simple installation and low cost.
- Curtain tape. A special braid with hooks is sewn to the finished product.
- Rings. They occupy a leading place among analogues. The best option for dense, heavy fabrics.
- Eyelets. Sewn rings built directly into the fabric allow you to hang the curtain on the curtain rod without the use of hooks or ribbons.
- Kuliska. It is a dense fabric pocket located along the top of the canvas.
- Textile loops. The ribbons sewn to the curtain are tied to the crossbar of the cornice. The loops have the shape of bows, knots, rings.
- Clips (crocodile clips). Standard type of fastener. They produce metal, plastic, and magnetic models. They are reliable, but can leave puffs.
Operating procedure
Once you have purchased the fabric and prepared all the equipment, start sewing. First of all, cut the fabric using the sketch. You need to make the pattern on the reverse side.
Synthetic fabric must be ironed before cutting. Next, it is folded, matching the edges, the edges are folded and cut into two sheets. Then each of them is cut according to the measurements. You also use the leftovers.
Side edge finishing
There are no rules on how to properly sew the side edges: determine the processing width yourself. But usually it does not exceed two or three centimeters.
First, the edges are folded inside out, ironed and pinched, then the sides are stitched.
Processing the edges from below
The fabric is pinned at the bottom about five centimeters, ironed, folded in another five centimeters, and pinned. Then sew the bottom.
Finishing the edge from above
The fabric is folded at the top by about one and a half centimeters, ironed and stitched. Apply a tape with loops and attach it, first chopping it with the canvas. Trim and secure the edges. Next, sew the top, bottom, and then the edges. After that, tighten the thread to the desired width. Here also keep in mind that the width of the crossed panels will be more than half the cornice.
This is how the ribbon with loops is sewn.
Video on the topic:
As you can see, the process is simple: just read everything carefully, select equipment and fabric, and sew curtains. Do not forget to pay attention to the edges, iron the product after sewing.
From leftover fabric, create decor for a room or curtains; you can sew sofa cushions; they will combine furniture with textiles. You can also make tiebacks from fabric.
Of course, you can sew more complex versions of curtains or create lambrequins or combine fabrics. But first, try something simple so that failure does not ruin your interest in decorating your own home.