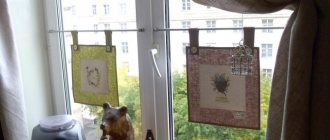
The window opening is an important part of the interior. Various design techniques are used to decorate it. However, the most common type of window decoration remains textiles and structures used to fasten the canvas. The choice and installation of curtain rods causes difficulties for many ordinary people. Before purchasing a suitable device, you should solve a number of problems, for example, take into account the correspondence of the appearance of the product to the style of the room, the ability of walls, finishing materials, and the item itself to withstand certain loads.
How to choose a cornice
From a functional point of view, the cornice is intended exclusively for attaching curtains. From an aesthetic point of view, this is an important element that can emphasize the style of the room and focus attention on the window opening. The item has a simple design, which consists of the following parts: a base supporting the curtain (pipe, string, tire); brackets, holders for fixing the base; fasteners for textile fabric; side plugs.
The choice of product should be approached very responsibly. When purchasing a design, you must consider the following points:
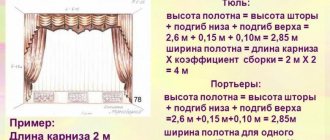
- Window size. The length of the cornice should exceed the width of the window opening by 40 cm.
- Load bearing capacity. The item must be strong enough to withstand the load exerted by the curtains.
- Location of batteries, pipes, protruding part of the window sill. These elements should not interfere with the free hanging and movement of the canvas.
- Color spectrum. The shade is selected in accordance with the existing design.
- Size and space. If round models are suitable for framing windows in a room of any size, then string models will look more impressive only in small rooms, and bulky wooden ones are recommended to be installed in large living rooms.
- Number of rows. Depending on the purpose, you can choose one-, two-, three-row designs. The latest models will allow you to decorate a room with complex textile compositions.
- Material. Metal, wood, and plastic are used in the production of products. The choice of the most suitable option depends on the style, price category, and personal preferences of the buyer.
What is the difference between one-, two- and three-row designs
Decorative tips on forged products. A true work of art
The principles for installing single-row or double-row ceiling cornices in such cases do not differ from each other. The number of rows depends on the number and weight of the curtains.
They came up with the idea of installing several rows so that you could easily hang curtains designed for different times of the day and control the level of lighting in the room. Also, such designs are used to create artistic decorations for draperies, when they hang in several rows in beautiful folds.
Thanks to this design, the weight of the curtains and curtains is distributed evenly along the entire length. To make it easy to open and move the curtains, they are attached to special runners. To learn how to install a cornice with your own hands, watch the video.
Installation errors
Elegant, Baroque style. A real decoration for any palace, or simply a room stylized as one
Errors are inevitable during installation work. In the absence of experience, it is difficult to perform all actions according to the instructions.
Below are the most common mistakes made during selection and installation:
- Weight discrepancy. When choosing a cornice, you should consider in advance what curtains will hang on it. Underestimating this factor can lead to it simply bursting and the entire structure falling along with the fastenings to the floor.
- You need to start fastening the structure from the edge. Installation must be carried out from the middle so that it is installed as parallel to the window as possible.
- Failure to maintain distance from the window. Too close or too far from the window. If you place the structure far from the window, this can ruin the view, especially if the cornice is not installed across the entire width of the room. Too close a location makes it difficult to open the windows normally. The curtain fabric often adheres to the radiator or window sill, becomes deformed, wrinkles, and unsightly folds appear.
Features and rules for installing cornices
Assembling and installing any model will not take much time from an experienced craftsman. An amateur who wants to do the work with his own hands will need help. Initially, he needs to take measurements of the window opening, on the basis of which calculations are made. Next, you should familiarize yourself with the rules and features of installation:
- Regardless of the mounting method (ceiling, wall), the length of the structure must be at least 30 cm greater than the width of the window, with the exception of the option when the product is located along the entire wall.
- The distance from the wall to the rod is selected within 10-15 cm. This is quite enough for the curtain to move freely without touching the protruding part of the window sill or the radiator.
- The distance between the cornice and the ceiling is determined individually, but professionals recommend mounting the structure at a distance of 5-10 cm from the ceiling surface.
- Particular attention should be paid to the height at which the device will be mounted above the upper border of the window frame. This parameter must exceed 5-7 cm, otherwise the curtains will interfere with the opening of the window.
Size range selection
The size of the cornices is determined by the material and type of construction. It is selected taking into account the parameters of the room being decorated. Tubular models are equipped with rods with a diameter of 16-40 mm. Mini-bars are more compact - 5-15 mm.
At the same time, in two-row models, two versions of rods are usually included - the main one with a diameter of about 28 mm and the tulle one with a diameter of 10-16 mm. The length of the rods reaches 2-4 mm, although three-meter options are most often chosen.
Plastic tires are offered in two standard widths - 60 mm and 90 mm, although in some cases exclusive models are both narrower and wider (up to 300 mm). But their length reaches 4 m.
The length of the aluminum structure can reach 6 m, and therefore it can be installed on windows of various parameters. In addition, it is possible to use joining elements and lengthen the entire structure.
Methods and choice of fastening
Depending on the installation method, a distinction is made between ceiling and wall cornices. In the first case, some models can be mounted directly to the ceiling or using brackets. In the second option, the products can only be mounted on supporting cantilever structures. Dowel-nails, self-tapping screws, liquid nails, drywall dowels, and anchor bolts are used as fasteners.
The choice of fasteners depends on various factors. First of all, the material of the walls and ceiling is taken into account. For example, for fragile partitions made of foam blocks, special expansion anchor bolts are used. For brick walls, or those built from durable concrete, you can use any type of fasteners. In red brick, which tends to chip, wood caps are often used.
It is worth paying attention to the raw materials from which the cornice is made, its weight, and the load it places on the partitions. In some cases, you will have to use additional fasteners or even abandon massive wooden or metal products in favor of lighter plastic or aluminum ones.
The bracket can be securely fixed on a wooden or concrete base. When installing the structure on a suspended ceiling or plasterboard, the presence of mortgages should be provided in advance.
Required Tools
To install any model of cornice, a certain set of tools is required; without them, high-quality installation will be impossible. As a rule, manufacturers supply each product with a special set of fasteners that will be needed during installation. But additional fasteners will never be superfluous, since sudden breakdowns of fasteners are possible during the installation process.
In order to hang a curtain rod, you need to rise to a certain height. This can be done using a stepladder. A hammer drill is the main tool; without it you cannot drill holes, especially if the wall is concrete. A tape measure and pencil will be needed to mark the holes. Dowels are used as a basis for self-tapping screws; they are necessary for more durable fastening of the structure. To install the cornice evenly, you will need a building level; with its help, you can hang the selected model as accurately as possible.
Installation of ceiling cornices
Ceiling models are very popular. They can be hung in almost any place, even placed in niches. These products are preferred in the following cases:
- if necessary, hang long curtains from the ceiling;
- if it is impossible to securely fix the brackets on the wall;
- to close the panoramic window;
- to hide minor finishing defects;
- the distance between the top of the window opening and the ceiling is so small that there is no possibility of mounting wall-mounted options.
Even a beginner in the construction business can carry out installation work. The main thing is to adhere to all the rules and recommendations, follow the instructions. The experience gained in this way will help in the future to correctly connect all the elements and install similar structures without any problems.
Materials and tools
Before starting work, you should prepare everything you need. This will allow you not to be distracted from work by searching for missing components or consumables. To perform installation you will need:
- curtain supporting base, brackets, caps or decorative ends;
- curtain rings or hooks;
- fasteners;
- measuring instruments, level, pencil;
- ladder;
- drill or hammer drill;
- screwdriver, screwdriver;
- hammer;
- hacksaw;
- drill.
Installation procedure
The order of work, as well as its type, directly depends on the type of cornice chosen. The profile structures can be fixed directly to the ceiling using brackets. Let's consider the option of attaching a plastic tire box to a concrete floor:
- We take measurements of the window opening.
- Following all the rules, we make markings on the ceiling.
- If the product is longer than the measurements taken, cut it using a hacksaw.
- We drill mounting holes in the plastic box, which should be located in the spaces between the tracks. To do this you will need two drills of different diameters. We make the first hole in the middle, the rest at the same distance from it. Their number directly depends on the expected load.
- Using a drill whose diameter exceeds the screw head, we make a hole on the front of the box.
- Using the second drill, which matches the diameter of the fastener rod, we drill a hole in the rear wall.
- We apply the box to the ceiling, starting from the center, set marks at the place where the dowels are attached, and drill holes in the concrete.
- We hammer in the dowels.
Assembling a double-row cornice
The initial stage of the assembly process involves unpacking and trying on the product. Each cornice is packed in compacted polypropylene using a thermal method. It is more convenient to open such packaging with a sharp knife.
It is necessary to separate all elements from the main pipe. After this, carefully make an incision along the polypropylene seam and remove it from the rod.
IMPORTANT! Careless cutting of the packaging material can damage the cornice, after which it will become unusable.
Installing the product without trying it on will cause significant difficulties. There are certain rules in this process.
Before the final installation of the double-row cornice, it is necessary to position the pipe along the window and partially assemble the product by putting brackets and ends on it.
During the fitting process, you should remember that it is not recommended to hang it at a short distance from the heating pipe. Such close proximity can lead to deformation of an interior element.
If the eaves pipe is found to be excessively long, it should be shortened to the required size. After this, you can move on to another stage, which is pruning.
Before shortening, you must make marks on the pipe with a marker. Then saw through it five millimeters deep along the seam. Carry out similar manipulations in the marked place, cutting its tire to the same length.
ATTENTION! While cutting, you must carefully monitor the “playing” tire. The sawn edges can be straightened by bending them inward with pliers. Any irregularities that appear are removed with a file.
The next stage is preliminary assembly. To do this, place the double-row cornice on the floor, put the end on the pipe, and secure the bracket using self-tapping screws. In this case, it is necessary to ensure that this part is completely hidden. For this reason, the bracket is directed towards the ceiling, with one ring placed between it and the tip.
Then you need to put on half the rings and place the middle bracket in the middle of the pipe. After the manipulations have been completed, you should repeat the procedure, only in the opposite order - put on the remaining rings with the exception of one, the bracket, the last ring and the tip. Proper installation requires clearance between the tip and the bracket.
Installation of wall cornices
Models mounted on walls have a wider application. They are compatible with interior design made in any style. Unlike ceiling options, these structures are much easier to install yourself. For clarity, let’s look at how to install the main types, which include:
- round;
- strings;
- profile;
- baguette
Each type has its own installation features. However, all of the above types are mounted using brackets. The main stages of the work are almost identical, as can be seen from the examples given in the instructions.
Baguette
The main difference between baguette cornices is the presence of a decorative strip that hides all structural elements. Based on the type of base used for attaching curtains, rod, string, and rail models are distinguished. The procedure for installing a baguette with a plastic tire:
- We mark the wall according to the level.
- We drill holes with a hammer drill and insert dowels into them.
- We install the brackets and securely fix them with self-tapping screws.
- According to the existing diagram, we assemble the workpiece and connect the tire to the decorative strip.
- We fix the resulting workpiece to the brackets.
- Upon completion of installation, you can hang curtains and tulle on the finished product.
String
The main feature of string models is their special structure. They consist of steel threads, brackets, and hooks. The length of the string should not exceed five meters; it can be hung in several rows. However, it is worth considering that only light textiles can be hung on a thin thread. The structure will not support the weight of heavy curtains. Installing these curtain rods should not cause difficulties even for an inexperienced person; the process itself is as follows:
- We determine the location for fastening and carry out markings according to the level.
- After attaching the fasteners, we make a mark for the dowel.
- We drill holes and install fasteners.
- Through the hole in the installed mount, we insert a steel string into the first bracket.
- We distribute hooks or rings along the thread.
- We pass the string through the second string bracket and adjust the required tension using a special bolt.
- We cut off the excess steel thread, you can also roll it, this will allow you to lengthen the product in the future.
Rod
Round cornices, in which the rod is the main element, are classic models. Special caps or decorative tips are attached to the edges of the product. They act as decoration and do not allow the rings to come off the pipe. When choosing such options, you should pay attention to their parameters. Short structures can be fixed on two brackets, but if their length exceeds 1.5 m, then additional fasteners should be provided, which are installed in the center. Installation work is carried out according to the following scheme:
- We measure the width of the window.
- We make markings according to the level.
- We unscrew the heel from the holder, try it on the wall, and mark with a pencil the places for the dowels.
- When installing long products, we make an additional mark in the middle of the window opening.
- Using an electric drill, we drill holes in the intended location and hammer dowels into them.
- Using self-tapping screws, screw the heels to the wall.
- We screw the base of the holder onto the heels.
- We assemble the structure, put on the required number of rings, and install plugs on the sides.
- When installing, first fix the central bracket, then the side fasteners.
- At the final stage we hang the curtains.
Profile
Profile models look appropriate in any interior. They are made from plastic or aluminum. The maximum length does not exceed 6 m, however, if necessary, this parameter can be increased using connecting parts. Some products are capable of bending in two planes at any angle, which allows them to be used to design window openings of any fancy shape. For clarity, let’s look at the step-by-step instructions for installing the structure:
- We determine the installation location.
- We make markings along the entire length with a pencil.
- If a long structure is being installed, it is necessary to provide more than two brackets, especially at bend points.
- Often profile curtain rods are sold without holders, so they will have to be purchased separately.
- We drill holes and install brackets.
- We fix the profile on the fasteners.
Rules for fastening to walls
To attach to walls made of fragile material, it is usually sufficient to drill a hole of a larger diameter. So, for walls made of foam concrete or gypsum concrete, in most cases 12 mm is sufficient. Since dowels for such holes are designed for screwing thick and long screws, dowels of a smaller diameter are inserted into the holes of large dowels, driving them in with gentle blows of a hammer. Such fasteners have another advantage: they allow a large error when drilling holes.
To attach to walls made of fragile material, it is usually sufficient to drill a hole of a larger diameter.
Sometimes it becomes necessary to select fasteners for fastening yourself, for example, when re-hanging a cornice from one place to another or when the factory fasteners are lost. A good option in this case is to use commercial anchors with internal threads. To attach anchors, drill holes of the appropriate diameter, insert them into the holes and, by striking a punch or punch inserted inside the anchors, wedge them into the holes. Because anchors provide a stronger hold than plug screws, the number of anchors may be smaller than the number of screws designed.
String cornices are most often placed on the ceiling, although they are also suitable for attaching to walls. The installation procedure for them is as follows: we determine where it will be placed, then, attaching the fasteners to the ceiling, we mark the holes for the screws with a thin pencil. We drill, then hammer plastic dowels into the holes and screw the fastenings with screws. Then we insert the string, fix it and tighten it using the tension device, which is located on the mount. In the most common case, the tension device is a simple tube, which, moving along the thread as it rotates, is pulled into a string.
It is good to install a string cornice where, from a decorative point of view, it is undesirable to use a large-sized design of baguette cornices. The string is much less noticeable and creates an effect in which only the texture and color scheme of the curtains are visible. But along with elegance, string-type cornices also have their disadvantages.
Showcase Potolku Body
How to hang a cornice on a suspended ceiling
If the room has suspended ceilings, then you should give preference to wall-mounted models. However, it is not always possible to hang the product on the wall. In this case, the master faces a more difficult task. This can be solved with the help of special mortgages, which are installed in advance, before stretching the fabric. There are two main ways to fix the cornice:
- Visible or open. The most common method. Before installing the stretch ceiling, we determine the place where the product will be fixed. Next, we make markings on the base ceiling, along which we secure the embedded wooden beam using dowels. We pre-treat the wood with special antiseptic and hydrophobic compounds. Then we stretch the canvas, install a profile cornice on top of it, having previously drilled holes in it. We fasten the product to the tree using self-tapping screws, which we screw through the film.
- Hidden in a niche. This method is radically different from the previous one. It is more complex to execute, but the resulting effect created by the curtains falling from the ceiling is worth the effort. In this case, we install the cornice in a niche; we attach the canvas not to the wall, but to the embedded block. First, we make markings on the ceiling and install the cornice using the previously described technology. Having retreated a few millimeters from the structure, we mount a wooden beam, we will screw fixing profiles to it and attach the canvas.
Stage one - unpack and try on
Any cornice, as a rule, is thermally packed in dense polyethylene, which is most convenient to unpack using a sharp stationery knife.
- To begin, separate all the components and components from the pipe itself - hooks, rings, decorative consoles, holders, fasteners.
- Afterwards, very carefully cut the packaging polypropylene along the seam and carefully remove it from the pipe, as if undressing it.
Please note that if you decide to cut the packaging carelessly, you can easily damage the pipe itself, and your double-row cornice will be hopelessly damaged. And now that all the packaging has been removed, you need to start trying on. Remember, it will be extremely difficult to install it without trying it on, as well as to assemble it without detailed photos or video instructions.
Features of fastening to drywall
You can install a cornice on almost any base; drywall is no exception. The work can be done by analogy with suspended ceilings, using embedded beams, or using special dowels such as “butterfly” or “driva”. But if in the first case it is possible to secure more bulky structures, then in the second it is worth giving preference to lightweight products whose weight can withstand the fragile material. Let's look at the second method in more detail:
- Before starting work, we assemble the cornice.
- We attach the structure to the wall, level it, and make marks with a pencil.
- Carefully drill holes.
- We take the butterfly dowel, squeeze the protrusions, insert it into the hole all the way, tapping it with a hammer.
- Next, use self-tapping screws to secure the heels of the brackets.
- We fix the product to the wall.
Selecting the control type
A convenient cornice is not only easy to attach, fits optimally into the interior, but also does not cause any difficulties during operation. There are several control options:
Manual type, when you need to close the curtain or open it manually. In this case, additional devices are not used.
Cord control using a special chain or rope. The basis of the mechanism is a sliding device with symmetrical opening of curtains on the sides or with one-sided displacement of curtains in the direction of the chain.
Remote control type - a signal from the remote control activates an electric drive, thanks to which the curtain moves independently without manual intervention. A portable or stationary type remote control is used. In the latter case, the device is mounted, for example, into a wall.
Installing cornices on a bay window
Bay windows are characterized by various shapes. They repeat the protruding shaped part of the building, which can be round, oval, trapezoidal, multifaceted. For rooms with non-standard geometry, special bay windows are used, which are practically no different from standard options and can be flexible and rigid. In the first case, bay window adapters are used to connect the elements; in the second, the profile itself is bent, after which it is installed in the designated place. Consider the method of installing flexible curtain rods:
- Depending on the chosen location for mounting the structure, we make markings on the wall or ceiling.
- Every 30-40 cm we drill holes for the brackets.
- We install fastenings.
- We try on the cornice and cut off the excess.
- We fix the structure to the fastenings.
- We hang hooks.
Wall placement of a curtain rod device
The ceiling cornice is usually attached to the wall using two or three brackets. The second option is more reliable. At the same time, you can hang even heavy curtains without the cornice sagging.
As a rule, it is located no higher than 5 cm from the ceiling and no less than 5 cm from the window opening. Usually hung in the middle from the ceiling to the window.
Installation of a rod cornice on a plastered brick wall with a window opening
You can hang a curtain rod on the wall accurately and simply if you use our tricks and strictly follow the instructions. Principle and sequence of actions:
- Using a tape measure, measure the required height of the cornice above the window;
- On the sides of the window, mark a distance of 15-20 cm from the edge of the window opening, the same on both sides. At the intersection of the height line and the side setback, you will need to screw in the holders for the brackets;
- Attach the holder to the resulting point and use a pencil to mark the locations in the holes for fastening;
- Using an electric drill and a concrete drill, drill the necessary holes;
TIP: Choose curtain rods with three-bolt supports. They are the most reliable. The diameter of the circumference of the mounting base must be at least 55 mm. Manufacturers often save on this. With a smaller contact area, the fasteners do not adhere well to the wall. The length of the brackets must be at least 15 cm. This way the curtain will not cling to a standard window sill or radiator.
- Insert dowels of the required sizes into the resulting holes;
- Attach the holder support and screw it with self-tapping screws using a Phillips screwdriver; Fix the bracket on the support;
- To ensure that the cornice is not skewed, but is perfectly level, you need to put on a supporting rod with a second bracket, attach it to the wall and use a building level, placing it on the cornice;
- Move the cornice slightly until the level reaches a state of equilibrium, that is, the cornice will be positioned strictly parallel to the floor;
- Make marks in the holes of the second holder and secure it in the same way as the first;
- Place the curtain rod in one of the brackets and put on the curtain rings. Install two rings outside the holders. They will act as stoppers;
- Place decorative caps on the rod;
Our cornice holds evenly and firmly on the wall. You can hang curtains.
Installing a tubular curtain rod on a plasterboard wall with a window
Some people mistakenly believe that hanging a curtain on a plasterboard wall is almost impossible. It's a delusion. We'll tell you how to do this. You just need to do everything correctly and use the right fasteners.
It's good when you know where the guides are and hang the curtain rod on them. If you take care in advance about using embedded parts, then the installation of cornices can be done in this place. However, such methods greatly limit the variability of the cornices, and the points where it is necessary to place the curtains and the design of the plasterboard sheathing may not coincide. There is a way out - using special dowels.
TIP: When carrying out repairs, it is better to do double sheathing with plasterboard. The loss in area will be small - only 20-25 mm, but the strength of the skin will increase, on which heavy objects can be hung, and sound insulation will be better.
- To attach a cornice to a standard wall with one layer of drywall, you need to estimate the weight of the future structure, including curtains. For string cornices and light voile, chiffon, and tulle curtains, simple screws for gypsum boards will be enough; you won’t even need dowels. The main thing is that the weight for this mount does not exceed 3 kg.
- Installation of curtain rods for curtains weighing from 3 to 5 kg is carried out using dowels for hollow structures. It is also called a butterfly dowel. When the dowel is inserted into the drywall, its capsule opens, presses tightly against the gypsum board and holds the screws being installed. A dowel called an “umbrella” has a similar principle of operation.
- In the plasterboard wall, holes are drilled at the required distance with a drill, a dowel is inserted and a self-tapping screw is screwed in. For very heavy curtains, special dowels are used - screw or volute dowels. They come in metal or plastic. For long curtains, it is better to provide at least three attachment points.
What cornices are fashionable in 2022
Beautiful cornices will give any room a finished look. Along with properly selected curtains, they will highlight the design of the room. In 2022, Scandinavian style and minimalism remain trendy. Therefore, when choosing the most suitable product, it is better to give preference to more functional models without unnecessary decoration. Metal cornices painted black or white, or wooden ones with a natural pattern will look most appropriate.
Art Deco will also strengthen its position. For this direction, you can use gold-plated products that will look perfect with Armstrong hanging systems. The classic style, which is characterized by strict symmetry, an abundance of decor, and the use of natural materials, is also relevant. When decorating the interior, you should think about the cornice hidden in the niche of the stretch ceiling, leaving only the flowing curtains in sight.
Color variety
Plastic cornices are standardly designed in white, which allows them to blend into the surface of the ceiling and visually expand the space without shifting the emphasis in the design. The plastic strip can be decorated with a film to resemble wood, leather, or metal.
A double-row metal cornice is often decorated in a matte or glossy finish. Chrome finishes suit modern interior types, while glossy finishes suit classic interiors.
The structure is also finished with copper, and a brass or bronze coating is used. When choosing wooden cornices, preference is given to cherry and walnut, although modern materials - wenge, cork, etc. - are becoming increasingly common.
Types of curtain rods
There are several varieties, and each of them requires a different approach to installation. Based on the mounting method, there are two types: wall and ceiling. The name speaks for itself: wall-mounted ones are attached to the wall, ceiling ones - to the ceiling.
There are many types of shape, here are just a few of them:
- round;
- strings;
- profile;
- baguette
Of course, there are differences in the material of manufacture. Products can be made of metal, plastic, wood. They can also be combined.