The use of a design such as a false window can change the existing interior of any room beyond recognition. By creating a false window with your own hands, you can easily hide any imperfections in the surface, and at the same time convey the much-needed atmosphere of comfort and coziness into the room, allowing you to turn even the most daring design solutions into reality.
- Upcoming manipulations
Any person strives to create comfort in his home, while trying to reduce the necessary costs to a minimum. With the use of a variety of modern design solutions, this has become not only possible, but also accessible to everyone. One of the excellent solutions that allows you to create much-needed comfort in a room for any purpose is to create a false window with your own hands.
Original use of simple false windows
The layout of the house does not always allow for a decent view from your own window. In order to adjust the basic characteristics of the room, it is recommended to use a false window design, which can be equipped with its own lighting. It is almost impossible to purchase a ready-made product, and the cost of such an order from a specialist can cost $25-150. However, there is still a solution. So, you can make a false window with your own hands.
Types of false windows
Today it is becoming possible to use several types of false windows simultaneously, which will differ from each other:
- the complexity of installation work;
- type and shape of the chosen design.
Most often you can find these types of decor for false structures in the form of:
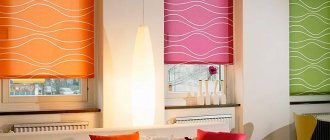
- curtains with curtains;
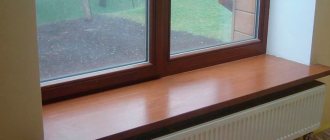
- window sills.
Based on the design features, the following types of false windows are distinguished:
| Short description | Photo |
| In the form of a landscape on the wall | |
| Mirror false window | |
| False window located on the ceiling | |
| Stained glass false windows |
Tools and materials
It’s not difficult to make a false window yourself, but you should worry about the timely acquisition of the necessary materials and tools. As experts note, the simplest option is photo wallpaper or a custom-printed design.
To create the design you will need the following components:
- A sketch in the form of a drawing or a printed analogue of the appropriate theme and size.
- Plasterboard sheets.
- Putty.
- Roller, brush, drill.
- Paint or varnish.
- Dowels, screws or liquid nails.
- Hammer, screwdriver or screwdriver.
- Wooden platbands.
When is it better to use false windows?
- False windows will look quite interesting and at the same time unusual in the corners and dark corridors of the house.
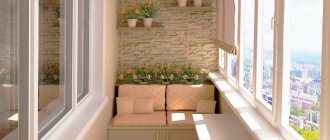
- False windows are extremely often used in small rooms, where a perspective image will help visually increase the much-needed space. Photographic images may also be used.
False window in the bathroom
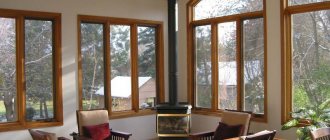
- Work areas, which include nooks and crannies of the house, offices, libraries and other small rooms in which a sufficient amount of natural light is rare. By choosing a backlit window design, you can solve several problems at the same time and give the drawn space realism.
- There is often a small partition between the windows, which is rarely used. It is this space that can most easily be used to arrange a false window.
The need for additional design
These designs are also called false windows; they are an ideal solution in the following cases:
- if there are two or more window blocks located closely together;
- narrow space;
- a large number of dark areas.
In the first option, to remove an inappropriate narrow gap, they think about filling it with an imitation of an opening with an interesting look. In this way, not only additional decoration is created, but an unsuccessful layout is corrected. To expand the space, you need to make an opening in the wall or the illusion of it - this is where false windows help
This is especially important in the work area; it results in a kind of removal of boundaries. Designs with additional lighting help to brighten the environment; designers offer many interesting solutions to the issue. There are a lot of variations on this theme, depending on the task at hand and the appropriate embodiment of the false window is selected
There are many variations on this theme, depending on the task at hand and the appropriate embodiment of the false window is selected.
Do-it-yourself false window with backlight: step-by-step instructions
Tools you will need:
- A large sheet of plywood, the dimensions of which must match and even exceed the dimensions of the future false window.
- Leatherette or any other material that will be used for covering, foil.
- When making a false window with backlight, you will need several LED strips. Complex soldering should be avoided, and sales assistants and store consultants will help with the rest.
- A decorative frame that will frame the future window.
- Stationery knife with an oblique blade.
- Polyurethane foam and good glue.
- Glass (panel) or colorless plastic, which is considered the more preferable material. Its thickness should be 2 mm or less. A drawing that is ideal in size and for the chosen topic. You can use small photo wallpapers.
It is worth noting that there is no need to use expensive materials, and all work can be done independently if you have free time and basic skills in handling available devices and tools. A set of different screwdrivers will not be superfluous. You should also make sure you have screws, a drill, sandpaper, construction (painting) tape and a hammer.
Making a box
When using a panel made of glass, it must be cut right in the store, since it is extremely difficult to do this yourself. The use of a glass panel requires the manufacture of a wooden frame. It is recommended to use a sealant to install the glass into the frame. This process is considered more labor-intensive compared to the same plastic element, which can be purchased at any hardware store for a low cost.
Examples of boxes for false windows
When using plastic, its surface can be either transparent or matte, which will help achieve the effect of diffused lighting, but it is not recommended to remove the protective film. This type of material has an extremely fragile surface, which is very easy to leave deep scratches on. It is from plastic that templates for the future window will be made.
Multi-colored glass for false windows
As a result, you should get ten blanks. However, each part must first be cut out of durable cardboard, which will make transferring to plastic easier and less labor-intensive.
- The picture will be glued to the front part of the box, so its dimensions must fully correspond to the size of the picture itself. In order for the painting to be slightly bent on all sides, it is necessary to remove the extra 2 cm. Measurements must be taken carefully.
Measuring the location of the image on the frame of the false window - The height of the box for making the roof should be about 8-12 cm, everything will depend on the width of the selected LED strip, if one is used. The dimensions of the transformer and other key elements are also taken into account.
Location of the LED strip in the false window box - The bottom of the box itself is also made according to the dimensions of the front side of the box. Only 0.5 cm is taken away from each side so that it is possible to close the box after inserting the structure inside.
- For the bottom you will need to make four more walls. Their dimensions will completely coincide with those used in the manufacture of the lid.
The process of making profiles for a false window
Then you should begin gluing the entire structure. When working with plastic elements, dichloroethane is often used, which belongs to the category of extremely caustic substances. In addition to the fact that the substance is extremely dangerous, it can also ignite. It is not recommended for use at home, and it does not provide the much-desired indicator of hardness. For domestic purposes, titanium is better suited, which can also be used when working with structures consisting of PVC elements.
Glue "Titan"
Pieces of plastic corner are glued to the corners so that they hold more firmly. The cost of such material is small, and you can find it in any construction market. Otherwise, it will be necessary to drill holes and install the structure on bolts, which will affect the appearance of the product.
Further stages of working with the box
After the box has been completely assembled, you should begin manipulations that will be aimed at transforming and decorating such an unusual decorative element as a false window. All angles of the structure must be 90°, otherwise the frame will turn out crooked, and this will be visible at first glance. In addition, it will not be possible to assemble everything as needed with crooked corners.
Always double check the evenness of the frame corners
Sequencing:
- The bottom of the assembled box is covered with foil. This is done to ensure that the lighting effect is maximum. Instead, you can use mirror plates, then there is no need to use foil. The cost of such material is somewhat more expensive. But the material that is available in the kitchen of every housewife without exception is perfect for foil.
- LED strips should be used at low power, but the placement of the bulbs should be as frequent as possible. This way the light will be distributed evenly and naturally. A roll of such material contains 5 m of tape with diodes, and five such coils should be purchased.
- You will need a transformer with a power of 450-600 watts.
Transformer for LED strip - The tape is cut along the length of the box in small sections, the length of which will be about 1.3 m. The quantitative sequence of such connections will be only three sections, otherwise the transformer will not cope. All other strips will be attached in parallel. The strips are attached to the reflective foil, connected to the transformer and brought to the outlet using ordinary copper wires.
An example of the arrangement of LED strips on a false window. It’s wise to make them in smaller quantities - it won’t make things worse - A pre-selected image is attached to the lid of the box. However, there are still some nuances. Strips of glue applied to the surface of the structure may be visible, so it is applied only to areas where bending over the edges of the frame occurs.
- On the sides, along their entire perimeter, the selected material (leatherette, for example) is pasted over, which will make the appearance of the structure more aesthetic.
Afterwards the two parts of the frame are assembled together. It is worth paying attention to the fact that the further the lid is placed from the bottom, the weaker the picture will be illuminated. A small niche is made on the surface of the wall, which should be slightly larger than the prepared canvas, where it will be placed. The wires are connected to the switch. The structure is inserted into the opening, a window or picture frame is installed on top of it, the surface of which is treated with any available material (leather, faux leather, fabric).
The process of making a false window with lighting yourself
You can also watch a video with a step-by-step and simple process of making an interesting false window with backlight:
Do-it-yourself false window from a mirror
Quite interesting solutions include the use of mirror surfaces in a room that falls into the small category. Thus, you can easily visually expand the boundaries of a small room. As a base you will need to use tiles or a full mirror. In fact, this will be an ordinary mirror built into the window frame.
Mirror false window
Installation is carried out on a flat surface, and there is no need to make any niches. However, the surface of the wall must be perfectly flat. Attaching a false window can be done in several ways.
In the first and, perhaps, the simplest case, the installation of individual elements of the structure itself is done - the glass is attached, and the frame is glued to it. To make the frame, a wooden board, plastic or any other material that could have been used to decorate the room earlier can be used.
DIY false window from a mirror. The wood is cut out and glued to the mirror base
In the second case, the already assembled and cut structure is fastened. To begin with, a frame with a lattice is attached, which will resemble a binding. Elements of tiles or mirrors of a certain size are cut out for existing niches, and then they are attached separately to each opening. Afterwards the structure is installed on the working surface.
DIY false window from a mirror. Mirrors are cut out separately and glued to the frame
There is no point in covering such false windows with curtains, since their main task will be to reflect the room, making it visually more spacious.
False window on the ceiling
This element of modern decor belongs to the category of the most common, which is often used by famous designers. Not everyone is able to design such elements on their own. Mounting on the ceiling surface can be done in three ways. In the first case, the ceiling must be perfectly flat and its surface only needs to be painted. However, this design is equally easy to mount both on the wall and on the ceiling. Installation can also be carried out on the surface of plasterboard ceilings, and this option is the most common. If you arrange a special niche, then the false window can be recessed into it.
False window on the ceiling
You can place lighting on the side niches, which can also be placed directly on the ceiling. However, in this case you will need to cover it with a pattern.
False window with lighting on the ceiling
The cable supply should be done in advance, and the supply will be carried out along the side wall and the small holes located there. The box will consist of a metal profile. After all the manipulations with the false window, the ceiling should be covered with plasterboard, which will allow the level of the ceiling and the window to be leveled.
Choosing a suitable location
Before making an imitation of a window, you need to choose in which room it will be installed. This information will help you decide on the size, shape and appearance of the decoration. Let's consider suitable options for different rooms.
Living room
As a rule, this room is intended for gathering the whole family and receiving guests. Despite the large area, at times there may be an illusion of lack of space. By installing a false window with a pleasant landscape, you will visually expand the room. It is recommended to use a background with distant objects, for example, a road stretching to the horizon.
Depending on the interior, you can choose a suitable image. If modern high-tech furniture is installed, photographs of cities are inserted into the false window. Eco-style will go well with the image of a forest or meadow. After installing the structure on the ceiling, fill it with a picture of a blue sky or stars.
Children's
A child will not be interested in looking at photographs of cities or ordinary forests. Many parents decide to choose a plot from a cartoon or fairy tale. For a boy, there can be a large castle with a dragon behind the false window. A girl will be glad to see a beautiful meadow where ponies, unicorns walk, and fairies fly. Many children happily fall asleep under images of the starry sky, especially if the false element has a built-in backlight.
Bedroom
This room is intended for relaxation, so it is not recommended to choose expressive themes. For the frame, the best option is natural wood or other natural material. As a result, the room will help you relax and free yourself from the hustle and bustle of the day.
If you have difficulty waking up, choose bright colors and appropriate themes. In many ways, they will be related to your interests. Photos with a yacht or the sea lift your spirits and motivate you to new achievements.
Working space
In order to stay focused on work, they use false windows with beautiful photographs of cities. Tall buildings, passing cars, and rushing people will create a sense of urgency and increase productivity. If you want to relax, you can install a false structure on the ceiling with the image of the sky. Leaning back in your chair, look into the blue, take a closer look at the clouds and thereby you can calm down.
Kitchen
The best place to install a false window is the space above the stove. If the room is small, it may make sense to install the structure along the entire length of the wall. In this way, the space will visually increase. For the kitchen, photographs are selected in accordance with the color of the set or the overall interior design. It is recommended to give preference to images that have perspective and a distant horizon.
Virtual ready-made false windows
This new product appeared relatively recently and came to us from European designers. In such structures it is customary to install living canvases, which can be changed at will by the owner of the apartment.
They are based on the principle of using a liquid crystal display, which is connected to a special device. In this way, it is possible to convey a rich and juicy picture. With their help you can create the necessary comfort in any room.
With the help of realistic pictures, you can transform the room, bringing the much-desired sunny and warm weather closer to a gray and boring day. However, regardless of the location of the structure, its color must correspond to the general style of the room, and the connection of light must be carried out in full and strict compliance with all existing fire and other safety rules.
An example of how such windows work can be seen in the video below. Quite an interesting, but expensive spectacle.
Advantages
Many designers use imitation windows when decorating houses. This is not surprising, because such structures have practically no drawbacks, and the scope for the possibility of their installation and types and combinations is simply huge. In addition to the original interior design, false windows allow you to make them look at your discretion.
The products will fit ergonomically and correctly into any interior, making it brighter and visually enlarging the space. Do you want to watch the sea surf, a beautiful sunset or a frosty blizzard every day, as well as another landscape to choose from? If so, then the design in question is the best opportunity for this.
False window designs can turn the disadvantages of rooms into their advantages; a lot of materials can be used as materials for their manufacture. The size and shape are also selected according to individual preferences and do not have any restrictions. Variations of the 3D format, which are created using the most modern technologies and software, will help to radically transform the room.
Do-it-yourself false window with a wall. Photo instructions
This photo instruction shows step by step how you can make a false window from simple polystyrene foam "Penoplex", using only nails, several wooden slats and corners for attaching shelves. Decoration was carried out by painting the frame and pasting the “walls” adjacent to the frame with the remains of wallpaper. For beauty, you can use a couple of curtains.
How to make a simple false window with your own hands
If we consider purchasing a false window design with lighting, the family budget will be seriously undermined. It’s a completely different matter when it comes to self-assembling such a structure using the most common materials. First, you need to decide on the dimensions of the future design and choose the right photo wallpaper. The picture should correspond to the general style of the room.
False window in the kitchen
Total you will need:
- buy photo wallpaper;
- acquire a basic set for any beginning craftsman;
- You can also order a picture you like from a printing house if the photo wallpaper is not to your liking (this is the only way to get a truly realistic and rich picture).
When making a false window yourself, you should prepare the following materials and tools:
| Screwdriver | Fluorescent light bulbs |
| Hammer | Round and flat brushes |
| Hammer | Acrylic or water-based paint |
| Electric drill | Spatulas |
| Fastenings | putty |
| Several sets of screws and dowels | Rollers |
| Transformer | Drywall sheets |
| Wooden trims | Picture of the required size |
Upcoming manipulations
- First you need to equip a small niche 20 cm deep from plasterboard. This is how you can create the necessary recess for subsequent installation of the window. The box will also contain lighting elements, if they were used.
- Platbands are installed strictly at an angle of 45°.
- Each element is coated with two layers of varnish or paint.
- The structure itself is subject to putty and left alone for a while, after which the surface is covered with water-based paint.
- It is necessary to apply markings in the existing box for subsequent installation of lighting fixtures (if any will be used). Holes are made through which the wires will be fed.
- To attach individual elements, dowels are used, for which holes are also drilled.
- A transformer should be placed between the light bulbs, which will allow the system to be combined into a single whole.
- The lower right hole is used for the wire outlet for the switch.
- Instead of fluorescent lamps, you can always use LED strips.
- The photopanel is fixed to the structure using screws.
- Platbands are placed around the entire perimeter of the structure.
- The screws should be painted over with paint.
Designers recommend removing the wall under the window, thus making the canvas cover the entire wall. To give the picture more realistic highlights and colors, you should use glass, arrange a cornice, attach a window sill and use transparent fabric, which can be tulle. Fresh flowers in such a recreation area will only decorate and emphasize the comfort of the room.