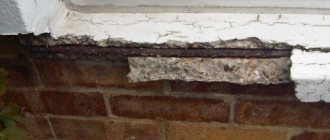
It very often turns out to be a source of cold penetration due to the flaws in it.
If you properly insulate the window sill, it will significantly reduce heat loss in the room and save heating costs.
We will tell you further about how to insulate the window sill of a plastic window.
Causes
There are three main reasons why it blows from under the windowsill.
Blowing is generated by:
- initial processing of the bottom of the object with low-quality building materials (cement and construction waste);
- installation wizard errors;
- deformation of the foam layer for installation (drying out of the material during operation).
Failure to timely correct damaged elements will lead to wear and tear of the entire structure and an increase in sources of cold penetration.
Advice: if the window system was installed by a company technician, it is better to check whether the warranty period is valid. If violations during installation were made by specialists, then according to the rules they will eliminate them.
Otherwise, the work can be done in person.
Possible difficulties and errors, their consequences
When insulating window sill boards, it is necessary to avoid process disruptions:
- After installing the canvas, there must be sufficient load on it. This is necessary so that the window sill maintains a horizontal position. Otherwise, the foam will be able to lift one of the sides and warp the canvas.
- If there are two windows in a room on the same wall, then insulation should be done simultaneously. Window sills should be placed not one at a time, but in combination. To do this, pull the cord and align the canvas along it. Otherwise, the level and depth of installation of window sills will vary.
Before starting work, you should carefully read the instructions. This will help avoid mistakes and mistakes.
How to insulate the window sill of a plastic window
It is advisable to carry out insulation activities in warm and dry weather. Many insulation materials should not be used in winter. Their quality suffers from the cold.
The operating algorithm is simple:
- Get rid of insulation material that has lost its function.
- Clean the area around the window sill and its joints from dust.
- Introduce new wind-proof building material for plastic windows.
The work of foaming/sealing cracks is accompanied by dismantling the decorative coating “before” and plastering with the use of a new coating “after”. To do this you will need to remove the window sill.
Note: if the masonry near the window is stone, then sometimes it is more expedient to dismantle it. Existing hollow areas need to be filled.
The general operating procedure is as follows:
- Remove the window sill completely.
- Clean the area of the wall where it was located from debris and dust and determine whether there are any deformation areas.
- Repair existing cracks using building material.
- Allow the structure to dry.
- Remove excess insulation and eliminate unevenness.
- Apply primer and antiseptic over the surface.
- Coat the joints of the elements and all corners with a sealant.
- Treat the wall area with plaster.
- Return the window sill to its original place in a level and correct position.
If the work is carried out carefully and materials are tightly introduced, the better the energy-saving properties of the entire window system will become.
No. 3. Debugging the clamping mechanism
House shrinkage and weather factors can lead to slight distortion of the window sashes and slight deformation of the sealing rubber. This leads to deterioration of thermal insulation, but in this case, returning the former tightness is a matter of a couple of minutes, however, knowledge of the design of a plastic window and skills in working with tools will be needed.
The clamping mechanism can be adjusted using special eccentrics located along the perimeter of the sashes. To ensure a tighter fit of the sash, the eccentric must be turned clockwise using a 4 mm hex key. Focus on the serif located on each such element. When it is directed towards the street, the pressure is weakened; when it is directed towards the seal, it is strengthened. The video shows everything well.
adjustment of the hinges , which also have their own mechanism responsible for the pressure density, helps to insulate a plastic window Here the regulation is carried out using a hexagon. You should follow a simple rule: if the tongue is pushed out strongly, then the sash fits well. To pull it out, you need to turn the hex counterclockwise if the hinges are on the left, and clockwise if on the right.
Things are even simpler with glazing beads . It is enough to pry off the old, loose glazing bead with a thin spatula, and install a new one in its place, which can be bought from the same company that sold and installed your windows.
After adjustment, check whether the tightness of the structure has improved using your palm or a lighter. If everything is done correctly, but there is still a draft, you will most likely have to change the seal.
Dismantling
Insulation of window sills begins with removing them from under the window. The operation is carried out using one of two dismantling options.
First method
It is necessary to very carefully remove the layer of plaster located under the slab. When wallpaper is pasted on the surface, remove it after soaking it in water.
Algorithm:
- The material is knocked down to the base of the wall. This gives full access to the structure, and it becomes easy to find cracks and chips.
- Dismantling requires breaking off the plaster near the window sill and slope.
- To complete the process, you need to get rid of the foam remaining from the initial installation of the object.
Important: the cut is made as carefully as possible; it is easy to cause cuts on the plastic.
Afterwards, just pull the window sill slightly towards you and down. Do not use great force when removing - damage to the “sensitive” plastic coating may occur.
Another dismantling method
It is possible to remove the window sill of a plastic window using a fine-toothed hacksaw with a long and stiff blade.
Instructions:
- The hacksaw is inserted under the object, then the old foam is cut along the entire length of the window sill.
- On the sides of the slopes, the sealant is cut, which created reinforced fastening of the structure.
- Carefully and slowly, the window sill rises upward and then extends towards itself.
To complete the dismantling, you need to clean the base of the window. Any dust collector will remove debris and expose all existing chips and cracks in the space. They are first covered with new insulation.
Closing the gap with a profile
This method is based on creating additional protection for the sealed seam using a plastic profile.
For work you will need the following materials:
- Transparent silicone sealant;
- Stationery knife, sharp scissors;
- Plastic profile in internal corner configuration.
Armed with everything you need, get to work.
Algorithm of actions
- First, measure and cut the profile to the length of the window frame with a margin of 2-3 cm.
- Then cut off its perforated part so that there is a distance of about 1 cm from the curved plate, and 2 mm from the bend of the right angle.
The profile cutting line must be sharpened
- Using a utility knife, sharpen the cutting line by scraping off the corners on both sides. This is done so that this part of the profile easily fits into the crevice, thereby creating a barrier for air entering the room.
- Make holes in the lower corners of the window with a depth of one to one and a half centimeters.
It is necessary to make holes in the lower corners of the window. Clean the joint between the frame and the window sill from debris, wash, degrease, and wipe dry.
The joint between the frame and the window sill must be clean and free of grease. Seal the gap by filling it with sealant.
The gap is sealed with sealant - Apply an even layer of sealant into the holes made and onto the joint.
- Apply a thin layer of sealant to the profile, insert one end into the hole, and insert the pointed edge of the cutting line into the slot.
The profile is installed in the joint between the window and the window sill - This way the entire profile is adjusted. Its opposite edge is inserted into the second hole.
- Press the corner tightly and hold for several minutes for better fixation.
- Sealant that has squeezed out can be carefully removed after hardening.
The disadvantage of this method is that it is labor-intensive and time-consuming. However, the result is impressive: a beautiful, durable corner in place of the black gap.
Now you know exactly what to do when it blows between the window sill and the plastic window. But sometimes this knowledge is not enough, since the source of the draft may be under the windowsill. A completely different method will be used here.
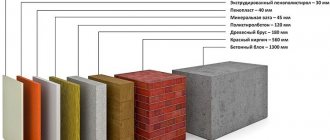
Choosing material for window sill insulation
When deciding how to insulate the window sill of a plastic window, you choose from two building materials.
Polyurethane foam
Before installing the window sill, the perimeter is foamed with installation insulation. Foam is a polyurethane foam sealant in aerosol packaging. The mixture is resistant to UV rays and has good adhesion.
A can of foam costs about 200-300 rubles. European brands have proven themselves well in the market.
How to work with it:
- The work progress includes the distribution of two intersecting lines in the center. They make it easier to attach the slab to the window base.
- Securing an object at the base of the glass opening.
- How level and correctly the window sill is installed is checked using a building level.
Insulating the sill of PVC windows using polyurethane foam is an easy, quick and straightforward process. However, it has its own peculiarities. The mixture, after foaming, is subject to expansion within 1 day. To prevent the mounted object from moving and the position being skewed, the window sill must be firmly fixed. You can place a heavy flower in a pot or a 3-liter jar filled with liquid on top. After 24 hours they are allowed to be removed.
Attention: polyurethane foam is used strictly in accordance with the conditions specified by the manufacturer. They are described on the packaging of the material. Most manufacturers indicate that work with this insulation is carried out at an air temperature of at least 18 °C.
Acrylic sealant
As an alternative to foam, acrylic sealant is used for installation.
This is a non-toxic product made from a polymer composition. It is suitable for external and indoor work. Advantages of insulation:
- low price;
- easy to use;
- UV tolerance;
- fire resistance;
- the material can be painted;
- high degree of adhesion.
With acrylic insulation, a more reliable and comprehensive seal against blowing is created.
How to use: apply the product to small cracks and all joints.
Note: at the moment of covering, excess substance often accumulates. To level the surface, use a classic spatula or any cloth. The base of the window opening is treated with a primer; less often, putty is used for leveling. It is distributed in a single layer, along marks pre-designated by the building level.
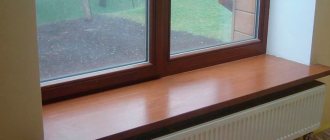
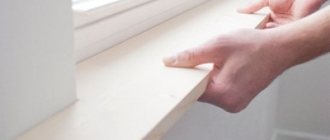
Installation of a plastic window sill
When the surface of the window frame is prepared, you can install a PVC window sill. You need to place the object at the bottom of the window on wooden supports. The thickness of the wood should correspond to the distance from the double-glazed window to the very bottom of the window sill. Proportions can be easily measured with a standard tape measure. Wooden supports will create the required design rigidity. It will maintain the strength of the system during its operation.
After attaching the object to the base, the cavity below is filled with insulation (foam or acrylic sealant). To avoid leaving voids and small cracks (places for cold air to pass through), you need to seal the joint between the inside of the plastic window sill and the mounting profile. Next, to securely fasten the wooden supports, foam is applied again. It foams the embedded plastic object and the wall joint from the outside.
How to seal the gap under the window sill after installing plastic windows
For thermal insulation, the same building materials are used: sealant and polyurethane foam. They can quickly insulate the window sill. Before starting work, it is better to treat the concrete surface and brickwork with an antiseptic or sealant.
Process Recommendations:
- It is easier to fill the gap between the wall and the window sill with foam for installation along the entire object.
- Small cracks in the thermal insulation or wall are best treated with sealant. Silicone will penetrate deeper than other building materials and will cover even small gaps.
- When the question is how to cover the cracks under the window sill from the outside of a plastic window, the solution is to walk along the slopes with extruded polystyrene foam URSA XPS. This will protect against frost.
Leveling of elements and openings (after all work) and waterproofing is done with cement mortar or covered with a dry mixture.
Briefly about the main thing
Many people believe that replacing ordinary windows with plastic double-glazed windows will solve the problem of cold wind and drafts. Unfortunately, this does not always work out. Often during the installation process, craftsmen leave gaps, especially under the window sill. Also, holes may appear due to time in the wall itself, due to drying of the mounting foam and other reasons.
It's easy to fix this on your own. It is necessary to remove the window sill, remove the old foam, coat the cracks and corners with sealant. Then apply mounting foam again, position and level the window sill and secure it with a weight so that it does not move. When everything is dry, the excess foam is removed, the wall is plastered, primed and painted. Nothing complicated, the main thing is accuracy and caution when working.
Question
Write in the comments if you had problems with drafts when you had plastic windows? Did you do the repairs yourself or turn to specialists?
Joint processing
To give the insulated window sill a finished shape, you need to plaster the slopes. To carry out the operation yourself you will need:
- cement mortar or standard dry mixture, which is distributed with a spatula;
- after the materials have dried, do another final coating of the slopes;
- Rub the entire coating area with sandpaper to level it out.
For aesthetics, plastered areas can be painted. If there was wallpaper before the work, you can paste new ones.
Note: the assembly seams cover the whole, but only partially the window frame.
Insulation of slopes from the inside
Before thinking about how to insulate a window sill, you need to find weak elements under the window. You will need to determine where exactly it is blowing. Common sources of drafts are the joints between the slab and the plastic. The second most popular “nuclei” of heat loss are cracks and crevices. They appear from mechanical stress and thermal exposure.
To cover up all the weak spots, you need to remove the previous insulation and apply a sealant along the entire perimeter of the slope.
Insulating a window from the street
Sometimes, after independently insulating the places under the windows, or after the work of the craftsmen, it begins to get drafty in the room, or at cold temperatures the windows fog up. To prevent this from happening, they insulate the slopes from the street.
Attention: the frames of PVC double-glazed windows must be pressed from the outside with brickwork or insulation. And it’s worth closing them by 1/3 of their width. This condition cannot be violated.
Insulation of a plastic window sill from the street includes finishing the drainage system and window slopes from the outside. If this is neglected, the cold will pass inside through the cracks at the joints of the double-glazed window frame and the window sill. Without outdoor insulation, fungus and mold may appear at the bottom of the PVC window.
Help: on the street it is not enough to apply foam or fill the cracks with plaster. These building materials are not practical on the outside. In bad weather conditions they will begin to collapse and crack.
Foam plastic is suitable for outdoor work. Layers of this building material are glued to the outer surface of the slopes with a special adhesive solution. A reinforcing mesh is laid on top of it. To make the view beautiful, the slope is plastered and, if desired, painted with façade paint of the selected color.
Exterior insulation method
Process in detail:
- Treat all surfaces with waterproofing material;
- Lay a layer of putty.
- Coat the entire area with foam. without leaving a single gap.
- Install the window sill according to the building level.
- Secure the object with additional weight (place heavy objects: books, a filled jar, etc.).
- When the foam dries, the excess is cut off with a knife flush with the wall.
How to putty the mounting foam under the window sill? After beating the plaster on the slope, they pass over its surface with a cement or dry mixture, leveling the walls. The open area of the foam is completely covered with the dry mixture. Dried building materials and the working area of the wall are treated with a primer. At the end it is possible to seal the object and drain with paint.
Help: the primer protects against moisture seepage, dries and is easy to apply.
An important touch is the high-quality processing of the ebb and the installation seam underneath it. To avoid the accumulation of moisture near the window, the low tide angle is created at more than 5 degrees, 3 cm away from the wall. The side edges are bent and protected with end strips. To prevent water from seeping through, seal the joints.
It is important to do this stage before interior work, since the joining seams will no longer be accessible.
Alternative options for dealing with drafts
There are times when it is not possible to replace window parts or do insulation work, but you need to get rid of drafts “quickly”. Alternative options for insulating PVC windows can come to the rescue.
Here are some of them:
gluing an additional layer of sealant around the perimeter of the window - this can be done before the winter period, when windows are rarely opened;
- gluing mounting tape at the joints and cracks of the window frame - a method known since Soviet times;
- using heat-saving film on glass is a good option for additional window insulation and retaining heat in the room;
- filling joints and cracks with improvised materials (soaked paper, strips of fabric, cotton wool, etc.) is another method that our grandparents used;
- Using thick curtains made of “warm” fabrics will help avoid the problem of heat “leakage” from the room through the window.
Not all of the above methods give an aesthetically beautiful and durable result. But for getting rid of the problem “in a hurry,” they are quite suitable.
It is important to remember that periodically cleaning double-glazed windows from dust and dirt helps them transmit more sunlight into the room, and therefore heat it. It is also important not only to wipe the plastic frame from dirt, but also to periodically moisten the rubber seal with glycerin - this way the material will last many times longer
Additional options
To insulate a window in your home, you can turn to time-tested methods. Here are some of them.
Using paper. Today it is used very rarely, although, in fact, it is the simplest and cheapest option. To realize this idea, you need to tear any paper into pieces, be it newspapers or wallpaper. Then you need to twist it into strands and fill the cracks between the window and the sash with this material. For this, either a screwdriver or another sharp object can be used.
Paper can also be used to make excellent putty. To do this, you need to grind it, soak it in water and squeeze it out, add one part clay and two parts crushed chalk. This putty will do a great job with even the smallest cracks.
Another option is simple papering, which can be done using laundry soap or glue. It is created with your own hands. To do this, ordinary flour is mixed with water in equal proportions, mixed well and brought to a boil.
A more modern method is to cover windows with special tape. This method is much simpler than the previous one. However, this type of finishing does not make it possible to ventilate the room. Also, when removing paper from windows, marks remain on the frames, and sometimes even paint is removed. Therefore, in the spring we have to update the surfaces a little.
- Cotton wool. The process is very simple. Cotton wool is processed in the same way as paper. It is placed in all the cracks, and paper or tape is glued on top. The only difference from the previous option is that it will be a little easier to get the cotton wool out of the cracks.
- Clothes cord. You can fill the gaps with regular cotton cord. The method is unusual, but effective. The cord is secured with small nails or glue. Thanks to this method, the window is sealed at a high level. Of course, in the spring you will have to devote a lot of time to dismantling this insulation.
- Foam rubber and sealant. This option is very effective and modern. A tape made from foam rubber will be inexpensive, and it can be used not just for one winter, but for two full years. This option is suitable for those windows with large gaps. Installation work is not particularly difficult, but requires a lot of work. This method of finishing allows you to open the window at any time of the year.
Insulation that is carried out using sealing cords is considered more durable. They are made of rubber or polyethylene foam. The advantage of such seals is their low price. Cords come in a variety of shapes, it all depends on what kind of gaps are in the window structures.
The highest level of protection against cold can be achieved by using sponge seals. They allow you to open the window at any time and last for more than one season. The seal can even be self-adhesive.
However, when buying such material, you need to pay attention to the expiration date. If it is already coming to an end, the seal will not stick or will come off very quickly
Therefore, it is better to buy a separate sealant, and separately glue or silicone sealant. This option will increase its durability.