Installation of suspended ceilings is a labor-intensive process that scares off many beginners. Indeed, to solve the assigned problems, you will have to prepare a sufficient set of tools, study the technical part, purchase equipment and materials.
At the same time, some points should be thought out even before attaching the stretch ceiling.
One of these issues is the installation of a ceiling cornice. What types of cornices are there?
Which installation options should you prefer? How much will the work cost? Each issue requires detailed consideration, which is what we will do.
How to make a curtain on a suspended ceiling?
The main advantage of ceiling cornices is ease of installation. Most often, the product is fixed to a regular (base) ceiling, which is a concrete slab.
In such cases, there are no problems with fastening and all work (even for an amateur) takes no more than 15-20 minutes.
The situation is different when it comes to plasterboard structures.
It is worth considering here that plasterboard structures cannot support large masses. That is why it is recommended to give preference to light curtain rods and curtains.
If the task is to hang products made of heavy fabric, then the fastening should be carried out not to the ceiling, but to the wall.
The task is more difficult if you need to attach a ceiling curtain under a suspended ceiling. Here you will have to think about it, because it is impossible to attach the baguette directly to the PVC film - it will be deformed, and the ceiling will lose its appearance.
Here you will have to look for other options, which are given below.
How to make a curtain for a suspended ceiling? There are three mounting methods:
1.The first option is to fix the cornice on a tension structure.
In this case, the installation is carried out using a support mortgage. A wooden beam is attached to the main ceiling, after which a PVC film is attached.
In this case, the block is located behind the suspended ceiling (closer to the window). Next, the tension structure is fixed to the beam. The advantage is that it covers the entire ceiling area.
2. The second option is to install the cornice in a special niche (mounted near the window).
It is into this structure that the cornice is attached. Here a block is drilled to the base ceiling, located 25-30 cm from the window.
A wall profile is attached to the bottom of the beam, where the PVC film is placed. With this design, the suspended ceiling does not reach the window, forming a niche.
The resulting space is enough to install a cornice to the main ceiling. This option is considered "hidden". The advantage is a unique visual effect, due to which the curtains appear to be lowered from the tension structure.
The video shows the design feature of a hidden curtain under a suspended ceiling
3. The third option is similar to the second with the only difference being that the thrust beam is hidden behind a PVC film. This type of execution is considered the most aesthetic.
To accomplish the task, a beam is attached at a distance of 20-25 cm from the window, after which hidden profiles are fixed to the latter, where the film is inserted.
Thanks to the use of two types of profiles (ceiling and bending), bending of the canvas and hiding of the beam behind the plane of the ceiling structure is guaranteed. Next, the cornice is attached to the main ceiling of the room.
The last method is considered the most expensive, but this is easily explained - it is the most aesthetically pleasing, difficult to implement, and the space behind the beam is reliably protected from dirt and dust.
In addition, the resulting niche can be used to install spotlights or LED lighting.
Below we will consider in more detail the open and hidden method of installing a cornice.
Installation of cornice for LED lighting
In order to install an LED strip on a ceiling cornice, you will need the following materials and tools:
- universal glue (titanium, acrylic putty or liquid nails);
- sharp knife;
- miter box;
- Matchbox;
- putty.
First, you need to glue foil tape to the base of the cornice (from the inside). If you had special tape included with the ceiling cornice, then use it to glue the joints and corners. After this, the LED strip is prepared. It can be assembled from individual sections that are joined together by soldering. But in this case there is a risk of short circuits through the foil tape. Therefore, in places of soldering, the protective paper is removed from the adhesive tape. It must be removed carefully, being careful not to damage the adhesive base.
A patch is glued to the contacts. This method will protect the tape from short circuits. The procedure is carried out along the entire length of the tape, so it is better to do this before installing it on the cornice.
Installation of a cornice in a suspended ceiling is carried out according to the following principle. The best option is to stick the cornice before wallpapering, that is, directly onto the plaster. The wall is pre-primed. In order to cut the cornice at an angle, a miter box is used. An alternative way to give the surfaces the required shape is to use special decorative corners.
Each element of the cornice is glued not only to the wall, but also to the previously installed mortgage strip. To impart rigidity to the resulting connection, it is recommended to use dowels made from matches. The cornice will be at a distance of 7-10 cm from the ceiling. In this case, the effect of hiding the light sources to a person who is in the opposite corner of the room should be achieved.
The installation of the tape itself is carried out in the following sequence:
- remove the protective layer of paper;
- stick the tape on the cornice;
- Special attention must be paid to the joints of two separate sections of the LED strip.
Many people consider the last stage of installation too petty and tedious, so they skip it. But as a result, the lighting system can very quickly become unusable due to a short circuit. The resulting joints of two adjacent pieces of tape should be as short as possible. Ideally, it should be equal to the distance between two adjacent LEDs. After the tape is installed on the cornice, you can proceed to connecting the power wires.
In order to create reliable cable contact, the resulting connection must be crimped with special pliers. This way the connection will be reliable even in hard-to-reach and small places. After this, the installation of the cornice on the suspended ceiling ends with the installation of LED amplifiers, power supplies and controllers. This power supply scheme can be conveniently changed or reconnected at any time.
LED lighting allows you to use several colors at the same time. Therefore, the use of this feature helps to emphasize the design of the room and apartment.
How to hang a curtain on a suspended ceiling: the open method
As discussed above, the open method of installing cornices is the easiest to implement and affordable.
Here the installation is performed according to the following algorithm:
- The location for attaching the ceiling cornice is determined, followed by marking points for installation. This work must be done in advance - before the start of the main work;
- marking the perimeter of the room with fixing a special profile for the ceiling to the walls;
- fastening along the previously marked line of the wooden block. The latter is fixed with dowels. The latter should be driven into holes previously made in the ceiling. Pay special attention to the choice of timber - its lower part should be closely adjacent to the PVC film. To adjust this parameter, it may be necessary to install special wedges between the ceiling and the beam;
- after fixing the beam, the ceiling sheet is stretched;
- The cornice is attached using self-tapping screws. You should act carefully to prevent damage to the PVC film. In places where the self-tapping screw passes through the tension structure, polymer rings are installed. In this case, the holes should not be cut, but burned;
- When installed correctly, the beam for attaching the cornice is hidden behind the structure.
The advantages of this option are ease of execution, high installation speed, and minimal costs.
An important point in the process of performing work is installing curtains under a suspended ceiling. Here it is important to strictly follow the sequence of actions and a number of rules.
Installation companies: who to trust?
Expert opinion
Mikhailova Maria Vasilievna
Furniture store manager. Knows everything about comfort and interior design
Recently, more and more companies have appeared that are ready to undertake the installation of tension structures. What companies can you trust to install suspended ceilings in Moscow?
There are several options here:
- Natcom is a company that has been operating in the market for more than ten years. The main direction of activity is the installation of tension structures of any complexity (multi-level, in small rooms, of various geometries, and so on). Masters come free of charge to take measurements, after which clients can choose color, material and installation features;
- "Bezshva" is a company that installs suspended ceilings. The peculiarity is the provision of a wide range of services and a good reputation. The main credo is low prices, high installation speed and a guarantee of the quality of the work performed;
- "ART DESIGN POTOLKOFF" is a company that installs ceilings, focuses on quality and has only qualified personnel (engineers, installers and managers). Each employee has been working in a specific industry for more than six years;
- “Stretch Ceilings Mytishchi” is a company that has been in the stretch ceilings market for a long time and has a reputation as a reliable installer. During the work process, only high-quality materials and modern equipment are used;
- “Bely-Bely” is another group of professionals that installs, repairs and maintains tension fabrics. The specialists have more than five years of experience. During this period, we managed to accumulate serious experience in installing ceilings made in Germany and France;
- ECOFOLE® is a company that deals with all types of work related to suspended ceilings. During this period, we managed to accumulate serious experience and guarantee quality to each client. The company’s advantage is the use of ECOFOLE® stretch fabrics, which are environmentally friendly and contain no formaldehyde.
- "Formula Ceilings" is a well-known company offering a wide range of ceilings from various manufacturers. You can choose from installation ceilings with one, two or more levels. To date, the company has installed thousands of different ceilings. In addition, each client receives a 10-year guarantee. The work is carried out in Moscow and the Moscow region. A separate plus is the availability of tension fabrics from different brands from Switzerland, Russia, Germany and other countries.
- "Potolkoff" is a company that has been operating since 2004 and installs high-quality domestic ceilings. Until recently, only foreign-made products were available to customers. Today, domestic ceilings are presented in 12 colors and have many shades. At the same time, the quality is not much different from foreign analogues. During the production process, only modern equipment is used, which guarantees high quality seams.
Niche for a curtain in a suspended ceiling: subtleties of hidden design
People who put aesthetics first prefer installing a cornice in a hidden niche. But how to hide a curtain under a suspended ceiling so that it looks most aesthetically pleasing?
Here the algorithm of actions looks like this:
- purchase of a cornice (before measuring the ceiling). This is due to the fact that the size of the future niche and, accordingly, the size of the PVC ceiling structure depend on the size of the device;
- The cornice is attached to the base ceiling. Dowels are used for fixation. The sleeve can be made of different materials (metal, plastic);
- At a distance of several millimeters from the cornice, a block is fixed to which a special profile for PVC film is installed. The profile is fastened from the side of the cornice, which makes the beam virtually invisible;
- The product looks most impressive when combined with glossy PVC film.
There is an opinion on the Internet that only professionals with extensive experience and special equipment can handle the installation of a stretch ceiling. But that's not true. If you have certain knowledge and tools, you can do the job yourself.
Preparatory work before installing mortgages
To correctly install the parts, you need to determine the height of the stretch ceiling. The bottom of the element should be at the level of the stretched fabric. Therefore, first they install the baguette, and then install the mortgages. Ceiling film is attached to mounting rails in various ways:
- glazing bead;
- wedge;
- harpoon;
- "clipso" system.
It is important to accurately determine the minimum distance from the ceiling slab to the tension covering. It depends on the type of mounted lamps:
- for point spots - 1...1.5 cm;
- for chandeliers - 3.5...5 cm;
- for lamps with halogen lamps - 10 cm;
- for LED strips - 2 cm.
If the film or canvas is located closer to the floor slab than these distances, then it will not be possible to install the desired lamps. It is most convenient to hide communications, wiring and filling of electrical appliances at a height of 5-6 cm.
Before starting work, clean the ceiling from crumbling plaster and coat it with an antibacterial primer. This will protect the surface from mold and mildew.
Ceiling curtain suspended ceiling: choosing a cornice
To understand the compatibility of cornices and suspended ceilings, it is worth knowing as much as possible about the types and features of products that exist on the market. All cornices are conventionally divided into ceiling and wall.
Based on material, cornices are classified as follows:
- plastic. Such products are in greatest demand due to their affordable price and low weight. In addition, plastic products are durable and flexible. Curtains move along the grooves with maximum smoothness, without delays;
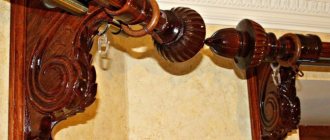
- wooden. Despite the external richness and even luxury of such products, they look very bulky. Wooden cornices are more suitable for rooms that have suspended ceilings. Disadvantages - high price and weight, which was mentioned above. If suspended ceilings and curtains with heavy material are planned, then this option is hardly optimal;
- steel. Such products are durable and reliable, so they are mounted just for the installation of heavy curtains and curtains. Installation of products is carried out using wooden or plastic pads;
- aluminum. The advantage is light weight and strength. In addition, during the installation process various decorative products are used that can decorate the appearance.
All types of cornices considered are presented in different colors, which allows you to choose the best option.
All cornices are divided into three types:
- baguette cornices are products that are made using various materials (most often wood). They can be wall or ceiling;
- round cornices. This design looks like a rod with rings moving along it. The material for the production of products is plastic, wood or metal. The inside of the cornice is hollow or filled (the first option is easier). The tip has a decorative function and is made in a curly or round shape. The round cornice is mounted only to the wall surface;
- profile cornices. Devices of this type are suitable for various types of curtains. Fixation can be carried out to the wall or ceiling. The materials used are plastic and aluminum. The product consists of several grouped tires. There is also a type of curtain rods designed for curtains with lambrequins.
When choosing curtains, you should consider a few tips:
- Curtains are purchased with a length reserve. It is desirable that the distance from the edge of the curtain to the window be 30 centimeters or more. In this case, there will be no problems with opening the curtains;
- It is worth leaving a certain distance from the radiator, window and window sill to the curtain. This is necessary so that the curtains do not touch the radiator and the window sill. Often 20-25 centimeters is enough. It is at this distance that the ceiling curtain is installed.
Cornice design
When thinking about the future design of the window area of the room, you must immediately decide on the design of the cornice. There are several main options:
- string cornice It is a stretched wire with hooks to which the curtain is attached. Most models are equipped with a string tension regulator. An excellent minimalist option, but such a curtain rod is unlikely to withstand heavy curtains;
- tire cornice It looks like a flat plate with several slots for mounting hooks. Several layers of curtains can be attached to one such curtain rod;
- profile cornice made of aluminum. Thanks to its high flexibility, it can be bent almost any way, which allows you to use profile cornices to design semicircular window openings;
- Separately, it is worth highlighting the flexible cornice , which is made of plastic. It can be given absolutely any shape, creating an unusual trajectory for the curtains. Such cornices are often used not even when decorating a window opening, but for zoning space and creating a screen;
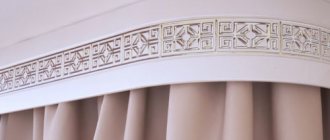
- baguette cornice It is distinguished by the presence of a decorative strip around the curtain fastening system, i.e. the hooks will not be visible at all. Sometimes LED lighting is mounted under the bar, obtaining an original result. A good option for open ceiling or wall mounting.
Cornices also differ in the number of guides. The most popular models are those with two guides: you can hang tulle and curtains on such a cornice. If it is necessary to decorate the structure with a lambrequin, choose a cornice with three guides. If blinds are chosen to darken the room, and only translucent tulle will be attached to the cornice, then you can take the simplest and cheapest option with one guide.
There is a classification according to the control method:
- mechanical curtain rods are a true classic. To open and close the curtains, you need to pull the cord. Everything is simple and reliable;
- A motorized curtain rod allows you to open and close curtains simply by pressing a button. The decision is justified if the curtains are long, wide, heavy, and you regularly manipulate them.
Separately, it is worth highlighting the so-called. “smart” curtain rods , which, thanks to a controller and a sensor system, can open and close themselves according to a certain schedule or depending on the light level in the room. In some cases, you can enable the effect of presence when no one is at home.
Curtains for a suspended ceiling: how much will it cost?
Before you buy a curtain for a suspended ceiling, and decide on the type of cornice.
At the same time, it is worth considering the total costs of purchasing the product and its installation.
Thus, installing an open curtain under a tension structure (if ordered from specialized companies) will cost 500-700 rubles per linear meter.
It is worth knowing the cost of curtains, which varies depending on the type.
Here the prices look like this:
- A 3-row curtain 1.6-4.0 meters long costs from 600 to 1450 rubles;
- 2-row curtain 1.6-4.0 meters long - from 400 to 1100 rubles.
In addition, certain costs occur when purchasing accessories:
- decorative strip costs 100 rubles per linear meter;
- roundings for 3 and 2 row curtains - 300-350 rubles.
As for the installation of hidden curtains, the cost here is higher - 700-900 rubles per linear meter. Here, a ceiling type of structure can be used as a cornice.
If the installation is carried out personally, then first of all you should focus not on the costs (they are approximately identical), but on the availability of certain skills and the planned design.
To figure out how to attach a curtain to a suspended ceiling, it is worth knowing the options and advantages of each type of fastening.
Self-production
Self-production is carried out in two cases: if the desired option is not available at retail points, or in an attempt to save money.
Most often, they make platforms for chandeliers with their own hands. Various materials are suitable for their manufacture:
- plywood;
- board;
- beam;
- OSB board;
- durable foam plastic.
The thickness of the workpiece must be at least 10–12 mm. The shape and size are selected individually, based on the dimensions of the lighting fixture.
Manufacturing stages
- Markings are applied to the selected material using a pencil, compass and ruler.
- Using a jigsaw, a workpiece of the desired size and shape is cut out (usually a circle, oval, square or rectangle).
- If necessary, the surface and edges are carefully sanded until smooth.
- A hole for the power cable (3–5 cm in diameter) is drilled in the center of the workpiece.
- Four metal hangers (made of punched tape or anchor plates) are attached to the platform at equal distances from each other.
It is advisable to choose moisture-resistant materials for the manufacture of mortgages. In addition, before installation they must be treated with antifungal agents.
Installation features
Most often, the installation of embedded lamps is carried out by specialists from the company that installs the ceiling. If possible, it is better to leave this work to them.
If you install it yourself, you will need a number of tools:
- stepladder or scaffolding;
- screwdriver;
- perforator;
- laser level (you can do without it, replacing it with a paint cord, but it will be easier to work with a level);
- pencil or marker;
- knife (stationery or construction knife).
When the cable is laid in parallel with the installation of mortgages, all work begins with marking the ceiling. If the wiring was laid in advance, the markings will only need to be double-checked.
It is advisable to first draw up a marking diagram on a sheet of paper indicating all distances and taking into account the scale. This will make it easier to carry out calculations and select the required distances. After this, the marks are transferred from the paper to the floor slabs.
Installation of platforms for chandeliers and spotlights
If you need to install a large number of lamps of the same type, it is easier to make a stencil that will be used to mark the locations of future mounting holes on the ceiling.
Platform assembly
- A circle equal to the diameter of the lamp base is cut from the universal platform. If the mortgages were purchased in a fixed size or were made independently, this item is skipped.
- Metal hangers are attached on both sides with a plastic insert (factory products have special protrusions for fastening). To do this, the suspensions need to be given a U-shape, or cut into two identical parts. “Bedbugs” (a type of self-tapping screws) are best suited for fastening hangers.
- Marks are applied to the ceiling at the places where the screws are attached - using a stencil or manually.
- Using a hammer drill, holes are drilled in the marked places into which plastic dowels are inserted.
- The platform is attached to the floor slabs using dowel-nails or 5x40 mm self-tapping screws.
- Using a paint cord or laser pointer, check the installation level of the mortgages.
The assembly and installation of mortgages for a chandelier occurs in the same way. The only difference is a larger number of attachment points and, accordingly, metal hangers. It is also worth considering the weight of the chandelier - for massive products, more reliable screws may be required.
Important point: If the wiring has already been laid, the room must be de-energized before installing platforms for lighting fixtures!
Installation of timber under wardrobes and cornices
When installing this type of mortgage, there are only two important points that you should pay attention to:
- preliminary preparation . If a wooden beam is used as a laying platform, it must be carefully sanded and treated with antifungal and water-repellent compounds. In this case, you need to make sure that the wood for the platform is completely dry - otherwise the timber will move over time. With aluminum mortgages, labor costs are less, but you still have to carefully grind all sharp corners and burrs;
- reliability of fastening . You should not skimp on the number of fasteners and the length of screws. After all, in addition to its own weight, the mortgage will have to support the weight of the cornice, or doors from the wardrobe, and maybe the load from the stretch ceiling. It is better to add a couple of extra fastening points than to redo the entire repair because the timber failed.
If all the rules for the manufacture and installation of mortgages are followed, this work can be done independently, even without having the appropriate skills.
Photo of curtains under a suspended ceiling - help in choosing
Before starting installation, you should study the prices and photos of curtains for suspended ceilings. The costs of performing the work are discussed in the section above.
As for photographs, it is worth paying attention to:
- types of cornices and features of their fastening;
- step-by-step execution of work when installing curtains in open and closed ways;
- options for LED lighting in the formed niche (if such is planned);
- photographs of curtains for curtains under a suspended ceiling;
- execution options.
The more information in front of your eyes in the form of photographs, the more accurately the work will be done, and the better the final result. In this case, there are always two options:
- do the work yourself. The advantage is saving money. Disadvantage – high risk of damaging expensive PVC film;
- entrust the installation to specialists. In this case, you can count on results. Disadvantages are higher costs that you have to put up with, as well as a high risk of running into unprofessionals.
������������ �� ����� ���� ������� �������, ��� �������� �����������? ����������� � ���������� �������! ������ ��� �� ������, ����� ������ ���������, ���� ���� � �������, � ������ ������������. ���������� ������� ������� �������� ��� �������� �������. ������� ���, ��� ������, ��� ������� �� �������� ��� ����� �������, ��������. ��� � ��� ��������, ���� ��������� � ������� �� ������� ���� � ���� � ����� ��������� ������������.��� �������� ���������� �������, ��� � ������� ��������� ������ ������������. ��� ���������� ��, ���� � ������ ��� �� ������������� ����� �����, � ��������� ���� �����? ������� ������ ������� ��������.������ ��� ��������� ������� �������� �����. ����� ����� �� ��������������, �������� ��� �������, ��� ����������� � ��� ������ �������� �������.��������� ����� � ������ ������������ ��������.
����� ������������� �������, ����������� ���������, ������� �� � ��������� � �������� ������ � ��������. � ��������� ����� ������ ��� ����������� ������������ ��������� �����. �������� � ��������, ������ �� ��� � ������������ ��� �������� �������������� ��������.
���������� ��� ������ ������� ������� �� �������, ����� ��� ������ �������� ��������.� ���� ������, �� ������������ ����� ������������� ������ � ��� �����, ��� � ������� ����� ������ �������������, ����������� ��������. � �������� ��������� �������� ���� ������, ���������� ������ ��� ����������. �������� � ������ ������ �������� ���������. ������ �������� �������� ��������� �������� �������. ����� � ��� ������, ��� ������������� ������, ������������ ������, ������� ������ ���� ��������� �������.
�������� ������� ������, ���� �������� ������� � ������ ������������� ���� � ������. ����������, ��� �������� ��������� ���������� ����� ���� � �����:
- ������������� � ������� �� �������� �������, ��� �� ������� ������� ��������� � ��������� �������� �����������. ����� ���������� ������� ������ ������� ������� ��� ������ ���������. ����� �����, ��� ����������� ���������� �������� �� ������. ������, �� ������ ����� ��������, � � ���� �������� � ������ ����� ���� �� ������ �� ���� ������ � ����� ��������. ������, ��� ���������, ���� ����������. �������, ��������� ����������� � ���������� ������ ����� ������� �������, ����� �������� ��� ������ ��������� � ���� ������������� ��� ��� � ������� ����� ���������.
������ �������!�������� ��� �������� ���������� �� ������ ������� ������������� � ������ � �������. � ���� ������ ���.
���������� �� ������� �����, ���� ������ �� ���� ��������, ��� ���������� ����� ���������, � ��������� �������� ����������� ���������� � ���� ���� � ����. ������ ������� � ���������. ��� ������������� ������ ��������� ������� ���������� ��������� ������� � ���������.
- ����, ������ ������ � ������������ ��������� �����. ������ �������� ������� �������� �� ����� �������. �������� ����� ��������������� ����� � �����, �� ������� � ����� ��������������� ��� �������� ������. ������� ��������� � �������� ��������. ������ ������������ ��������� ����� �� �������. ��������� �������, ��� ��������� � ������, ������, ��� ���� �� ����� ���������� ������ ������ �� ����, � ��������������� �� ����������� ��� �������. ��������� ����� �� ��������� ����������� ������. ��� ���������, ����� ����������� �����������, � �� ����������.
- ������ ���������� � ���������� � ��������� ���������. �������� ���������� ������, ���� �� ����� �������������� �������. �������� ������ ������ �� ������ �������� ��������� �������. �������������� ��� ������� ��������� ����� �������� � ��������.
- ��� ��������, ��� ��������� �������� �������� ������ ��� ������, ����� ������� ��� �������� ��������� �������. ������, ��� ����������� ���������, ������������� ������� ������ ������������. ���� ������������ � �������� �� ��� ������� �� ������ ��� ������.
- ������ ������ ����� ����������� �� �������, ���� �� ������ ���� ���������. ������� ����������� ���� � ���� ��������� ���������. ������ ����� ����������� � ��������� ��������� �������. � ���� ��������� ������� ���������� � ������ �������� ������ �����.
- �������, �������� ������� �����. �������� ������ ������������ � ��������. ���������� ����� ��������� ��� �� ����������� �������, ��� � �� ����� �������. �������� ����� ��������. �������, ���� �������� ������� � ������ ������������ ���������.
- �� � ��������� �����������, ������ ���������� ������� �� ������ ��� ������, ��� ����� ��� ����������. ��������� ������ �� ��������.
�����!����, �������� ��� ����� ������, ����� ����������, ��� �������, ���� �������� ������� �� ��� ������. ��� ����� ��������. � ������, ��� �������� ��������� ��������� ��������, ��������� ����� ���������� ��� ������� ������ ����������.
������ �������, ��� ����� ���������� ����������� ���������� �� ������, ��� ����� ������, ���� ����������������� ������������� �� ������.������ �������� ������� ������������� �� �� ��� ����������� �������, � ����������� ��������� �������� �����, ���� � �������� ������. � ����� �������� �������� ������� ������. � ���������� ������� ���������� �������, ��� ����� ��������� ������ ������� � �������, �� ��������� ���������� ��������. �� � ���, ��� �� ������������ � ����� ������ ������, �� ��� ����� �� ����� ����� ����� ����� ������.��� ������ ���� �������� ����� ������. ������������, ���� �� ������ �������� ��������� �������, �� ����� �������� ������������ �������.��� ������, ������ �� ������ �������. ����� ����� ����������� � ����������, ������ � �������, � �������. �������������� ��� ����������� ������� ������, ��� �����, ���� �� ������� � ���� ����. �� �������� ������������� ��������, ���������� ������������� � ��� ����� ������������!
Having started a renovation with a conventional suspended ceiling, the curtain is usually selected at the final stage, when all the rough work has been done and the wallpaper has already been pasted. If the renovation of the room is planned with the installation of a stretch ceiling, then the timing of the actions is somewhat different, and you should take care of what type of curtain the curtain will be in advance. What types of curtains for suspended ceilings exist, and how to install them?
Types of materials.
Installation of a two-level ceiling
Mortgages made of heat-resistant plastic are often used. They prevent overheating of PVC film and fabric. For the strength of fastening of heavy chandeliers, wooden, OSB, and plywood parts are also used. To install spotlights, you can attach elements of cut metal hangers to the base surface.
Methods of attaching curtains to a suspended ceiling
Having decided to install a suspended ceiling, many do not even realize that the curtain can be installed directly on it. Yes, this is quite possible, you just need to do several operations first.
So, there are two ways to attach curtains to a suspended ceiling:
- standard (traditional) method;
- alternative installation option.
Let us now consider each option separately and in more detail.
In the case when the installation of curtains on a suspended ceiling is carried out in the traditional way, then special embedded parts are prepared. They are made from thick sheets of plywood or wooden beams. At the same time, their surface should be perfectly flat and smooth.
Such embedded parts are attached to the concrete base of a regular ceiling (under a tension ceiling), in the same plane as the film of the canvas. At the same time, it is very important that all embedded parts are very clearly on the same level. This can be easily controlled by tensioning the construction thread.
Then the ceiling itself is directly stretched, and the curtains are installed on the suspended ceiling in those places where the mortgages are installed. When attaching the curtain to the mortgages (through the film of the fabric), you should be extremely careful so as not to damage it. To do this, you can make small cuts in the film and then fasten the curtain in those places with self-tapping screws.
The disadvantage of this method is that all the details of attaching curtains to curtains (hooks, hangers, etc.) are located in a visible place.
The second installation option is a hidden curtain on a suspended ceiling.
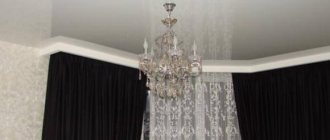
With this mounting option, the curtain looks more attractive. It seems as if the curtains are falling from the very ceiling, they seem to be floating. The advantage of this installation, compared to the first option, is that all the curtain fastening elements are hidden in a niche and are not visually visible.
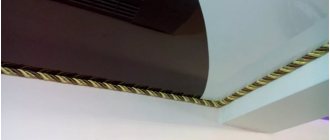
Hidden ceiling curtains on a suspended ceiling are installed by installing any shaped ceiling cornice in a niche specially formed between the suspended ceiling and the wall with the window. It is also worth noting that such a curtain on a suspended ceiling looks much more attractive if it is decorated with a ceiling plinth.
Types of niches for hidden cornices
Sometimes, for some reason, it is impossible to organize a recess under the curtains (for example, the communications running along the ceiling interfere with screwing the cornice). In this case, the cornice is mounted directly on the suspended ceiling, on a base, which can be a beam placed 5 mm above the canvas. From the outside (from the side of the room) the structure is covered with a decorative overlay.
Hidden built-in corniceSource all hereclub.rus
In other cases, a niche is formed in the structure of the stretch ceiling. Stretch ceilings with a niche for curtains can be made in several ways. Technical solutions vary in degree of complexity, which affects production time and cost. The following options for cornice recesses are possible (in order of increasing cost):
Budget niche. The low-cost method mentioned above, in which a niche is formed using a beam that takes on the main load (it is attached to a concrete base). From the side of the room there is a smooth canvas trimmed with decorative edging. The advantages are ease of installation. There are two disadvantages - a visible edging, which does not always look decent, and also the opportunity to get acquainted with the design by looking at it from the side of the window.
The canvas hides the presence of the beam and corniceSource nevapotolok.ru
- With the installation of a plasterboard box. A niche formed from plasterboard separates the cornice and the suspended ceiling. Due to the fact that it is structurally slightly lower than the canvas, you cannot damage it when hanging curtains. The advantage of this method is that the cost of installing the ceiling does not increase. The disadvantage is that the finish looks uneven, and the price includes drywall work.
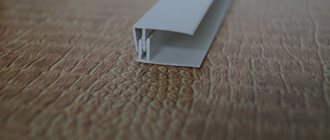
- Aluminum profile with bend. The use of a special profile allows you to get a neat recess with the blade folded upward. The profile is a square pipe, unlike a wooden block, which allows you to insert the blade through the bumper and secure it in the place provided for the harpoon. The advantage of the design is simple installation and aesthetic appearance (no edging), the disadvantage is that if the canvas is lowered too much, the gap in the niche can exceed 4-5 cm.
Using aluminum profileSource euroizum.by
- The fold of the canvas reaches the ceiling. The bend is carried out to the concrete base, for which special profiles made of plastic or aluminum are also used. As a result, all parts are securely hidden under a perfectly smooth canvas without a hint of a gap. The method is desirable if, for example, the window opens onto a balcony. There is only one minus - there is a possibility of damaging the canvas during operation.
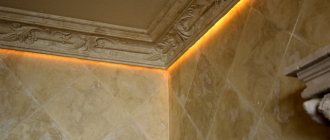
- Soaring stretch ceiling with a niche for a curtain. An elegant option for disguising a ceiling cornice: an LED strip creates romantic lighting, while the structure remains out of sight. To increase the effect, you can make indents from all walls, and not just from the window. The advantage of a floating ceiling is beauty, the disadvantage is the complexity of the work, which is reflected in the cost.
Floating stretch ceilingSource m-ok.com.ua
About a niche with lighting on a suspended ceiling in the following video:
Curtains for suspended ceilings: price
As for the cost, ceiling curtains for suspended ceilings are slightly cheaper in comparison with the classic fastening method.
For example, (in Yekaterinburg) it offers installation of an open curtain under a suspended ceiling at a cost of 500 rubles. for 1 m.p. As for the cost of the curtains themselves, they are as follows:
| Type of curtain | Size, cm | Cost, rub. |
| 3-row | from 160 to 400 | from 632 to 1333 |
| 2-row | from 160 to 400 | from 444 to 1104 |
Important! In the table of curtain sizes, the maximum and minimum values are indicated; in general, curtains for suspended ceilings exist in all sizes within the specified limits, with a difference of 20 cm (1.6 m; 1.8 m; 2.0 m, etc.) . The cost of the curtains indicated in the table includes a set of hooks, a stopper and a mounting plug.
Additionally also paid:
100
350
320
| Type of fittings | Cost, rub. for 1 m.p. |
| Decorative strip | |
| curves for 3-row curtains | |
| curves for 2-row curtains |
Attention! The types of fittings indicated in the table are not included in standard curtain kits and are always paid separately.
As for the installation of a hidden curtain for suspended ceilings (photo) from, it costs 700 rubles. for 1 m.p., and as a cornice you can use any ceiling option, or those suggested in the tables for open types.
To summarize, we can say that both methods of installing curtains under a suspended ceiling (photo) are quite popular, but still the second option (hidden curtains) is simpler in terms of installation and operation.
Having decided to install suspended ceilings in your house, you should also think about the curtains that will be in one room or another. Speaking about curtains for tension flows, we mean, first of all, the method of attaching the entire structure to the ceiling.
Methods for installing curtains
First you need to define the terms. Many people call a curtain a device for fastening a curtain, that is, a cornice.
But this is completely wrong, a curtain is a curtain made of light, usually transparent fabric. That is, curtains for a suspended ceiling are no different from curtains for any other type of ceiling. The specifics concern precisely the method of installing the cornice.
When planning a stretch ceiling, based on your preferences, you will plan to attach the curtain rod. There are only 2 mounting options:
- The traditional method is when the curtain rod is installed on a suspended ceiling, as in the photo above;
- An alternative (hidden) method is to hide the curtain rod in a niche.
To understand the principles of preparing for the installation of curtains, we will consider each method separately and understand the principles of their installation.
A special case
Niches and mortgages are used not only for attaching cornices when decorating window or door openings, but also for zoning a room with suspended ceilings. Of course, all the nuances of the project are thought out in advance, then the drawing is transferred to the ceiling, and embeds are made along the lines.
Zoning
The simplest option, if you need to fence off a flat area along a tension fabric, is enough to fix the embedded beam and then attach a curtain guide to it.
Metal profile frames should be loaded moderately. To zone a space with suspended ceilings, it is recommended to use a flexible cornice; it is lightweight, elastic, smoothly outlines all lines and curves, the fabric is selected accordingly: light and airy.
For zoning a room with suspended ceilings using curtain rods
Bay windows
Separately, let’s say the fastening of cornices to a suspended ceiling for the arrangement and decoration of bay windows. If it is multifaceted, you can think of a system of mortgages that follows the contour of the architectural form.
You will need to connect several bars at different angles, fix them on the ceiling, then you can stretch the fabric. A straight cornice, connected at the corners with beautiful joining elements, would be appropriate here.
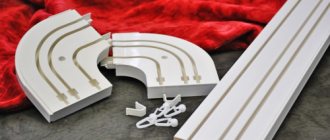
For round and curved bay windows in rooms with suspended ceilings, you will need to form a niche from a metal profile and plasterboard, and hang the curtains on a flexible cornice.
Flexible curtain rods are universal for designing curved shapes, minimum bend radius 50 mm
In conclusion, we offer a video - a comparison of cornices on a suspended ceiling and hidden in a niche
Scheme for attaching a ceiling cornice to a suspended ceiling
Directly during fastening of the frame, a platform is installed under the ceiling sheet in the form of small blocks of plastic, plywood or wooden beams. Such sites are called mortgages. There are several mandatory rules for the installation and quality of such embedded platforms:
- they must be perfectly smooth and even;
- each do must be on the same level as the others;
- the general design of the mortgages is installed clearly at the level of the tension web.
Curtains for suspended ceilings are mounted on cornices, which differ in material and parameters (length, width, number of guide rails). It is easier for specialists to work with metal cornices; they are more durable and not as flexible, which makes it possible to attach fewer mortgages.
After marking, the embedded bars with edges polished to prevent tearing of the fabric are attached to the base of the ceiling. Next, the suspended ceiling is installed and markings are made for the cornice. To do this, apply the cornice and mark the mounting location with a marker.
Varieties
A niche is left between the base ceiling and the stretch fabric, in which the ceiling curtain will be installed.
The types of cornices for suspended ceilings are as follows:
- Aluminum ones are good because they are easy to work with, as they are light and at the same time durable. For additional decor, you can use overlays;
- unlike aluminum, wooden ones are not only very heavy, but also expensive, but they look much more luxurious (great for private houses with high flows);
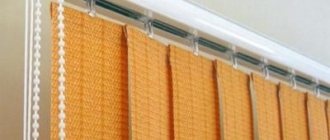
- the most common type are plastic curtains, they are light and inexpensive, and besides, the curtains “move” unhindered;
- steel ones are used for curtains; plastic or wooden linings are used for decoration.
Alternative (hidden) option
Scheme of an alternative method of attaching curtains to a suspended ceiling
This method is much simpler and there is less chance of damaging the tension fabric itself. The essence of this method is this: when the tension fabric is installed, a niche is left between the window and the ceiling, where the cornice itself is already installed on the main ceiling. The cornice is hidden in this niche, creating the effect as if the curtains are falling from the ceiling itself.
Mortgages for lamps
Small spotlights have low power, so they are usually mounted in groups.
After securing the baguette to the walls and marking the ceiling surface, the installation of the mortgages begins:
- Stretch the cord between opposite walls, wedging it into a baguette. He beats the bottom mark of the supporting element under the lamp.
- Prepare the platforms for the lamps - cut part of it to the required diameter. It should be slightly larger than the diameter of the electrical appliance.
- Fasten the 4 halves of the suspension to the part with self-tapping screws.
- Drill 4 holes on the ceiling with a hammer drill and hammer in the dowels.
- Mount the mortgage, aligning it along the cord.
- Pass the electrical wiring through the hole, strip the ends and insulate them. Insert it back, forming a loop.
- After installing the stretch ceiling, a tread ring is glued to the installation site of the embed and a hole is cut out in the canvas.
- Mount the spotlight in the seat, connecting it to the electrical wiring.
For halogen lamps, it is recommended to use a double protector ring to avoid heating the adjacent ceiling film. Their power should not exceed 35 W. For incandescent lamps this figure is 60 W.