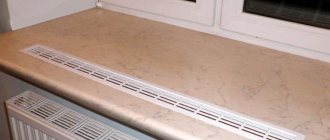
The problem of winter insulation of houses is relevant even for the southern regions of our country, and in the north it is a serious issue of life support. Heating costs directly depend on the thermal conductivity of materials and the use of insulators. Precious heat escapes through walls, floors and ceilings, windows and doors.
To solve this problem, modern and inexpensive penoplex insulation based on extruded polystyrene is used in construction. To get an excellent result, you need to master the technology of attaching penoplex to walls; in this case, you can reduce repair costs by doing the installation yourself.
Preparing the concrete base
The concrete floor must be leveled and cracks repaired.
Before attaching penoplex to the concrete on the floor, a number of measures should be taken to prepare the base. Ignoring this stage is fraught with rather unpleasant consequences.
- Dismantling the old coating. Cleaning the surface from debris and dust.
- Removing nails, screws, protruding reinforcement and other foreign objects.
- Carrying out measurements and inspection of the activity area. Determining the level of the subfloor, the presence of open seams, cracks and holes.
- Leveling the slab, sealing all openings with cement mortar or sealant.
- Sanding the floor. Removing all protrusions and uneven surfaces. The height difference should not be more than 1% per linear meter.
- Concrete primer. This procedure must be carried out at least twice to ensure deep penetration of the liquid.
Types and technical parameters of penoplex
Two types of polystyrene heat insulators are used as wall insulation:
- external, used for insulation of the external part of buildings (“Penoplex Facade”);
- internal, insulating walls from inside premises (“Penoplex Comfort”).
The dimensions of both types of penoplex are identical:
- length - 1200 mm
- width - 600 mm
- thickness - from 20 to 150 mm
The materials differ only in some technical parameters. The following table clearly shows this:
| Technical specifications | Coefficient of thermal conductivity | Flammability | Surface compressive strength MPa | Moisture absorption per day (%) | Sound insulation (db) | Range of safe operating temperatures |
| Penoplex Facade | 0,3 | moderate | 0,2 | 0,5 | 41 | minus 100 – plus 75 |
| Penoplex Comfort | 0,3 | strong | 0,18 | 0,4 | 41 | minus 100 – plus 75 |
Costs for building materials
Today, the construction markets of Moscow and the Moscow region can offer buyers the following materials at prices:
- Penoplex in packs, thickness 100 mm for outdoor use, RUB 1,550;
- Penoplex in packs, thickness 50 mm for interior work, RUB 1,250;
- primer solution 10 l, 300 rub.;
- plaster mixtures, 25 kg, 360 rubles;
- fiberglass mesh for reinforcement, 35.50 rub/m2;
- profile fasteners, packaging, RUB 740;
- glue for fixing plates, 25 kg, 230 rub.;
- mushroom dowels for Penoplex, 3 rub. /PC.;
- dowels for fastening supporting parts, packaging, 740 rub.;
- starting profile, 120 rub.;
- facade paint for finishing, 15 kg, 513 rub.
Cost of work in the Russian Federation
The technological process of installing Penoplex on brick walls also consists of many separate operations that determine the total cost of work per 1 m2 of brick wall area.
Prices for finishing work depend on the region where the property is located, transport links and the height of the building.
Average prices by region of the Russian Federation for different types of work:
- Insulation of external brick walls, RUB 380. /m2.
- Internal protection of brick walls, RUB 310. /m2.
- Reinforcement of a brick wall with fiberglass mesh, 410 RUR/m2.
- Rubbing walls with glue, 220 rub. /p.m.
- Primer of walls, 80 RUR/m2.
- Application of decorating plaster, 380 RUR/m2.
- Wall painting, 110 RUR/m2.
If you are interested in how and with what you can insulate brick walls from the inside and outside, take a look at this section.
Treatment
To ensure reliable insulation, an adhesive composition is used, self-tapping screws are screwed in, dowels, liquid nails and cement mortar are used. To properly glue penoplex, you need to take into account the type and thickness of the brick. Installation of penoplex is carried out in the following ways:
- Adhesive composition. Mounting adhesive is better suited for fastening polystyrene foam; it can be mounted both inside and outside the building.
- Self-tapping screws. The insulation is produced in a set with self-tapping screws that will fit different tile thicknesses. After processing, they leave holes that are covered with cement mortar to prevent moisture from appearing under the insulation sheets.
- Dowels. To work you will need assembly adhesive. The disadvantage of this method is the formation of an air cushion between the slab and the wall, which causes mold and moisture to appear, and a collapse may occur.
- Liquid Nails. It fits perfectly on the surface and provides a good bond between the material and the brick.
- Cement mortar. Treatment with the solution secures the insulation well. Since cement is heavy, it is recommended to additionally use glue to avoid detachment of the material.
- Polyurethane foam. The coating is carried out using a construction gun, which applies the solution over the entire sheet of foam plastic.
How to carry out double insulation
This finishing will ensure maximum comfort inside the finished building. This technology is mainly used for finishing balconies.
With this treatment, a double layer of thermal insulation is used to cover the load-bearing wall and parapet. The floor, ceiling and side walls can be treated with one layer of insulation. For such cladding, penoplex is often used together with penofol.
Although such insulation materials are independent materials, together they can provide a higher quality result. The first step is to fasten the penoplex using one of the previously discussed methods. After this, penofol is laid. Its installation is carried out using staples or an adhesive mixture.
Installation of insulation
The slabs are glued to the wall, secured with disc dowels, the joints are foamed.
Penoplex slabs are laid on the insulated surface using adhesive or combined technology. In the second case, they are additionally fixed with disc-shaped dowels. To fix the slabs, a special glue is used, which is diluted before starting work. The surface of the penoplex is passed with a grater or a needle roller to reduce smoothness. The solution is applied to it with a notched trowel. Depending on the size of the insulated surface, the glue is distributed over the entire slab or along the perimeter and middle.
The insulation is installed using a frame or frameless method. Under plasterboard or wooden lining, a frame is assembled from wooden blocks or special guides. Installation begins with marking the ceiling, then the lines are transferred to the walls. The guides are attached in increments of 600 mm - this is the width of the foam boards. When using wooden blocks, the material is pre-treated with an antiseptic. The heat insulator will fit tightly between the sheathing. The frameless method is less expensive and labor-intensive. The finishing material is attached directly to the insulation.
On the walls
Adhesive for penoplex
The technology for installing penoplex depends on the wall material. For concrete structures that do not have external insulation, the use of vapor barrier is recommended. Freezing of the walls will cause condensation and constant dampness. This problem does not arise in wooden houses.
Laying the insulation begins from the bottom corner. In each subsequent row, it is advisable to move the slabs by half the width. Installation in a checkerboard pattern reduces the length of the seams. Fastening to the wall occurs using various compounds:
- Bitumen mastic - used as a fixative and waterproofing in rooms with high humidity.
- Cement-based mineral adhesive is the most common option. The composition hardens quickly, so it is mixed in small portions. Thorough mixing is required until the solution is homogeneous.
- Polyurethane adhesive in cans is easy to use, one package is enough for 12-15 square meters. m.
- Polyurethane foam - a universal composition that will ensure reliable adhesion to brick, concrete, and aerated concrete. The foam dries quickly and creates a sealed seam.
Penoplex with glue applied is pressed tightly against the wall and held for 40-60 seconds. For reliability, the slabs are fixed with 5 dowels, the fasteners are hammered in the corners and center.
The gaps between the penoplex are filled with foam. After drying, the protruding parts are cut off. When insulating using the frame method, the slabs are laid in a similar way.
To the ceiling
Ceiling insulation technology is no different from walls
Ceiling insulation is carried out from the inside or outside. In a private house, to reduce heat loss, penoplex is laid on the floor of the attic. Fixation occurs with an adhesive composition. Boards are attached to the sheathing on top of the heat insulator. In apartments this is not possible, so insulation is done from the inside. The surface is prepared in the same way as walls - cleaned, leveled and primed.
Glue is applied to the surface of the slabs, then they are pressed firmly to the ceiling. Fixing with dowels securely fastens the insulation. If a frame is provided, penoplex is placed between the guides. All seams are filled with construction foam.
Video description
Step-by-step technology for facade insulation with penoplex in the video:
The compositions are designed for external and internal use. Adhesives are resistant to temperature changes, high humidity, and sunlight. When developing the formulations, high-quality materials are used; they are as safe as possible for people and the environment. However, in any case, before starting work, you must carefully study the recommendations and requirements of manufacturers and consult with specialists. Choose an adhesive that will be best suited for a particular surface. Manufacturers also offer special universal adhesives. Some compositions are additional insulation for the basement, roof or foundation.
Compositions for penoplex are developed specifically for slabs and withstand the negative influence of the environment; universal options can be used with different materials. Source stroymat77.ru
What are the advantages of using foam in the case of penoplex?
Penoplex is used as a soundproofing material, and polyurethane foam is used to blow in the seams between the plates. At the same time, it qualitatively seals the seam. Another useful function offered by foam is gluing the foam board to surfaces, even vertical ones.
Even an inexperienced builder can do this kind of work. The slabs are glued unnoticed, however, the penoplex is securely fixed and they proceed to the next stage.
Application of foam with penoplex
Using this product instead of glue will help save money, applying the foam is much easier and requires less time to dry completely than glue. The use of foam is in no way inferior to specialized glue in terms of adhesive properties. Why do they buy it to simultaneously use it both for gluing penoplex and for blowing in seams and joints.
How to install dowels?
Wall marking
After this, they begin to install the dowels. First, markings are made. Using a hammer drill, holes are drilled in the wall through the insulation into which fasteners will be inserted. Select a drill with a diameter of 10 mm and make a hole of the required depth. It should be 10-15 mm longer than the length of the sleeve of the corresponding brand of dowel.
It is important to control the horizontal position of the tool so that the dowel does not become oblique and one side sticks out above the surface. To ensure that they all have the same depth, a marker is made on the drill using insulating tape
The diameter of the hole should be such that the anchor fits into it without effort. Otherwise it may bend and break. The resulting holes are cleaned with compressed air.
The next step is to directly attach the foam to the wall with dowels. Plastic umbrellas are inserted into the holes. The hat should be slightly recessed in the thermal insulation so that it does not protrude above the surface. Since foam or mineral wool has a low density, this can be done by pressing with your hand or lightly tapping with a hammer.
Then the rod is inserted into the umbrella until it stops. The rest of the part is hammered in so that the head is flush with the foam. If plastic rods are used, do not apply too much force. This may cause the nail to become deformed. If fiberglass dowels are used, then it is inserted into the hole assembled.
The last step is sealing the dowels. Upon completion of the work, you can see quite deep holes in which the caps remain. To prevent voids from appearing in their place during subsequent facing work, the holes must be sealed with an adhesive mixture using a paint spatula. The evenness of the surface is checked with a level or square. After installing the dowels, the surface is plastered or the curtain wall is installed.
Most modern fasteners are made of frost-resistant and impact-resistant polypropylene, so installation is possible at low temperatures. They will not crack or break.
How to properly insulate?
This installation technology will depend on the chosen method of insulation - external or internal, the thickness of the insulation and the method of fastening. For example, if Penoplex is covered with siding, you will have to install a sheathing made of wood or metal profiles. In this case, there will be a ventilation gap between the finish and the protective layer, so there will be no need to use a vapor barrier.
How to glue on the outside?
Before insulating the house, both slabs and wall coverings are carefully prepared. In the first case, the slabs are processed with a needle roller to achieve surface roughness. In the second case, the wall is cleaned of dust and all old layers of dirt; if there are cracks, they are carefully sealed. It will also be necessary to treat the surface against biocontaminants with fungicides.
After completing the preparation of the surfaces, check the verticality and horizontality of the base, and if any deviation is detected, correct it with cement mortar. All metal parts are treated with anti-corrosion agents.
Installation of insulation can be carried out when the prepared surfaces are completely dry and have reached their final hardness.
External installation technology
- Mark the “0” line.
- Install the starting profile at the lower level 30 cm below the 1st floor along the entire perimeter of the house. The level is struck with a laser tool.
- Penoplex slabs are prepared and cut, adhering to the rule that the pieces should not be narrower than 200 mm. In the area of openings, the elements are made in the shape of the letter “L” and have allowances for precise joining on slopes.
- Prepare adhesive solutions according to the recommendations of the board manufacturer, which is indicated on the packaging. Typically, the shelf life of the adhesive solution is no more than 2 hours and is used at a temperature not lower than +5 C.
- Glue is applied around the perimeter of the insulation with a width of 100 mm and a layer thickness of no more than 2-5 mm, while the surface of the sheet must be covered with an adhesive composition of at least 40% of the area.
- The first row is installed on the starting metal profile.
- Each sheet is pressed tightly to the base, excess glue is removed and the vertical and horizontal levels are controlled.
- The position can be adjusted by tapping with a grater.
After 72 hours, the slabs can be additionally secured with special dowels, after which a layer of plaster can be applied to the reinforced mesh and decorative finishing can be performed.
How to secure from the inside?
This is a very rare installation scheme for thermal protection, since Penoplex almost does not allow vapor to pass through. With the right approach, such an installation is possible if there is no thermal insulation system on the outside of the building. In this case, the insulation layer is assumed to be small.
Technology for installing Penoplex on an internal brick wall of a room:
- Clean the brick wall surfaces from dirt and deposits.
- Seal cracks and chips, remove protrusions so that the surface is smooth.
- Treat the brick wall with antiseptics.
- Mark the insulation boards and check their quality by level.
- Install the lower starting profile horizontally.
- Mix the glue.
- Begin installing the insulation from the bottom up with the seam offset, forming a staggered laying order.
- Liquid nails are applied crosswise and along the perimeter of the slab.
- The joints between the sheets are coated and sealed with foil tape.
- If necessary, after 72 hours they are additionally secured with dowels.
- They carry out finishing that is acceptable according to the standards for interior work.
Video description
Features of fastening foam boards indoors can be seen in the video
Depending on the nature of the work, the glue is applied in three ways:
- continuous layer - over the entire area, evenly, with a distance of 3 cm from the edge;
- stripes - “L”-shaped four stripes in the corners and two long ones in the center;
- point – dense drops are made at a distance of 30 cm from each other.
Having figured out how to glue penoplex to concrete or other surfaces, you need to remember several important nuances of the work. It is better to do all work with an assistant. Be sure to read the glue consumption level and the manufacturer's instructions. Spray adhesives are easiest to work with, but they are not suitable for all surfaces.
Be sure to treat all surfaces with a primer to improve the quality of bonding and protect against fungus. The adhesive solution is applied evenly, in a layer of several millimeters. Immediately after touching, it is imperative to level each slab. Do not forget about safety measures and manufacturers' recommendations.
Each adhesive option is applied differently, this is important to consider during installation of slabs Source obustroeno.com
What is penoplex
Penoplex is a heat-insulating material, which is one of the brands of extruded polystyrene foam.
This material can be used for external or internal insulation of concrete walls, as well as for insulation of hollow walls. The great popularity of penoplex is explained by the fact that it has high thermal insulation characteristics and an affordable price.
This insulation is superior in its characteristics to many roll and slab materials; its main advantages are as follows:
- low thermal conductivity;
- it practically does not absorb moisture, that is, it has low hydrophobicity, which cannot be said about mineral insulation;
- vapor permeability, this indicator is important when performing insulation from the inside of the house; if it is low, then condensation will begin to form between the wall and the material, which will cause the humidity in the room to increase, and fungus and mold will form on the walls;
- good strength indicators are ensured due to the uniform distribution of cells, this characteristic is especially important when carrying out external work;
- affordable price.
The disadvantages of this material include the small temperature range of its use, therefore it cannot be used for insulation of industrial premises, baths or saunas. Another disadvantage of penoplex is that rodents love it, so care must be taken to destroy them.
Building codes
Certification documents are issued for facade insulation systems in Russia - Technical Certificate of Rosstroy of the Russian Federation.
But so far, not a single technical certificate for a facade insulation system with a thin plaster layer specifies penoplex, technoplex or its analogues as the main wall insulation. That is why you will not find the facade of an administrative building insulated with extrusion, because not a single state inspection organization will approve the insulation project for such a facade (and the insulation of the facades of administrative buildings must be approved), unless it is a “squatter construction”.
Preparing the wall surface for laying penoplex
Whatever method of fastening the insulation is chosen, the preparation of the wall surface for this process is the same everywhere, and in the total mass of screed production, it takes the greatest amount of time and labor effort.
First, you need to decide on the top point of the finished floor and thus approximately understand how thick the total layer of the future screed should be. Determining the floor height level is influenced by:
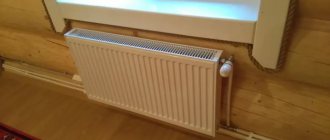
- hanging height of heating radiators;
- common floor level with other rooms;
- height of door sills.
After solving these issues, it is necessary to clean the walls of growths and other protruding objects. If there are depressions, they must be repaired until they are smooth. A damper tape will be glued along the perimeter of the future screed, so the walls (to the height of the floor) should be covered with a layer of deep penetration primer intended for the materials from which the partitions are made.
It is desirable that the soil mixture solution has an antibacterial filling.
After the primer has dried, the joints of the walls and floor must be treated with a liquid waterproofing layer. After completing these works, you can begin gluing the tape. If there is no special damper tape, then you can use any roll insulation, the thickness of which does not exceed 20 mm, and even roofing felt - but this is for the most extreme cases.
Stick the damper tape so that the lower edge touches the floor, and the upper edge is at least 20 mm above the level of the intended floor.
Then, on the damper, along all the walls, duplicate the extreme level of the floor screed.
Step-by-step instruction
Preparing the base
Before starting work, it is necessary to clean the concrete wall from dirt, fungus, and grease stains; if possible, rinse it well with water.
After this, the condition of the surface is assessed, all cracks and cracks are sealed, and unevenness is eliminated.
Waterproofing
At the next stage, waterproofing work is carried out using a deep penetration primer or bitumen mastic.
You can begin installing penoplex only after they have completely dried.
Penoplex fastening
To control the installation of sheets vertically, vertical sags are attached; it is also necessary to control their installation in the horizontal direction.
The sheets are attached to the wall with glue, and they are laid tightly next to each other and offset from the previous row. All seams must be properly sealed with putty, tape or foam.
After the glue has set, the sheets must be additionally fixed using
fasteners for penoplex (
dowel-fungi), they provide reliable fastening and a tight fit of the insulation, a hole is drilled in the wall through the insulation, and a dowel - fungus - is inserted into it.
Laying the sheets starts from the bottom up; in order to lay them evenly, it is necessary to secure the mounting angle. To improve the adhesion of polystyrene foam and the concrete surface, it is recommended to clean it; this can be done with a metal brush or coarse sandpaper.
After the glue has hardened, it is necessary to protect the insulation from external negative influences, so a fiberglass mesh is attached to it using the same solution on which the sheets were installed, usually ceresite, but maybe another.
It is necessary to give time for the solution used to fix the mesh to dry and a protective layer of plaster can be applied. If the work is carried out inside the building, then you can immediately attach the drywall, and only then plaster it.
To perform the above work you will need the following tools and materials:
- penoplex;
- glue;
- antiseptic;
- deep penetration primer;
- plaster;
- measuring instruments;
- knife;
- spatulas;
- fasteners for penoplex (dowel-fungi);
- reinforcing mesh.
Fixation methods
The ease of installation of penoplex is one of its main advantages, thanks to which not only a specialist, but also any other person, if desired and knows the correct sequence of work and its observance during the process, can insulate the walls outside the building properly. The material can be fastened in several ways, both outside and inside the structure.
With the construction of the sheathing
In this case, you need to build a special frame or, when fastening, you can resort to using thermal insulation between wood planks or aluminum profiles. Giving preference to this method, it is best to select sheets with dimensions that will correspond to the distance between the components of the sheathing, which will significantly reduce the amount of waste.
In such a situation, during installation it is necessary to lay insulation in the gaps, after which it is necessary to seal the perimeter using polyurethane foam, which also simultaneously secures the material to the wall. Finishing is installed on top of the penoplex, which can be a block house, siding and wall panels.
Using special adhesives
Without erecting the sheathing, the insulation can be fixed using a special cement-based adhesive, which is also used when using mineral wool and polystyrene foam. These formulations are sold dry in paper bags. Subsequently, the mixture must be diluted with water. In addition, you can use bitumen-polymer mastic, liquid nails or polyurethane foam, the application of which must be carried out using a special gun, which is often used when spraying the latter. It is necessary to cover the sheet with the selected composition in a zigzag, around the perimeter or crosswise. The surface of the panels is corrugated on the inside, providing better adhesion. If the sheets are smooth, then they need to be rolled with a needle roller.
If the material does not fit tightly, the seams should be taped with foil tape, which prevents heat leakage. Before the adhesive mixture hardens, you have about an hour to make adjustments or remove the layer. To prevent the penoplex from sliding down, its lower part must be attached to a starting bar, which must be installed in a strictly horizontal position.
Using special fasteners
To fix the slabs, special dowels with wide plate-shaped caps are used. To fasten one sheet, you need to use 5-6 such fasteners. With the help of dowels it is possible to make a reliable and long-lasting fixation. Their large-width caps themselves do not lead to a violation of the integrity of the insulation. The use of these elements is optimal if it is necessary to finish large areas or in cases where there are uneven surfaces on the walls.
Drilling holes in the rough base must be done using a hammer drill. The length of the dowels must be at least 10 cm, depending on the thickness of the insulation used, which in many cases includes self-tapping screws of the required size.
It is better to additionally cover the joints of the plates with adhesive and cover the seams with foil tape. Due to this method of fixation, a loose fit occurs, which causes the formation of fungus under the penoplex itself. To avoid this negative consequence, the rough base should first be treated with an antifungal mixture.
Choosing glue
The choice of adhesive for insulation is influenced by the fact that penoplex has low resistance to substances such as:
- benzene, toluene, xylene;
- formaldehyde, formaldehyde;
- acetone, methyl ethyl ket;
- diethyl alcohol, solvent based
- gasoline, kerosene, diesel fuel;
- coal tar, epoxy resin hardeners;
- oil paints.
Mineral (cement) based adhesives are recommended:
- Stopter K-20 company “ATLAS”;
- UNISTeplokley Group of Companies "Unis";
- PlitonitSTF, a cement-based sticky substance, allows you to perform this work as efficiently as possible.
Cement compositions are inexpensive and effective when penoplex is used for outdoor work. This composition is excellent for attaching slab insulation to concrete, sandstone and aerated concrete.Cement-based adhesive compositions are sold in the form of a bulk mixture packaged in paper packaging. After combining with water, the cement composition can be used for its intended purpose.
2. For craftsmen who are interested in learning how to attach penoplex to a brick wall, we can advise using polyurethane-based glue, for example: Ceresit CT 84.
Polyurethane compounds are ideal for attaching insulation to brick surfaces and wooden walls made from flat types of lumber.
Polyurethane adhesive can also be used to insulate concrete walls, but the cost of installation in this case will increase significantly compared to work done using cement-based material. The sticky substance is sold ready-made in aerosol cans with a capacity of 750 ml.
3. Polymer glue (“Avangard-Ku”) is used to quickly fix penoplex to various surfaces.
Can be used for attaching slabs to the ceiling surface.
4. Waterproofing adhesive (“Bitumast-Bitumast”) is made on the basis of bitumen, therefore this composition is used for installing slab insulation in rooms with high air humidity.
The best manufacturers of penoplex glue
For reliable fastening of the material to the insulated surface, it is recommended to purchase the following products - the glue of this company is produced on the basis of a cement mixture and is produced in dry form in bags weighing 25 kg.
The substance is ideal for outdoor use. Due to the greater resistance of the composition to low temperatures, high humidity and other unfavorable natural factors.
2. “Teploskrep De Luxe” - a composition based on high-quality cement, most often used for insulating building facades.
The glue can also be used for interior work, because all components of this building material are safe for human health.
3. “Kleiberit 569” - polyurethane adhesive made in Germany.
Excellent for interior and exterior work, as well as installation of foam boards in rooms with high humidity.
4. “Penoplex FastFix 750 ml” - based on polyurethane, which can be used to fix slab insulation to concrete, wood, brick or natural stone.
In addition to installing penoplex on the walls of a building, this composition can be successfully used to insulate the foundation, roof and basements. The product is moisture resistant and can be used in damp areas.
5. “Technonikol 500 Professional” is a universal polyurethane adhesive foam that is suitable for fastening various types of materials, including penoplex.
Insulation can be installed using TechnoNIKOL 500 Professional both indoors and outdoors. The product has excellent adhesion to concrete, metal and wood, and can be used to glue insulation together.
Bonding insulation boards together
How to glue penoplex together? It is prohibited to use a substance that contains the following substances:
General characteristics
Since the production technology of all types of Penoplex is similar, they have many of the same characteristics:
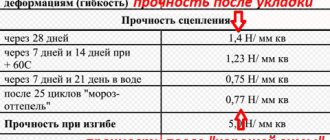
- water absorption is very low;
- when immersed in water for a day, no more than 0.4% of the volume;
- when immersed for 28 days, 0.5% of the volume.
- fire resistance - G4. The material is flammable and should not be used in areas where there is a risk of heating above 80°C
- thermal conductivity coefficient 0.032 W/(m×°K). This is 9 times lower than that of Rockwool mineral wool mats (0.30 (m×°K)), which is considered one of the best in its group.
- specific heat capacity 1.45 kJ/(kg.°C). Low heat capacity - it takes little time to heat up after, for example, freezing.
- sound insulation of the partition (GKL-PENOPLEX 50 mm-GKL) - 41 dB. EPPU is not a very good sound insulator. Most of this bundle is made up of gypsum boards.
- when used in a floor structure, structural noise insulation is 23 dB. When laying XPS of sufficient thickness on the floor, sounds (including percussion) will become less clear.
- vapor permeability - 0.005 mg/(m.h.Pa). Vapor permeability is very low. That is, moisture almost does not pass through it in a vapor state.
- temperature range -70°C to +70°C.
As you can see, according to temperature indicators, any type of Penoplex can be used in any part of the country - from the south to the north. Moreover, if you leave it to “winter” unprotected, nothing will happen to the material. This is not the merit of Penoplex, but a general property of extruded polystyrene foam.
Preparing the wall for insulation
We clean the walls from dust, dirt, efflorescence, old oil and lime paint, repair the existing plaster (if any) or plaster it. Treat old plaster with strengthening primer.
Checking the evenness of the surface: on an area of 3 m kV, the deviation should not exceed 2 cm; if exceeded, plastering is required. Fungus and mold are removed using appropriate compounds. We dismantle aprons, flashings and external drainage systems.
Before insulation, the walls are primed again to increase the adhesion of the layers to each other. The drying time for the base after priming with water-soluble compounds is 4–6 hours.
Before gluing the insulation, attach the brackets of attachments (air conditioning, lighting, etc.) to the walls, lengthen the crutches and holders of aprons and drainage systems.
Houses are different, and they need to be insulated in different ways.
There is no universal means for insulation.
Methods of fastening insulation materials also directly depend on the room itself: on the surface of the walls, operating conditions. It is best to consult with specialists before starting work.
Wood and stone materials are the most common materials used in the construction of houses.
Particular attention should be paid to surface preparation. If the walls are made of brick or concrete, you will need:
- get rid of all efflorescence on the brickwork;
- clean the walls from traces of paint, dirt stains, all kinds of deposits and fuels and lubricants;
- remove dust from the surface of the walls;
- if fungus is detected, the surface must be treated with an antiseptic;
- repair chips and cracks in the surface;
- treat the surface with a primer, then smooth out any unevenness with putty;
- reapply primer for the walls.
The tree is prepared much faster and easier. You will need to apply a specialized impregnation to the wooden surface to protect it from rot and insects. After this, install the timber base, also treated with impregnation. This nuance will allow for additional ventilation of the facades of a residential building.
General installation rules
To obtain a high-quality layer of thermal insulation, you must follow the rules for attaching penoplex. First of all, you need to fix the starting bar. This can be either a wooden beam or a metal part with perforation
The second one can be bought at any hardware store, but please note that the strip must be commensurate with the width of the insulation
The bar is set after small calculations. Initially, you will need to carve out a horizontal line along the entire perimeter of a private house. It is better to secure the “starter” using dowels. This feature will at least protect against the penoplex sliding down. Before installing penoplex, the wall is processed and cleaned.
The inner side of the insulation must be rolled with a needle roller. This guarantees a rough surface, which means better adhesion to the walls.
The slabs are installed from bottom to top, and each horizontal row will need to be offset by half a slab. This type of fastening of classic penoplex to the wall ensures maximum heat retention.
Press the plates against each other as tightly as possible. To make the insulation connection as strong as possible, the second row can be attached directly to the grooves of the first. To save adhesive composition, after installation you can seal the joints with installation foam. So, how to glue penoplex to a wooden or brick wall?
Briefly about the main thing
There is no clear answer to the question of how to glue penoplex to each other or to different surfaces. Manufacturers offer specialized adhesive compositions that have the following characteristics:
- high quality adhesives are not afraid of moisture, temperature changes, sun rays and wind;
- the compositions are developed for different surfaces and are applied using several techniques;
- glue is applied in several ways depending on its type and characteristics;
- There are several types of adhesive solutions;
- some compositions are strictly prohibited for use for interior work;
Which one to choose depends on the task at hand and the operating conditions of the insulated object.
How to properly attach penoplex to a concrete wall
The modern construction industry is annually enriched with a mass of new materials with unique properties that make it possible to build stronger, more durable and cheaper structures.
One such material is penoplex or EPS, used mainly as thermal insulation.
At the same time, to ensure high reliability and long service life, it is important to correctly perform the installation procedure
In the photo - gluing EPS to a concrete foundation
Installation methods and materials used
Installation of polystyrene foam slabs can be done without the use of any additional fasteners, however, the concrete surface should be carefully prepared:
Advice: if the protrusions interfere with your preparation, use cutting reinforced concrete with diamond wheels to dismantle them.
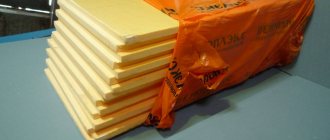
In the photo - foam boards
Before gluing penoplex to concrete, you need to prepare the following materials:
- cement mortar;
- primers;
- adhesives for polystyrene foam;
- drills for mixing glue components;
- containers in which the components will be mixed;
- serrated spatulas.
If installation is planned to be carried out using additional fasteners, the set of materials will be even smaller:
- insulation;
- glue;
- seam sealant;
- dowels
- The method of attaching insulation using liquid nails is widely popular. Its advantage is that this substance does not need to be applied to the entire surface of the sheet - it is enough to apply it pointwise.
Application of liquid nails
Advice: keep in mind that its use is not possible with every type of insulation, moreover, it contains toxic substances.
To carry out work using this method, in addition to polystyrene foam and liquid nails, you will also need protective gloves.
- Another option that answers the question of how to glue penoplex to concrete is the use of special foam. However, it is advisable to resort to this method only when working with floors, since the foam has rather low adhesive properties. There are several types of foam: for fastening foam block structures;
- for foam sheets;
- for polystyrene foam boards.
Below we will talk in detail about how to glue penoplex to concrete and the characteristics of these materials.
Properties of various types of glue and options for its use
Its key advantages include:
- pronounced waterproofing properties;
- resistance to low temperatures.
It does not require any special preliminary preparation, however, if work is carried out at an air temperature below + 5 ˚С, it is recommended to warm the glue to + 18-20 ˚С.
The best manufacturers
How to glue penoplex to concrete and other surfaces, which manufacturer of the composition to choose? Many experts prefer well-established and well-known companies. Among such manufacturers are Teploskrep, Kleiberit, Penoplex, Technonikol and some other companies. The products of these manufacturers were developed specifically for foam boards. It can be liquid, foamed or dry. The market offers products from domestic and foreign manufacturers in different price categories.
Fastening drywall
GVL (gypsum fiber sheet) is a well-known drywall that is widely used in repairs.
GVL is attached to penoplex in two ways. It can be glued and also strengthened by installing a frame made of metal or wood. The wooden frame should be a few centimeters behind the wall. The space between the slats is filled with foam sheets. The gaps between the plates of thermal insulation material are closed with installation foam. Then drywall is attached to the wooden blocks.
Insulation using penoplex and plasterboard is a fairly common method used on loggias, balconies, basements and garages. Penoplex sheets covered with plasterboard should not be used in high rooms (wall heights greater than 2.5 m). The frame should be stitched tightly.
Fastening drywall to penoplex using dowels is the best solution. For low wall heights, fastening with glue is a completely acceptable option.