Where to buy PENOPLEX® thermal insulation?
is a manufacturer of thermal insulation; distributors sell products. On the website, in the “Where to buy” section, you can select: country, city, partner status and select the supplier closest to you. You can also order PENOPLEX® products in the online store
How to attach PENOPLEX® thermal insulation?
The method of fastening PENOPLEX® directly depends on the structure in which thermal insulation is used.
— When insulating structures located below ground level, such as foundations, plinths, blind areas, preliminary adhesive fixation and weighting using backfilling of soil is sufficient.
— When thermally insulating a floor under a screed, PENOPLEX®, in principle, does not require any fastening.
— As for the walls, preliminary adhesive is required, as well as mandatory mechanical fixation, for which disc-shaped dowels are usually used. In some special cases, mechanical fixation of PENOPLEX® slabs using lathing is possible.
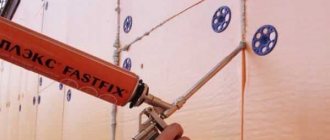
Basic recommendations for installing PENOPLEX® boards with PENOPLEX® FASTFIX® glue
1. It is advisable to make notches on the surface of the slab or process it so that it becomes rough.
2. Special PENOPLEX® FASTFIX® adhesive is intended for installation of PENOPLEX® thermal insulation. Recommended method of application: in even stripes around the perimeter at a distance of 1-3 cm from the edge and along the slab in the middle.
3. To attach PENOPLEX to the facade, in addition to adhesive, it is necessary to also use mechanical fixation.
Basic recommendations for installing PENOPLEX® slabs on dowels
1. To ensure good thermal insulation ability, disc dowels made of synthetic materials with low thermal conductivity are used in the facade system, which prevent the formation of cold bridges.
2. As a spacer element for disc dowels, driven or screw-in spacers made of galvanized or stainless steel with a thermally insulating plastic head are used, which minimizes heat loss.
3. The hole for the dowel is drilled 10-15 mm deeper than the driven part of the dowel itself.
4. If the base consists of heavy concrete, then the minimum length of the spacer part of the dowel entering the wall should be 45 mm. In solid brick masonry, the depth of fixing the dowel is 60-70 mm, in hollow brick masonry - 80-90 mm. In bases made of foam or gas silicate blocks, it is required to fasten to a depth of at least 100 or 120 mm (with a dowel diameter of 8 and 10 mm, respectively).
5. If PENOPLEX® thermal insulation is attached to a waterproofing layer, then it is necessary to use weld-on fasteners instead of dowels.
How does PENOPLEX BASE® differ from PENOPLEX COMFORT®?
The main differences between PENOPLEX® materials are in different areas of application. Thermal insulation PENOPLEX OSNOVA® is used at industrial and civil construction sites.
PENOPLEX COMFORT® slabs are intended for private housing construction. They are used for insulation of country houses or city apartments in structures where special load requirements are not imposed. PENOPLEX COMFORT® boards can be purchased at hardware stores.
Does PENOPLEX® burn? What is its flammability class?
The PENOPLEX® material has a flammability group of G4. At the same time, many design solutions developed using PENOPLEX® thermal insulation have a fire hazard class of K0.
Design solutions indicating the fire hazard class can be found at RAPEX STO:
Technical solutions for roofing systems are separately described at the link on the website:
How to insulate a loggia/balcony?
The basic principles and recommendations for insulating balconies and loggias can be found by following the link:
What thickness of PENOPLEX® should I choose?
The thickness of the insulation is a very important parameter that must be calculated based on the region in which the work is being carried out, the purpose of the object (residential building or outbuilding), as well as the existing materials of the enclosing structure.
All these values can be taken into account in our calculator on the website and find out the required minimum value of thermal insulation thickness for your case. In addition, the calculator allows you to make an aggregate calculation of the total number of slabs.
how to attach wooden blocks to the wall on top of the insulation?
decided to insulate the loggia in the videos on YouTube, everything is simple and clear except for one thing: how and how to attach the sheathing slats on top of the insulation? isopink 5 cm, foil membrane 1 cm, the block itself is 2 cm, in total the pie turned out to be 8 cm. The walls are concrete, just like that, you can’t take them with a self-tapping screw without a dowel. Is there any trick? Or is there a special fastener?
strengthen the sheathing first, and insert insulation between the slats, which is allegedly incorrect and leads to condensation and other horrors
Ellie, lathing in two layers in the transverse direction and, accordingly, two layers of insulation. Lay thin insulation between the bars, or more precisely the slats
Ellie There is a special fastener, colloquially “mushroom for eps”. Google it.
ussur, no good
sanya1965, how to attach penoplex or isopink, I understand, I don’t understand how to arrange the sheathing on top? technically - how? this dowel must be at least 8 cm
I looked at the album of technical solutions for penoplex)))) there insulation boards are inserted between wooden slats, so who’s lying? and for what?
Ellie wrote: ussur, no good
For clarity, this technology minimizes cold bridges
Ellie wrote: sanya1965, how to attach penoplex or isopink, I understand, I don’t understand how to arrange the sheathing on top? technically - how? this dowel must be at least 8 cm
I attached it like this. The dowel is ordinary without sides. On the drill I made a mark to what depth to drill - the length of the dowel + the thickness of the insulation. I drilled a hole through the insulation and pushed in the dowel. Then I fastened the rail with long wood screws.
ussur wrote: for clarity, this technology minimizes cold bridges
not bad, but the thickness is large?
and material consumption. twice as much
Ellie, lath 2.5 and penoplex 2.5 - two layers. and even better 4 and 4 - the total thickness will not increase in any way
Ellie wrote: we decided to insulate the loggia in the videos on YouTube, everything is simple and clear
I advise you to visit the website loggia.ru. When using EPS as insulation, things often go something like this. Screw self-tapping screws/screws into a strip of the required length (you can pre-drill holes and even make a countersink for the head of the screw/tapping screw) so that the tip sticks out of the strip by about 1 cm. Apply the strip to the desired location. In the places pricked with self-tapping screws, drill holes for nylon dowels without a “fungus” limiter. Screw the screws/screws deeper into the rail. Lightly screw the dowel onto the self-tapping screw. Place the strip in place by pushing the dowels into the holes and tapping them with a hammer through the self-tapping screws. After you feel that the dowel has entered the wall, you can tighten the self-tapping screws/screws, while simultaneously placing spacers to level the slats. For better insulation, foam can be blown into the drilled holes before (and after) mounting the slats. Not long dowels are used, but regular ones, i.e. There are no dowels in the insulation; it is completely recessed into the solid base of the wall.
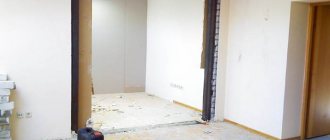
We install insulation under drywall without the help of hired specialists
A common insulation option. No metal or wood frame needed. It is used for insulating small, flat surfaces: interior walls of apartments in panel houses, basements, garages; balconies and loggias.
Many people experience freezing of walls in apartments, private houses, balconies or basements. The problem is solved by installing insulation on the outside of the building, but sometimes it is more expedient, cheaper and more reliable to do it from the inside.
After choosing the material, the question arises of how to insulate a wall with plasterboard with your own hands. In home practice, two methods are used: Insulating walls with plasterboard from the inside is a technology that goes against the basics of heating engineering. However, there are situations when it is impossible to carry out work outside.
In this case, this technology is indispensable.
- Dew point offset. There is a high probability that the walls will get wet.
- Reducing the volume of the room. The metal frame, insulation and drywall “eat up the usable space.
- Reducing the threshold of maximum loads on the wall. Insulation has a lower density than brick or concrete. When installing heavy shelves on a wall sheathed with insulation, anchoring may be required.
How to attach
Where to buy PENOPLEX® thermal insulation?
is a manufacturer of thermal insulation; distributors sell products. On the website, in the “Where to buy” section, you can select: country, city, partner status and select the supplier closest to you. You can also order PENOPLEX® products in the online store
How to attach PENOPLEX® thermal insulation?
The method of fastening PENOPLEX® directly depends on the structure in which thermal insulation is used.
– When insulating structures located below ground level, such as foundations, plinths, blind areas, preliminary adhesive fixation and weighting using backfilling of soil is sufficient.
– When thermally insulating a floor under a screed, PENOPLEX® in principle does not require any fastening.
– As for the walls, preliminary adhesive is required, as well as mandatory mechanical fixation, for which disc-shaped dowels are usually used. In some special cases, mechanical fixation of PENOPLEX® slabs using lathing is possible.
Basic recommendations for installing PENOPLEX® boards with PENOPLEX® FASTFIX® glue
1. It is advisable to make notches on the surface of the slab or process it so that it becomes rough.
2. Special PENOPLEX® FASTFIX® adhesive is intended for installation of PENOPLEX® thermal insulation. Recommended method of application: in even stripes around the perimeter at a distance of 1-3 cm from the edge and along the slab in the middle.
3. To attach PENOPLEX to the facade, in addition to adhesive, it is necessary to also use mechanical fixation.
Basic recommendations for installing PENOPLEX® slabs on dowels
1. To ensure good thermal insulation ability, disc dowels made of synthetic materials with low thermal conductivity are used in the facade system, which prevent the formation of cold bridges.
2. As a spacer element for disc dowels, driven or screw-in spacers made of galvanized or stainless steel with a thermally insulating plastic head are used, which minimizes heat loss.
3. The hole for the dowel is drilled 10-15 mm deeper than the driven part of the dowel itself.
4. If the base consists of heavy concrete, then the minimum length of the spacer part of the dowel entering the wall should be 45 mm. In solid brick masonry, the depth of fixing the dowel is 60-70 mm, in hollow brick masonry - 80-90 mm. In bases made of foam or gas silicate blocks, it is required to fasten to a depth of at least 100 or 120 mm (with a dowel diameter of 8 and 10 mm, respectively).
5. If PENOPLEX® thermal insulation is attached to a waterproofing layer, then it is necessary to use weld-on fasteners instead of dowels.
How does PENOPLEX BASE® differ from PENOPLEX COMFORT®?
The main differences between PENOPLEX® materials are in different areas of application. Thermal insulation PENOPLEX OSNOVA® is used at industrial and civil construction sites.
PENOPLEX COMFORT® slabs are intended for private housing construction. They are used for insulation of country houses or city apartments in structures where special load requirements are not imposed. PENOPLEX COMFORT® boards can be purchased at hardware stores.
Surface preparation
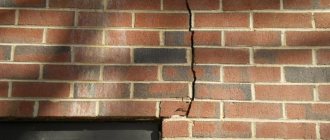
Surface treatment before installing insulation is a very important step. If this is not done, then mold may appear under the penoplex, which over time will destroy the insulation and building material. There are some differences between preparing a brick or similar surface and a wooden one. A brick or concrete wall must first be cleaned of dirt and dust. It is also worth removing any old paint or other paint coatings that may be present. All cracks will need to be sealed with mortar or polyurethane foam. If any salt remains after the rain, it must also be eliminated. The mold is removed and the place where it has grown is treated with an antiseptic.
When insulating a wooden surface, preparation is also required. All areas are carefully inspected. Where mold appears, scrape it off with a stiff brush. After this, the area is treated with an antiseptic. Additionally, it is necessary to coat the tree with special compounds against putrefactive processes.
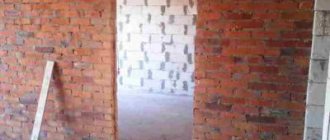
Insulation of the loggia. How to attach the sheathing?
God bless everyone! I want to insulate the loggia using the known method: penoplex (XPS), penofol (folgoizolon), gypsum plasterboard + putty. I read everything, got acquainted with all the stages - in general, everything is clear. But there is one question. What dowels (or just self-tapping screws for penoplex) should be used to attach the sheathing (bar or profile) on top of penoplex and penofol? What should it be attached to with dowels: to the brick wall of the parapet and walls, or to the penoplex itself (already fixed)? I plan to supply 50 mm penoplex, 5-10 mm penofol. I will attach the penoplex to the wall with special dowels. I would appreciate an answer to a specific question. Please do not discuss the insulation method so that there is no unnecessary flames.
x-men wrote: What should it be attached to with dowels: to the brick wall of the parapet and walls,
x-men wrote: or to the penoplex itself (already attached)?
No. The danger will quickly disappear due to the low tear-out strength of EPS. Moreover, gypsum plasterboard, the severity is decent.
x-men wrote: What dowels (or just self-tapping screws for penoplex) should be used to attach the sheathing (bar or profile) on top of penoplex and penofol?
Regular polyethylene dowels 6mm. Self-tapping screws are 3.5-4.8 mm, and the length is to match the dowels + insulation + batten. Metal anchors should not be used, they will freeze.
Having suffered on the first loggia, on the second I did this - I attached Penolex to the walls with 1-2 mushrooms, and then I made holes right through the wall, hammered in long dowels (the dowel starts from the surface of the extrusion), foamed the resulting holes and hooked the sheathing into the dowels using self-tapping screws . It turns out strong and not very hemorrhoids.
DiVO wrote: Regular 6mm polyethylene dowels.
I strongly recommend using 10 mm in diameter. 6-8 mm are soft and their long length (10 cm in length) is not convenient to hammer in. crumple and break.
It’s clear – it’s definitely possible to mount it on the wall. It goes something like this:
- Drill the insulation and the wall for a dowel with a diameter of 8 (10) and a length of 60 mm.
- Drive a dowel into the masonry through the insulation and fasten the block or profile with a 3.5 (4.8) self-tapping screw with a length of at least 110 mm. Or do you still need polypropylene dowels 120 cm long?
It will be inconvenient to push short ones through the insulation and control the depth of their penetration into the masonry. Better
unique_name wrote: hammered in long dowels (the dowel starts from the surface of the extrusion)
In addition, for even an 8 mm dowel, a 3.5 mm self-tapping screw is too thin. When you buy dowels, look on the packaging for what diameter of screws they are designed for.
What is your extrusion thickness? I used 10X10 dowels for 5 cm
All! I have no more questions! Thank you all very much!
I'll add an ancient topic. If the masonry is made of hollow bricks, is it better to use dowel nails instead of self-tapping screws?
DiVO wrote: When you buy dowels, look on the packaging for what diameter of screws they are designed for.
Why separately? There are dowel-nails as a set.
Chip and Dale wrote: There are dowel-nails as a set.
and they meant it - as far as I know, they are not sold outside the kit. Like 8×120, etc. I just don’t understand - the plastic dowel itself, with such a length, has only 2.5-3 centimeters of unevenness at the tip, is this enough for the sheathing it holds through a 5-7 centimeter EPP thermal insulation layer to then hold drywall. And the same question with the ceiling (monolith) - will these dowel nails also work, or are self-tapping screws better here, as on “warm walls”, where there is only penofol?
Altruist2 wrote: Like 8mmx12cm
Altruist2 wrote: is this enough so that the sheathing it holds through a layer of PPE thermal insulation of 5-7 centimeters can then hold the drywall.
if the expanding part is not in the void, more than.
Altruist2 wrote: And the same question with the ceiling (monolith) - will these dowel nails also work?
It’s possible, but not necessary. Wedge anchor, dowel + self-tapping screw.
It is necessary that at least 3 cm of the dowel-nail go into the concrete (brick). There they just burst apart.
Buying separate dowels and screws separately is nonsense!
Ruslan1111 wrote: a bit cool. 6x40-50 is enough.
Well, how cool - Nenoplex 5 cm. let's say, on glue (also something + the roundness of the parapet surfaces) + 1 cm. penofol + keep the 20x40 sheathing + as they say 3 cm. so that it fits into the brick - now at least 11cm.
Clarification - the dowel-nail indicated above in the link is inserted entirely into the sheathing, something like this:
What to do with the head if you plan to put drywall on top? It turns out that the sheathing needs to be prepared for drowning? And the second point - they say that it is better to drill without impact, so that there is a hole in the hollow brick close to the dowel - what are your opinions?
Chip and Dale wrote: Buying dowels separately and screws separately is nonsense!
I came to the forum for a while, and here my topic is being discussed)). I did mine a long time ago. Dowel-nails are sold and, of course, included in our kit. But I didn't use them. I bought polypropylene dowels and separately 6 mm 110-120 self-tapping screws for them. I did not attach the sheathing to the parapet with self-tapping screws, so that there were no extra cold bridges. With a parapet height of a meter, I limited myself to attaching the sheathing to the floor and window sill. The window sill was attached to the corners under the window frame and foamed. I fastened 20*40 sheathing along the side walls of the loggia and the ceiling with self-tapping screws. I think it’s better not to use dowel nails for the ceiling, especially when using penofol - I’m afraid that it will be pulled out. I ditched the drywall and made everything clapboard. This is how it happened:
Fastening Features
When making connections of various elements with an aerated concrete surface, it is necessary to take into account the fact that metal parts may be destroyed when interacting with concrete. Therefore, you should use only recommended fasteners that will create a reliable, long-term fixation.
Nylon dowels: in the center - for solid materials, at the edges - for hollow and porous materials.
Aerated concrete is a fairly soft material that is easy to process. But when choosing how to attach elements to it, you need to pay attention to what kind of load the material will create on the surface of the blocks. Lightweight finishing materials can be fastened with small nails and self-tapping screws, as they can withstand the load very well. It is recommended to take wedge-shaped nails, which provide resistance to tearing out. They are very easy to attach.
The screws must be threaded along the entire length. Heavy objects in the form of wall cabinets are best secured using plastic or metal dowels with appropriate load-bearing capacity.
All fasteners for fixing to the foam block must have anti-corrosion protection, be made of stainless steel or processed using hot zinc.
Dowels for hollow materials: 1 - nylon tilting dowel, 2 - spring drop-down dowel, 3 - metal roll-over dowel, 4 - spring drop-down dowel with hook, 4 - metal flip-over dowel with hook.
It is best to take dowels from nylon, as they are more durable.
The following are used as fastening elements for aerated concrete:
- universal nylon dowels, suitable for any surface;
- fastening with special dowels for profiles and plasterboard sheets;
- fastening elements for hollow materials;
- dowels for use with insulating materials (have a special plastic umbrella at the end);
- chemical capsules and fasteners;
- injection systems for fixation;
- dowel clamps.
How to install siding on penoplex
Penoplex is used quite often in installation. Penoplex (extruded polystyrene foam) is a modern synthetic material suitable for thermal insulation work. Penoplex is used quite often as insulation and insulating material for siding, which is explained by its advantages and improved quality characteristics.
Benefits of penoplex
Today, a large number of different materials are produced for thermal insulation, and penoplex is one of the most effective and modern. It belongs to the category of environmentally friendly materials and is completely not susceptible to processes such as rotting and decomposition under the negative influence of precipitation.
The material is very durable and has excellent sound and heat insulation characteristics. In addition, penoplex is quite affordable, and is also quite easy and quick to install independently, without the involvement of specialists.
The advantages of penoplex also include low vapor permeability, good fire safety indicators, bending and compressive strength, lack of deformation and destruction under prolonged exposure to high and low temperatures.
Penoplex is a modern synthetic material suitable for thermal insulation work.
Compared to foam plastic, this insulation has a higher level of rigidity and increased strength. Penoplex is produced as slabs of various sizes and thicknesses, which facilitates the work of insulating facades. The average service life of such material is more than fifty years. The base under the penoplex must be dry, level and clean.
Fastening methods
Surfaces made of different materials can be insulated in different ways. The process of covering a building includes several steps:
- surface preparation;
- insulation fastening;
- finishing.
In order to perform high-quality thermal insulation, penoplex should be installed correctly. First, the starting bar is screwed strictly horizontally. The bottom row of insulation is laid on it.
It is recommended to install a factory additional element (perforated, metal). You need to buy a strip that matches the width of the insulation and the required number of corners.
Before installing penoplex, a horizontal level is drawn along the walls of the building. The starting bar is screwed to the line. It holds the insulation and maintains the “geometry” of the installation.
Insulation of walls outside and inside – which is better?
There are several options for insulating the walls of a private house:
If you look from a practical point of view, external insulation of walls is much more convenient and effective. In addition, it becomes possible to additionally decorate the facade of the house with an unusual material, such as mosaic or decorative plaster.
Due to penoplex, the walls of the house are additionally leveled, saving finishing material . The only obstacle to external wall insulation may be a ban on facade repairs in apartment buildings.
Comparison of insulation methods
But don’t despair, because there is always the opportunity to insulate the walls from the inside. Interior wall decoration with penoplex can be done in any season.
When using penoplex, installation work is simplified and you can do it yourself. Whatever finishing method you choose, it is necessary to carry out cleaning work on the walls where the foam sheets will be located. Then the surface is treated with special moisture control agents and antifungal solutions.
Chips, cracks and other damage formed in the walls are repaired. Penoplex is installed only on a well-dried surface using a special adhesive composition, and then additionally attached to the wall with mushroom dowels.
Advice from professionals
To insulate a house using penoplexes, there is absolutely no need to select special weather conditions. It is enough that it does not rain or snow. The duration of drying of the adhesive solution will depend on the ambient temperature, but the quality of adhesion does not affect.
Before you buy material and do everything yourself, still consult with professionals. Maybe for a particular building it is better to choose a different insulation or finishing material. In addition, a master who knows his business will help you accurately calculate the amount of materials and the thickness of the insulation.
Technology of covering a house with siding with insulation: main stages
Preparing the base. Dismantling of all external lamps, decorative elements, gutters, window and door frames (if any). Freeing the outer surface of the walls of a wooden house from all sources of rot and treating it with fire-bioprotective compounds. Cleaning the walls of a brick or block house from dirt, deposits, subsequent treatment with a deep penetration primer (2 times).
Marking the walls. It is carried out taking into account the fact that sheathing bars must be installed at the bottom and top of the wall, at the corners of the building and around window and door openings. The sheathing pitch is determined by the requirements for the selected siding model and the width of the insulation. Most often this value is 60 centimeters. If insulation is made with mineral or glass wool, then - 59 centimeters.
Treat all elements of the wooden sheathing with fire-retardant agents 2 times (the second time after the first layer has completely dried).
Installation of corner vertical bars and horizontal (top and bottom) bars. Installation of the entire sheathing with a fastening step of 50 centimeters.
Laying insulation (mineral wool - starting from the bottom, moving up, and foam plastic - from top to bottom). Lay with offset joints. Window and door openings are lined with narrow trims last. Fastening the insulation (mineral wool - with dowels with a wide head, polystyrene foam boards to wood - with dowels, to concrete - with glue).
Installing a windproof membrane on top of the insulation. The film sheets are fastened to the sheathing bars from the bottom up using a construction stapler. The staples are located at a distance of 20 centimeters from each other. Adjacent canvases overlap each other by 10 centimeters. The joints should be taped with reinforced tape. For polyurethane foam insulation and extruded polystyrene, this step can be skipped.
Installation of the siding sheathing is carried out on top of the windproof membrane. The thickness of the bars is 40-30 millimeters, the step of attaching the insulation sheathing to the bars is no more than 40 centimeters. This creates a ventilation gap. Direct installation of siding according to the manufacturer’s instructions. This work must be done immediately after laying the insulation.
Technology of insulating walls with penoplex from the outside - what elements does the thermal insulation pie consist of?
To insulate external walls, the following order of placement of thermal insulation layers is used:
- Glue, it is applied to a wall that is previously dry and cleaned of various types of dirt and irregularities;
- Insulation , which is additionally attached to the wall with special mushroom dowels. This allows the sheet to lie tightly on the wall surface without creating heat bridges;
- After fixing the penoplex, it must be protected from exposure to ultraviolet radiation. Therefore, a layer of reinforced putty using a soft mesh is applied. If you plan to finish with siding, then it is recommended to install a waterproofing membrane;
- Decorative finishing creates an additional layer of protection and gives an aesthetic appearance to the building.
Which penoplex to choose for wall insulation? Which one is better for external insulation?
Penoplex is divided into several main types. They differ from each other in composition and characteristics. The better the properties of the material, the higher its price. The name of each brand speaks for itself, so it is easier for the builder to choose the option that suits him:
- Roofing – used for thermal insulation of all types of roofs;
- Wall - used for thermal insulation of walls and the inside of the house;
- Foundation – used for insulating the foundation of a building or basement. The main advantage of this type is its water resistance, specially designed for such work;
- Penoplex comfort - is more popular when decorating balconies and apartment rooms. It has fairly good characteristics, but a high price for the material;
- Penoplex 45 is the highest sheet density. It is used in the construction of highways and airport runways. This type of penoplex is resistant to even the most critical temperatures.