The specific design of window units is largely determined by the functional affiliation of the premises in the house.
Windows not only transmit light and heat from the sun, but can also transmit cold and dampness. In this regard, if such blocks are installed incorrectly, the house will become cool and damp, which is why mold appears on the walls and furniture.
It is correct when the size and placement of window units is determined by the project, taking into account the construction volume of the house and the climatic characteristics of the area.
However, homeowners sometimes have a situation when they need to install a new window or reconstruct an old one in a built house, in which case they will need to know all the rules and regulations, as well as the procedure for obtaining permission and the technology for performing the work.
We will talk about the construction of window openings in a brick wall below.
Cutting new windows and doors
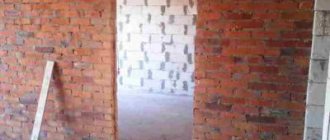
Let's say you need to cut a couple of new openings .
Let one of them be a new window in the side wall of the back room, which previously served as a utility room or storage room and which until now had no windows. Let the second opening be the new door to the large cupboard that you have under the stairs. The opening for the window must be cut in a good-quality brick wall 22 cm thick. The overall size of the new opening in the brickwork on the outside of the house should be noted, checking the drawings to find out the exact position of the opening and its dimensions. To cut one brick from a masonry, you need to knock it out from the center of the marked area using a chisel and hammer. Fortunately, the brickwork is laid with lime mortar, so this won't be too difficult. But in reality this means that you can easily break the fastening of other bricks, so you need to work carefully (Fig. 1).
Fig.1
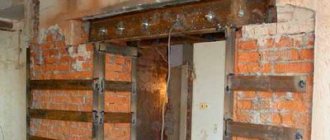
You need to use a construction support on top to support the top of the doorway being cut from the inside so that it does not collapse. The first task of the builders will be to cut a row of bricks horizontally and thus form the top line of the future opening. This 'gap' extends from one side of the new window to the other and is approximately 22cm deep. Then another row of bricks is cut directly below it, but only the width of the window. The reason why only two rows of bricks are cut first is that before cutting the rest of the opening, the builders want to first lay new window lintels and support the brickwork over the gap (Fig. 2)
Fig.2
On the outside, the brickwork above the gap tends to immediately settle, falling into the freshly cut opening, before the builders have time to lay down the cement mortar, so the builders use a hidden piece of mortar. A galvanized steel square is laid, covering the entire width of the opening being cut. The width of this steel piece should be twice as narrow as the thickness of the brickwork, and it should be laid so that its lower edge can support a row of bricks on the outside of the house. Then this part of the wall is well strengthened with the help of alternating spoons (spacers) and butts (butt bricks, lintel beams), which are laid on this steel part flush with the existing masonry dressing (Fig. 3).
Fig.3
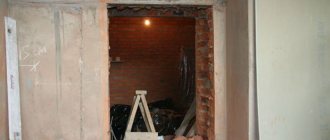
On the inside, cement-lime mortar is laid out along the top of the opening. The width of this layer of lime mortar is also equal to half the thickness of the wall. The cut gap is tightly supported with the help of a construction support, while its ends are strengthened with the help of roofing tiles (usually made of natural slate), so that now it completely takes on the weight of the section of the wall located above the cut opening. After this, the construction support can be removed (Fig. 4).
Fig.4
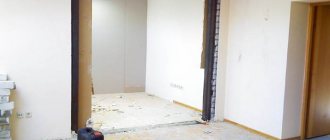
Once the top of the new opening is fully reinforced and fully supported, the rest of the opening can be cut out. On the outside of the wall, builders use a sanding wheel to cut a straight line into the brickwork around the perimeter of the new opening. The central section of bricks is then knocked out of place. The line cut by the disk means that the edge of this opening is a straight cut, and the window frame will fit into it without problems, and all that remains to be done is to apply sealant so as not to leave any gaps. Now you can imagine the difficulty of knocking out the central section from an opening in a thick brick wall. Just a little time, and you can already see that as soon as the window frame falls into the opening, nothing else needs to be done (Fig. 5).
Fig.5
As for making an opening for the door , which needs to be cut for the china cabinet located under the stairs. Previously, you accessed this area from a back room at the back of the house. However, after the reconstruction carried out in the house, access here is now required, on the contrary, from the front part of the house. The position of the new opening is marked on the wall and a cavity is cut out from above. Use a mortar block and bracket to support the center of the opening while a gap is cut along the top line, and then mortar is applied to that top edge. This wall is only half a brick thick and is mortared on both sides so that the cement mortar can simply be laid on top. Lime mortar is applied and firmly supported, while on each side of the wall the edges of the opening with overlap are reinforced with natural slate roofing tiles. Then the construction support is removed and, as was done with the window, the rest of the opening is knocked out of its place in the same way.
Added: 01/20/2015 11:37:41
Change of size
Before changing the size of the window on the wall, which is provided for by the project, you need to determine what type it is: load-bearing or dividing .
This can be understood by studying the house design or technical plan, which the operating organization or BTI must provide to the apartment owner. After this, it will be possible to prepare a set of documents to obtain permission to re-equip window openings.
When and why is it necessary?
In the era of standard construction 60-90. of the last century, most windows were installed in sizes that do not correspond to modern design and building fashion in residential construction.
Changes in state urban planning standards and the emergence of innovative building materials today allow owners of old residential buildings to carry out reconstruction with an increase in window units.
The place of old square or other standard window blocks is now occupied by rhombic, arched and other modern double-glazed windows.
Along with the need to install large windows, there is a situation when, on the contrary, they need to be installed smaller ones, for example, when old administrative premises are being reconstructed or additional wall area is needed to install furniture.
Reconstruction
Work on the reconstruction of window units is associated with the safety of the process, since it is often carried out at height.
In addition, dangerous work includes dismantling a lintel and part of a brick wall; if done incorrectly, the wall above the window may collapse.
In addition to the usual mason's kit, for dismantling work you will need a sledgehammer, a jackhammer and a hammer drill. Currently, many construction companies, instead of a jackhammer, have begun to use diamond cutting, which works with any type of material, providing the most accurate opening configuration with virtually no noise and dust.
In addition, to carry out the work, the master will need a brick to form a new size, laying mortar and a set of protective clothing:
- headphones,
- gloves,
- overalls,
- mask,
- glasses and shoes.
How to expand and contract?
Expanding the size of window blocks in a brick house is carried out using impact-dynamic cutting or a tool with cutting diamond discs.
The main stages of increasing the window opening:
- Clear the room of objects as much as possible.
- Protecting furniture from possible dust.
- Removing old double glazing.
- Mark the boundaries of the new portal.
- Punch a through hole.
- Install a new jumper, larger in size.
- Bricks are knocked out 30 cm wider than the window frame.
Stages of reducing a window opening:
- Take out the old window block and clean the internal surfaces of the opening, including with a vacuum cleaner. Cleaned surfaces are primed to ensure good adhesion to the solution.
- In order to reduce the cross-section of the window opening in height, holes for the corners are drilled with a hammer drill and secured with dowels or bolts.
- Lay the 1st brick row.
- To reduce the width of the opening, masonry is made, which is aligned along the outside.
- The gaps between the corner and the wall need to be foamed, then carefully cut off the frozen foam with a knife.
- The laying solution is thick; during the process, the blocks are tapped with a rubber hammer to ensure better adhesion to each other.
- Allow the masonry to harden overnight.
- Reinforced mesh is installed.
- Plastering is being done.
- The dried plaster is carefully coated with a primer.
- A new double-glazed window is inserted and the small window is ready.
How to cut a door in a brick wall or cut a window
Very often, the reconstruction of buildings or major renovations includes the creation of new entrances.
To do this yourself, you need to know some of the nuances of the work in order to avoid the wall collapsing. Creating an opening for a door in a load-bearing wall requires special attention. And any redevelopment must be agreed upon with the relevant authorities. You can learn more about how to properly and safely remodel a house. It is not difficult to make an opening in a load-bearing wall, but it is a very labor-intensive job.
Windows are the calling card of a residential building
Finishing window openings
There are no residential buildings without windows. They are needed for natural lighting and ventilation. From the outside, windows act as an element of architecture and their shape can tell about the style and time of its creation. In the interior, there are many ways to turn them into decor.
A skewed or loosely fitting frame causes drafts and dampness in the house. The resulting condensation creates conditions for the appearance of black spots of mold and mildew. It is necessary that the frame fits tightly to the wall, without distortions or cracks. Dew formed from temperature changes was removed without getting on the walls. The rain did not get inside the window.
Preparation
Before dismantling the wall, be sure to check the presence of wiring or a chimney in the planned opening. If the result is positive, the wiring must be carried out in another place, the distance to the chimney pipe must be at least 30 cm.
It is very important to be sure which wall the work will be carried out on:
- bearing wall;
- non-load-bearing partition;
- shear wall.
A non-load-bearing wall usually acts as a dividing partition, and the status of a brick wall may also be indicated in the house design. If there is no way to know exactly which wall it is, then it must be perceived as load-bearing.
To cut a new entrance in the wall you will need the following tools:
Experts also use a construction cutter. To cut through the wall, we recommend using a hammer drill or jackhammer, as well as an angle grinder with a diamond wheel.
Adviсe
- Try to first knock out the wall in the place where the lintel will be, then install the crossbar there and fill it with cement mortar. It will take about a week, or even two, for the cement mortar to finally fix the crossbar. After this, it will be possible to remove the remaining brickwork and finish the opening.
- In the case of spoon masonry, the halves of bricks that interfere with installing the door in the doorway must be knocked out with a hammer drill. You need to operate this tool so that the hammer head is perpendicular to the wall. It is forbidden to enter the doorway and knock out the halves with a hammer drill, directing the shock wave from top to bottom. This can lead to bad consequences (the crossbar may not withstand such a load).
- Bricks, the halves of which stick out in the doorway, can be knocked out completely. But before installing the door, do not forget to pour half bricks into the wall to align the sides.
- These same halves can be cut using a grinder on both sides.
Working with a curtain wall
To avoid the collapse of part of the wall, it must be disassembled starting from the top. If you plan to have an opening up to the ceiling, you need to make markings.
Using a construction hammer and chisel, knock out the top row. While deleting the following
rows, it must be remembered that some bricks can be held loosely without adhesion to the masonry itself. The chisel is held perpendicular to the wall.
Before cutting a hole in the wall, it must be covered with a lintel, which transfers the entire load to the walls evenly on both sides of the doorway. You need to draw an opening taking into account a gap of 3 cm, which should be present between the door frame and the wall (the window is calculated in the same way). Experts advise determining the line of the opening with the line of the brickwork.
Above the opening marking, you need to draw the required size of the lintel, extending 25 cm beyond the vertical line in each direction. You need to start punching the wall from the hole drilled for the lintel.
Since the mark for the bottom of the lintel usually does not coincide with the multiple number of brick rows, it is necessary to cut out the extra row and mount the lintel at the correct and required mark. If the thickness of the required wall is very large, you need to lay two lintels and fill them with mortar.
The gap between the lintel and the brick wall is filled with construction cement mortar. If there is a suspicion that the wall has collapsed, it must be completely dismantled, right up to the ceiling, and laid out again over the lintel.
Final components of the work
The reinforcement must be tied with wire threads. In this case, the master can do without welding. And for strength, use supports, as they will have to support the concrete.
It is important to provide in the space left by the facing masonry and lintel. Mineral wool 1 dm thick will do a good job. And on top of it there will be a layer of concrete.
The window faced the street, so protection from the cold should be maximum during redevelopment.
It is worth laying a brick on a layer of wool, and then spraying foam to prevent drafts from penetrating through the cracks in the door. Today it is possible to use 3 cm thick polystyrene foam for insulation.
To prepare concrete for fastening the door, you need sand, cement, and crushed stone. Pour concrete with reinforcement. To do this, lower it into the solution. After which they usually wait a day, then remove the formwork.
Remember that there may be paint or excess plaster left on the window. Next comes the time to insert the door frame instead of the window. Screw it in with screws or dowels. But before that, measure with a level so that everything is even. Fill all excess space with installation foam.
So, if you are tired of the existing apartment or house plan, then take on changing it. With certain skills in handling some construction equipment, this can be easily done without outside help.
No matter how trite it sounds, people really have different tastes. Some people like to combine everything under one high ceiling, and highlight the boundaries of functionality only with a color scheme, or limit it to furniture; others prefer walls between rooms with obligatory doors and almost locks on each.
Why all this, if the conversation is about cutting a window in the wall, you ask. But the point is that the problems of having to cut a new window or door most often arise when new owners remodel the premises.
Bearing wall
When working with a load-bearing or reinforced wall, you need to carefully consider the load transmitted to the base. To strengthen the ceiling, shoes are used, which are placed on one side and the other of the wall - a non-circular wooden post is installed on the beam.
To cut a wide entrance, the supporting beam is fixed along the wall on both sides before installing the supporting structure, otherwise it will be inconvenient to move the lintels.
In order to make a high-quality opening, it is necessary to maintain all the strength of the walls. For everything to work out, you need to know all the designs of existing coatings and floors. Concrete floors are most suitable for such work; plasterboard and plank floors should not be used.
All load-bearing sections of the floor are temporarily supported. Installation of jumpers is carried out in two steps:
If the masonry is strong, then there is no need to strengthen the old one. It only contains sockets for support blocks, which will be installed later.
Important!
- Work with caution. Improperly made openings can deform door frames, windows, walls and (the worst thing) weaken the structure of the house!
- First you need to decide what exactly the opening is for? Different openings require a special solution. The opening for the new door should be 10 mm larger than the door frame and 6 mm higher. This is the ideal calculation. For the window you need to make similar indents. Craftsmen advise making the opening line so that it coincides with the line of the cement masonry.
- Small openings of about 0.9 m do not need temporary supports. Bricks in such openings can independently support their own weight.
The creation of large-scale openings should be treated with special care. Let's take a closer look at the technology of creating an opening in a brick wall.
Step 1
Using a large triangle, place the points (holes and lintels) of the proposed opening. If you are making a hole in an external wall, then marking is best done from the outside. If there is plaster or whitewash on the wall, you must remove it from the corners of the future opening. This will help you to correctly position the brickwork at the chosen height. Don't forget that the top edge of the lintels should be in the bottom row of brickwork. Use a pen to mark the location of the jumpers on the wall. And then add 15 cm from each edge of the lintel to strengthen it with supports.
Step 2
Now you need to install the supports. Adjustable supports are best installed 60-90 cm from the wall. Place a wooden beam on these supports, this way the load will be distributed. The supports need to be increased until they begin to rest against the ceiling.
Step 3
Let's move on to the outer wall. Mark on it the position of the beams at 20 cm (or it is better to focus on the height of two bricks, which are located above the supporting beam and 15 cm to the center from its ends). We drill the wall so as to transfer the marks for the studs to the other side. Use a chisel or a massive hammer. Work must be done on both sides of the wall. It is better to make the holes rectangular so that the pins can fit in smoothly. The studs are made from beams measuring 7.5 by 10 cm, and they are made long enough to cover each side of the wall by 60 cm. They must rest against the brickwork, so before installing the studs, the vaults are cleared of cement.
Step 4
Insert pins into the through holes. They should look the same on both sides. The studs (protrusions) should be supported with adjustable supports on both sides. The supports must be strictly vertical! The height of the supports should be adjusted - the studs should be pressed tightly against the arch of the holes. Then secure the entire support structure with nails (nails are driven into the support boards and studs).
Step 5
To get rid of plaster, you will need a chisel and a hammer. Use these tools to expose the brickwork within the opening. Don't forget to add 2.5 cm on each side on one side and the other. From the place where the jumper will be, carefully begin to disassemble the brick. This work is very dusty, so we recommend wearing special safety glasses. You will definitely need an assistant to work on both sides of the wall. Clean the cavity from cement from below and from above: this way you will achieve a flat surface. Now insert the beam.
Installation of a vaulted lintel
The masonry above the updated door system is reinforced with a vaulted lintel. It can be used with a door width of 1 m, and the height between the doorway and the ceiling allows the load to be transferred to the masonry.
The structure for this type of lintel must be punched together with the base system. Laying is carried out starting from the heel of the arch. The lowest front part of the vault, which is necessary for constructing such a lintel, is chipped off and filled with mortar until the shape of the desired vaulted ceiling is formed. All work is made from fired ceramic stone:
- you need to lay out the ceiling starting from both heels and towards the middle of the arch. The height of the brickwork is up to 45 cm. This lintel is moved apart using horizontally laid brick blocks;
- using bricks laid on cement mortar, the lintel is secured to the wall. The doorway can be punched after the masonry mortar has set;
- above the top line of the doorway it is necessary to make a groove for the channel. The strip must have a length that exceeds the width of the opening by 1 m. It is necessary to ensure that the metal profile can fit tightly into the prepared fine;
- Before installation, holes must be drilled in the entire channel for tightening and durable fastening. The distance between these holes should be a maximum of 30 cm. The channel is secured in the groove with mortar. You need to make holes through the wall that correspond to the holes in the groove. A channel is also installed on the opposite side. Both of these profiles need to be tightened with studs. After this operation, you can cut the opening.
Creating an opening in a wall is a very responsible process, but if you take on the work with all responsibility and care, you can cut a good, high-quality door or window.
Let's start cutting out the opening
First of all, measure your door or window. Next, you will need to make markings on the wall. At the same time, do not forget to add about 5 cm to the width of the door frame. Do not forget that after installation the door frame will be blown with foam, which provides fixation and additional insulation. First knock out the cement plaster, remove the skirting boards, if any. They can be on a cement base - there is no need to touch them, they will get confused with the last row of brickwork.
Whether you knock out an opening in a partition or it is a semi-load-bearing or load-bearing wall, it is made in the shape of the letter “T”. This is done so that you can insert a crossbar at the top, which will hold the upper brickwork. If you have a partition, then the crossbar can be an ordinary wooden board, the thickness of which is 50 mm or more. If you have a load-bearing or semi-load-bearing wall, then, as you understand, you will need much more durable material. So, a reinforced concrete beam can play its role.
How to fill an opening in a wall with bricks, instructions
When, having decided to redevelop a room, we are faced with the question of how to fill an opening in a wall with bricks, we look for an answer on the Internet.
Having our own living space, we try to resort to the services of paid craftsmen as rarely as possible. Everything that can be done with one’s own hands significantly saves the budget and, most often, does not differ at all in quality from professional work.
Suppose you have a need to brick a window opening, but you have no idea where to start.
Don't panic, because this doesn't require any special skills. If you collect the necessary materials and tools, then step by step, you can achieve what you want.
New window in old masonry
If there is a need to make windows in an old solid wall, then you must follow the rules.
- First you need to cut a hole in the wall for the ceiling. Install the block or lintel structure or insert the reinforcement and pour the concrete in place.
- Materials must have a quality certificate.
- After complete hardening, you can punch a hole in the wall under the windows, with the expectation of designing the lower support and side quarters.
- At the bottom, masonry is made in a transverse row, the sides of the opening are laid out.
- The frame is installed after complete crystallization of the solution and initial shrinkage.
How to brick a window with your own hands
Before you start working, you need to purchase or get from stock a simple set of tools:
- drill mixer;
- trowel;
- rod for laying an even seam;
- perforator;
- construction plumb line;
- hammer;
- scraper;
- scrap;
- polystyrene foam for insulation if you are using the hollow brick laying method.
In addition to the tools, you will need the following materials:
- sand;
- cement;
- bricks;
- container for stirring the solution. However, if you purchase a ready-made mixture, you will not need a container.
Preparatory work
In order to brick a window, you need to do some preparatory work, namely:
- Dismantle the old window, removing all the old parts.
- Clear the opening from the layer of previous mortar to make it easier to apply the new one.
- Remove the window sill.
- Produce surface primer.
- We create grooves. On the side walls of the opening, in the old seams, make small recesses for better adhesion of the old and new masonry.
- Destroy traces of dust and dispose of debris.
- Decide on the laying method.
How to brick a window?
Perhaps in the world of construction, there are many different ways of “how to seal a window opening in a brick wall,” but we will highlight only two of them - the simplest ones. So that everyone who turns to this article can brick the opening themselves.
Deaf way
The first method is called “deaf”.
It allows you to completely fill the previous window opening with bricks, laying them out in one continuous row.
Hollow way
You can also brick a window by resorting to the second method, which is called “hollow”.
This method allows for two layings of brick material - on the outside and inside of the room. And their connecting link is polystyrene foam, which performs sound and heat insulation functions.
This method is used in cases where the walls are very “thick” and a flat wall surface is required both inside and outside.
When performing the above method, it is necessary to understand that it is necessary to lay out brick rows parallel to each other.
options for laying bricks using the hollow method
Basic tips on how to brick an opening in a wall
To fill an opening in a wall with brick, it is best to use red brick, because it is considered one of the most durable materials. In addition, you don’t have to “worry” about the thickness of the masonry, because the red brick will perfectly match the dimensions of the walls of the brick room.
But, if you have another type of brick, then naturally, use it. Even if it is a used brick.
Be sure to use a level with a plumb line - it will help avoid distortion, deformation and do the work competently and correctly.
Before starting work, measure the area that will need to be bricked. Knowing the size of the opening and the size of one brick, you can easily make correct calculations and purchase the required amount of building material.
If this issue is not resolved in advance, then you risk buying too much, or discovering in the middle of the work that you haven’t bought enough bricks.
Don’t forget to consider what masonry method you will use. Since the amount of brick also depends on this.
Stages of work completion
After dismantling and other preparatory work has been completed, the most crucial moment comes - the construction process.
The very first step is to prepare the solution, which consists of cement and sand.
The sand must first be thoroughly sifted and then mixed with cement in a ratio of 1:3. You can also purchase a ready-made mixture, especially if you are afraid that the solution will be prepared incorrectly.
After the solution has been prepared or purchased, you can begin installation. The mortar, two to three bricks long, must be laid out in the place of the masonry and on the side of the opening.
You can put the mortar on the side of the brick. At the end of the article you will find a video showing how to properly lay brick in masonry.
Using a trowel, you can pull up the side parts of the bricks and press them to the next ones, having previously coated it with mortar. In order for the seams to be the same everywhere, you need to carefully knock on the bricks. Do not forget that the size of the masonry should not exceed the width of the building wall.
By performing these simple manipulations, you can not only brick the window, but also simply reduce its size. In addition, anyone can do this work quickly and efficiently.
You can see the process of working with brick more clearly in the video below. This is a lesson for beginners showing how to properly lay brick in masonry.
And knowing all the intricacies of masonry, you will quickly understand how to fill an opening in a wall with brick.
And yet to the wheelhouse
The process itself, while seemingly simple, is not so simple. The thing is that many buildings have stood for many years, the components from which the building was built are in working position and have stood. And any rough intervention can lead not only to the removal of material, but also to the collapse of the wall.
Therefore, we will do everything extremely carefully. To begin with, let's collect materials, tools and accessories.
We will need:
- All the levels that exist: simple construction and water (water is mandatory for old-built houses, where, due to shrinkage processes, the level of the masonry can be far from horizontal), ideally a laser level, a plumb line;
- The entire mason's set (trowel, spatula, mixing attachment for preparing working mixtures);
- Measuring instruments (tape measure, large square, folding meter);
- Hammer, chisels of several types, scraping if available;
- A hammer drill and an angle grinder with a stone circle (the angle grinder should be a professional one with a large circle), drills for through-hole drilling of a wall with Pobedit or diamond tips;
- Supports for fastening studs, as well as the studs themselves and boards at least 50 mm thick for single-level alignment of supports.
For your information! The so affectionately named stilettos are very far from how we imagine them in everyday life. In fact, these are quite powerful beams, the main purpose of which is to create a supporting structure for the wall in order to prevent destruction at the time of work to remove material under the window.
The preparation process is important
There are several important steps in this process:
- Stage one: complete cleaning of the area, plaster and other types of coating;
- The second stage is marking the space for the window, window covering, as well as places for the studs to pass out.
- Using a hammer and chisel, it is necessary to completely clean the brick wall from layers of plaster in the area of the proposed window, allowing for at least an additional 15 cm around the perimeter of the proposed window, for convenience. You will also need to clear the space for the floor beam and the already mentioned studs.
Note! At the stage of cleaning the wall, you will need to think about the size of the window in a brick house. Usually, the sizes of windows in brick houses in the private sector are ordered according to a template, all are the same, so in this case there will be no problems. The sizes of windows in a brick Khrushchev house can be of several types, but given that the walls there are load-bearing, obtaining permission to install another window is quite difficult and almost impossible. Therefore, the question: the size of windows in a brick Khrushchev building can only be considered in the context of replacing wooden windows with plastic ones.
- At the second stage of preparatory work, the places directly under the window, under the floor beam and under the studs are marked. Here, the electrical wiring is inspected and moved if necessary, and the possibility and necessity of connecting heating radiators is assessed. Also, special attention is paid to the condition, this may indicate that in this place the structure has maximum shrinkage and it may be impractical to create a void for a window here.
Advice! When applying markings to the wall, keep in mind that if you are opening a sandwich system, you need to consider further insulation, or at least sealing the joint. That is, it is necessary to calculate the increase in the window opening precisely by the width of the insulation. And when planning a place for a lintel, you must remember that the structure itself must extend at least 15 -20 cm from the opening into the material.
Wall work
Now let's move on to working directly with the wall.
In this case, we carry out the following step by step:
- Through holes are drilled in a brick wall in such a way that the lower part of the brickwork will be on a wooden beam (sometimes metal corners are placed between the beam and the brick). The brick is carefully knocked out using a hammer and chisel, so as to obtain square recesses. The work takes place both outside the building and from the inside, where there is a possibility, the brick is cut with a grinder, where this possibility is absent, the body of the brick is drilled out, and then knocked out with a hammer and chisel of the required size;
- Next, the so-called studs are installed. In this case, beams are laid in the tunnels and supported by racks, which in turn are fixed on wooden platforms. When setting up this structure, it is taken into account that the distance from the racks to the wall must be at least 60 cm, all of them are leveled and only then fixed to the racks and the racks to the platforms with nails in special holes for fixation;
- Now you need to prepare a place for the floor beam. In this case, two techniques are applicable:
- Simpler, using two channels;
- More complex, using a combined jumper. The first technique involves disassembling the brick, taking into account previous recommendations for channels that are installed on the ribs. In this case, the brick is removed both from the outside and from the inside. Holes, at least 5, are drilled in the channel itself to secure the two fragments to each other with bolts; the same holes are drilled in the remaining layer of brick. And then the channel is tightened with bolts. This connection will be quite strong and durable. Fixing the channels in the wall can be done with cement mortar, which can be used to build up the wall at the joints, or fill it with foam concrete, which will be somewhat simpler. All further work can be carried out after the channels are completely ready and the filling has hardened;
- The second technique is more complex, as it involves the installation of a reinforced concrete structure and a metal corner. A reinforced concrete structure can be either ready-made or made by hand using reinforcement and cement. The only point to pay attention to is that the design must be prepared in advance. The recess is prepared differently than for a channel, the cement beam is located closer to the inner layer, and the metal corner is brought out, while the corner itself goes towards the beam, forming a niche. Since the ceiling consists of different elements, a hydraulic barrier is placed on top of them, then insulation or insulation can be placed on the corner. But this combined beam can be packed in the same way as a channel - with cement mortar. Readiness for further work is made after the solution has hardened and the partition has settled.
- Next, we prepare a recess to fit the size of the window in a brick house. It's not so difficult anymore. The brick is beaten with a hammer drill and a lance; in places where it is necessary to remove part of the brick, a grinder is used to first cut it, and then chisels and a hammer, or a hammer drill and lance, are used. The entire opening is cleared from top to bottom. After removing the last layer of brick, the opening is leveled, cleared of debris and prepared for the next step.
On a note! If you decide to install a window, be prepared for the fact that there will be a lot of garbage.
- Next comes the ordering and installation of plastic windows in a brick house. It is clear that the price of the issue may not be entirely budgetary, but there is someone to supply, there is someone to ask. And if the solution to the question of why plastic windows in a brick house sweat is not due to the fault of the installers, immediately think about the issue of additional ventilation in the room. You may not have to rush to seal the holes from the studs, which are pulled out and sealed before installing the window.
And it happens the other way around
Sometimes people are much more interested in how to brick a window, especially if this window is in a corner apartment, and even on the north side.
In this case, the instructions are quite simple:
- Select material for bookmarking
. This can be red building brick or double sand-lime brick M 150, as well as a sufficient amount of cement and sand; - Remove the frame and window sill
. The windows can be easily removed from their hinges, but the frame and window sill will have to be broken out with a crowbar or a nail puller, the layer of plaster that is located in the window opening will also be removed, and the wall will be cleaned to its original condition; - Next, pieces of reinforcement 20 cm in size can be driven into the brick wall for better adhesion of the materials to each other. You can, of course, leave the grooves, but this activity requires knocking out bricks, putting new ones in their place, and putting mortar in there, which is not very convenient. If you decide to carry out external insulation of the wall, then the reinforcement in the wall will completely suit you;
Window and door openings are an integral part of any structure, and their correct installation greatly affects the reliability of the entire building. This is especially true when retrofitting a wall with a window or door.
Since in most cases this must be done in a load-bearing wall, its partial dismantling leads to the threat of collapse of the entire house.
Brick window opening
- 1 Design of lintels during construction
- 2 Purlins from channel (angle)
- 3 Standard jumper
- 4 Homemade run
- 5 The procedure for designing lintels in finished walls
- 6 Videos
The design of window openings in buildings under construction is, as is known, a mandatory component of construction work carried out during the construction of residential buildings. When preparing an opening for windows, it is assumed that the operational reliability of the entire structure under construction largely depends on the quality of its execution.
Particularly noteworthy are cases where the masonry of a brick window opening is carried out as part of the completion of load-bearing walls, the partial dismantling of which can only be carried out after a whole range of preparatory measures.
What do you need to know before starting work?
It is worth separately considering the issue of reinstalling the radiator if it was located directly under the bottom of the window opening. Outside you will need to install a window sill and fix the balustrade in the simplest way. If the event is more complex, you will have to cut through a wall. The following tools will be useful to you during the process:
- Steel corners at 90 degree angles to make a jumper.
- Channels.
- Beams made of reinforced concrete, when a new wall hole is indispensable.
- Hammer.
- Ruler.
- Bulgarian.
- Sledgehammer for dismantling.
- Mineral wool.
- Polyurethane foam.
If the wall is load-bearing, then the overlapping structures should be secured by using long vertical posts along the entire height of the housing. Most often, the door is made precisely in the load-bearing partition, which holds heavy slabs. For such a task, it is necessary to use beams for the sake of stability of the future structure. If you live in an apartment building, then you should take care of the consent of the residents and a special permit.
First, after you have removed the window, you need to remove the bottom partition. If it is made of brick, it can be broken with a sledgehammer. If there are metal elements in it, they are eliminated with a grinder. Drywall products are disassembled in parts, first the screws are taken out.
Design of lintels during construction
Jumpers diagram
The basis for forming an opening in a brick wall is a well-known structural element (the so-called purlin), resting its ends on the walls lined with brick. For the manufacture of purlins, such well-known building elements as:
- industrial concrete lintels (it is also possible to make them yourself);
- metal channels of one size or another;
- standard metal corners.
Using a channel
The choice of material for purlins (lintels) is made taking into account the expected loads on this part of the structure, as well as for reasons of ease of working with them. When choosing their linear dimensions, one should proceed from the requirements of SNiP, which specify the amount of masonry overlap within the range of 150–200 mm on each side.
Therefore, with a window opening 1200 mm wide, you will need to prepare or buy a purlin about 1500-1600 mm long.
Purlins from channel (angle)
Diagram of a window opening in brick load-bearing walls
One of the most common types of lintels, by means of which window openings are formed in brickwork, are metal channels (corners) of the appropriate size. When laying half-brick partitions, the most convenient channel size is 120 (140) mm, and for full brick walls, the standard size 240 (270) mm is best suited.
When using a metal corner as a jumper, you may encounter certain restrictions on its size related to the load capacity of the structure. Even fairly strong corners with standard dimensions of 100 × 100 mm (100 × 75 mm) can be used only in cases where the masonry above the window opening and the masonry of the walls are securely connected to each other, and the length of the purlin itself is short.
During installation, the corner must be positioned so that its two edges have contact with the material placed on top of it. The length of the corner lintel cannot be more than 1.5 meters, since a larger span can bend and the masonry above it can sag.
Recommendations from professionals
- Block jumper. Installed if the house is built of similar material. The width of the opening should not exceed 1.2 meters, the height - no more than two-thirds of the previous indicators. For reinforcement, reinforced rods with a cross-section of 6-8 mm are placed under the blocks. The ends of the reinforcement are bent upward and inserted behind the laid blocks. The blocks are laid using an adhesive solution. The outlet on the sides must be at least 115 mm.
- Ready-made concrete lintels. The material of the building does not matter. The choice of beams depends on the height of the row of walls of the building. If it is brickwork, make sure that the height of several rows together with row seams is equal to the height of one lintel laid on the mortar. In the case of blocks, select beams according to the height of the block. Installation is carried out with an overlap of at least 25-30 cm on each side. If 2-3 parallel beams are laid, the space between them is filled with adhesive, cement mortar.
It is unacceptable to drill holes, make grooves, or carry out other mechanical operations with concrete lintels. This will lead to a decrease in the strength of the structure.
- Corner jumpers. To strengthen brick and concrete window openings, metal corners are used. The elements are laid on the inside and outside, flush with the outside of the wall. Installation of the first row of purlins is carried out with trimming of block elements. The margins along the edges are at least 10-13 cm. For an opening no more than 1 meter 20 centimeters wide, the size of the corner flange is 50 mm. Before installing metal elements, treat with anti-corrosion agents.
What if it's cladding?
Installing a lintel under facing bricks requires the right approach. To preserve the appearance of the external cladding, do not use concrete, corner, or monolithic structures. Use a metal plate. It is not visible from the outside, and the bottom is masked by ebb.
Installation is carried out in the following order:
- Depending on the depth of the opening, two, three or more plates are prepared. Thickness is at least 3-4 mm, but do not overdo it. Thick plates are more difficult to decorate.
Standard jumper
Window lintels
When designing a window opening using concrete lintels, you will be faced with two possible options:
- use of finished industrial products;
- production of homemade jumpers, poured at the place of their installation.
If you use a finished product, you should simply use it to close the opening in the wall, and then continue laying the wall along its entire length.
Masonry over the opening
Unfortunately, it is not always possible to purchase a ready-made concrete lintel of the required size, which most often happens with non-standard window dimensions.
On the other hand, the weight of the finished lintel often exceeds 100 kg; so without using special lifting equipment you are unlikely to be able to raise it to the required height. Most performers who do not want to deal with the rental of lifting mechanisms prefer jumpers made in-house to the finished product.
How to install a lintel by changing the opening parameters?
Often there are very small openings that subsequently widen. Sometimes, in order to make a door, you need to break down a wall made of several layers, for example, a brick one. Then strengthening occurs in two stages: in the load-bearing structure and in the brick. It is quite difficult to do this work on your own; jumpers are usually purchased. But you can make them yourself.
There are several types of jumpers:
- Beams supporting horizontal supports.
- Structures on which only masonry is located on top.
- Interior lightweight beams.
- Structures equipped with shelves for upper loads, called crossbars.
Depending on which room the future door will be in, it’s worth starting work. For cladding, fastening will take place using a corner. It must be greater than 80 mm. Fix it so that the former window opening is not visible in the masonry. When dismantling, make sure that the parameters remain as even and symmetrical as they were. The corner should fit snugly according to the dimensions of a 1/4 window of 50 mm.
There are 2 types of products, depending on their installation in the former window opening. Sometimes the jumper is poured immediately above it, and sometimes it is attached later. The first type is more convenient in construction, and it is also cheaper. This will allow you to fit the price of the door into your budget at no cost, because the structure will not need to be moved with a special crane.
Now make the formwork using 20 mm thick pieces of wood. Connect them using self-tapping screws. A row of boards is placed horizontally on the base according to the dimensions of the cut window, and the fittings are placed on top. The second stage is knocking down a vertical row of boards with self-tapping screws.
Homemade run
When designing window openings of non-standard sizes, the production of the lintel (its filling) is carried out at the location. To do this you will need to perform the following typical operations:
- first of all, the masonry surfaces on the sides of the window opening are cleaned of mortar residues;
- after this they are thoroughly primed;
- At the final stage of work, formwork is installed at the location of the lintel.
Formwork
Taking into account the significant weight of the workpiece being poured, fairly strong boards with a thickness of at least 20 mm are usually used as the “bottom” of the formwork. To securely fix them in the opening, it is recommended to use special supports supported on the lower edge of the window opening.
Reinforcement
Upon completion of these procedures, a thin layer of pre-prepared concrete mixture is poured into the formwork, after which a reinforcing mesh is immediately placed there. After this, you can continue pouring the lintel, followed by placing another reinforcing fill in the concrete. When dismantling the formwork, it should be taken into account that it is not always possible to dismantle its lower part.
Supports for formwork
When pouring the lintel yourself, you must carefully ensure that the concrete solution does not seep through the formwork boards and that the structural supports do not bend. If there is the slightest deformation of its lower part, you should stop pouring and start it again only after the already filled layer has “set.”
Lintel masonry
When decorating window openings lined with facing bricks (the so-called facing brickwork), in order to preserve its decorative advantages, it is allowed to use channels (wide metal corners). In this case, the visible part of the purlin will be located only on the inside of the load-bearing wall.
Laying a figured window opening
In this case, there should not be any noticeable traces of the presence of a lintel on its façade surface.
The procedure for designing lintels in finished walls
Strengthening an opening in a load-bearing wall
Before starting to design an opening in a load-bearing brick wall, it will be necessary to carry out a number of preparatory operations:
- First of all, you will need the run itself, prepared using one of the methods indicated above (excluding the option of pouring the concrete lintel yourself).
- Next, you have to punch a hole in the brick wall, having previously installed metal support columns under the ceiling. The columns must be driven into the ceiling with a noticeable tension created by pre-prepared wooden spacers.
- After taking all the necessary preventive measures, you can begin to form the contours of the future window opening, starting with punching out the area for the lintel. This operation should be performed with great care, carefully monitoring the condition of nearby areas of wall masonry.
Making a window opening in a finished wall
After a cavity of the required size is formed, a lintel of the type you choose is inserted into it, which is then fixed in the opening using concrete mortar. Immediately after the solution has dried, the plaster (finishing coating) is removed from the area under the ceiling, and then the masonry is dismantled to form a hole for the future window. Disassembly must be done from top to bottom; in this case, its lower border should be located 10–15 cm below the level required by the size of the window.
Reinforcing the opening with channels
Conclusion
Proper arrangement of window openings is quite an important operation, which largely affects the reliability of the entire house. Therefore, it is necessary to approach this issue with all responsibility. The video in this article will help you correctly arrange window openings.
The windows tell passersby about the purpose of the building, and in what prosperity the people inhabiting the house live. Sunlight pours into the rooms through the window opening. At the same time, cold and moisture penetrate in winter. We enter the room through the door. If the openings are not properly made and lined, dampness and mold will settle in the house instead of comfort. To maintain comfort, quarter openings are made in brick and concrete walls. In log cabins, a high-quality frame and cashing play an important role.
Finishing window openings for brick walls