First, let's remember what balusters are. These are vertical posts that are used in the construction of staircases, balcony railings, balustrades or gazebos.
The distance between racks on flights of stairs, landings, balconies and roofs can be: 1 - no more than 150 mm, 2 - no more than 300 mm, 3 - no more than 100 mm for preschool institutions.
The main purpose of balusters is to give the entire structure greater rigidity and ensure safe movement along the stairs or balcony. In addition, such racks usually serve as decorative elements that complement the overall style of the interior of a room or building.
Therefore, choosing the optimal distance between balusters means giving the structure an aesthetic and attractive appearance.
What should be the height of the handrails on the stairs according to GOST?
Korovin Sergey Dmitrievich
Master of Architecture, graduated from Samara State University of Architecture and Civil Engineering. 11 years of experience in design and construction.
When designing residential and industrial buildings, state standards and norms are used for arranging internal and external staircases. An important parameter regulated by GOST is the height of the stair railing.
The regulatory documents that define the basic parameters for fencing include the following norms and standards: GOST 23120-78, SNiP IV–14–84, GOST 25772-83, GOST R 51261-99, SNiP 2.08.01-89, SNIP 2.08.02 -89, SNIP 2.08.02-89. They describe the requirements for the height of railings on stairs in a private house, in industrial premises and public buildings, and determine the dimensions of railings for balconies, loggias and roofs.
The need to standardize the size of stair railings is associated with maintaining sufficient safety measures for people inside and outside the premises. The dimensions of the span width and height of the barrier are provided for by fire safety standards.
The minimum height of handrails on stairs should be 90 cm.
Who to order and how much it will cost: the Internet can help you!
Modest fencing for a modest balcony
Alas, the number of offers on the Moscow market for services for installing wooden fencing on private balconies is depressing. And the photographs of the results of the installation work reminded me very much of the fence that Uncle Kostya and I put up for our neighbor at the dacha last year. Very unpretentious.
However, information from the World Wide Web made it possible to decide what kind of loan to take from my wife in order to have wooden railings attached to our balcony.
| Company name | Website | Product Description | Price per linear meter, rub. |
| "Gazebos for you" | https://besedka-vam.ru/ | There are sparse support posts, an upper and lower crossbar, and between them there are crosswise fencing strips. The decorative effect is technotronically minimal. Most of the proposed options look frankly “rare”: a child of 3-5 years old could easily fall through such a fence. | 4000 rub. per linear meter of sections (presumably fencing) plus 1.5 thousand for strengthening this fence with support posts. Or, maybe, per linear meter of the pole itself - it’s difficult to understand from the description. In general, 5.5 thousand per linear meter without installation. Delivery – 25% of the order value. |
| "Private Master" | https://www.master4me.ru/ | About the same thing, but the fencing strips are placed more often, mostly vertically. There is also an option with crosswise slats. The appearance is no longer reminiscent of a railing on the stairs in a transport workshop, but something more rural, homely. | Minimum price with installation (material - pine, painting - brush) - 8500 rubles. Painting with a spray gun followed by tinting and varnishing increases the price of a linear meter by 3-4 thousand rubles. Using larch instead of pine increases the price by 2-3 thousand rubles, oak - by about 4 thousand rubles. |
Wooden fencing for loggia
In general, an idea of the market for these unique services can be drawn as follows: the cost of material per linear meter of fencing is approximately 5.5-6 thousand, another 2.5-3 thousand is labor. The more often the fence is bound, the higher the prices.
However, there is no smell of the much-coveted “pot-bellied with a waist” balusters. Probably, such a fence needs to be made with your own hands. Or order from some unique master.
An annoyed uncle Kostya popped in to find out the prices for these same balusters: it turned out that pine ones were almost the price of firewood - 67 rubles. per piece, oak - almost at the price of MTS shares: 330 rubles. a piece. However, judging by the price list of goods and services, it is better to install them yourself.
General requirements for fencing
A standard requirement for the organization of stair railings is the obligation to install handrails on flights with a number of steps of three or more. Other regulations provide specific guidelines for structural dimensions for each type of structure. These include:
- The minimum width of a flight of stairs, measured along the inner surface of the railing, cannot be less than 90 cm.
- For interior spaces, the height of the staircase railing should be 90 cm. This standard applies to administrative buildings and residential buildings with two or more floors.
- For fencing of staircases installed on the street, structures with a height of 120 cm or more are made.
- If the width of the flight of stairs exceeds 125 cm, it is recommended to install handrails on both sides of the stairs. In cases where the width of the flight of stairs exceeds 250 cm, a separator is organized in the middle of the flight, which allows streamlining the flow of visitors.
- A flight of stairs, one part adjacent to the main wall of the building and having a width of 125 cm or more, in addition to the external fence, is equipped with a special handrail securely fixed to the wall.
- Stairs that have a non-standard, curved configuration, and are spaced from the wall of the building, must be equipped with barriers on each side.
- Railings used for flights of stairs leading to the attic, attic or basement must be at least 90 cm high.
The fence height standard of 90 cm is valid for the average height of an adult and teenagers, but in some cases, in places where only adults are located or during individual construction, it is possible to install handrails at a height of 110 cm.
GOST imposes special requirements for the processing of materials used for the manufacture of fences. All railing joints must be carefully adjusted, and the handrails themselves must be sanded.
Stair railings must withstand a load of at least thirty kilograms per linear meter. This requirement suggests providing the required number of vertical fencing posts that support the railings. More frequent installation of balusters allows them to withstand these loads.
When organizing wall railings, it is necessary to provide for the location of the holding brackets at a distance of 0.5 m from each other.
The standard for evacuation and fire escape stairs for load per linear meter is 54 kg.
Requirements for the height of railings and fences
For buildings and structures for various purposes, GOST requirements provide special standards that are designed to ensure fire safety and ease of use of stairs. Standard sizes are provided for the following structures:
- flights of stairs located in residential, public and industrial buildings;v
- stairs in kindergartens and other preschool institutions;
- fencing of balconies and loggias;
- fencing of open gazebos, terraces and verandas;
- ramps for the disabled.
Stairs
The distance from the floor surface to the top of the handrail should be 0.9 m - these are the requirements for the height of the handrail on the stairs. GOST 25772-83 provides this size for private houses, public and industrial buildings, residential high-rise buildings, shops.
Some public buildings have three flights of stairs. According to the standards, such flights do not need to be equipped with a handrail, but if there is a lot of traffic from visitors to this institution, it is recommended to equip the stairs with a fence. There are no special height requirements in this case, but most often it is from 80 to 90 cm.
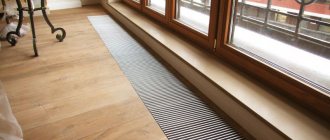
Balconies and loggias
The height of the railing on the balcony is a barrier that ensures the safety of people on the upper floors in residential and public buildings. The minimum size of a balcony railing is considered to be a railing height of 120 cm or more. This size allows you to reliably protect small children from accidentally falling out of the balcony or loggia.
Modern standards allow for panoramic glazing of loggias and balconies, but for the construction of the lower part of the fence it is necessary to use materials of increased strength that can cope with lateral loads.
Terraces and verandas
When constructing open terraces and verandas at a height of more than 30 cm from ground level, it is necessary to provide railings. Regulates the height of the railings on the terrace according to GOST 25772-83.
The optimal height of the fence for terraces and verandas is considered to be 110-120 cm. This size makes it possible to prevent a fall and also allows a person to comfortably lean on the railing, and therefore balusters for an outdoor area should be selected taking into account this standard.
The height of the railings on the veranda, as well as the distance between the balusters, should not interfere with a comfortable view from a sitting position.
Ramp guards for disabled people
When making handrails for ramps, it should be taken into account that an applied load of 50 kg at any level must be successfully withstood by the structure. When designing handrails for ramps, the following rules must be observed:
- The optimal design of handrails for ramps is considered to be the organization of two levels, which are located parallel to the angle of descent from the flight;
- the top handrail is installed at a height of 90 cm;
- the lower handrail is installed at a height of 70 cm;
- to ensure comfortable descent and ascent, the handrail is equipped with a 30 cm reach beyond the outer fence post;
- both handrails must be securely fastened to the base of the fence and connected to each other;
- if a single-tier handrail is used to enclose a ramp, it is additionally secured to adjacent walls or other structural elements.
Requirements depending on the type of premises
Kindergartens and other preschool institutions
Stair railings in these institutions are installed at a height of 50 cm. If there is a large flow of visitors, an additional handrail for adults is installed at a height of 90 cm.
For preschool institutions, there is a standard that determines the distance between the vertical posts of the fence. The gap between the balusters should not exceed 15 cm.
Schools
In schools, at the request of GOST, fences with a height of 120 cm or more are installed. This requirement is due to the need to restrain the child from accidentally falling. The activity of younger schoolchildren during recess is quite high, so such a high barrier to the opening is required for safety.
For special schools and educational institutions for mentally retarded children, stair railings are made of metal mesh at a height of 1.5 to 1.8 m.
Fire escapes
All buildings whose height exceeds one floor are equipped with these structures. The guardrails of fire escape and escape stairs at the exit site should be 120 cm.
Outdoor installation sites
This design provides for the installation of fencing with a height of 100 cm.
In addition to the listed requirements for the height of fences, there are standards regulating the width of the railings (from 30 to 70 mm) and the distance between the vertical posts (no more than 50 cm).
Installation of metal balusters
Installation of metal balusters is simpler: there are special clamps - thrust bearings, which are screwed into the steps or to the side of the stairs. The baluster, post, and post are then attached to the installed elements. All you need to do is select elements of the appropriate shape/size.
Attaching metal balusters to steps is somewhat simpler
There is one point: most of the fasteners suggest fixing balusters in them using clamping screws. So, screws are not very reliable; such a connection quickly begins to “loose.” Of course, they can be tightened a couple of times, but welding is much more reliable. If the metal thickness allows - from 1 mm or more - it is better to use welding.
We attach it to the step
Marking the installation locations of metal balusters occurs as described above. First, we select one rack to stand on a step or two at a time, then we distribute them so that all distances are the same. Heel pads are installed in the designated places. They usually “sit” on 3-4 fasteners. Use self-tapping screws if the steps are wooden or dowels for concrete or brick steps.
Metal balusters/racks are inserted into the installed thrust bearings, positioned strictly vertically, and welded. It is better to “grab” from four sides - to exclude the possibility of deviation in any direction. This completes the installation of metal balusters (stainless, nickel-plated, chrome-plated steel). Next you just need to install the handrail, which is also not particularly difficult.
This is what standard fasteners for installing metal balusters of prefabricated railings look like
If the wall thickness of the tube of prefabricated metal railings is too small for welding, it is not possible to select the appropriate welding mode; the tubes have to be secured to the heel supports using bolts. We still don’t recommend squeezing. Such a connection really gets loose quickly. You can drill through holes in the pipes and screw bolts of a suitable diameter into them.
Another option for installing rod balusters: weld a pin to the bottom and screw it into the step. If desired, you can glue a nut into the hole in the step.
The height of the balcony to the window - what should it be?
When converting a balcony area into a room, not only the parameters of the environment in contact with it change, but also the geometry of the existing enclosing structures - after insulation from the inside they become thicker, which entails other changes.
From the perspective of compliance with safety requirements, we will consider one of such structures - a balcony fencing, or how to equip a balcony area so that the characteristics of the parapet comply with established standards.
Interesting design solutions
Let's take a closer look at several beautiful and attractive balcony rooms, complemented by railings.
- A chic balcony in a building finished with white plaster can be decorated with a black wrought-iron fence with stone or brick sides, also treated with light-colored coatings. Against such a background, small black street lamps in retro style will look harmonious.
Elegant and snow-white balusters made of polyurethane are used in decorating exteriors and interiors of premises. Classic smooth lines give the space a finished and formal look. The main purpose of the structural element is to support the railings of the fences.
Source
Balcony railing designs
Fencing of balconies and loggias not only ensures the safety of the people there; if properly designed, they are also decorative elements. The requirements for these structures are set out in GOST 25772-83 “Fencing of balconies and stairs” and SNiP 2.01.07-85 * “Loads and impacts”, but the standards regulate only safety issues. On the one hand, this means that the choice of constructive and design solutions remains with the homeowner, on the other hand, this conclusion is relevant only for private houses, and the design of the apartment’s balcony enclosure must fit into the overall concept of the building’s facade.
With the freedom to choose the style of the parapet, designers will offer many options for its execution from stone, metal, glass and wood.
Structurally, fencing for balconies and loggias is of the following types:
- lattice - the name speaks for itself, the parapet is a structure made of rods;
- screen – sheets or screens are hung inside the contour;
- combined - a combination of lattice and screen sections, often made from different materials.
From the above examples it is clear that fencing is an effective element of balcony decor, which also has the necessary strength characteristics, but the pictures show open balcony areas. After glazing the balcony, the aesthetics of these structures lose relevance - they are replaced by stone ones or hidden by double-sided finishing. As for safety, GOST requirements for fencing also apply to the parapets of converted balconies, in particular their height.
What to give preference: roof or visor
The roof is not included in the list of mandatory components of a balcony, but it can significantly expand its functionality. Instead of a roof, a canopy can also be installed, which will also act as protection from bad weather and direct sunlight.
Roof requirements:
- The surface area of the roof should be slightly larger than the surface area of the load-bearing slab and balcony railing.
- The roof must be installed at an angle to prevent accumulation of snow mass.
On a note! The roof can be single-pitch or gable. The first option is the simplest and most budget-friendly, the second is ideal for corner balconies.
A special Marquise canopy will help give your balcony an unusual and stylish look . This metal structure is covered with a special fabric, which allows it not only to act as a protective element, but also to emphasize the individual style of the entire structure.
Dome-type visors are less popular . This is due to certain difficulties in its manufacture, but many owners of individual buildings prefer this method of decorating the facade structure.
The arched canopy looks stylish and elegant , which is practical and highly functional.
Dependence of the fence on the height of the building
It is no secret that after thermal insulation of the floor, the balcony parapet will become lower - the thermal protection will “take away” a height from it equal to the thickness of the floor “pie” on the balcony slab. You can, of course, increase the structure by this amount, but sometimes it seems acceptable to leave it as is, or add another value to the height.
In such situations, you should focus on the same GOST 257672-83, which regulates the height of railings for balconies and loggias depending on the height of the building:
| The height of the balcony railing depending on the height of the building according to GOST 257672-83 “Fencing of balconies and stairs” | ||
| Building height | up to 30 m | over 30 m |
| Balcony railing height | not less than 1000.0 mm | not less than 1100.0 mm |
Parapets of balconies and loggias of preschool institutions, regardless of the height of the building, must be at least 120 cm.
It should be noted that the requirement for a balcony railing height of 110 cm applies to all balconies of the building, and not just those that are above 30 m. In addition, the table shows the minimum permissible height values, but the railing can be made higher.
Between the parapet and the window block, a window sill is most often installed, which is used as a shelf, and flower pots are placed on it. Therefore, if the residents are tall, the height of the fence is increased - based on ease of use. In this case, the thickness of the window sill board should also be taken into account, usually not exceeding 5 cm.
As for the strength of the parapet on a balcony or loggia, it is regulated by SNiP 2.01.07-85* “Loads and impacts” and for residential buildings it is 0.3 kN/m (30 kgf/m).
SNiP 2.01.07-85* “Loads and impacts”
3.11. Standard values of horizontal loads on handrails of staircases and balconies railings should be taken equal to:
a) for residential buildings, preschool institutions, holiday homes, sanatoriums, hospitals and other medical institutions - 0.3 kN/m (30 kgf/m);
b) for stands and sports halls - 1.5 kN/m (150 kgf/m);
c) for other buildings and premises in the absence of special requirements - 0.8 kN/m (80 kgf/m).
Web page not found on InspectApedia.com
.
What to do if a link to a web page on InspectApedia.com results in a 404 page error
It's as simple as... well, choosing from 1, 2 or 3
- Use the InspectAPedia search box in the top right corner of our webpage, find the text or information you're looking for, and then view the links our custom Google search engine returns
- Email us directly asking for help finding the information you've been looking for - just use the CONTACT US on any of our web pages, including this one, and we'll respond as soon as possible.
- Use your web browser's BACK button or arrow (usually in the top left corner of your browser screen next to the box showing the URL of the page you're on) to go back to the previous article you were viewing.
If you'd like, you can also send us an email with that name or webpage URL and tell us what didn't work and what information you need. If you really want to help us, use the BACK button on your browser, then copy the URL of the webpage you were trying to load and use our CONTACT (found at both the top and bottom of the page) to send us that information via email so we can resolve the issue. - Thank you.
We apologize for this SNAFU and promise to do our best to quickly respond to you and correct the error.
— Editor, InspectApedia.com
or enter your search terms in the InspectApedia search box just below.
We also provide a MASTER INDEX on this topic, or you can try the top or bottom SEARCH bar as a quick way to find the information you need.
Green links show where you are. © Copyright 2017 InspectApedia.com, All rights reserved.
InspectApedia.com Publisher: Daniel Friedman
The correct height of the balcony railing is a guarantee of safety
Balconies and loggias are an integral part of modern apartments, industrial buildings and multi-storey private houses. Thanks to these architectural elements, the living area is significantly expanded. In addition to aesthetic functions, they also play the role of a connecting link between the interior and the outside world.
An important part of any architectural structure is the fencing, which determines the appearance of both an individual element and the entire building as a whole.
Photo of a balcony in a country house
Cast iron railings
Railings made of cast iron, made by casting or forging, are widespread. They go well with any architectural style. Heavy metal in skillful hands can be transformed into light structures in the form of plants, ornaments, and folk motifs.
This fencing option is durable, reliable and has high aesthetic characteristics. With the help of cast iron, you can equip both a country house and a city apartment. There are many design options: massive cast structures, delicate forged products, a combination of rough stands with exquisite floral or geometric motifs.
Cast iron railings have one significant drawback - susceptibility to corrosion. Therefore, when making a fence, street balusters are pre-coated with special means to protect cast iron from rust.
Features of protective fences
Material used
To add exclusivity and originality to the design of the fence, parts from:
- black, painted steel;
- ground or polished steel;
- chromed and nickel-plated metal;
- corrugated and flat asbestos-cement sheets;
- durable glass and plastic.
Metal decorative grille
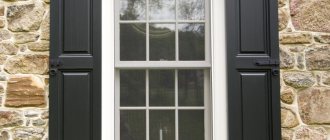
Types of balcony fences
The following varieties are very popular:
- prefabricated aluminum structures;
- forged balcony railings, the price of which is significantly higher than the cost of other types;
- fencing for loggias made of brick and concrete, which can subsequently be glazed using wooden, plastic or aluminum frames (see more about wooden fencing for balconies and terraces here);
- screens made of glass and plastic.
All parts are usually connected to each other using welding or special fastening material.
Chromed steel and curved glass screen
Plastic nets are also widely used for fencing sports grounds, ensuring the safety of spectators during competitions or when working with sports equipment.
Renting fencing for construction sites allows you to solve issues related to the need to fence off a certain area for a short time.
Answers to a number of questions can be found in the video in this article.
Design features
Protection for balconies and loggias structurally consists of:
- vertical posts that serve as a supporting frame;
- handrails designed to support people;
- elements that directly perform the protection function.
The racks are securely attached to the floor or base of the loggia. Handrails can have a wide variety of shapes for ease of use.
Forged protective grille
Installation of a balcony fence
Due to the fact that increased safety requirements are imposed on the design of balconies, during their construction one should adhere to the recommended building codes and GOSTs.
First of all, these include:
- GOST 25772-83 – Steel railings for balconies of stairs and roofs;
- GOST 23118-99 – Steel building structures;
- SNiP 2.01.07-85 clause 3.11 – Loads and impacts;
- SNiP 2.03.11-85 – Corrosion protection of building structures.
The regulatory documents listed above describe in detail what requirements balcony designs must meet.
Parameters of enclosing elements according to GOST
For example, according to GOST, the height of the balcony railing may vary depending on the functional purpose of the building and its design features:
- In buildings up to 30 meters high (in mm):
- fence height – 1000;
- railing height – 900;
- the distance between the vertical parts of the lattice elements is 100;
- distance between supports of combined and screen fencing – 300;
- In buildings above 30 meters (in mm): fence height – 1100;
- railing height – 1000;
- the distance between the vertical parts of the lattice elements is 100;
- distance between supports of combined and screen fencing – 300;
- On smoke-free stairwells (in mm): fence height – 1200;
- railing height – 1100;
- the distance between the vertical parts of the lattice elements is 110;
- distance between supports of combined and screen fencing – 300;
- In preschool institutions (in mm): fence height – 1200;
- railing height – 1180;
- the distance between the vertical posts of the lattice elements is 100.
A short instruction will help you install a protective fence with your own hands:
- The perimeter protection must first be designed, taking into account that horizontal screens are not acceptable from a security point of view. Only vertical fencing elements are used;
- The choice of construction material, as well as its shape (design), depends on the direction of the world, where the balcony or loggia is oriented, as well as on their shape and size;
- Fence posts, in order to maximize space conservation, are mounted at the very edge of the base;
Advice! It should be taken into account that vertical metal grilles of balcony railings cannot provide visual insulation, as well as protection from dust and wind. Grates with a lot of horizontal parts are dangerous because children can easily climb on them.
- The joints of the racks are waterproofed in two stages:
- waterproofing of the embedded rack is carried out;
- then the stand is isolated, which performs a decorative function;
- The height of balcony railings must comply with the established standards described above;
Safety requirements
To ensure complete safety when using safety fences, they must meet the following requirements:
- load-bearing parts must be firmly and rigidly attached to the wall and floor (base) of the loggia or terrace;
- load-bearing elements must not be subject to corrosion;
- parts must not have cracks, damage or other integrity problems;
- the required height of fencing for balconies and loggias must be ensured;
- the protection must have a sufficient margin of safety, since in addition to the gravity of people, it is subject to wind load, especially for parts made of glass and plastic;
- under any load, the connecting seams should not leak and their waterproofing should not be compromised.
According to the requirements of SNiP 2.01.07-85, handrails and railings must withstand horizontal loads within the following limits:
- for sanatoriums, rest homes, hospitals and preschool institutions - 30 kgf/m;
- for sports halls and stands – 150 kgf/m;
- for residential and public buildings, as well as other buildings in the absence of additional requirements - 80 kgf/m.
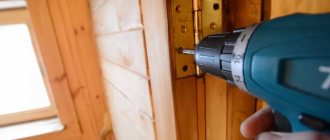
Fastening wooden balusters and posts
Many will agree that installing railings is more complicated than making the staircase itself: there are too many different components, there are no standard solutions suitable for everyone. This is where the difficulty lies. Wood railings are perhaps the most difficult to install. The material is plastic, but therein lies the problem: an element that is well secured at first can wobble with a decent amplitude after a year or two. Therefore, they approach the fastening of wooden posts and balusters very, very carefully, play it safe, use combined methods, adding glue if possible. This makes the connections tighter.
Not the most elegant installation of wooden balusters on stone or concrete steps, but reliable
In general, a baluster or post is attached either to the step board itself, or to the stringer - it depends on the design of the staircase. Internal stairs on stringers are rarely made today, so we will mainly talk about installing railings to the steps.
Using a bolt (capercaillie) to the step through
There is a simple option - through fastening of balusters and support pillars to the step. The only requirement: the thickness of the step must be decent - more than 40 mm.
In this case, to install a baluster or pillars at a selected point, a through hole is made in the step board through which a bolt with a diameter of at least 8-10 mm is passed (12 and 14 mm is possible, depending on the cross-section of the baluster). The minimum length of wood grouse is 80 mm (the rest can be sawed off). A hole of larger diameter is drilled under the bolt. After installation, it must be recessed so that at least 5 mm remains to the edge of the board. The resulting hole is closed with a decorative overlay (you can choose a plastic one of a suitable color or make it from wood).
Installation of wooden balusters: fasten through to the step
A bolt is inserted into the hole, and a hole 2-3 mm smaller in diameter than the diameter of the bolt used is drilled in the center of the baluster. The specific diameter depends on the type of wood: the harder the wood, the smaller the difference between the diameters of the drill and the bolt should be. The depth of the hole is equal to the length of the bolt.
The bolt is screwed in from below, passes through the step, and enters the body of the baluster. It is screwed onto the thread and exposed. Finally tighten from below using a socket wrench of the required diameter. The good thing about this option is that, in theory, the connection can be tightened if you remove the plug and use a wrench to reduce the backlash. But the “tightening” works until the hole in the wood becomes too large from the play. And it (play) will appear sooner or later - from loads that are directed in different directions, from natural processes occurring in the wood. So the connection is not permanent.
On a dowel or threaded rod
If it is impossible to get to the steps from below, there is an option for attaching balusters to dowels (50*10, 60*12, 70*14, 70*16 mm). The dowel is chosen to be large, with a large diameter. The installation of balusters in this case is as follows: a hole is drilled in the step with a depth equal to half the length of the dowel. We drill a second similar hole in the lower part of the baluster. The diameter of the drill is 1-2 mm less than the diameter of the dowel.
Installation of wooden railings on dowels
Epoxy glue is poured into both holes, the dowel is inserted into the hole in the step until it stops, then a baluster is put on it. For greater reliability of such fastening, you can coat the entire lower part of the baluster with glue.
One point: look for dowels from the same wood from which the steps and railings are made. They have the same coefficient of thermal expansion and react equally to shrinkage and increased humidity. This will make the connection more durable. Installing balusters on dowels is a traditional, but not the most reliable method today. Firstly, the dowels can break, and secondly, the connection itself still becomes loose. So in a few years you will have to look for a way to fix the dangling railings.
Instead of a dowel, you can use a threaded rod. The process of installing a baluster is no different. Everything is the same, only you don’t have to fill the hole with glue, although...
For self-tapping screws
The most “collective farm” method, which professionals really dislike, but which is easier to understand and implement, is installing balusters on self-tapping screws. For fastening to the steps, use wood screws with a diameter of at least 6 mm and a length of 60 mm. Place two on each side (total, 8 screws on each side).
The simplest and most “wrong” way. And one more thing: a lot of hassle in order to cover unsightly marks
They need to be screwed at an angle of 30-40°, and holes must be pre-drilled for the caps. Install screws, then close the holes with plugs cut from the same wood or cover them with wood putty.
Using Zipbolt (zipbolt)
A relatively new fastening element that can be used to attach balusters to both steps and handrails. It is easy to use, but expensive. If you install the railings with your own hands and “for yourself,” this is a good option. Installing balusters using zipbolts is also good because the connection can subsequently be tightened, eliminating any play that appears.
The zipbolt consists of a threaded rod and a removable gear head. There are two types:
- of two movably connected threaded rods of approximately equal length;
- from one threaded rod (type 13.600).
The option with movably connected pins is good for connecting balusters and railings, railings with support posts. A straight zip bolt is good for hidden connections of perpendicular bars. This is exactly the case for installing balusters on steps, support pillars on the floor, and the ceiling of the second floor. The dimensions of this fastener are substantial - diameter 8 mm, length 96 mm, so it will hold the pole well, and there is no doubt about the reliability of fastening the balusters.
Zipbolt device for perpendicular connection of parts
The algorithm itself is similar to mounting on a stud: you need to drill a hole in the step and baluster for installing a threaded stud. The length of the hole in both parts should be equal to the length of the stud, minus the height of the head.
The difference is that to install the head you need a technological hole perpendicular to the main one. It should be slightly larger in size than the diameter of the head, and its center should coincide with the axis of the hole for the pin. After the pin is installed, a removable gear head is inserted into the technological hole. It has special slots along the key. Install the head so that the slots are accessible. Using a 6 mm hex key, which is inserted into these slots, the head is turned until it stops, pulling the baluster towards and fixing the pin.
When installing railing support posts on the floor using a zip bolt, questions may arise regarding the method of fastening. If the floor is wooden, the threaded part is simply screwed in. If the floor is concrete, you can use chemical anchors. If there are metal embedded parts, the bolt can be welded. The last method, by the way, is the most reliable: at least the bolt will no longer be loose.
Dovetail connection
Another way to connect balusters and steps is carpentry. Using a specially shaped groove and tenon - dovetail. This option is possible if you make the balusters yourself or if they have a significant margin in length at the bottom.
Such an installation of balusters is possible if the railing is planned to be made almost from the very edge of the steps. Then trapezoid-shaped holes are cut into the steps from the end, and the same ones are formed on the balusters. The ends of the cuts are lubricated with wood glue or epoxy resin, aligned and fixed.
When fastening with a dovetail, you can also use nails to strengthen the connection between the baluster and the step
With this method of connection, the racks must be fixed in a vertical position for some time - until the glue dries - as they may deviate. To do this, construct a temporary supporting structure, which is disassembled after the glue has hardened.
To make the steps look better from the side, the ends are covered with overhead decorative strips. The planks can be “planted” with glue, nails, screws, and dowels. The choice is absolutely arbitrary, but the most correct and invisible one is dowels. Such installation of balusters is based entirely on the art of carpentry and requires precise adherence to dimensions.
Installation of balusters on a stringer (string)
When installing balusters on a bowstring or stringer, you can use the same methods of installing balusters: on dowels, studs, self-tapping screws, zipbolts. You can even make a dovetail, but you will have to cut it in a different plane, which is no more difficult, and, perhaps, even simpler. For decoration, you can use strips on both sides.
The difference between installing balusters on a string (string) is that the post must be sawed at a certain angle so that they stand strictly vertically. But in a surface cut at an angle, it is difficult to drill a hole that runs along the axis of the element. To avoid problems with this, first drill holes, then cut at the desired angle. A simple trick that makes the job much easier.
Installing balusters on a string: a simple process
There is one specific method designed specifically for a ladder with a bowstring. They make a baluster: a bar that “sits” on the bowstrings thanks to a groove cut in the lower part. The posts are attached to the baluster through and through - with bolts, dowels or self-tapping screws (the worst option). The choice is yours, and then the entire structure is installed on the bowstring. The connection is adhesive; for reliability, you can use bots, screws, and nails. But they are for additional fixation.
There is another method that is usually used only for this type of stairs: the balusters are secured with nails or self-tapping screws, decorative strips are installed on the sides, and the gaps between the balusters are closed with fixing strips. With this method of fixation, you can also additionally use glue - it will not be superfluous.
A few words about increasing reliability
All baluster fastenings - on studs, self-tapping screws, dowels, bolts - become loose over time and play appears. This is an inevitable process. When loaded, the railings wobble a little. At first, the deviation is a fraction of a millimeter, absolutely imperceptible. As you use it, the deviation increases, and the railing at hand already noticeably “walks.” The softer the wood, the faster the play appears. We have to take it down and redo it. In order to delay this moment to the maximum, they use any available additional methods of fixation.
There is a special fastener for balusters on a bowstring
Most often, glue is used as an additional fixing force. You can use any carpentry resin or epoxy resin. There is no point in looking for more expensive ones - these work very well. All joints are coated with glue. You can even lubricate screws/nails with glue. For better adhesion, the places where the glue will be applied are cleaned of dust/debris and wiped to remove greasy deposits.
Features of fencing on the balcony
The safe operation of a balcony depends on the features of its fencing, which is based on a structure consisting of three elements:
- Frame - racks that are attached to the balcony slab with metal corners to enhance stability.
- Railings installed at the height specified by the standard.
- Filling between the balcony slab and railings. Performs a protective and decorative function. The filling can be lattice, screen (made from sheet or slab materials) or a combination.
The following types of material are used for filling:
- Tree.
- Brick, concrete.
- Metal: forged, prefabricated, profiled products.
- Plastic, glass.
- Combined: concrete and metal or stainless steel and glass.
The peculiarity of protective fences made using the forging method is the ability to embody any artistic image of a balcony. Ready-made forged modules can be flat or three-dimensional. They are made from rods or strips of varying thickness. Prefabricated products are made from threaded elements by mechanical assembly. The installation process is simple, and the joints are not subject to corrosion, which is an advantage of this material. Profiled products are made of stainless steel and have a square or round cross-section.
To ensure the safety of children on the balcony, you need to study the requirements applicable to preschool institutions. They provide for the use of only vertical elements (horizontal, mesh or any metal grating are not allowed), located at a distance of no more than 10 cm from each other.
Screen fillings are used more often to make balcony fencing than lattice ones, because they provide visual insulation and protect from wind and dust.
How are structural columns created?
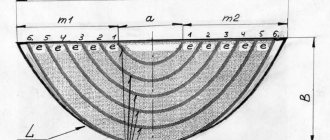
Structural elements made of PVC, plastic and foam are cast in a special mold. A sketch of the mold (the price of which depends on the size and complexity) for casting is created taking into account the customer’s wishes for size and decoration, after which a unique 100% scale template is made. Subsequently, the template is filled with molded plastic, which hardens for 8 to 12 hours. The finished form allows you to create monolithic PVC balusters, similar to concrete ones.
A pleasant feature of polymer structures is their complete similarity. When using wood, stone or metal, which requires manual processing of each individual part, such results are almost impossible to achieve.