Namely, we will talk about slopes and their finishing with plastic panels. Many will say that, well, this plastic is harmful. But, in my defense, I will note that it is not at all harmful, looks aesthetically pleasing and does not require a lot of maintenance and messy installation work, unlike plaster.
So, let me tell you about the slopes. For those who are not familiar, read it. Share your tips in the comments!
Window slopes made of plastic: self-installation - 2 methods
After installing plastic windows, the window opening does not look the best: foam, pieces of plaster stick out, and the wall material is visible in places. All this “beauty” is closed in various ways, the most practical, fast and inexpensive of which is plastic slopes. It is better to make them from sandwich panels (two layers of plastic with polypropylene foam between them). They are dense, durable, made of good material.
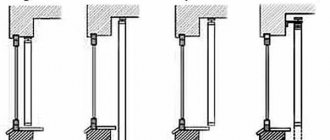
There are two main methods for installing plastic slopes: with and without a starting profile. Both come with step-by-step instructions and photos. Decide for yourself how to attach slopes to plastic windows. Both methods give good results.
Installation of slopes from sandwich panels without starting profiles
This method is suitable when the window is installed so that the distance from the window frame to the opening wall is too small. In this case, installation with a starting profile (see below) is either very difficult or - usually from the hinge side - completely impossible.
After installing the plastic window, the following picture was observed.
The installation of slopes for plastic windows begins with preparing the opening: we cut off the remaining foam with a stationery knife. It is easy to cut, just don’t overdo it, cut it flush and don’t cut it out - the foam both holds and insulates the frame. Pieces of plaster that interfere and protrude are also removed. If they hold up well and do not protrude beyond the plane of the future slope, you can leave them - the foam will slide less.
Then, around the perimeter of the window we nail (we place it on dowels if the wall is concrete) a thin strip - 10 * 40 mm - with the wide side facing the slope.
Usually they don’t level it, they nail it as is, but if you want, you can make it level by placing pieces of plywood, thin boards, etc. in the right places.
Next, we cut the foam around the perimeter of the frame so that the sandwich panel fits there. It should go in about 1 cm. We cut off the foam carefully so that there are no residues on the frame, but without damaging the plastic.
Now you need to cut the plastic panels correctly. You can do it in a standard way: using measurements, you can make a stencil. It seems easier with a stencil. Take a sheet of paper larger than your window (I had old wallpaper). Apply to the slope, crimp, bending the excess. Cut along the curved lines, try on, adjust as necessary.
It is more convenient to start from the upper part of the opening. Having made a paper stencil, we outline it on the plastic. Considering that about 1 cm will go into the foam groove, add this centimeter along the edge that will be inserted there. We cut it out with a small margin - it’s easier to cut it off than to cover it up later.
We cut it with a hacksaw and a metal blade, try it on, adjust it so that the plastic stands up straight, without bending. We level it so that the panel is flush with the plaster. The edge turns out to be almost even; where necessary, we trim it with a file.
Having removed the tried-on and adjusted strip, along the outer edge that will be nailed to the plank, we drill holes according to the thickness of the nails, retreating about 0.5 cm from the edge. This will make it easier to attach and will not damage the plastic.
We put it in place again, take a balloon with mounting foam and short “sprays” to fill the gap with foam. We try to get as deep as possible, but don’t pour too much: when it swells, it can distort the plastic.
More on the topic Plastic windows A class
There are several points to consider when working with polyurethane foam. If the plastic is smooth, the foam does not have a very good grip on it. To improve it, either treat the surface that faces the wall with sandpaper, and/or prime it with something to improve adhesion. The second nuance: for normal polymerization of the foam, moisture is needed.
Therefore, before installing the plastic, the slope is sprayed with water from a spray bottle. Naturally, there should be no dust on the wall - it should be swept away with a brush or removed with a vacuum cleaner. If the plaster or mortar is loose, the opening is pre-treated with a penetrating primer, which will bind the concrete particles together.
Then we lift the panel, pressing down the foam, insert the nails into the holes and fasten the outer edge to the bar. The inner one rests against the window frame.
Using the same technology - cut out a paper template, try it on, transfer it to plastic - cut out a plastic side. Here you need to be especially precise so that the gap between the slope panel and the window sill (upper slope) is minimal.
To do this, the edge will have to be sanded. To make the edge smooth it is easier, it is more convenient to process it with sandpaper attached to a smooth block, a file or a sharpening stone (half a circle, as in the photo).
We adjust it until it matches perfectly (as best as possible) at the top and bottom, and install it in place, driving one edge into the groove near the window. When the result is satisfactory, we level the outer vertical edge to the same level as the wall plaster.
You can do this with a stationery knife on the spot, or you can draw a line on the panel (with a pencil, a thin marker, scratch it with something sharp) and then modify it with whatever is convenient.
Having removed it, we also drill holes for nails along the outer edge. We install the panel in place, take foam, and fill the gap from bottom to top.
Too much foam is not good here either, as it can bend the plastic. Therefore, we fill it in short portions, trying to fill it as deeply as possible.
On the vertical parts of the slopes, you can do it differently: apply foam to the panel ready for installation along the far edge, which goes under the frame, before installation. The strip is made continuous or applied as a small snake.
Only you need to do this not from the very edge, but stepping back a little. Then the plastic part is inserted into the cut-out groove, positioned as needed, and the rest of the gap is filled with foam (do not forget to wet the wall before installation). Once filled, press, level, and secure with nails into the bar.
To prevent the foam from moving the edges of the slope during the polymerization process, tape the joint at the top and bottom with masking tape. No matter how hard you try to adjust the plastic evenly, gaps, albeit small ones, remain. They can be covered with acrylic. It is sold in foam-type tubes and placed in the same mounting gun.
Squeeze the strip into the gap, rub it, level it, remove the excess with a damp soft cloth or sponge. This operation needs to be done in small areas and wiped carefully - completely clean. As long as the acrylic has not hardened, it cleans up well.
Then - with great difficulty. It is more convenient to start sealing cracks from the top - immediately - the horizontal panel of the slope, then the joints, then move down first along one side, then along the other. The last to be sealed are the joints with the window sill.
After drying - 12-24 hours, depending on the sealant (written on the tube), acrylic can be pulled into the seam - this is if the cracks are large. Go through all these places a second time using the same method.
After the second layer has dried, if there are any roughness or unevenness, they can be smoothed out with fine-grain sandpaper, folded in half. In general, it is better to carefully level it while it is still wet, otherwise you may scratch the plastic.
More on the topic How to fix plastic windows?
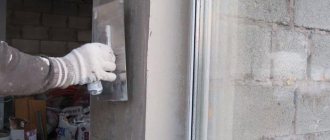
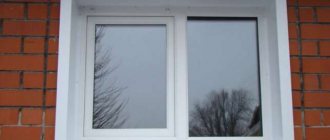
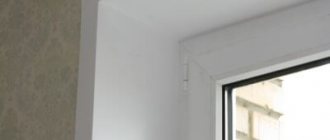
That's it, the plastic slopes are installed. After the final polymerization of the foam, the bevels must be puttied, leveling with the surface of the walls. After this, you can remove the protective blue film. As a result, the window will look something like this.
When installing these plastic slopes, sandwich panels were used. These are two layers of plastic, between which there is a layer of foamed propylene foam. Using the same technology, you can make a window frame from inexpensive plastic window sills or white PVC wall panels.
The most unreliable material is panels: even wall panels are pressed through quite easily, and if the front layer of plastic is thin (cheap), then the jumpers are visible in the light. This is not the case with sandwich panels and plastic window sills. And it takes a lot of effort to push through, and there are no jumpers even for clearance.
We install plastic slopes with a starting profile
The installation of plastic slopes using this technology begins with the preparation of the window opening. We cut off the foam evenly, remove everything that does not adhere well, clean off the dust, and if necessary, go over the opening with a primer that improves adhesion.
A wooden block is attached along the perimeter of the opening, but already near the frame. Choose the thickness depending on the distance: it should almost fit the frame. One side of the block must be worked with a plane, making an inclination. The angle of inclination of this face is equal to the installation angle of the slope. You can saw it off, but it’s more difficult to make it straight unless you have a circular saw with an adjustable angle.
We screw the treated block to the walls around the perimeter of the opening. The mounting method depends on the wall material. If the wall is brick, you can try using self-tapping screws; in a concrete wall, you need to install dowels.
You buy a starting profile in the store, install it with the long side to the block, and fasten it. It is more convenient and faster to fix it to the bar with staples from a construction stapler; if you don’t have one, you can use small nails or self-tapping screws with flat heads.
When choosing a starting profile, choose a dense one. It’s more expensive, but you only need three meters per window, maybe a little more. A dense profile will hold the plastic well, a soft one will bend and the appearance will be ugly. Another point - when installing the profile, press it as tightly as possible to the frame so that there are either no gaps at all or they are minimal.
At the top, when joining vertical and horizontal profiles, you need to be especially careful and cut them exactly at an angle of 45°. If there are small gaps, they can be sealed with acrylic.
Using this technology, it is more convenient to start installing reservoir slopes from the sidewalls. Insert the panel into the fixed starting profile. It is also better to take them from expensive and dense ones, with a thick layer of plastic. If you install cheap ones (ceiling), then the front wall is thin, and in bright light the jumpers will be visible. In addition, such plastic can be pressed even with your finger.
The width of the plastic panel should be larger than the slope. If the width of one is not enough, two are joined. But then at the junction you will need an additional vertical strip to which the first strip will be attached.
The panel inserted into the profile is usually longer than the opening. Holding it with your hand, mark the line of the opening. After removing, cut along the marked line.
We install the panel again, move it a little away from the wall and fill it with foam, trying to fill it without gaps, but without excess. To make this happen, we start from the far bottom corner - draw from bottom to top near the nailed bar. By the time we reached the top, the foam below had expanded a little.
Draw a line with foam again, but closer to the edge. The closer to the outer edge, the less foam is required - after all, the panel is installed under a slope, so make the paths thinner. Having reached the middle, make a snake on the rest of the surface and press the panel the way it should stand.
Align and check. Secure to the wall with masking tape. The second part and then the upper part are installed in the same way. It can also be cut out using a paper template, and the edges can be adjusted to a perfect (or almost) match using sandpaper.
Having installed all parts of the slope and secured with masking tape, leave until complete polymerization. Then, in order not to putty the gaps between the slope and the wall, a white plastic corner is glued onto liquid nails.
The main task is to cut exactly in the corners. It is easy to glue: apply a thin strip of glue to both shelves of the corner, press it, moving your hand along it, hold it for a couple of minutes. This is how they are installed around the entire perimeter, then, before the glue dries, they are also glued with masking tape and left.
After a day, we remove the tape, the plastic slopes are ready.
If there are gaps somewhere, they are sealed with acrylic, as described above. Don't use silicone. In the light it quickly turns yellow. In a year or two your windows will look terrible. Look for white acrylic sealant and mask it with it.
Source: stroychik.ru/okna/okonnye-otkosy-iz-plastika
A newly installed window, no matter whether it is plastic or wooden, has an unfinished appearance. And even after installing the window sill, almost nothing will change. And in order for your window to acquire an aesthetic appearance, it is necessary to install slopes.
Today, plastic slopes for windows are popular. Slopes are part of the window opening on the side and top of the window. After replacing a window unit or installing a new one, finishing the slopes is an obligatory stage of work, along with installing a window sill.
This is like the final touch to installing the window and giving it a noble, light and bright look. Slopes can be plastered, plasterboard, or plastic.
Questions and answers
Inexperienced users always have questions to which they have to look for answers. This takes time and disrupts the progress of work. Therefore, it is necessary to answer the most common questions in advance and make the task easier for users.
What if the opening is uneven and the plastic panels touch it only at some points?
In such a situation, you need to attach the panels to the slope (let them rest on at least two or even one point) and check their position. If they are not warped, you can fix them with pieces of masking tape (half tape on the panel, half on the wall) and fill the open cracks with foam. It will provide more dense support for the panels and at the same time fix their position.
How to install insulation if a regular plastic panel (not a sandwich) is used?
As a rule, the inside is insulated with ordinary mineral wool. Take soft, rolled material. Cut a strip of the desired size and insert it under the panel. You can fix the heat insulator with putty, but most craftsmen simply place mineral wool under the slopes without any fastening - it holds perfectly well even without additional elements.
Does the thickness of sandwich panels matter?
The thickness of the sandwich may be too large if the plastic window in the opening is installed quite tightly and the gap is small. For example, a 24mm thick panel may not be physically possible to fit into the gap between the opening and the edge of the plastic sash (or between the opening and the hinges). In addition, if you use a starting profile, you will have to select the thickness of the panel to match it.
How can you decorate the joints between the panels if they are not very neat?
There are two options here. The first is grout (acrylic). This is a type of special putty for plastic that fills seams, gaps, and cracks. The second method is small plastic corners (some craftsmen make them themselves from the starting profile, carefully cutting off the excess strip).
Can I use sheet plastic (not panels)?
This option is more difficult, since the plastic does not have sufficient rigidity and self-supporting ability. It can only be used as cladding on slopes plastered or finished with plasterboard.
Types of slopes
- Plastered slope - a rough layer of mortar (cement-sand or gypsum) is applied to the surface; after drying, a finishing layer is applied and painted.
- Slope made of plasterboard - the surface is covered with plasterboard, primed, puttied and painted or covered with wallpaper.
- Plastic slopes - the window opening is covered with plastic panels.
Plastic slope for windows can be of two types
- Hollow panels that have stiffening ribs inside;
- Sandwich panels are two plastic panels connected to each other by foamed polystyrene.
Insulation of this window system
To insulate the product, you can use polystyrene foam, mineral wool, warm plaster, or a sandwich panel.
Each has its pros and cons. Therefore, the choice must be made after familiarizing yourself with the characteristics of the material. If foam plastic is selected, then the operating algorithm looks like this :
Clean surfaces from dust.- Apply a thin layer of primer.
- Seal the seams between the frame and sienna with foam.
- Measure and cut the foam to the desired size.
- Apply glue to it.
- Attach it to the wall.
- Cover the seams between the foam and the profile with primer.
- Attach the sheets with self-tapping screws.
Insulation will make it possible to avoid the appearance of cold bridges.
On the pages of our website there are separate articles about the insulation of slopes, both outside and inside the room.
Advantages of plastic slopes
- aesthetic and finished look;
- installation of plastic slopes is an almost clean and quick procedure;
- long service life - slopes are made of the same material as plastic windows so that both windows and slopes have the same service life;
- steam- and moisture-proof - plastic slopes can be washed without worrying that water will damage them;
- ease of maintenance - they can only be wiped off from dust, and the plastered slope has to be painted periodically;
- unlike plastered ones, plastic slopes do not crack;
- ideal for plastic windows, resulting in a monolithic structure.
Of course, it is not without its drawbacks. Plastic window slopes are often scratched, and the same applies to plastic window sills. But if you treat them with care and care, the slopes will last a very long time.
As for the myth about the dangers of plastic products, as our beloved Shurik said, “And nowadays it’s easier to get poisoned with sprat from a jar.” PVC slopes are not much more harmful than varnish or paint. Plastic slopes have good thermal insulation, unlike plastered ones.
They have an air layer (plastic panels) or a layer of polyurethane foam (sandwich panel), and due to installation, PVC slopes can receive additional thermal insulation. If plastic slopes are installed on polyurethane foam, in this case the free space under the panel is filled, resulting in improved thermal insulation and protection against fungus.
They can also be installed using PVC-based glue. Liquid PVC glue helps to make an almost monolithic structure of slopes and windows.
https://www.youtube.com/watch?v=d3jUehO2JA0
Finishing window slopes with hollow plastic panels will cost less, but it has its drawbacks - a thin layer of thermal protection. A slope made of sandwich panels is a more preferable option in this regard. They are more durable, warmer and can be used to finish wide slopes - up to 1.5 meters.
The disadvantage of such slopes is the high price. Finishing window slopes is not an easy process; if you take on this work yourself, without experience, you can ruin everything. And installation will cost you twice as much. Therefore, if you do not have confidence in your own abilities, it is best to turn to professionals.
The price of plastic slopes depends on the height and width of the product.
Laminated slopes (with color coating) will cost more than regular ones. For example, the price for a plastic slope made of a sandwich panel 150 mm wide will be around 150 rubles per linear meter, colored “sandwiches” - 1,200 rubles per m/p, and the cost of panels 600 - 800 mm wide: 600 and 3,000 rubles, respectively .
The price for installing plastic slopes can be 400 - 500 rubles per linear meter, depending on the width.
If you still think that plastering window slopes is more profitable than sheathing them with plastic, remember the advantages of PVC slopes. Plastic window slopes will not turn yellow over time, will not crack and do not require periodic painting.
Source: proevrookna.ru/otkosy-na-okna/plastikovye-otkosy-na-okna.html
What requirements must the slope material meet?
Regardless of the technology for protective and decorative finishing of a window opening, finished slopes must meet certain requirements. The design must withstand various mechanical impacts without loss of operational and aesthetic characteristics. It is necessary that the slopes are moisture resistant. This especially applies to outdoor structures. The material must be characterized by wear resistance, immunity to ultraviolet rays and high humidity, and temperature changes.
Important! To waterproof the frame, a PVC window ebb is attached to its outer side.
Slopes must be moisture-resistant, wear-resistant, and have low thermal conductivity
The protective structure of the window should not deform over time. It must be distinguished by a long period of operation without loss of original properties. Due to the fact that the slope panel closes the installation gap, this is the main source of heat loss. It is necessary that the material has low thermal conductivity, which will provide a good level of heat and sound insulation in the room.
The chosen finish for the slopes should be aesthetically appealing. High-quality cladding is characterized by a neat appearance. It is necessary that the finish is in harmony with the window profile and fits into the interior design of the room. Maco window fittings have proven themselves to be the best in this regard.
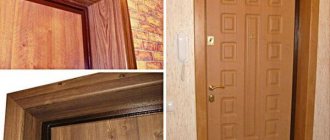
How to make window slopes with your own hands from plastic
A variety of modern building materials allows you to quickly and efficiently carry out any work related to both the construction of structures and the finishing and repair of finished real estate properties.
Today, more and more people prefer metal-plastic structures (windows, balconies, terraces) due to their high technical and economic characteristics and due to their impeccable appearance. In addition, such designs significantly improve the performance of the walls of the house.
List of preparatory works
Measuring, installing and adjusting plastic windows is carried out by specialized teams, which is the key to the correct implementation of all technological measures and entitles the customer to warranty service. But such operations as installing slopes of plastic windows, if desired, can be performed on your own.
Slopes come in various types, and may differ in color, shape, and materials from which they are made. The most common materials used for the production of slopes are the following:
- drywall;
- plastic, MDF, sandwich panel;
- cement mortar;
- tree.
However, plastic slopes have proven themselves to be the best. This is due to the fact that as a result of installing such slopes, a single structure is obtained, ideal for decorating any room.
Also, a significant advantage of such slopes is their low cost, durability, high speed of installation work (3-4 hours), ease of maintenance, and the ability to choose any color segment.
So, after the metal-plastic window has been installed and at least 36 hours have passed (the period of complete hardening of the polyurethane foam), you can install the window slopes.
First you need to decide on the list of necessary materials and tools required for such work. Firstly, it is advisable to purchase plastic, and it is best to give preference to high-quality and durable products.
The initial cost savings when purchasing a cheap product may result in additional costs associated with repairing damaged items.
The thickness of the plastic should not be less than 8 millimeters, and the lengths of the panels should be equal to the specified dimensions of the opening in height and width. Accordingly, the depth of the slope should be no greater than the width of the plastic panel.
Secondly, you will need the following building materials: starting strip, F-shaped profile, polyurethane foam, cement mortar, silicone, small screws (bugs), tape, paper clips, insulation.
The tools you need to have are a hammer, a drill with a bit for self-tapping screws, a screwdriver, a gun for silicone and polyurethane foam, a trowel, a spatula, a tape measure, and rags. When all the necessary attributes have been prepared, you can begin the procedure of finishing the slopes of plastic windows.
Requirements
There are certain requirements for products.
They should be:
- Durable . The service life of the part cannot be less than that of the window.
- Reliable and durable . The task of the element is considered to be the ability to improve the performance of the structure. At the same time, wind and heat protection properties must be maintained.
- Aesthetic . To fulfill this condition, the slopes are made in the same style as the entire window structure.
There are quite a lot of regulations on the installation of plastic windows. When installing, you need to be guided by the main ones:
GOST 30971-02. It contains requirements for the seams of assembly joints connecting window blocks to wall openings.- GOST R 52749-2007. The content covers questions on the topic “Window installation seams with vapor-permeable self-expanding tapes.”
- SNiP 3.04.01-87. The document discusses all possible sizes of permissible deviations in vertical and width dimensions of slopes.
If the installation of slopes on a PVC window is carried out by specialists from a construction company, then it is necessary to carefully study the contract. It must indicate the regulatory documents on the basis of which it operates. In the absence of such a clause, it will be very difficult to prove the owner is right in case of poor-quality installation.
Regarding technical parameters, you should refer to the Standard Map of the Labor Process of Construction Production (KT 6-67). It says that the slopes need to be plastered with a slight bevel from the box at the surface of the wall. This bevel forms the opening of the window slopes. Marking is done using a square with a movable bar.
Attention! The angle of dawn should be the same on all slopes inside the building.
Manufacturing technology for plastic slopes
The first step is to remove the shipping tape from the profile of the metal-plastic window and seal the cracks formed on the street side with cement mortar. This procedure allows you to seal the external assembly seam and hide the foam from direct sunlight, which has a destructive effect on this material.
In principle, any mixture for external work can be used as a mortar, be it putty or a special cement-based mixture. The external slopes of the windows can subsequently be coated with any dye. After this, you can begin interior work.
A starting strip is taken and cut to the dimensions of the window (height, width, height), and then drilled using self-tapping screws to the profile around the perimeter. This strip will be the base for the plastic panel. Then you need to prepare the panels for the slopes directly.
This is done as follows. First, the top panel is made; for this, plastic is cut to the size of the upper part of the opening and installed in the grooves of the starting strip, and then two side panels are made in the same way.
The entire installation is best done using a plumb line or building level. The resulting frame must be made in such a way that the following conditions are met:
- between the plastic and the base of the opening there was a gap of at least 20 millimeters (for filling with foam);
- the angle of rotation of the side elements of the slope was the same for the left and right sides (measured using a square applied to the window profile in the upper and lower parts on the right and left);
- if the elements of plastic panels protrude excessively above the plane of the opening, then it is recommended to adjust their dimensions using a mounting knife;
- In the places where the panels join (in all corners), it is advisable to mount scraps of the starting profile, which will cover the unevenness of the cuts.
The next step is the production of edgings from an F-shaped profile. As with plastic, this process must begin with the top element.
The joining points of the F-shaped profile must be cut at 45 degrees to each other. A very serious stage in the manufacture of plastic slopes is the foaming of the resulting voids.
The difficulty is not to overdo it with this process, so that the foam does not open the slopes when it hardens. To do this, it is advisable to foam the area around the perimeter of the window at the very base and lay the foam as bridges between the plastic and the old slope.
Another layer of foam is laid along the angle of the slope, and prepared F-shaped profiles are installed in the resulting space, and their fixation is best done using tape.
When the foam hardens (15-20 minutes), the structure becomes rigid and quite stable. The final step is to coat the cracks with a special sealant or silicone.
In order for the foam to have good adhesion, it is recommended to pre-wet the surfaces with water. It is also very important to hide defects under the window sill and ebb and clean the resulting slopes from construction debris and dust.
What is it, photo
The side part of the window opening is called the slope. They are located inside the frame part of the window on the sides and top. Located between the frame and the wall. This applies to the outside and inside. Design of slopes is a mandatory stage in the installation of the overall structure.
When an old window is replaced, severe destruction of the old parts occurs during dismantling. If work is underway to install a new window, then to complete it it is also necessary to install slopes. This will significantly improve the quality characteristics of the product.
You can install these elements yourself . To do this, you need to study the features of the technology and prepare the necessary tools.
Important! If you need to decorate the outside of a window located high off the ground, then this task should be entrusted to professionals.
Plastic slope:
We make slopes and drywall:
Simple plaster slope:
What are they needed for?
When located on any side of the window, the plane performs important functions for the operation of the window structure:
- Decorative . Allows you to hide all irregularities and defects after installing the frame.
- Warming . The product protects the room from the penetration of cold and moisture.
- Steam and waterproofing . Prevents the formation of condensation, mildew and mold.
- Soundproofing . This is very important if the building is located near tram tracks, highways, or busy streets.
Important! It is necessary to install slopes made of high-quality material.
Recommendations for the manufacture of plastic slopes
To ensure that the process of installing plastic slopes does not cause great difficulties for the contractor, during construction operations it is advisable to adhere to the following recommendations:
- Use PVC panels of good quality, in color that matches the color shade of the window profile;
- Before using the panels, remove (cut) the mounting tenon from them;
- Trimming and cutting of PVC panels is done using a mounting knife or jigsaw;
- To prevent deformation of the panels during the foam hardening process, you should use mounting foam with a low expansion coefficient, and also ensure mechanical fixation of the slope elements in a given position while the foam pre-sets (5 - 10 minutes);
- If necessary, heat-insulating materials can be laid in the technological gaps between the back part of the PVC panels and the base base of the opening (before the foaming process);
- To quickly remove traces of tape, it is best to use a cotton swab soaked in acetone;
After making the slope, you should ensure that part of the opening under the window sill is plastered. Everything is ready and your slopes will delight you for decades. That is, it became clear that plastic slopes for windows can be made with their own hands by almost any person with the slightest knowledge of the construction industry.
Source: domgvozdem.ru/index.php/okna-i-dveri/79-ustanovka-otkosov-plastikovykh-okon
Reason for repair or replacement
The main reasons for carrying out repairs or replacement are considered:
- replacement of window openings;
- installation errors;
- manufacturer's defect;
- improper use of the window;
- low-quality components or fasteners;
- the appearance of cracks or stains on slopes;
- paint burnout.
In all of the above cases, repairs are not necessary. In case of severe damage, it is recommended to completely replace the product.
All detailed information about the repair of slopes for plastic windows is posted in a separate article.
What are the advantages of PVC slopes?
- They are durable and wear-resistant - the service life of a window and a properly installed slope are equal;
- They are a finishing touch, they do not need to be painted - the window immediately takes on a finished look;
- They are warm to the touch - you can stay by the window for as long as you like without fear of catching a cold;
- They have a smooth, moisture-resistant surface that is very easy to care for. It is enough to simply wash it with detergent without abrasive particles. It also does not fade or deform.
PVC slopes are not just panels, but a collection of elements. They ensure efficient operation of windows. This includes the sandwich panel itself, corners and sealing system.
And yet, where to apply it?
Application:
- finishing of window slopes
— filling door voids in warehouse, industrial, office enclosing structures
– PVC balcony and street doors
— for the production of billboards, banners, signs
– finishing of walls and ceilings on loggias and balconies, as well as in rooms with high humidity
- internal lining of a truck body to retain heat or vice versa to create a refrigeration chamber in warm weather (the sandwich panel prevents cold air from escaping, creating a “thermos effect”)
Why do we recommend finishing with sandwich panels?
Because it is a three-layer material - light insulation between two layers of durable plastic. It is these three layers that provide resistance to mechanical damage, reliable tightness and excellent thermal insulation.
High thermal insulation properties are given to the panel by its middle layer of extruded or free-foamed polystyrene foam. It is non-flammable and has very low thermal conductivity (0.041-0.045 sq.m/K)
Finishing slopes with sandwich panels is very simple. There are several standard sizes. The thickness is usually 8-10 mm, but the width varies from 2 to 3 m, length from 0.9 to 2 m. This allows installation without joints and seams.
And with the help of laminated sandwich panels, which have a wide range of colors and different textures, you can create a unique design and comfort at home.
Advantages of starting profiles for PVC windows
These designs have a large number of advantages, thanks to which the installation of slopes will be simpler. Among them:
- the window opening can be quickly and easily leveled without the use of putty or plaster compounds only with the help of this design;
- starting profiles are easily attached to the wall using self-tapping screws or liquid nails;
- they have excellent decorative properties. By installing slope panels using starting profiles, you will get joints without sealing seams;
- ease of processing. Plastic structures can be easily cut with scissors, an electric jigsaw, a grinder, or even a simple stationery knife. PVC profiles also bend easily and take the required shape.
The manufacturability of the processes is achieved thanks to the special properties of polyvinyl chloride.
Installation of plastic slopes in panel and brick houses
After installing the window, you can begin finishing after 24 hours, during which time the foam will completely harden.
In this case, installation is the simplest due to the fact that the thickness of the concrete wall, compared to a brick wall, is small. The standard width of PVC slopes of 250 mm is sufficient here. But insulation here must be done very carefully; concrete walls are the coldest.
- The wall is cleared of foam and the starting profile is attached to it with self-tapping screws.
- Now we cut out the panels. Installation starts from the top, and then the sides are attached
- The space under the sandwich panels is foamed. To avoid deformation, secure them with tape and there should be no excess foam!
- All joints are sealed
- The installation is completed with a finishing F-profile. At the joints it must be cut at an angle of 45 degrees.
- Brick has high thermal conductivity. Additional insulation is not required here. Typically, in brick houses, the wall masonry is thick, and heat loss is avoided by simply recessing the window inside the wall.
The price and complexity of installation will be affected by the thickness of the wall. After all, the standard width of PVC slopes may not be enough here, and wider sandwich panels are more expensive than narrow ones, which is quite logical. Otherwise, the installation follows the same pattern.
Causes of mold formation
Where warm and cold air meet, condensation forms. This place is called the dew point. Most often, it is located on slopes. If installation is incorrect or of poor quality, the constant presence of moisture leads to the appearance of mold.
Other reasons include insufficient tightness of the walls, errors in the construction of the building, and prolonged lack of repairs.
You can find more information about the causes of mold formation on slopes here.
Advantages of panels over other materials
Panels are considered a universal finishing material. Finishing slopes using this product is a simpler procedure than applying plaster or using gypsum boards. Plastic varieties stand out especially. They are characterized by good durability, low cost and ease of installation.
Covering window slopes with panels has many advantages, namely:
- The work is completed in a short time. The process usually takes no more than one day, which is significantly less than putting putty and subsequent painting.
- If properly sealed, such slopes will become an excellent barrier to the penetration of cold.
- Modern materials have good properties. They are durable and indestructible from exposure to ultraviolet radiation.
- There is no need to carry out additional finishing measures. The fact is that the panels have different colors and textures, which makes them suitable for use in various interiors.
- The result is an attractive decorative surface. It is also necessary to take into account that there are additional elements (profiles, corners, moldings) that make the coating even more sophisticated.
Exterior materials
Many modern materials are used to decorate windows outside, some of them are also successfully used for slopes inside the house.
Plastering
A classic, but still popular, finishing method. It is considered the least expensive, but durable and reliable. The use of the solution allows you to ideally level the plane of the slopes for any materials for cladding the facade.
Plastering an external slope Source oz90.ru
Moisture-resistant drywall
Using sheets of moisture-resistant material, an absolutely flat surface is obtained. The disadvantage of drywall is the need for subsequent additional coating - for example, tiles, decorative plaster, paints and varnishes.
Plastic slopes
PVC panels can be used for both interior and exterior decoration. Plastic can be combined with any facade material, and especially with vinyl siding.
PVC slopes Source rem-okna74.ru
Expanded polystyrene
Expanded polystyrene panels are often used to design slopes when additional thermal insulation is required. But, like plasterboard sheets, they need to apply a decorative protective layer.
Slope finished with polystyrene foam Source o-remonte.info
Clinker tiles
The option using tiles is one of the most aesthetic. The material is often used for facades finished with porcelain bricks or tiles, decorative bricks for jointing, or simply plastered and painted.
Finishing with clinker tiles Source www.remontnik.ru
Lining
Natural lining is ideally combined with facades made of logs or timber, covered with a block house. The material harmoniously complements the composition of the exterior, especially when using platbands.
Finishing with natural lining Source 2gis.ru
Sandwich panels
The material consists of plastic plates, between the layers of which a rigid thermal insulating material is laid. The panels are suitable for both indoor and outdoor use. They harmonize perfectly with any façade cladding.
Vinyl lining
Available in a wide variety of colors and can be used in conjunction with any heat-insulating materials. Combines with any home exterior design.
Application for cladding external slopes of vinyl lining Source forum.na-svyazi.ru
Metal slopes
Galvanized steel sheets are particularly durable. The facade side is treated with a powder composition that provides anti-corrosion protection, durability and a beautiful appearance of the entire house. The sheets are extremely resistant to atmospheric factors, have high thermal and sound insulation properties, are easy to install, and do not require maintenance.
Sheet metal slopes Source oz90.ru
A natural stone
The use of natural stone is considered far from a budget option for designing slopes, but the decoration against the background of the facade looks very impressive. The material does not absorb moisture at all, therefore they provide an ideal humidity regime for double-glazed windows.
Natural stone has a magnificent appearance and unique texture, combined with brickwork and plastered facade.
Slopes finished with natural stone Source stoneplanet.ru