Vertical and horizontal blinds are popular products in the world that allow you to limit the amount of light entering a room. The products are used very often, their popularity is comparable to curtains! You can find a wide variety of vertical and horizontal blinds on sale, and if necessary, you can even purchase a ceiling bracket for blinds.
Horizontal blinds
Manufacturers offer several types of blinds
- Vertical;
- Horizontal;
- Accordion or pleated;
- Roll type of folding.
Vertical blinds have the form of vertical slats (strips) connected to each other, which move around their axis using a plastic chain. And also, they can be moved left or right.
The operating principle of horizontal blinds is the same as vertical ones. Only folding occurs from bottom to top.
Pleated - they look like an accordion, for this they are impregnated with special means so that they keep their corrugated shape. They can be attached to both a plastic window and a window opening.
Roller blinds - have the appearance of a continuous canvas that can be rolled into a roll, while opening or closing part or all of the window.
Depending on their materials, lamellas can be:
- metal;
- wooden;
- bamboo;
- plastic;
- made from fabric.
Installation of vertical blinds
Anyone can install such curtains with their own hands. If the blinds are short, they can be placed inside the window openings. Otherwise, installation is carried out on the wall or under the ceiling.
For error-free fastening, sequential instructions are given:
Step 1:Marking
The central point of the window opening is determined and correlated with the center of the blind cornice. You need to make marks along the edges of the structure with your own hands. Points for installing self-tapping screws are marked on both sides of the cornice closer to the center of the window block by about 5-6 mm.
Place the cornice against the wall so that the center of the cornice coincides with the center of the window, and make marks along the edges.
Step 2:Look by level
At the same time, you need to evaluate whether the slats are positioned correctly. Their lower part should be 1-2 cm above the floor level. The same amount must be retreated when installing short curtains (up to the window sill).
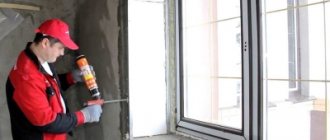
Step 3:Attaching the Brackets
Dowels are installed in holes prepared in advance with your own hands. The brackets are secured, this is done using self-tapping screws. Next, special clips are installed on these elements.
Be careful when using the hammer drill when drilling for bracket fastenings, otherwise part of the wall may break off. Step 4:Installing slats and chain
Step 4:Installing slats and chain
A cornice is attached, into which all that remains is to insert the runners and hang the vertical slats directly on them. The final touch is attaching the chain.
The slats must be hung in the exact order in which they are folded in the package. Otherwise, the design of the blinds may be damaged.
Which blinds are the best option for a balcony?
Before you start placing blinds on plastic windows, you should understand whether they are needed at all.
Will they become a hindrance when closing or opening the window? One thing can be said for sure - if a loggia or balcony is converted into a separate room, then blinds are definitely needed.
When choosing blinds, in addition to design and appearance, special attention should be paid to the following points:
- functionality and practicality of fasteners;
- It should be taken into account that not all types of fastenings are suitable for window units;
- practicality of blinds;
- It is better to choose plastic or fabric material for the balcony; wood and bamboo can create unnecessary noise.
How to take correct measurements?
If you decide to install blinds yourself, then you need to know a few important points. Windows do not always have a completely even shape, therefore, for measurements it is better to use a steel tape measure and measure everything down to the millimeter, in different places of the opening.
For a certain type of fastening, there are some nuances in measurements:
- If you are planning to install blinds on the wall, above the window opening, you should understand that the cornice will take approximately 5 cm. The length of the blinds is up to you to determine: either they will completely cover the window opening, or only to the lower edge of the window. According to the width of the blinds, you should set: 10 cm more than the opening;
- When installing blinds on a window sash, you need to measure the distance between two vertical glazing beads (this will be the fastening). You also choose the length yourself, and the width should be 3 cm larger than the glass to avoid unnecessary clearance;
- Placing blinds in the window opening is considered the most difficult procedure. The parameters are measured: according to the width and height of the window, while the height is calculated as the length of the glass with the addition of 1 cm to cover the rubber seals. It is important to consider that when folded, the blinds do not interfere with opening the window.
Installation instructions for concrete ceilings
For fastening use special latches included in the kit. They are installed on the ceiling. A cornice is attached to the bottom, into the groove of which the lamellas are inserted. Both vertical and horizontal blinds are attached using this principle. Only the brackets and the cornice itself differ, but the technology is generally the same. We will consider the installation using the example of vertical blinds.
To work you will need:
- ladder;
- pencil;
- roulette;
- drill;
- screwdriver;
- plastic dowels;
- self-tapping screws
First, a suitable location is determined. Blinds should not cling to the window sill or radiator, or interfere with opening the window. Usually it is enough to step back 10-15 cm from the opening. To verify this, a plumb line is lowered from the ceiling.
Blinds can cover just a window or an entire wall. But in the first case, it is better to make them 5 centimeters wider on each side, and in the latter case, retreat 2-3 cm.
Taking these distances into account, the extreme points of the cornice location are marked. The distances from the window opening must be the same, otherwise the blinds will hang crookedly.
Then the cornice is applied to the ceiling and the fastening points are marked. For standard models, 2-3 are enough (along the edges, with an indentation of about 10 cm, and sometimes in the middle). For long and heavy ones you will need more, approximately every meter.
The slab is drilled and dowels are inserted. The latches are attached with self-tapping screws, and the cornice is hung from them. Then the slats are attached by hooking the runners to the clips.
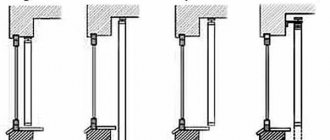
Basic window mounting options
There are two main methods for installing blinds on plastic windows, with and without a drill. The slats of the blinds are located on the cornice, and how this cornice will be held on the window, at the top of the wall or in the window opening, depends on the installation method.
Drilling installation method
Blinds for plastic window sashes are attached separately for each one.
The cornice is applied to the upper edge of the sash and the places for its attachment are indicated. For greater accuracy, at the places of fastening with screws, it is better to drill neat holes in advance. We attach the bracket, screw in the screws and fasten the cornice.
Afterwards you need to fix the fishing line that holds the slats. We make small holes directly opposite the line exit under the glazing beads at the bottom of the sash. We thread the fishing line through the plugs, and fix the plugs themselves into the holes.
The drilling method is used by placing cornices on the ceiling or wall on top of the window. To do this, make appropriate holes into which dowels are driven and brackets are secured with screws.
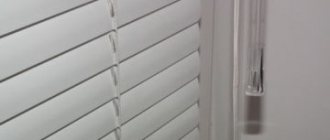
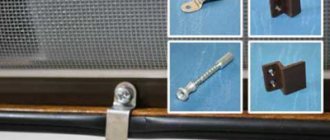
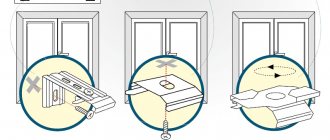
Features of fastening blinds
Rice. 9. Blinds with fastening to the sash.
Features of fastening blinds for plastic windows depend, first of all, on the type of their design. As mentioned earlier, vertical window blinds cannot be attached to a profile. Cassette and roller blinds do not need to be attached to the wall (especially since this may be unprofitable from the point of view of their design features). Horizontal blinds can be attached both to the wall (large-sized samples) and to the window profile (on each sash). The latter option makes it possible to use the rotating mechanism of plastic windows without raising the blinds, so it is more rational to choose it.
Roller window blinds
Rice. 10. Roller blinds with fastening to the sash.
Rice. 11. Roller blinds with wall mounting.
Attaching roller window blinds is the simplest procedure among all other types of blinds. The small dimensions and light weight of the structure make it possible to do without drilling and screws. Roller blinds in most cases are mounted on the window frame, but there are also cases of mounting on the wall. In this case, you should pay attention to its condition. If the wall is plastered, you need to check how firmly it holds. To do this, simply knock on the wall. If the sound is dull, this indicates that the layer of plaster is coming away from the wall. Therefore, before installing roller blinds on the wall, all defects should be eliminated.
Horizontal window blinds
Rice. 12. Horizontal blinds with sash mounting.
Rice. 13. Horizontal blinds with wall mounting.
Horizontal window blinds, as mentioned in previous paragraphs, can be attached both to the window profile and to the wall. When mounting on a frame using self-tapping screws, one important feature should be taken into account. Drilling is unacceptable in cases where it is necessary to preserve the heat-insulating and sealing characteristics of the profile (this applies to warm aluminum profiles and energy-saving double-glazed windows with an increased coefficient of heat transfer resistance). In this case, it is preferable to opt for attaching horizontal blinds to the window frame using double-sided adhesive tape (the thickness of the adhesive layer should be 1 mm).
Vertical window blinds
Rice. 14. Vertical window blinds with wall mounting.
Rice. 15. Vertical blinds with ceiling mounting.
Vertical window blinds can be mounted both on the wall and on the ceiling. The second option requires a more responsible approach. Light vertical blinds, the cornices and slats of which are made of plastic or fabric, are more suitable for it. First of all, it is necessary to ensure good adhesion between the dowels and the walls of the holes in the ceiling. To do this, a special adhesive solution can be applied to the dowel, which, after drying, will provide a fairly reliable adhesion. When attaching vertical blinds to walls, they must be inspected for structural damage and, if necessary, removed.
Cassette window blinds
Rice. 16. Cassette blinds.
Before installing cassette window blinds on the profile, it is necessary to mark the place where the cassette is attached (the box into which the blinds are assembled when closed). Next, you need to attach the blinds (on the back of the cassette there is double-sided adhesive tape, from which you must first remove the protective film). Then, if necessary, you can finally secure the cassette to the window profile using self-tapping screws (not acceptable if the plastic window profiles are heat-saving - drilling can reduce this characteristic).
How to remove blinds correctly
Over time, like everything else in the house, window structures become covered with dust, so blinds should be removed for cleaning. Each type has its own characteristics when removing.
Removing vertical blinds:
- we transfer the lamellas to the open state, after which we assemble them;
- release the chain from the weights and remove the weights;
- We remove each lamella: lift the slider clip and, moving it a little, remove the lamellas one by one.
Removing horizontal blinds:
- remove the cornice from the bracket;
- We assemble the lamellas at the top and look for the retainer protrusion;
- pull the lock towards you and to the right;
- remove the slats.
Removing roller blinds:
- there is a tongue on the bracket, you need to bend it using a screwdriver;
- remove the shaft by pulling it towards you.
Suspended ceiling installation
Often the concrete surface is not painted, but sheathed with various decorative materials (plasterboard, clapboard, plastic panels, etc.). Such a structure will not withstand a lot of weight, over time it will become covered with cracks and may collapse.
To attach horizontal or vertical blinds to a suspended ceiling, you need to install the embed in advance. This is a beam or board that is screwed into the future location of the cornice before installing the finishing. Then take self-tapping screws of such a size as to reach the mortgage. Then the installation proceeds, almost as in the previous case. The difference is small: wood dowels are not needed, and the fasteners can be screwed in immediately, without drilling a hole in advance.
If it was not possible to plan the location before the repair and a mortgage is not provided, use long screws. The fasteners are screwed through the decorative trim into the rough ceiling.
Armstrong-type suspension systems are widely used in offices, as they allow you to quickly level the ceiling. With them, installation is even easier; you don’t have to drill a hole, since special brackets are available. There are two bends on top of them that cling to the guides of the hanging system, and on the bottom there are latches for attaching the cornice.
The location of the brackets is determined in the same way as with a concrete ceiling, but taking into account the guides (choose perpendicular to the window). The bracket is placed at the desired point and rotated. A click means it is securely fastened.
Check again to see if all the points are located evenly. The cornice is attached to the latches and the blinds are assembled.