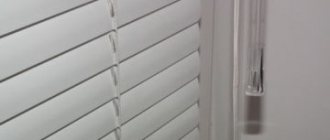
Accessories for roller blinds
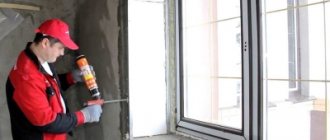
Important! For installation with drilling you will need: tape measure, level, simple pencil, sharp knife, drill, screws, screwdriver. We offer you to see what the design of a roller blind looks like and where it can be attached.
Methods for installing roller blinds
- Determine where the curtains will be placed.
- Mark the locations of the grooves.
- Drill holes in the designated places and attach the brackets.
- Mount the mechanism with the chain on one edge of the shaft with the blade.
- Check the functionality of the chain system.
- On the opposite side, insert a limiter into the shaft pipe.
- Secure the strip in the grooves and secure the ends of the pipe with clamps.
- Check functionality.
Installation method for roller blinds with drilling
Requirements for fastenings
Before you start comparing fastening methods, it is necessary to develop certain universal requirements that can be applied to any model of curtains and to any fastening elements.
Here are the properties that fastenings for roller blinds should provide:
- Reliability. Under no circumstances should a curtain attached to a window frame, wall or ceiling break or fall. After all, a falling structure can frighten a person nearby, injure him, or cause material damage (for example, knocking a flower pot to the floor).
- Ease of use. A fixed curtain should not interfere with attempts to open the window for ventilation or water indoor flowers standing on the windowsill. Also, roller blinds should be easy to open and close using the mechanisms available in the design (cord, chain, etc.).
- Possibility of dismantling if necessary. Before hanging curtains, think about what will remain in their place after they are removed for replacement. It is highly undesirable to choose fastening methods that will leave rough holes or other hard-to-disguise marks on the frame or wall.
Fastening safety becomes especially important if there will be pets or small children in the room. The child will certainly want to pull the hanging cords, and the cat will try to climb higher on the curtain. It is important that the curtain does not fall and that the cord does not cause injury or suffocation.
Based on these requirements, we will consider the main methods of attaching roller blinds to plastic windows and choose the best option.
What can you save on when buying plastic windows?
A plastic window is a modern design that is created by robots; human participation in this technological process is minimized. It would seem that then they should all be the same, but this is not so; if you look at the stands where sellers offer fragments of window structures, they all differ significantly in both price and characteristics. How can you avoid making a mistake and choose the plastic window that will meet all your requirements and save money at the same time?
One of the criteria for choosing plastic windows is the choice of profile brand; it is this that is cut into the necessary fragments from which frames and sashes are made. It is the name of the profile brand that is indicated on the protective film, which immediately attracts the consumer’s attention, because it is not removed until the installation of the plastic window is completed. Take into account the fact that the profile is manufactured by one company, the whole structure is assembled by another company, and the installation is carried out by a third company. What determines the cost of a profile? First of all, this is, of course, a brand. The cheapest frames will be made from profiles from domestic manufacturers, but if you prefer products from foreign companies, then find out in advance about the location of production facilities; if they are located in the Russian Federation, then their prices will not differ too much. Prices for branded profiles differ from the market average by 30-40%, as for a profile imported from Germany, it will cost you even more, prices differ by 2.5-3 times. At any profile production plant there is strict quality control, and the process of manufacturing the structure itself is carried out in accordance with strict technological standards, so the choice of a particular brand of profile depends only on you, and the location of production facilities does not in any way affect the quality of the finished product.
The cost of a window structure is also influenced by the class of the profile; there are profiles of classes A and B. Class A profiles are characterized by high mechanical strength, frost resistance and dimensional stability. It makes sense to choose class A profiles if the window structures are large-format or burglary-resistant. For residents of central Russia, the best option would be to install windows from 4 or 5 chamber profiles, the width of which ranges from 68 to 72 mm. The price difference between them and 3-chamber profiles is small, but the latter will freeze if the air temperature drops below 25°C. If you want to significantly save on energy, then it is considered necessary to increase the number of chambers to 6-8, the system width of such a profile should be at least 76 mm, they can also be filled with modern reinforcing insulation, but the cost of the window structure will double. This is advisable if your home is energy efficient or you live in a subarctic or arctic climate.
White windows will be the cheapest, any lamination will cost you more: one-sided - 20-30%, double-sided - 30-40%.
But you shouldn’t give up a mosquito net; it’s a convenient option for which you can and should pay money: 1. you will save yourself from annoying mosquitoes and flies; 2. it will cost you less than a roll version; 3. if you order it right away, it will be delivered to you along with the window, but if you want to purchase it separately, you will have to take care of the delivery yourself.
The number of sealing circuits also affects the cost of a plastic window; as a rule, it is 2. The presence of a third circuit will increase the sound insulation of windows by 2-3 dB, and will also protect the fittings from moisture, which will increase its service life. Premium systems are equipped with an additional circuit, the design of which includes 6 internal chambers.
There are no universal recommendations for choosing plastic windows, because each specific case has its own nuances, but now you know what affects the overall cost of a plastic window, this will help you choose the right design without overpaying.
How to attach roller blinds to windows?
Step 1. Take measurements
Step 2. Choose curtains
Blinds are one of the most practical types of window decoration. There are: horizontal, vertical or bay windows, with slats (slats) of various lengths. There are also many decorative options, such as: Roman blinds, multi-textured blinds, photo blinds, pleated and roller blinds. They can also be made of fabric, aluminum or wood.
- easy to clean with a vacuum cleaner, brush or damp sponge;
- if damaged, it is enough to replace a few slats and not buy new curtains;
- easy to adjust room lighting;
- the cheapest option for window decoration.
- when opening windows, the slats have to be “assembled”;
- occupy useful window area;
- fabric blinds can only be washed by hand in warm water no more than twice during their entire service life;
- some models limit the opening of sashes close to slopes;
- Metal blinds make a ringing sound when there is a draft.
Roller blinds can be made from different functional types of fabrics. Ordinary fabric curtains are characterized by a low level of light transmission; they diffuse light well.
- fabrics are resistant to fading;
- repel dust;
- many price categories and a large assortment;
- Can be combined with classic curtains.
- if the windows “sweat”, the curtains will stick to them;
- dry clean or vacuum cleaner only;
- Difficult to regulate light level.
Step 3. Preparing to install curtains
First of all, it is recommended to study the instructions that are included in each set of curtains. It’s also worth immediately laying out all the parts of the future mechanism on the table in the order in which they should be installed, so that not a single part gets lost or suddenly turns out to be superfluous. Next, we decide where we will attach the curtains.
- on the ceiling or upper slope of the window;
- on the wall above the window opening;
- into the pier on vertical slopes;
- on a blind window;
- on the opening sash.
Step 4. Install the curtains
In the case of blinds, fastening can be done using self-tapping screws, but if the curtains have to be removed, the holes will become very noticeable.
In addition, it is not recommended to drill plastic windows initially, so brackets and double-sided tape are an option. In general, the installation scheme is the same in all cases - the brackets are connected to holders equipped with a locking connection. A chain mechanism is put on one side of the roller. The structure must first be attached to the window, leveled and the exact location noted. Next, the brackets are attached to the surface using double-sided tape, which the manufacturer has already equipped them with. But before this, the surface of the window profile must be thoroughly cleaned and degreased. In this case, it is better to use alcohol-containing compounds, since all kinds of solvents can ruin the appearance of the coating.
The top film of adhesive tape is removed, the element is attached to the top strip of the window. The surfaces press well against each other. The clamp on the bracket must be snapped all the way. We install a chain mechanism that will open and close the curtain on the side where the spike with gear is located on the bracket. Then we insert the brackets into the roller.
Now you can check how well the curtains work. At this stage it will be clear whether the structure is mounted smoothly. This is very important, since, unlike classic curtains, roller blinds and blinds have a rigid structure and will not be able to “smooth out” distortions, thereby spoiling the appearance of the window; in addition, due to inaccuracies in installation, the mechanism may “stick.” If all the steps are completed correctly, the mechanism will work smoothly, and the curtains will serve you for a very long time.
Installation of blinds without contact with the window block
Fitting windows with curtains without affecting the window block is an ideal installation method when trying to maintain the integrity of the frame.
There are several ways to hang blinds so that the window unit is not used as a load-bearing base and is not in direct contact with the blinds. Each of the technologies used does not require the use of a single type of accessory, but involves the choice of one of several devices that differ in design.
Important! The metal-plastic profiles used for the manufacture of window and door units vary in quality, therefore, if the consumer has complaints about the products (destruction, changes in geometry), it is important to present to the manufacturer a binding without abnormal holes, which can be qualified as a reason for weakening of the structure and a basis for refusal of warranty service .
Methods for installing blinds without contact with the window block
We will group the methods for installing blinds by location, and describe the installation technologies that can be used in this situation.
Note: the designs of roller blinds and roller blinds (roller blinds) are related, so everything described below applies to both accessories, which have a similar purpose - shading the room and limiting the view through the window opening.
To the wall above the opening
If the window sashes open outward, or, when opening inward, the width of each of them is less than the depth of the opening (in the open position, the sashes do not protrude into the room beyond the plane of the wall), then such a window can be equipped with blinds by mounting them on the wall above the upper slope - without any impact on the window unit.
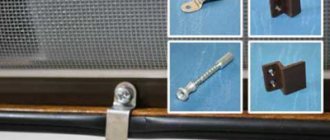
In this way, the following types of accessories can be installed on this base:
- horizontal:
- vertical;
- roller (roller shutter);
Installing blinds above the upper slope makes it possible to limit the penetration of sunlight into the room as much as possible if the device is 10-15 cm wider than the window opening in each direction.
Roller blinds for window openings with window sills flush with the wall and protruding inward
When using roller blinds or devices with horizontal slats in blinds, a canvas of the same width as the window sill looks aesthetically pleasing.
The length (height) of the device depends on the geometry of the window sill - if the front edge of the board is located flush with the wall, then the curtain rod should be 10 cm lower than it. If the window sill protrudes into the room, then the cornice must be laid on it, or use blinds with ceiling brackets fastenings that allow you to position the canvas at the desired distance from the wall.
The design of vertical blinds with a significant width of the slats also forces the use of ceiling installation, since the slats cannot be located close to the wall in order to be able to rotate around their axis.
Vertical lamellas
Installation of blinds over a window opening, depending on the design, comes down to attaching the upper cornice of the device (with horizontal or vertical lamellas) or a roll with slats to the wall above the slope. If you choose the correct dimensions of the device, its installation operation is simple and can be done independently.
Options for wall and ceiling placement of curtains with complete overlap of the window opening
The length of the upper slope is measured and a mark is placed on the wall opposite its middle, from which a section equal to the design height of the curtains above the window opening is laid perpendicularly upward. Through the top point of this segment, using a bubble level, draw a horizontal line on which the roll or upper cornice of the blinds will be located.
Marking horizontal lines and holes for mounting brackets
The device is applied to this line, centered relative to the window opening, and marks are marked on the wall at the drilling sites for attaching the brackets.
Using a drill and a drill bit, make mounting holes in the concrete, insert nylon holes into them and fasten the brackets along them with self-tapping screws.
Applying marks where holes are made
Important! Self-tapping screws should be used with a diameter of 4-5 mm and a length of at least 60 mm - the hole should not be limited in depth by the thickness of the plaster layer, so it is better to replace standard fasteners of a smaller size.
In roller blinds, the roll axis with the gear shaft is removed from the brackets. The brackets are mounted along the holes made, and then the axis with the shaft and the curtain is re-attached to them.
Installing a shaft with a curtain and a gear drive on an axle mounted on a bracket
The disadvantage of installing blinds on the wall above the window is the visual concealment of the volume of the room when the curtains are completely closed, since the niche above the window sill becomes covered from view.
To the upper slope
Installing blinds on the upper plane of a window opening is technologically no different from installing them on the wall above the window. The difference in arrangement lies only in the brackets used (ceiling fasteners) and the dimensions of the blinds - they must fit into the window niche.
You can use the same structures as those installed above the opening - with horizontal or vertical lamellas, as well as roll ones.
A necessary condition for the possibility of such an installation is outward-opening or static, fixed doors.
The marking is done as follows:
- A longitudinal line is drawn along the upper slope, parallel to the plane of the binding and at a distance of 7-10 cm from it (but not closer than 5 cm from the edge of the slope) - so that the handles for opening the shutters do not protrude through the curtain;
- The upper cornice assembly is applied to the line, centered along the niche, and marks are made along the holes in the brackets for drilling mounting holes.
Then the holes are drilled and the brackets are attached to the base.
The distance from the holes to the outer edge of the slope should not be less than 5 cm
When installing horizontal and vertical blinds, after marking, the brackets are removed from the device and attached to the base separately, and then the cornice is attached to them.
Important! If the slats of vertical curtains are removed from the guides for ease of installation of the curtain rod, then before removal they must be numbered for subsequent installation in the same sequence, otherwise the artistic design of the canvas as a whole may be violated.
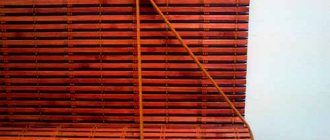
The installation of roller blinds on a slope is identical to the installation of slats, but when purchasing, the choice of blinds of this design must be correct - wall-mounted models are not always designed for mounting on the ceiling.
Roller blinds: on the left - only for wall placement, on the right - universal
The disadvantage of installing blinds or roller blinds in a window opening is the inevitable gaps between the canvas and the side slopes, which reduces the effectiveness of shading the room.
Step-by-step instructions for installing roller blinds
Installing roller blinds is a stylish, modern design solution. They can be installed in a private house, apartment, office, or commercial premises. Such curtains are not afraid of temperature changes, wet cleaning, dust, and dirt. Depending on the weight of the structure, its type, and design solution, there are several mounting options. Let's look at them in more detail.
Necessary tools, materials
To work you need to prepare:
- building level, ruler, simple pencil;
- screwdriver (screwdriver);
- drill;
- self-tapping screws, screws, dowels;
- double sided tape.
Tools for installing curtains on a plastic window
Note! When screwing in self-tapping screws, the integrity of the plastic window is compromised. After dismantling, deep holes will remain on the frame, and sometimes the plastic may crack. It doesn't look aesthetically pleasing.
Step-by-step instructions for installing open-type curtains (using self-tapping screws)
With such fasteners, the structure will last as long as possible and reliably. However, the use of self-tapping screws involves drilling holes in the frame or wall. To drill, you need to prepare a drill and suitable screws.
Main methods and their advantages
Despite the similarity in design of all models of roller blinds, there are noticeable differences between them. Therefore, before choosing a specific mounting method, it is worth studying the roller blinds you are purchasing.
Here are the main points by which such structures are classified:
- Length. The canvas is selected so as to hide the window sill or leave the possibility of its use.
- Canvas material. Not only its ability to reflect sunlight, but also the overall weight of the structure depends on the density of the material. The denser the fabric, the greater the total weight.
- Design features. If the Mini and Classic types are installed at the top of the window, then the Mix type seems to be upside down. Its roll is installed at the bottom, and the fastening, as a rule, is made directly to the frame.
Roller designs combine perfectly with other types of curtains and can only act as part of the window decor. Of course, in this case the installation becomes more complicated, since additional calculations are required so that all the elements do not interfere with each other.
As a rule, the roller shutter kit includes everything necessary to attach it to the wall and prepare it for use. But before starting installation, you must carefully check the completeness. It is better to immediately discover that something is missing and go to the store for the missing parts, rather than waste time on fruitless improvisations.
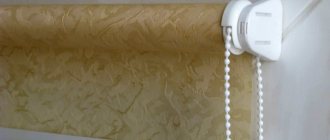
Magnetic tape
This mounting option is only suitable for a small product. It can be installed either on the wall or directly on the window. To do this, magnets are attached to the surface using a self-tapping screw or double-sided tape. They are placed on the curtain at the same distance. Next, the roll structure is applied to the fastener on the wall or frame.
Magnetic tape is a good device for attaching curtains.
There are many options for attaching roller blinds to a wall or window.
Roller blinds made from the right fabric allow you to achieve the desired level of illumination in the room
The choice depends on the type of structure, its weight, availability of tools for installation, etc.
Choose a curtain that matches the design of your room.
You can clearly see the whole process in the video.
Installing roller blinds on plastic windows largely depends on their type. The following types of products are distinguished on the curtain market:
- Classic open. The most popular option because it is easy to operate and has an aesthetic appearance. The entire structure is easily attached using corners to the top of the frame, and a regular shaft subsequently performs its function of rolling and unfolding the canvas. Thin guides are installed on the sides of the frame, capable of fixing the unfolded material so that it does not dangle.
- UNI cassette blinds are closed. The cassette box, made to match the color of the main curtain material, ideally hides the working shaft inside itself. everything else is similar to the classic look.
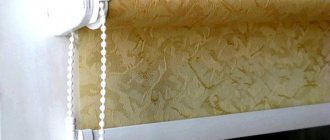
- MINI roller blinds, open and closed. The fastening mechanism (brackets, Velcro) allows them to be connected to the frame without drilling. The bottom of such a work is framed with a magnet, which fixes the open canvas to the window.
Types of blinds that are attached without drilling
Blinds can only be hung on the window sash without drilling; to avoid deformation from the load, they must be compact and lightweight. This fastening is convenient because you do not need to roll up or lift the curtains to open the window. The following types of blinds can be installed without drilling:
- horizontal blinds made of thin wooden and aluminum slats, 25 mm and 16 mm wide;
- pleated curtains;
- roller and Roman curtains - mini systems, small cassette systems, regular ones on a roller, including the most fashionable now day-night.
All about choosing and installing roller blinds
There are many types of light-protective sheets, but they have common features. All of them consist of a metal tube-roller, or rod, on which fabric is wound: bamboo or cotton material. The length is adjusted using a chain that is attached to a rotating mechanism on one side of the roll.
Usually at the bottom of the curtain there is a steel or wooden weight bar that protects it from deformation, allows it to hang evenly and fit tightly to the glass. The latter is achieved using a pair of small magnets that are glued to the bottom of the frame and attract the weighting material, if it is metal.
You can take a more complicated route and thread a fishing line through the guides, which will hold the roller shutter during wind fluctuations and opening in the “window” mode. It must first be threaded into the upper fasteners several times so that when tensioned it does not pull out. Unwind it all the way and insert it into the special eyelet on the weight bar. At the bottom of the frame, attach small corners with holes for fishing line. Pull it there, tie it, cut off the excess.
Sometimes manufacturers install a spring inside the shaft. In this case, there is no need to fiddle with the cord with your hands to open or close the “roll”. It is enough to pull the plumb line located on the bottom bar with a little effort.
Cheap plastic windows or the stingy one pays twice
Today, in Moscow alone, there are about 800-900 companies that produce and sell plastic windows from PVC profiles. Of these, no more than 20% are serious market players who shape demand and pricing policy. But the offers from even these 20% of companies vary so much that they can often confuse their clients.
The natural desire of a Russian buyer is to buy the same thing, but for less money. It often seems to us that if a cheap product looks no different from an expensive one, then it is not inferior in quality.
It is possible to buy cheap plastic windows in Moscow with installation, but you should approach the choice of manufacturer very responsibly. When choosing a decent option, it is important to understand that a truly high-quality product cannot cost a penny. Skilled labor and high-quality components are invested in it, which form the real market value. And if the price seems unreasonably low, then it’s worth thinking about what lengths the manufacturer went to in order to attract the buyer with such a “profitable” offer.
At best, the low price will turn out to be a marketing ploy, but in reality it will be at the level of competitors. At worst, the price reduction will occur due to a decrease in quality, and savings “today” will result in a series of troubles “tomorrow”. Right now we invite you to familiarize yourself with the points that affect the reduction in price of a window. We hope they will help you approach the choice of plastic windows with greater responsibility.
Formation of the price of a plastic window
Profile
One of the main cost items in the manufacture of a plastic window is the profile, which consists of plastic and metal. By reducing the amount of plastic or reducing its quality, you can significantly save on the production of PVC products. And there are 3 ways how this can be achieved:
- Production of profiles from recycled materials and cheaper components. Such a “replacement” can lead not only to a decrease in the performance characteristics of the window, but also to a change in its color or even the appearance of an unpleasant odor.
- Use of low-quality modifiers and stabilizers. They are largely responsible for the durability of the window, its color and resistance to environmental influences (temperature changes, precipitation, sunlight). In other words, if inferior modifiers are added, after 2-3 years the window will lose its novelty and become fragile and fragile.
- Reducing the thickness of the profile walls. This move directly affects the strength and rigidity of the entire structure.
Reinforcement
To increase the rigidity and strength of a plastic window, reinforcement is used. As a rule, it is made from special galvanized profiles with a wall thickness of 1.5 mm. Saving on this component can lead to serious consequences, but unscrupulous manufacturers still take this risk:
- Firstly, they use metal with low-quality coating or no coating at all, which reduces its resistance to corrosion, and, therefore, its durability.
- And, secondly, they reduce the thickness of the reinforcement to 1.1 mm. A window with such reinforcement will no longer be able to withstand the design loads.
Double-glazed window
A plastic window consists of almost 80% double-glazed glass, so it makes a significant contribution to the total cost of the entire structure. The first way you can save on double-glazed windows is to use glass of a lower grade. As a result, the client does not receive a perfectly smooth and transparent surface of float glass, but its cheap and cloudy analogue, and, moreover, with air bubbles.
The second option is to save on glass elements such as sealants and desiccant. In this case, the buyer is faced with constant fogging of the glass from the inside, as well as a violation of the tightness of the glass unit.
Seals
The main task of the sealing contours is to ensure a tight fit of the glass unit to the frame and sash, as well as tight closure of the sashes. High-quality seals help avoid drafts and improve the thermal insulation properties of the window. While seals made from low-quality materials not only do not perform these tasks, but also lead to changes in the geometry of the entire plastic window.
Accessories
One of the weakest points of a plastic window is the fittings. It is constantly exposed to mechanical stress, so increased requirements for reliability and durability are placed on it. Cheap fittings simply will not be able to work stably under constant loads; they will fail within 2-3 years.
Equipment
The production of high-quality and reliable windows is only possible using specialized equipment. The leaders in this area are German and HAFFNER. However, even today you can find “masters” who produce windows at home. Naturally, the quality of such products leaves much to be desired.
Work force
Any, even the most proven technology, can be ruined by improperly trained people. Qualified personnel are the basis of production. Savings in this area in almost 100% of cases lead to errors and defects during product manufacturing. Poor quality welding of window corner joints, improper installation of seals and dehumidifiers, violations in the creation of functional openings - these are only a small part of the troubles that an inexperienced workforce can cause.
Installation
Even the highest quality and reliable window, manufactured in full compliance with modern requirements and standards, can be ruined if installed incorrectly. Window installation should only be carried out by specialists who have the necessary qualifications and solid experience. And their work cannot be cheap.
An “economical” installation option almost always entails the following consequences:
- The sashes touch the frame when opening/closing.
- Failure of fittings.
- Formation of a gap between the sashes and the frame.
- Lack of adjustment options.
Design features
All roller blinds are structurally composed of a light-protective fabric and a shaft with control elements. The canvas can be raised, wound around a shaft, or lowered, blocking access to external lighting inside the room.
There are two main types of roll systems:
- Open type. In this case, the shaft with a strip of fabric wound on it is not covered with a protective box, but is installed on the end fasteners in an open manner.
- Closed type. For such a system, the shaft is installed in a special box. Firstly, it protects structural elements from external damage and dust, and secondly, it gives the curtains a more presentable appearance. By choosing the desired color of the box, you can organically fit it into the surrounding interior.