The ability to smoothly regulate room illumination, ease of use, ease of maintenance and fastening of blinds are the main arguments that designers give when choosing this type of window structures. Manufacturers produce horizontal, vertical, cassette, and roll models. Their reliability, service life, and functionality largely depend on the accuracy of measurements and how correctly the installation was performed.
You can install blinds on your windows yourself.
Blind design and installation options
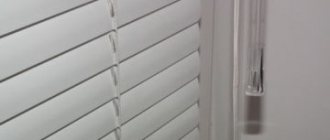
The designs presented by manufacturers are divided into horizontal and vertical types depending on the location of the lamellas. In the first case, the materials for making plates are most often plastic, metal, wood, their standard width is 16 or 25 mm. The position is adjusted by a rotating mechanism located inside the cornice, made of U-shaped aluminum or PVC profile. To fix and control the lamellas, threads or chains are used, and the angle of rotation is changed using a cane (stick).
Vertical blinds are visually similar to classic curtains. They consist of fabric elements with a width of 89 or 127 mm. The choice of model is determined by the area of the room (for compact rooms, narrow plates are purchased). The length can reach the floor or window sill.
The canvas moves to one side or from the center to the walls. A chain and cord are provided for control, which help to rotate and move the slats.
Installation of blinds involves securely fastening the curtain rod to the brackets that manufacturers include in the package.
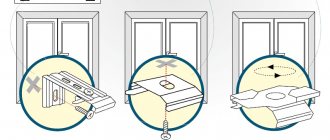
Blind design.
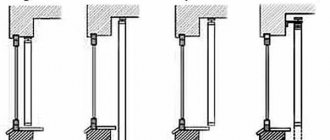
Taking into account the features of future operation, choose one of the following installation methods:
- On the sash (with or without profile drilling). Arguments in favor of this method include the ability to use the window sill as a functional area and convenient opening regardless of the design.
- On the ceiling. The minimum distance to the corner above the window is 5 cm.
- To the wall above the window. For shallow slopes, long brackets are used.
- In the opening (in this case, the surfaces adjacent to the glass unit are not covered by the blinds). The depth of the structure can be adjusted at the discretion of the owners.
The dimensions of the canvas and the features of its operation depend on the chosen installation method. Therefore, it is worth deciding before purchasing.
Attaching to a suspended ceiling
You need to think about this in advance, before installing the canvas. Then there is the opportunity to install a mortgage or make a niche.
The beam is installed in the place where they plan to hang the cornice. The height is calculated so that the edge touches the stretch ceiling. A beam that is too large will stick out, while a small one will pull in the fabric and wrinkles may form.
After installing the stretch ceiling, find the location of the beam. The latches for the cornice are mounted on self-tapping screws, which are screwed into the wood without dowels. The canvas must first be strengthened - stick on pieces of reinforced tape or small tread rings so that the hole does not come apart from the tension.
The second method allows you to make a hidden fastening, in which the blinds are installed in a niche. To do this, the ceiling is not stretched over the entire area, but retreated from the outer wall. The distance is made such that the cornice fits. A beam is screwed a few centimeters from the window, and baguettes for the stretch ceiling are attached to it. The height is calculated flush with the profiles on the walls.
After stretching the canvas, they begin to install the cornice and assemble the blinds. The work is carried out in the same order as with a painted concrete ceiling. But you need to be especially careful not to accidentally pierce or cut the fragile PVC film, which is used as a canvas for suspended ceilings.
If the installation is planned after the installation of the covering, special wall brackets in the form of corners will help. They are screwed to the wall, and there are holes on top to which you can attach the cornice. It is necessary to carefully calculate the height and length of the screws so as not to damage the stretched film.
Thus, the blinds can be attached to any ceiling surface. Wall brackets or long screws will help solve the problem, even if the installation was not planned in advance.
Taking measurements
Before purchasing and installing blinds with your own hands, craftsmen recommend measuring each window separately (even if they have visually the same dimensions), recording the data obtained in detail.
In the window opening
It is necessary to place the canvas within the available free space so that you can adjust its position without the slats touching adjacent surfaces. To do this, the width of the plates should be 2 cm less relative to each side. When determining the height of the blinds, subtract 2-3 cm from the obtained value so that they do not touch the window sill. If the slope has geometry errors, measure its parameters at the level at which you plan to install the structure.
It is necessary to take measurements in the window opening.
On the wall
When choosing this method of fastening, so that the canvas is correctly placed on the window and reliably protects the room from ultraviolet radiation, the length of the structure should exceed the size of the opening by 10 cm, and the width by 20 cm. You can increase the final dimensions of the blinds in accordance with personal wishes .
Horizontal blinds are most often installed on the wall.
On the doors
If the double-glazed window includes several elements, the blinds are installed on the frame and secured with double-sided tape or screws. To prevent sunlight from penetrating into the room, the width of the lamellas should be 3 cm larger than the glass. This will ensure free movement of the profile when opening, the ability to turn the handle without interference.
Blinds are installed on a window.
Common breakdowns and troubleshooting methods
Most often the lamellas become unusable. They may become deformed, break or lose their appearance relative to the coating.
According to their prevalence, cords can be called further. In most cases, they are wiped due to frequent changes in the position of the slats. It is less likely that this cable will break.
Mechanism breakdowns are less common. This could be a crack in a plastic part or foreign elements getting into metal parts that are driven.
Most of them can be eliminated. You can contact specialists, which you will have to pay if the case is not covered by warranty. Therefore, owners of blinds often begin repairs on their own.
Swivel mechanism
If the blinds do not close completely, then this is a sign of a malfunction in the mechanism. Of all the possible troubleshooting processes, repairing it is considered the most difficult. Therefore, you should prefer to contact specialists.
If, nevertheless, the replacement of the damage will be carried out with your own hands, then you should start by remembering the location of all structural elements.
Next you need to do the following:
- remove the plugs;
- pull out the shaft with the device attached to it;
- separate parts;
- pull the cord out of the broken one and insert it into the new part.
Then everything happens in reverse order. That is, fastening the mechanism and assembling the structure. The main thing is not to break the sequence. Otherwise, new troubles may soon arise.
Slat repair
It is almost impossible to fix an unusable plank. Therefore, the only way to fix the problem is to completely replace the lamella.
The process looks like this:
- plugs are dismantled;
- the cable is pulled out;
- The defective part is replaced.
Next, the work is carried out in reverse order.
Most craftsmen recommend entrusting the repair of wooden blinds to specialists. It will be more difficult to resolve this issue on your own due to the fragility and softness of the material.
Replacing latches and hooks
This activity has to be carried out if the slats stop turning. Replacement parts can be purchased at specialty stores or ordered directly from the manufacturer. In both cases, it is important to understand that the dimensions of the elements may be different. Therefore, you need to measure the parts or take them with you for comparison.
The repair process includes several steps:
- dismantling a part that has become unusable;
- installation is carried out in a strictly stationary position of the rotating mechanism.
Next, insert a cane into the hook. If we are talking about a latch, then it changes according to the same principle.
Broken cord
How to fix horizontal blinds if the cord comes off? Before you purchase a new one, you need to take measurements of the curtain design. The replacement looks like this:
- dismantling all remains;
- the new product is passed through the mechanism so that it ends up between the cylinder and the roller;
- then it passes through the hole in the basket and is threaded between the ladder;
- the second part of the product is refilled using the same algorithm;
- then the cable is pulled through the holes in the lamellas, going around the ladder from different sides.
The final step is to tie a knot outside the plug.
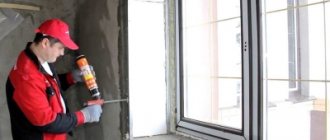
Installation of blinds on plastic windows
The work is carried out in several stages. After taking measurements and markings, if necessary, prepare holes for fastening. At the same time, minimum distances are maintained from the edge of the opening to the boundaries of the lamellas in order to ensure reliable protection of the room from ultraviolet radiation.
Installation of blinds is carried out in several stages.
Depending on the chosen method of placing the structure relative to the plastic profile and slopes, self-tapping screws or screws are screwed in and brackets are mounted. Once clicked, they will be securely fastened.
After connecting the hook of the rotary device to the control element, the functionality of the product is checked.
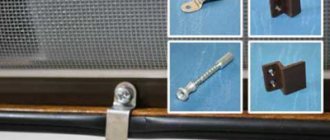
Types of fastening
In terms of reliability, builders in most cases recommend fastening blinds using self-tapping screws, screws and dowels (the choice is determined by the base material). If necessary, brackets can be used. If you plan to install the leaf on the sash without drilling, in addition to double-sided tape, craftsmen often decide to install plastic overlays that are fixed to the profile using hooks that are placed on the upper end surface of the sash.
Blinds are best secured using self-tapping screws.
Installation Features
Each type of blind (pleated, cassette, vertical, horizontal) requires consideration of design features when installing.
Horizontal blinds
Before hanging the canvas, you should take into account the characteristics of the installation location and choose a model with a special coating that protects the slats from external factors (deposits on the surface of the plates of fat, dirt, moisture). You need to hang inclined structures so that the lower strips are secured, without sagging.
Horizontal blinds must have protective slats.
Vertical structures
Products of this type have become a convenient replacement for classic curtains in homes, offices, and administrative buildings. There are several options for fixing the light-protective structure with fabric slats. The choice depends on the operating conditions. The installation process differs in that the runners have to be assembled. To ensure a stable position of the canvas, weights are suspended at the bottom of the structure.
Vertical designs are a convenient replacement for classic curtains.
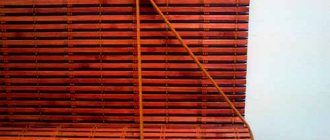
Roller blinds
To assemble the structure, you will need fasteners for the cornice and a strip at the bottom. Self-tapping screws are most often used, which ensure maximum reliability of the structure. They can be replaced with adhesive tape (a professional material that can withstand high loads).
Roller blinds are a simple design that consists of fabric.
Cassette curtains
The tension fabric is fixed within an open or closed frame. The peculiarity of the installation is that, depending on the architecture and purpose of the rooms, the position of the blinds can be adjusted relative to the top of the opening or window sill using guides.
Cassette curtains are tightly fixed in the window frames.
1. Ceiling bracket for attaching vertical blinds to the ceiling Art. BK 432 - 40 rubles.
.
2. Wall bracket 75 mm for mounting vertical blinds on the wall Art. BK 424 assembled - 70 rubles.
3. Wall bracket 100 mm for mounting vertical blinds on the wall Art. BK 425 assembled - 85 rubles.
4. Wall bracket with extension assembly for attaching vertical blinds to the wall - 140 rubles.
5. Wall bracket extension 145 mm Art. VK 433 - 50 rubles.
6. Universal bracket for mounting horizontal blinds (wall/ceiling) Art. X25K 07 - 60 rubles.
7. Ceiling bracket for vertical blinds on “Armstrong” “without drilling” Art. BK 436 — 60 rubles
8. Lower curtain rod holder for attaching horizontal blinds Art. X25K 11 - 50 rubles.
9. Bottom curtain rod holder type B (with counter part) for fastening horizontal blinds Art. X25K 11 B - 60 rubles.
10. Cable with clamps for inclined horizontal blinds (set) - 220 rubles m/p
11. Bottom bracket type B for inclined configuration Art. NK 03B - 90 rubles.
12. Brush for cleaning horizontal blinds Art.X25K 29 - 400 rubles.
13. Control circuit No. 10 SK standard plastic Art. VK 411CK — 100 rubles m/p
14. Bracket for mosquito net: lower 10 mm - 40 rubles; top 20 mm - 50 rubles.
mm
15. Magnetic retainer of the bottom strip for horizontal blinds with fastening with self-tapping screws - 200 rubles
16. Magnetic lock of the bottom strip for horizontal blinds “without drilling” - 180 rubles
17. Magnetic strip clamp in a plastic case (without drilling the frame) - 100 rubles.
18. Control rod connector for horizontal blinds Art. Х25К 26 – 70 rubles
19. Control rod for horizontal blinds (transparent) Art. Х25К — 80 rubles m/p
(Horizontal blinds control handle assembly: hook, rod (up to 1 m/p), tip - 190 RUR/pc.)
20. Control rod hook Art. X25K 23 - 60 rubles.
21. Tip of the control rod for horizontal blinds Art. X25K 26 B - 60 rubles.
22. Insert into caliper GZ Art. Х25К 14 – 60 rubles
23. Side cover (plug) lower GZh Art. X25K 17 - 60 rubles.
24. Upper side cover (plug) GZh Art. Х25К 18 – 50 rubles
25. Universal cord clamp right (left) GZh Art. Х25К 16U — 160 rubles
26. Rotary mechanism GZ Art. Х25К 12 – 200 rubles
27. Top bracket for PVC windows for fastening blinds without drilling the window frame Art. Х25К 09 – 350 rubles
28. Lower bracket for PVC windows for fastening blinds without drilling the window frame Art. Х25К 10 – 390 rubles
29. Fixation of the control rod for horizontal blinds for fastening to PVC windows “without drilling” Art. Х25К 17 – 250 rubles
30. Control handle for interframe blinds Art. MK 06 70 cm - 260 rubles.
31. Control handle for inter-frame blinds Art. MK 06 90 cm - 280 rubles.
32. Control handle for inter-frame blinds Art. MK 06 120 cm - 300 rubles.
Production of control handles for inter-frame blinds according to the size of the curtain from 11 cm to 137 cm - 450 rubles.
33. Control handle lock for inter-frame blinds Art. MK 07 — 70 rubles
34. Rope holder for inter-frame blinds Art. MK 03 — 60 rubles
35. Bottom chain for vertical blinds 89mm plastic Art. BK 409 - 70 rubles m/p.
36. Slider standard V34 with distance for vertical blinds Art. VK 402 - 30 rubles.
37. Bottom weight 32 g for blinds 89 mm for vertical blinds Art. BK 405D — 55 rubles
38. Rope weight set for vertical blinds Art. VK 421K — 120 rubles
39. Control circuit for vertical and roller blinds, plastic - 100 rubles m/p
40. Control chain holder (clamp) for Isotra cassette blinds - 70 rubles.
41. Izolight cassette blinds control circuit clamp - 90 rubles.
42. Stand tiles for Isotra cassette blinds - 50 rubles.
43. Control circuit Art. KG25 (for cassette systems Isotra, Isolite, Venus) - 70 rubles m/p
44. Control circuit Art. KR/K19 3.2 mm (for fabric roller blinds mini, zebra) - 70 rubles m/p
45. Rope for horizontal blinds 1.2 mm white Art. GZH Kh25K 05 (for horizontal, inter-frame, inclined blinds 16/25/50 mm) - 20 rubles m/p
Tips and tricks for use
Manufacturers most often provide a guarantee for blinds with a height of up to 2.5 m and a width of 22-220 cm (larger canvases consist of several independent parts for ease of care and use).
Recommendations for using structures:
- Before purchasing, pay attention to the equipment: fasteners, controls (the blade can be adjusted using a stick or chain), functionality.
- Before starting installation work, consider whether convenient access to the controls will be provided for each family member.
- If possible, you should not allow the shutters to open when the blinds are not in the assembled state.
- Periodically, the mechanisms require maintenance (removal of accumulated dust and other contaminants).
If you have detailed instructions, select high-quality designs, and take accurate measurements, self-installation of blinds in most cases goes quickly. To ensure long-term operation without breakdowns, it is enough to follow the basic rules of use and care.
Aesthetics and practicality
Just recently, blinds were perceived as nothing more than some kind of foreign exotica. But quickly enough our fellow citizens, accustomed to traditional curtains and drapes, were able to appreciate the practicality of use and the aesthetic beauty of these structures.
From then on, the “triumphant march” of these light-protective devices, invented back in the 18th century in the USA, began through apartments and offices in our country. Today, we no longer perceive them as something unusual - more and more owners of residential and office premises give preference to these easy-to-use lattice structures.
The only negative that can be pointed out is the higher price of blinds compared to classic fabric curtains. However, the overall cost of the structure can be reduced if you install it on the windows yourself.