Using the can without shaking first
Polyurethane foam consists of many components. The reaction between them occurs only in open (and humid) air. In the cylinder, the substances included in the “cocktail” almost do not interact with each other. And since they all have different densities, separation begins quite quickly. Dense, heavy liquids sink to the bottom of the container, while light liquids rise. And if you do not shake the can before use, the foam output will be weak and uneven.
To effectively remove foam from the container, before use it must be shaken at least 20 times, holding it with the valve facing up.
How to clean a dried foam canister?
Agree, throwing away a half-used container of polyurethane foam is, at a minimum, not rational. What to do if there is nowhere else to blow it out? As a rule, it dries out quite quickly, and after 5-6 hours it is almost impossible to squeeze anything out of the balloon. But this is only at first glance - inside it is in normal condition. Therefore, there is no point in throwing away unused foam, even if the container does not show any signs of life - it can be cleaned and reanimated, returning it to working condition.
How to clean a foam bottle?
The first sign of the working capacity of a cylinder with polyurethane foam is the mobility of the fitting - if it does not rotate around its axis, it means that it must be turned by force. We lightly take it with pliers and slowly turn it - first in one direction, then in the other. The task is to make the fitting rotate freely around its axis - if you have achieved this, then be sure that subsequent actions will revive it one hundred percent. If you can’t twist the fitting, then that’s it – the cylinder is heading straight to the landfill. This is one of the reasons why it is necessary to clean the foam container as early as possible - almost immediately after it dries.
Let's go further - in order for the cylinder to function fully, the fitting itself must be cleaned of dried foam. Everything is simple here - for this you will need a long self-tapping screw. It must be screwed into the dried foam, which is located in the cylinder fitting, and with a sharp movement pull it out of there along with the dried foam. This task is quite simple to deal with - the process is somewhat similar to uncorking wine bottles.
Once the old foam has been removed from the canister nozzle, it's time to check it. To do this, hold the cylinder with the nozzle up, lightly press it - if you hear the hissing of air, then everything is in order, and for the restored foam cylinder to work fully, all that remains is to clean the tube.
READ ALSO: How to choose a reliable tile adhesive?
If you look at it more closely, you will notice that it consists of two parts: a straight section and a bent section. We separate them with our hands.
As a rule, the process of separating them is carried out quickly. Parts of the tube just need to be pulled forcefully in different directions and you can start cleaning.
There are no problems with cleaning the straight section of the tube - a very long screw, thick wire or a long knitting needle solves almost all problems.
Here you can do the same as in the case of the fitting - screw a self-tapping screw into the foam and pull out a piece. In general, it is advisable to clean it in parts, first on one side of the tube, then on the other - this is even easier than picking out the foam from the tube with a smooth knitting needle.
The curved area is a little more difficult to clean, although not by much. Everything is done exactly as in the case of a straight tube. The quality of cleaning can be checked with air - you just need to blow into the bent part of the tube.
That's basically it. We assemble the parts of the tube into a single whole, install it on the cylinder and you can start foaming.
How to prevent a container of polyurethane foam from drying out?
It is easier to anticipate any unpleasant situation than to correct it later. In the case of a polyurethane foam cylinder, this is truer than ever. In order to prevent the foam from drying out and prolong its life, it must be purged with a reagent gas, due to which the foam comes out.
To do this, you need to install the cylinder vertically with the nozzle up, and lightly press the valve to blow it out for at least one second. At least in this way the remaining foam will be removed from the fitting. Well, you can always clean the tube. It is very important in this case not to remove it from the cylinder - the foam in the tube will dry out and prevent air from entering the cylinder nozzle. It is this nuance that will help prevent the foam container from drying out completely over the course of several weeks.
Heating foam on fire
In addition to liquids, polyurethane foam contains a flammable gas propellant. Strong and sudden heating of a pressure cylinder can (and often does) lead to an explosion. And even if it does not lead to fatal destruction, it will take a long time to wash the floor, ceiling and walls of the room from foam. And this is quite difficult to do.
To avoid this extremely unpleasant situation, the balloon should be placed in a basin of hot water for 5-10 minutes. This will ensure smooth heating.
Cleaning the fitting from foam
First, you need to clean the fitting itself - that is, the valve or outlet device that is located on the cylinder. This must be done with the utmost caution, since it is possible that events will develop when not only the master himself, but also the room in which he performs the work ends up in the foam.
A large garbage bag, inside of which all manipulations with the cylinder must be carried out, work clothes and attentiveness are enough to prevent this from happening.
The first step is to carefully disconnect the outlet pipe from the fitting and press on it. If there is no hissing, it means it is clogged and needs to be cleaned. Then you need to take pliers, carefully clamp the fitting and try to turn it around its axis.
If it rotates, there is hope of reviving the balloon.
To do this, you should screw a self-tapping screw into the fitting (or rather, into the foam that has dried in it) two or three turns (no more, so as not to damage the part), and then pull out the self-tapping screw along with the remainder of the product, using it like a corkscrew. Usually this is enough for the fitting to come free. The test is still the same - press and hear a hissing sound.
Incorrect position of the cylinder when spraying
It would seem logical to spray the material while holding the container with the nozzle up, but as practice shows, it is better to turn it upside down. Then the light propellant gas contained inside will rise and press on the foam, providing maximum yield.
But what if you need to fill a seam in a hard-to-reach place, for example, under the ceiling? To do this, you can make a simple device by putting a flexible tube on the nose of the cylinder and attaching a stick holder to its free end.
Mechanical cleaning
The mechanical cleaning method is used in the second case - when the pistol was not regularly maintained, and after several uses the foam near the connecting thread, trigger and in the channel hardened and literally turned into stone.
Removing foam that has turned to stone
The density with which it is packed under pressure from a cylinder, combined with its strong physical properties, makes the material in this case practically invulnerable to any solvents. The liquid poured inside the gun is not even able to make its way through the channel, which makes this cleaning method impossible. To do this, you need to use a mechanical method.
Applying foam to a dry surface
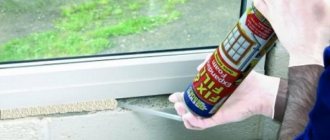
Before applying polyurethane foam, the surface must be moistened.
A prerequisite for hardening of polyurethane foam is high air humidity (40-60%). If weather conditions do not meet this requirement, the surface should simply be sprayed with water from a spray bottle. If the foam has to be applied in two layers, the first one should also be pre-wetted.
When working in cold weather, do not wet surfaces with water, as this will lead to icing. For sub-zero temperatures, a special “winter” foam has been developed
How to disassemble a pistol
As a last resort, when the methods described above do not help, you must resort to disassembly to clean the parts of the foam gun individually.
Disassembling the foam gun
Using pliers or an adjustable wrench, you need to unscrew the mechanism that is responsible for supplying material from the cylinder - it is located in the recess for its fastening.
p, blockquote 26,0,0,0,0 —>
After this, the trigger mechanism is disconnected and the gun barrel is pulled out, if necessary, all the corresponding nuts and bolts are unscrewed. After disassembly, each part can be individually treated with acetone, after removing any large remaining foam with a knife. The Kraftul and Stayer models are assembled in reverse order.
p, blockquote 27,0,0,0,0 —>
Below is a video that shows how you can clean a dirty nail gun from dried foam.
p, blockquote 28,0,0,0,1 —>
What to do if the valve does not allow foam to pass through?
High-quality polyurethane foam has excellent characteristics; to achieve these indicators, the manufacturer makes every effort to ensure that its products work and bring pleasure to the user. But there are nuances that are beyond the control of even the construction chemical giant. So, aerosol packaging and the valve for it are mass production, which is almost impossible to control individually. A good manufacturer of polyurethane foam uses containers only from trusted factories. If the valve is defective, then it may release gas from the cylinder or allow moisture to enter inside, where the polypropylene will interact with it and harden, or it may simply not work when pressed.
The operation of the valve on a polyurethane foam cylinder is also affected by the storage of the building material itself. It is strictly forbidden to store the cylinder in a horizontal position, as well as in damp and cold rooms. If the cylinder is kept with the valve down or horizontally for a long time, pre-polymer flows into it and crystallizes, thereby clogging the outlet. Also, if the polyurethane foam is stored in a damp room, then moisture can get under the valve and a crust of frozen foam will form inside the cylinder, which is difficult to disturb. The storage temperature is clearly defined by the manufacturer, so it is not intended to violate these limits. With prolonged exposure to cold temperatures, the polyurethane foam in the cylinder changes its structure, shrinking and collecting in lumps, which subsequently clog the cylinder valve. The same thing happens when exposed to increased heat.
If you find that the valve in the cylinder does not allow foam to pass through, or does not do it well, you can try to carefully adjust the rod with a slight movement, tilting it to the side or slightly pressing it inward. It is also worth gently tapping the ring on the cylinder, which also affects the valve itself. If the rod moves, then there is a possibility of activating its actions; if not, then most likely it will be impossible to activate the cylinder.
It is strongly not recommended to pierce or drill the cylinder or valve; this action will most likely result in uncontrolled leakage of polyurethane foam onto the surface. If the product is defective, it is best to return it to the seller; to do this, you must preserve the integrity of the packaging and the receipt (if there was one). Defective goods must be returned in accordance with the legislation of Ukraine.
The Ferom+ company complies with the rules of transportation and storage, therefore it guarantees the quality of its products. Buy high-quality construction chemicals from responsible sellers and enjoy your purchase.
How to open a container with foam frozen in the outlet valve
In one of the previous articles, I talked about how to preserve a container of household polyurethane foam in order to reuse it. For those who haven't read it, I recommend taking a look here. Today I’ll tell you what to do if construction foam has frozen in the tube and valve of the cylinder.
Let’s imagine this situation: you remembered a half-used bottle left over from a previous apartment or house renovation when you needed to “fill up” an unexpectedly discovered gap. Searches in the corners of the bathroom or closet were crowned with success: the required cylinder was found, but the polyurethane foam had dried in the plastic tube . What to do? You shouldn’t press the adapter with all your might: in the best case, you’ll break off the finger stops, in the worst case, you’ll damage the valve and end up with polyurethane sealant residue on your clothes and, possibly, the entire room. Also, do not heat the cylinder with hot water or on a gas stove - it may turn out even worse than in the photo at the beginning of the article.
We will act technically and carefully. Firstly: let's prepare a garbage bag, just in case there is a fireman. Secondly: let's wear gloves. It is better to put aside the Versace suit and wear a simple T-shirt and sweatpants. Third: prepare acetone (a solvent will also work). Let's consider possible situations, in increasing complexity, the scale of the tragedy, so to speak.
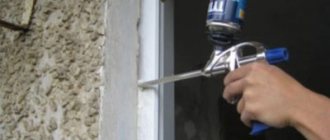
If the polyurethane foam has frozen in the supply tube
First of all, we will try to remove the adapter tube by unscrewing it along the thread of the plastic fitting; you should slightly pull the tube upward, towards you. If it doesn’t work out, then don’t be overzealous; if you rip off the valve, foam will splash everything within a meter radius. For this case, we prepared a garbage bag. But let's not be pessimists, in 99% of cases the adapter separates without difficulty.
The removed tube needs to be cleaned with a knitting needle (bicycle, moped, knitting needle) or a piece of wire. Polyurethane sealant does not stick to plastic, so there are no special difficulties. Then we inspect the nozzle of the bottle's release valve. If there is thickened but not frozen foam in the fitting, then clean it with improvised means (a match, a piece of rag, etc.) and then rinse with acetone. The cylinder is ready for use.
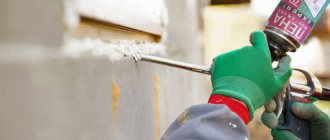
Polyurethane foam has dried in the outlet valve of the bottle
If the cylinder valve is clogged with hardened polyurethane foam , do not try to clean it with a match or knitting needle - the situation will only worsen. You will need a self-tapping screw with a length of 35 mm, a diameter of 4 mm with a large thread and pliers. Carefully screw in the screw two or three turns so as not to pierce the valve through. Using pliers we pull out the self-tapping screw, and the frozen foam comes out with it. Now the balloon can be used.
Sometimes the sealant hardens in the valve from the inside of the cylinder. I’ll tell you why this happens and what to do in this case in the next article: “A radical way to revive an old balloon with amateur foam.”
Types of instruments
There are household and professional designs.
- Household ones are usually represented by plastic models. They are inexpensive because they are not designed for long-term use. They are beneficial to use when renovating one apartment (several doors, windows, sealing a balcony). It is better to carry out all work promptly, within a couple of days. Then the internal cavities become clogged with sealant, and it is not possible to clean them. Therefore, this type is considered disposable.
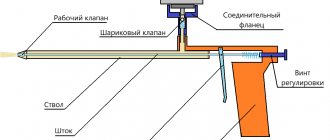
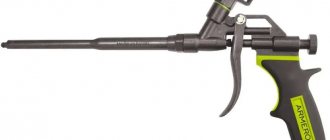
- Professional ones are made from metal. They are more resistant to chemical compounds of both the foam itself and its cleaner. Such models are more durable than plastic ones. They are a simple design: a metal barrel, an adapter for attaching a cylinder, a trigger, a handle and an adjustment screw. Depending on the manufacturing company, designs may differ slightly with different devices. But their main difference from household ones is the presence of a mechanism for regulating the quantity and speed of supply of the composition.
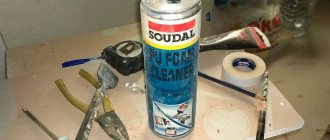
Cleaner for spray foam gun
The standard product is a 500 ml aerosol can into which a solvent is pumped under pressure. The main active ingredient is dimethyl ketone, to which various additives are added. Using this aerosol you can clean not only tools, but also tidy up your hands, clothes, and other surfaces.
During work it is necessary to observe safety precautions:
- keep away from fire, batteries and direct rays of the sun;
- do not allow the container to heat above 50 degrees;
- ensure that the substance does not get into your eyes;
- when using at home, ventilate the room well;
- After use, wash your hands with soap.
Cleaners are divided into those that dissolve uncured polyurethane foam and those that work with dried solution.
The former perfectly clean canister valves, gun adapters, as well as their internal parts. Well-known companies producing this type of solvent include Tytan. They produce a kit: foam plus solvent. Many manufacturers offer solution-soaked wipes that are suitable for external treatment of instruments.
The latter act on hardened polyurethane foam, softening it for 10-15 minutes, after which it can also be washed with softening wipes. Among the manufacturers of this type of product are TechnoNIKOL and Makroflex.