Not all people like plastic windows. No one likes scary old wooden windows, disfigured by time. But can they be restored? After all, the appearance of wooden windows is better than plastic ones.
In practice, restoration of wooden windows is not common, since the restoration process is very labor-intensive and the payment for the work is usually comparable to the cost of a new plastic window. Therefore, if you want to provide your apartment with decent-looking wooden windows on a budget, it is better to be patient, have minimally sufficient tools, and carry out the restoration work yourself.
Tools and materials for restoration of wooden windows
- hot air gun (construction hair dryer);
- hard spatula 25-40mm wide;
- a small hacksaw with a fine tooth (for cross-cutting wood);
- small carpenter's miter box;
- screwdriver or drill;
- square;
- bubble level;
- drill for metal or wood with a diameter of 8mm;
- beech dowels with a diameter of 8mm;
- waterproof PVA wood glue;
- carpentry clamps (the length of the clamp should allow you to clamp the transom or its fragment on the work table) in an amount of at least two;
- hammer or mallet;
- antiseptic;
- deep penetration acrylic primer and acrylic paint, or drying oil and oil paint;
- foam rollers 5.5 cm wide with a handle holder and a small bath;
- a small grinder or a piece of a smooth wooden block and sandpaper of different grits - P40 (60), P100 (120);
- carpentry (countersunk head) galvanized nails 20mm long;
- wood screws 35-45mm long;
- grinder with petal wheels, grit P40(60), P100(120);
- wood putty;
- glazing beads;
- self-tapping screws 2.5x25 (head PZ1);
- safety glasses, gloves, respirator.
You may need (depending on the required depth of restoration): a plane, another miter box (of a size that allows you to place the transom frame inside it), and carpenter's chisels. A simple restoration method - if you don’t have the necessary tools and time, it will help improve your window
It is highly advisable to have unnecessary transoms of the same size in stock. If you are potentially considering the option of restoring wooden windows, and at the same time one of your neighbors is installing plastic windows, do not hesitate to select a few transoms in the most decent condition for yourself. Particular attention should be paid to external transoms; they are most susceptible to the aging process.
What you need to repair windows yourself
To properly restore wooden windows with your own hands, you will need the following materials and tools:
- hair dryer for removing paint. This unit helps to remove the coating without damaging the surface of the frame;
- Grinder;
- sandpaper;
- a shoe knife that easily removes old paint;
- spatula, since repairing wooden window frames requires putty to renew the surface of the frame and sashes;
- paint brushes;
- chisels;
- fittings, glass (this is if you plan to change these elements);
- drying oil, varnish, paint;
- primer;
- putty;
- seal.
It is important to pay a little more attention to the choice of putty. In total, for work you will need three types:
- Coarse putty for window frames with wooden surfaces. It will be used to seal large cracks and other defects. The material is often used during the restoration of wooden doors.
- Fine-grained finish. Most often the product is used to decorate the interior of premises. But it is also great for working with wood. The only point you need to remember is choosing the right color. The best option is white. It hides repaired defects better than beige.
- Deep penetration primer. The material is necessary to achieve a better combination of paint and putty.
Initial stage of work
At the initial stage of restoration of wooden windows, it is necessary to carry out a thorough inspection of the transoms, window sills and frames. Some windows are better not to mess with. The easiest windows to restore are those made of hardwood boiled in drying oil. Most often, such windows are found in old houses. In apartment buildings from the times of the USSR, the wood is usually of lower quality, but such windows are significantly younger.
A typical view of an old wooden window in need of restoration.
Main problems
The main problems with old wooden windows are:
- a large number of layers of paint, which causes a sloppy appearance;
- loose fit of the transoms to the frame and to each other, the result is relatively free air circulation and very low thermal insulation qualities;
- rotten sections of transoms and window frames;
- window distortion;
- difficult closing.
Refusal to restore old wooden windows is advisable if the windows are severely skewed, rotten areas are common, the wood is severely cracked in many places, etc. Most often, significant problems arise with the lower crossbars of external transoms, as well as in the places where the lower latches are installed. That is why it is highly advisable to have spare, unnecessary transoms of the same size in stock - you can get “spare parts” from them.
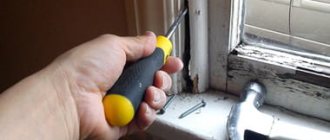
First of all, we determine how the glass is fixed. Most often these are glazing beads, sometimes putty is simply applied. The beads are attached with small nails, so they can be easily undermined with a strong knife, chisel or regular slotted screwdriver. When removing them, do not forget to hold the glass. We work carefully so that the glass does not crack.
Remove window putty with a knife or chisel. From time to time there will be small nails that keep the glass from falling out. They are easy to remove with pliers.
After removing all the glass, we proceed to removing the paint.
Our services
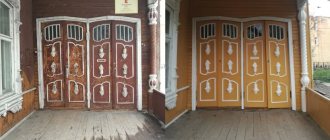
provides window restoration services. Our experienced craftsmen will qualitatively carry out any restoration work - restoring the appearance of the window, improving the functional characteristics and changing the window design.
Upon completion, you will receive an updated, practically new, aesthetically attractive, neatly painted window that will be reliable, durable and environmentally friendly! At the same time, you will save your budget and be able to enjoy the “new” old windows for a long time.
Removing old paint
When restoring, old paint from wooden windows should be completely removed. This is best done with a heat gun (heat gun). Heat the paint with a hairdryer until bubbles appear. Without allowing it to cool, immediately remove the paint with a spatula. The use of special paint removers is not advisable. Removers emit a strong toxic odor and require a certain exposure time. After its application, the time required to soften the old paint is determined experimentally. Usually this is 5-25 minutes. If you start removing the paint earlier, it will not soften yet. If you are late, it will dry out again. In addition, removers remove paint layer by layer. That is, you will have to go through the same section several times. You can use a hairdryer to remove it right down to the wood (with a “reasonable” number of layers).
The process of removing old paint with a hot air gun.
Antique windows often have curved edges. A flat spatula is not suitable for cleaning them. If there are a lot of windows, it’s worth making a special stripping tool from a piece of sheet steel (the blade of the same spatula) to suit the configuration of your windows. After the transoms, we peel off the paint from the frame and shutters (if any).
In what cases is restoration required?
It will be necessary to restore a wooden product in the following cases:
- it begins to blow from under the sash;
- deformation of the frame has occurred;
- a fungus has appeared;
- the glass has lost its integrity;
- window fittings are damaged;
- the sash does not close tightly;
- the integrity of the tree is compromised.
Repair is also necessary when a distortion occurs or rotten areas appear.
Important! A complete restoration requires additional repair work. These include the installation of new frames and window sills, improvement of external and internal slopes. That is why restoration is chosen as a method of saving time and money.
What does this concept include?
The concept of “recovery” includes:
- assessment of the extent of damage;
- preparation of tools and materials;
- dismantling;
- carrying out basic work to eliminate the problem.
The process may require painting of the frames. To do this, the old coating is first removed. Removal of fittings followed by their replacement and installation.
Assessing the suitability of transoms and frames, removing and repairing problem areas
Removing the paint down to the wood will reveal all hidden defects. There is no need to be afraid of them. Local cracking and small rotten areas can be repaired. The worst thing is if the wood has become completely (throughout its entire thickness) loose. Loose fragments must be replaced. It often happens that the bottom corners become the most problematic places - moisture accumulates in them. In very old windows in such places, entire pieces are sometimes completely “eaten away.” Repairing these particular areas of wooden windows is the most difficult.
The lower part of the transom is badly rotted.
Severely dried out and cracked fragments.
You should carefully inspect the bottom of the window frame. Especially at the edges (in the corners) and in the center. Usually you have to either cut out the rotten areas or dismantle the entire lower part. If there are no problems, you are lucky.
The lower edge of the dismantled section of the window frame.
For high-quality restoration of transoms, it is advisable to disassemble them into separate parts. In the future they will have to be sanded; in the corners this is almost impossible to do if the transom is assembled. Disassembly is carried out by removing the metal corners attached to screws and drilling out the dowels with an 8mm drill.
A dowel is a wooden round rod glued to the corners of the joints.
After drilling out the dowels, the transom can be easily disassembled.
If the corners of the transoms are in order, there are no rotten areas, you don’t have to disassemble them.
We remove rotten areas with chisels and a hammer (mallet).
Removing the rotten area.
After removal, a section of the correct geometric shape should be obtained.
We prepare the area for gluing the liner.
We fill it by making an insert of the required size and shape. It is highly desirable that the liner be made of identical wood and have an overlap - a size with a margin in the direction in which it can be sanded (at least in the direction from the front plane of the transom). If there is a “donor” transom (or parts thereof), you should use it as a raw material.
Preparing the insert for gluing.
We install the liner with glue. We clamp with clamps.
We hold the tab under the pressure of the clamps until the glue dries.
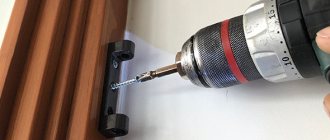
After drying, drill through the liner and the transom with an 8mm drill, install the beech dowels with the same glue. The number of dowels must correspond to the size of the liner.
Long dowels are sold in construction hypermarkets in the form of round timber 8mm in diameter with longitudinal notches. The length is usually up to 900mm, they can simply be cut to the desired length.
After repairing problem areas of wooden windows, we sand these areas, removing the overlap. In this case, the liner will lie strictly flush (at the same level) with the surface of the transom.
Sand the tabs.
Sanding is best done with a grinder with adjustable rotation speed at about 3000 rpm using a flap wheel with grit P40 or P60. Coarse grain size is caused by paint residues and impregnation with drying oil, which is why the circle with finer grains becomes clogged very quickly.
Coloring
You choose the type of paint yourself, based on your preferences. The only thing I can advise you to do is to take glossy or semi-gloss. They retain their color for a long time. This is especially true for white paints. Surfaces painted with matte white paint quickly turn gray: they have a porous structure, which gives them a “matte” appearance. These pores become clogged with microscopic dust particles, which give a grayish tint. Therefore, for perfectly white windows, take gloss or semi-gloss.
The first layer is a primer. This is one part paint diluted with two parts of a suitable solvent. After the primer has dried, you can apply the base paint. There will be several layers, so everything will be painted over.
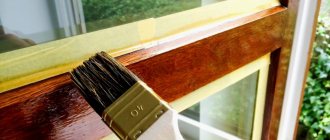
Apply paint in thin layers in different directions
Do not use a lot of paint on your brush: there will be drips that are not easy to deal with. Dip, squeeze, rub well. You need to move from top to bottom without changing direction. This is the only way the layer will be even. Apply the first layer, moving the brush from left to right, the second - from top to bottom, and the third layer - from right to left.
Each subsequent layer is applied only after the previous one has completely dried. If after the first application of paint there are streaks and uneven spots, after the paint has dried, take sandpaper and smooth them out. Just don't wear it down to wood. Do the second layer more carefully, but even here you can still sand it a little. The third one should be without flaws. After the paint has dried, your self-restored window can be installed in place.
Assembly, filling and sanding
After repairing problem areas of wooden windows, we antisepticize the cavities of the tongue-and-groove joints and dry them. Next, we connect the parts by applying moisture-resistant wood glue. Using a carpenter's square, we make sure that the angles are right. For better contact of the tenon with the groove, we clamp them with clamps. Let it dry. We strengthen the connection with wooden dowels, installing them with glue in place of the previously drilled ones.
Small irregularities can be smoothed out with wood putty. First, we clean the areas to be puttied with sandpaper, saturate them with primer, and dry them. Apply putty with a small spatula, pressing it intensively into the irregularities to be filled.
Puttying small irregularities.
The gaps at the ends of the parts and in the area of the liner (if its size turns out to be inaccurate) are best sealed as follows. We generously fill the gap with wood glue, then rub sawdust into it. After drying, we begin finishing sanding.
Transoms after polishing.
The fineness of the grinding abrasive depends on the condition of the transom. If there are paint residues or a weathered (darkened) layer, it is advisable to use a coarse P60 abrasive. It will ensure that the desired layer is removed. Next we use P100(120). If in the end you want to get a surface close to glossy, we additionally grind it with a finer abrasive P180 (240).
The process of sanding wooden windows, especially removing the layer, is very dusty. It is impossible to perform it in a residential area. To some extent, the process of dust formation can be leveled out by using a construction vacuum cleaner, working in tandem with a power tool that has a dust removal pipe.
It is better to perform grinding in a non-residential area. For example, in a workshop or garage.
How to eliminate rotten areas
Moisture is the first enemy of wood. If the windows “cry”, rotting is inevitable. It is important to detect the defect in time so that it can be eliminated without replacing the window.
To work, you will need to dismantle the frame or sash with the damaged area, remove the glass and lay the product on a flat panel. A damaged piece of wood needs to be hewn or cut off, and a new piece should be planted in its place. It must be carefully adjusted to size and secured with liquid nails or wood glue. Level the surface, cover with putty, sand and paint. If everything is done carefully, then there will be no trace of the defect.
Minor damage can be repaired with putty. To do this, it must be applied liberally to the damaged area until the lost volume is restored. The composition must be kept until completely dry and given the correct shape.
Frame and window sill
If the lower part of the wooden window frame is very rotten, it must be removed. To do this, we make a cut in the middle of the dismantled section of the frame and pry it with a small crowbar. A piece weakened by time can usually be dismantled easily. We remove all debris with a vacuum cleaner and soak it generously with a deeply penetrating primer.
We tidy up the section of the wall under the frame.
We examine the longitudinal edge of the window sill that is revealed to our eyes. If a void is visible underneath, blow it out with foam. When restoring wooden windows, it is easiest to make a new section of the frame from two separate parts - the main one and an additional lining on top. For the first one, we take a 50mm thick board, plan it, cut it to size, and generously antiseptic it. The installation is carried out using an adhesive composition. For example, Knauf Perlfix. The composition should be thick. We fill the installation site, place the workpiece on top and tap it with a mallet so that the new section of the frame is at the level we require.
After the glue hardens, we make holes with a diameter of 12-16mm and a depth of 5-10mm in several places along the length of the workpiece. Their location should be such that they are subsequently covered with an overlay on top. Then use a 10mm drill to drill them to the full depth. Using a 10mm drill bit, we make a hole through the glue into the body of the window sill part of the wall. We remove the sludge with a vacuum cleaner. We press the replaced part of the slave with window anchors with a diameter of 10 mm and the length required in your case (usually 130-160 mm).
It is convenient to make the top lining from a piece of lining, platband, thicknessing board up to 20mm thick. We close the outer transoms, press the outer longitudinal end (edge) of the lining against the transoms and fix the latter either with glue or with carpentry nails with a countersunk head.
Replaced lower frame section.
We peel off the old paint from the window sill. Most often, a longitudinal gap appears; it is best to embroider it and fill it with a glued wooden plank of the required thickness, driven with a mallet into this gap to the full depth.
If the window sills are in very poor condition, they will have to be replaced. The easiest way to make a new window sill for restored wooden windows is from furniture board with a thickness of at least 28mm. The ends of the window sill must be cut into the walls to a depth of at least 50mm. Therefore, you don’t have to worry about the quality of the cut in these places. In order to ensure a neat longitudinal cut, pick up a board of the required width in a construction hypermarket. We also install the window sill using an adhesive compound, but thanks to the cutting into the walls, window anchors will no longer be needed.
Insulation
There are several ways to reduce heat loss from windows, using:
- paper for covering windows;
- silicone sealants;
- fabric strips;
- tubular profiles;
- seals in frame sashes;
- heat-saving film.
The last two methods are the most effective and aesthetically pleasing.
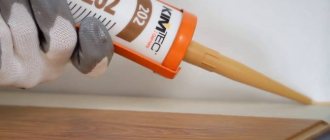
First, we treat the junction of the glass and sashes with silicone sealant.
Silicone sealant is excellent for insulating wooden windows
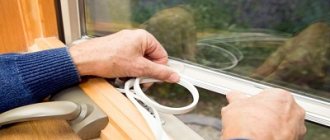
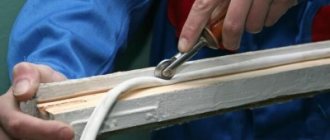
Then, along the perimeter of the sash, using a milling cutter at an angle of 45° in the direction of the flashing, we cut out a groove 5 mm deep and remove the chips from the channel. We consistently press the PVC seal into the resulting groove along its entire length, without stretching it.
To facilitate installation of the seal in the groove, you can use a special roller
The seal, in addition to protecting against drafts, provides additional sound insulation.
Recently, energy-saving film has been used to insulate windows. It is transparent, does not impair visibility and has a self-adhesive backing.
Energy-saving film not only saves heat, but also protects the room from excessive sunlight
Its functional features are as follows: the film allows daylight to pass through, but prevents heat transfer from the room, which allows you to save up to 60% of the heat escaping through the windows. The method of applying each specific film is described in detail in the instructions supplied with it.
Geometry correction
Geometry correction is one of the most difficult types of wood window restoration work. Changing the geometry of one transom will require adjustments to the dimensions of adjacent transoms and addressing the issue of fit to the frame. Let's go back to the first photo of this article:
The window has a pronounced skew to the right. This can be clearly seen from the middle horizontal cross member. The difference was 3 cm - it is clearly visible to the naked eye.
Correction of the geometry in this case was carried out by shortening the right vertical of the upper transom by 3 cm. To do this, the transom needs to be disassembled, cut, and then the tenon for the tongue-and-groove corner connection must be made again. The precise production of such a connection is the subject of a separate article. In the simplest case, we make cuts with a hacksaw, then use a chisel and a hammer (mallet) to remove the excess, constantly trying the tenon to the groove. Then we antisepticize, dry, apply glue, connect, and reinforce with a dowel.
We drill out dowels in the lower transoms, correct their shape in the form of a parallelogram into rectangles (using a square), and install new dowels. It is advisable to reinforce all transoms with metal corners secured with small self-tapping screws. They need to be installed on the invisible side of the transoms.
After correcting the geometry, there is no more skew.
It is not uncommon, as in this case, that when the lower part of the frame is replaced, a gap appears under the lower transoms. It cannot always be eliminated when replacing the lower part of the frame. We are increasing the height of the transom.
Transom extension.
Extending the transom is done by gluing a block of slightly greater thickness and width (so that there is an overlap) than the gap. We attach the block with self-tapping screws to the glue. After drying, we turn out the screws, drill out the holes from under them with an 8mm drill and install dowels on the glue. Then we sand off the overlap.
After building up, we sand it so that everything is level.
The final adjustment of the height of the transom is done with a plane, constantly trying the transom in its place. In the same way (if necessary), you can increase the width and also eliminate the rather wide oblique gap.
After fitting, use a small bubble level to check that the installation is correct.
Transoms with corrected geometry are installed level.
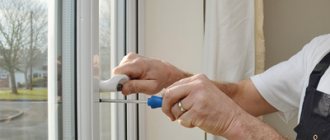
Cleaning the fittings, preparing for painting
When restoring antique windows, trying to replace the fittings will most likely fail. The hinges, latches and handles of those times are very different from what is now on store shelves. To some extent, this also applies to windows from the times of the USSR.
On the left is a restored 19th-century latch, on the right is a modern one.
Problems can also arise due to missing locks on the shutters - they have not been produced for a long time. In this case, you can combine a padlock pad with a hook.
For shutters, it is not advisable to use just hooks or latches - they are not reliable enough. The locking mechanism must be such that it cannot be pryed open with a knife from the outside.
To remove paint from the fittings, place it on a lit gas burner.
Burning metal fittings to remove old paint.
Heating old paint with an open flame will eventually lead to a moderate ignition - this process must be carried out under constant supervision!
Old paint ignites when heated.
We carry out firing until the paint is completely charred, after which we remove the fittings with pliers or pliers and throw them into a metal container with cold water. After cooling, charred paint residues can be easily removed with a steel wool dishwasher.
After washing, immediately dry the fittings with a hairdryer; it is advisable to rinse them with a solvent (to avoid rusting). Preparing the fittings for painting involves priming all metal elements with acetone-based acrylic enamel from a spray can.
If metal elements are not coated with non-water-based enamel, then when painting with water-soluble paints, rust will appear very soon.
We prime wooden surfaces with a deep penetration acrylic primer - for acrylic paint, or with drying oil for oil paint. It should be noted here that drying oil priming and oil paint coating require a long drying time. Therefore, it is more advisable to focus on the acrylic version. It dries quickly, is water-based (non-toxic), and does not emit any odor.
Glazing
We clean the glass from traces of putty and other contaminants. We carry out all work wearing strong gloves to avoid cuts. When dismantling and washing, it is likely that it will not be possible to keep all the glass intact. It is better not to throw away large fragments right away; they can be useful for cutting out glass in window vents.
Glass cutting.
We will install the glass using glazing beads and galvanized carpentry nails 20mm long. Using a miter box and a fine-toothed hacksaw, we cut pre-antiseptic, primed and painted glazing beads in two layers.
Cutting glazing beads in a miter box.
Apply acrylic sealant to the transom around the perimeter of the glass. We apply the glass, carefully pressing it along the perimeter, making sure that the pressure on the sealant is uniform along the entire perimeter. This will ensure a tight seal. Then we nail the glazing beads. If they crack at the same time, you will have to do preliminary drilling with a 1.5mm drill bit. The pitch of the nails is 10-15cm. We fill the cracks in the corners of the beads with sealant. After drying, cut off the excess that appears with a wet knife.
We install glass.
The nail heads, if desired, can be tinted with a cotton swab.