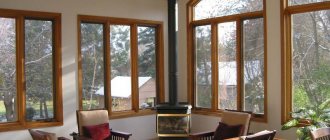
After installing modern metal-plastic or wooden windows with double-glazed windows, it’s time to take care of their framing - window slopes. Finishing the window opening is necessary not only to give the window a complete and neat appearance, but also to improve its thermal insulation qualities. The oldest, but to this day, method of finishing window and door slopes that has not lost its popularity is plastering. We will try to figure out how to plaster slopes on windows with our own hands, and find out all the intricacies of this process.
Methods for finishing window slopes
When installing new windows in old buildings, unexpected situations arise. Very often, the slopes of window openings themselves “strive” to collapse. Under them there are voids or a very large layer of insulation. This usually happens due to inadequate standards during construction work.
You can make new window or door slopes with your own hands from different finishing materials: MDF, plasterboard, plastic. However, traditional plastering of slopes with mortars has a number of advantages, including:
- high impact strength;
- long service life;
- affordable price.
There are also disadvantages to finishing window slopes with plaster. First of all, this is insufficient thermal insulation and the possibility of cracks.
Plastering slopes in window and door openings is quite a painstaking job, but with some knowledge and minimal ability to handle a spatula it can be done with your own hands.
Advantages and disadvantages of the plastering method
Plastering slopes has not lost its popularity for many years. Its advantages :
- Long service life.
- Sustainability.
- Strength.
- Affordable price of material.
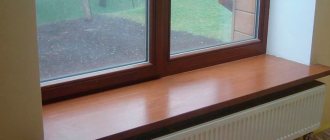
- The method is suitable for plastic double-glazed windows and wooden windows (read about installing slopes and window sills on plastic windows here).
Important
A big plus is the simple technology, which gives good results even to a beginner who has never done anything like this before.
There are also disadvantages:
- Thermal insulation is of average level.
- The surface will crack over time.
- There is a high risk of mold and mildew, both outside and inside, on the wall.
Tools and materials for plastering slopes
When doing the work yourself, you should first decide on the selection of materials and tools with which you can plaster the slopes in the window opening. Their list includes:
- plaster mixture;
- putty;
- primer;
- brush;
- polyurethane foam;
- spatulas of two types – wide and narrow;
- Master OK;
- grater and grater;
- short level up to 1 meter long, plumb;
- roulette;
- goniometer;
- containers for solution and water.
USEFUL INFORMATION: Pros and cons of panoramic balcony glazing
To remove the excess layer of old plaster from window slopes, you will need a hammer drill; if you don’t have it, you can use a hammer and chisel.
Both cement-sand mortar and dry gypsum mixture are suitable as a composition for plastering slopes. Gypsum-based plaster will cost you a little more, but it has some important advantages:
- high plasticity, providing convenience when working with slopes;
- possibility of applying a thicker layer.
Choosing material
Plastering slopes after installing plastic windows requires the right choice of material to complete this work. There are many options and you need to know which one will be most successful for your case. The choice is influenced by two important parameters:
- location of slopes (external, internal);
- humidity level.
Plastering the external slopes of windows is carried out exclusively with cement materials. The same applies to rooms with high humidity levels. So for work in the bathroom, sauna, bathhouse, shower, you need to choose only cement-based materials.
Gypsum plasters are used for interior work in residential premises. Such materials tolerate direct contact with water very poorly, as well as high humidity. But they are able to maintain the indoor microclimate. The best plaster for window slopes is different for each case, you need to navigate the situation and make the right choice.
Preparatory work
Preparation includes several stages: protecting windows or doors, eliminating cracks and treating the surface of slopes.
Structural protection
Before finishing the slopes, you need to take care of the safety of the window sill, as well as the windows or doors themselves. They need to be protected not only from mechanical damage, but also from the ingress of mortar, which is especially dangerous for wooden structures due to the possibility of swelling, deformation, and damage to the veneer or varnish.
- The surface of the window sill is covered with thick paper.
- Joints, window or door frames are covered with construction tape.
- The door leaf can be removed or covered with oilcloth or film.
Do not forget also about the safety of fittings and radiators. It’s easier to wrap them in rags or paper than to wash them for a long time.
Sealing cracks
Wide gaps between the window and the opening are sealed by the installation team, but small gaps may remain. In this case, you can fill them with polyurethane foam yourself. After it hardens, the excess is carefully cut off with a knife so that a small recess up to 2-3 cm deep is obtained, which will subsequently be filled with solution.
Slope surface preparation
This stage consists of the following actions:
- Remains of old plaster, paint or oil stains are removed from the surface of the window opening.
- If there are smooth places, notches are made on them.
- After cleaning, the slopes are primed, which is necessary to increase adhesion - the adhesion of two dissimilar materials. Processing is done with a wide brush.
- After the composition has dried, you can proceed to the next part of the work.
USEFUL INFORMATION: How to install a plastic window sill with your own hands
Preparing the work surface
How to properly plaster slopes on windows and get an excellent result depends on good surface preparation. A small violation of an important stage will be the main cause of cracked or fallen plaster. So:
- The beauty and accuracy of plastering work will require leveling the surface of the window slopes from the outside and inside. According to building codes, vertical slopes should not deviate more than 1-2 mm per 1 m. Inspect the evenness of each wall. Before plastering the window slopes, it is necessary to level the walls. Time costs and plaster consumption will increase, but it is better not to ignore quality requirements in order to get a good result. If the surface is slightly curved, a wire mesh is suitable for leveling.
The surface of the slope must be cleaned and leveled before plastering. - We clean the surface from traces of dirt and dust in order to increase the adhesion properties of the mortar to the plastering areas. Walls made of brick or concrete are cleaned with a 3% solution of hydrochloric acid and washed with cold water. To get rid of oil stains, you can use oily clay. You need to apply it to the desired areas and allow it to dry well, then remove it. The procedure can be repeated as necessary.
- Plaster mixtures are applied to the window opening after removing the previous layers. External and internal slopes must be tapped so that loose particles of the old mixture fall out. The resulting cracks are cleaned, dirt and greasy stains are removed. Areas with chipped plaster are moistened with water and covered with a new solution. As it dries, a new solution can be applied to the plastered area, distributing it over the entire surface of the slopes.
Construction beacons are used to level the surface of the slopes.
To properly plaster the slopes on the windows with your own hands, take into account all the preparatory stages to achieve high quality work. To accurately level the surface, use construction beacons or a plaster profile . Visually smooth walls can play a cruel joke after all the work is completed, so be sure to install guides along which the surface will be leveled. Beacons will serve as a guarantee as a leveling element, the use of which will avoid future alterations and additional costs.
Plastering on beacons
Marking the opening
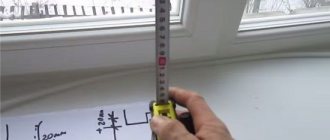
There is a concept called “dawn angle”. To allow more light into the room, the angle formed between the plane of the window or doorway and the plane of the wall must be more than 90 degrees. In order to take into account the angle of dawn, you need a protractor. With its help, a line is drawn on the window sill from the corner of the window frame so that 1 cm of deviation corresponds to 10 cm of the opening depth. So, with a wall thickness of 30 cm, the line will move to the side by 3 cm.
Why do you need to protect slopes?
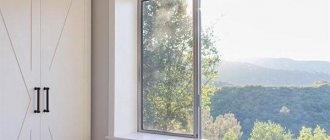
In general, it is difficult to underestimate the importance of windows. First of all, they are a source of natural light, and their role in the interior is also far from the last. Moreover, this applies not only to the windows themselves, but also to the slopes framing them, which can also give the room a unique look. They hide the mounting elements, and the entire structure acquires integrity and completeness.
However, creating an interior is far from the main function, although, of course, it should not be underestimated. In addition, the finishing of the slopes affects the thermal insulation of the room. After all, even a non-specialist knows that the greatest heat loss will always be in the area of windows and entrance doors. And in order to reduce them to a minimum, it is necessary to carry out comprehensive work on the installation of window sills, slopes, and their finishing. And only then will the room be cozy and warm at any time of the year. In addition, if you do not finish the slopes, the dew point will be indoors, which will lead to constant fogging of the glass.
Installation of beacons
Professional builders perform plastering work on beacons made of wood or metal. If a small layer is required, you can plaster the slopes according to the marks made from the gypsum mixture.
If you are going to plaster the slopes with your own hands, having absolutely no experience in leveling surfaces with building mixtures, then it is better to purchase ready-made beacons for plastering in the store. In extreme cases, you can use strips of plywood.
- Along the entire surface of the outer wall, beacons are attached using nails or screws. The vertical is set using a plumb line, and the horizon level is set using a level.
- The second beacons must be installed so that they are adjacent to the window frame or door block. They are attached using a mixture with the addition of gypsum, into which the profile is pressed. For this you can also use clean, quickly hardening alabaster.
How to level surfaces?
Aligning the slopes is necessary to make the windows look neat and beautiful. Inspect them: vertically they cannot deviate by more than 2 mm (based on 1 meter). Therefore, do not skimp on plastering: even if you have to spend more money and time, it will only bring benefits in the future. If the curvature is weak, use wire mesh.
Also to help are profiles for plaster and beacons. They are mounted on mortar, but since they do not guarantee sufficient strength, use additional dowels or screws (if the walls are brick). The beacons must be plumb so that they do not move .
Alignment
After all the preparatory work, sketching begins, and then leveling the prepared mixture or solution onto the plane of the opening. When all the space between the beacons is filled, the entire surface is smoothed with a grater from bottom to top. This way the work is done on all three sides of the window: right, left and top.
After the solution has dried, it is necessary to remove the beacons. To do this, use a spatula to trim the connection between the profile and the new plaster. The vacated space is also filled with the mixture and leveled.
Tip: to prevent cracking of the plaster due to thermal expansion of PVC window frames, a 3-5 cm wide groove is made between the frame and the slope with a spatula in the not yet hardened mortar. Silicone sealant is poured into the recess, which will act as an elastic gasket.
What to do with external slopes
Plastering the external slopes of windows must also be carried out without fail. It is wrong to think that if this part of the window space is not visible, then it is not necessary to improve it. It will not be possible to achieve high-quality insulation without external slopes. Plastering the external slopes of windows is carried out according to the scheme described above, taking into account only some features. To perform this work, you need to proceed according to the following scheme:
- From the outside around the perimeter of the window, you need to trim off the excess foam that protrudes above the frame. At the end, the foam should be 5 mm less than the slope level. This distance is necessary for putty, which will cover the foam.
- Mix the solution according to the diagram shown on the package. Scoop up the solution with a spatula and apply it to the work surface. The solution is smoothed until the slope takes its previous appearance. It is not necessary to invest in one layer; it is better to divide the work into several stages. It will take a long time, but it will be effective. Each mixture contains information regarding the permissible layer thickness and drying time.
- When the plaster for the outside window slopes has dried, you need to pick up a grater. Do not apply force or press on the surface, otherwise excess will be removed and you will have to reapply the solution. Our task is to remove roughness and give the surface smoothness.
- Now the plaster on the external slopes of plastic windows can be painted. The paint will provide additional protection to the surface from precipitation and external factors.
This is how the external slopes of the windows of a brick house are plastered. The material of the walls does not have much influence on the upcoming work.
Now you know which plaster is best for window slopes, you can perform external and internal work, not only improve, but also insulate the space around the perimeter of the window. According to the scheme described above, plastering of slopes of wooden windows and plastic structures can be carried out. These two processes do not have any special differences.
Plastering external slopes of plastic windows
This procedure consists of several stages:
- The most difficult stage in finishing work is plastering the top part. This is where we begin attaching the base for the applied solution - the type of mesh you have chosen. The shape of the fastening depends on the type of slopes you will make - straight (perpendicular to the window frame) or unfolded.
- We strictly determine the thickness of the layer that we will apply using a plumb line and mark the value with a marker.
- The surface on which we will apply the plaster must be treated very well with a construction primer, this will allow the solution to adhere more firmly to the surface.
- After this, mix the plaster solution for the first time. To create the best quality mortar, it is recommended to use a drill with a construction mixer. It will ensure thorough mixing of the components and uniformity of the structure.
- Using a trowel and spatula, we apply the first rough layer, trying to fill in all the flaws in the surface of the walls as thoroughly as possible. The installed mesh will serve as additional reinforcement and will not allow the plaster to peel off, but to set directly on the wall.
- If you need to fix a lot, and the layer turns out to be very thick, then you should not immediately apply it completely. It is better to do it in stages, adding the required layer several times, each previous layer being pre-primed. It is advisable to let each of them dry for at least 1-2 days.
- The last layer must be removed with a spatula, forming the finishing surface. Usually, after drying, small cracks remain on it; they are caused by the fact that “starting” mixtures are used for the plaster. To remove them, you need to use a small (the size of the slope or slightly smaller) spatula to treat the dried slope with a slightly more liquid solution than was used previously. By applying a moderately thin layer, we will hide all the imperfections of the rough surface under it. After the last layer has dried, the surface is carefully sanded, removing small wave-like irregularities.
- After they are formed, it is necessary to draw a corner with the main wall. To do this, two trowels are used, one of them is placed on the plane of the main wall of the building, and the second one is drawn out at a beautiful even angle. It is recommended to first mark the line of the corner using a plumb line so that it does not turn out to be blocked. For this, the plaster solution needs to be moderately thick, so that the required angle can be freely formed, and after rubbing with a float, the applied layer does not immediately float, but begins to set.
- After the formation of the corner is completed, you need to wait until the applied solution dries completely. To do this, you need to wait at least 2-3 days in dry weather so that you can safely proceed to further improvement of the slopes.
- Next, gently but thoroughly rub in the last layer of applied plaster. Visible cracks and minor flaws can be easily corrected with a soft paint brush and liquid solution. This layer does not require much time to dry, and soon you can begin priming the slopes.
- The next mandatory step is to protect the plaster from moisture. The ideal option for this would be to use hydrophobic paint from the same manufacturer whose plaster mixture you used. This layer will protect your plaster from water and will not allow external natural phenomena to adversely affect it.
- After protection from moisture, the finished smooth slopes can be painted with facade white paint. A recommended, but more expensive option would be to use acrylic sealant, which, in addition to protecting against moisture and dirt, will add another protective layer. In addition, it is easy to clean, which will allow you to return your slopes to their snow-white, original appearance using a regular rag and soap. In addition, the service life of this paint is approximately twice as long as usual, which will allow you to soon not return to preventive maintenance.
Some tips and recommendations.
In the room where work takes place, the air temperature should not fall below 6°C.
Failure to comply with this rule leads to poor quality plaster.
When preparing the plaster mixture yourself, you must adhere to all the manufacturer’s recommendations, which he outlined in the text on the packaging.
The date of manufacture and critical expiration date must be present.
If this period ends soon, it is better not to use the mixture, its quality could decrease.
The question often arises, which slopes are better, plastic or plaster? The best solution would be this option.
If you have plastic windows, then when it gets hot they increase in volume and cracks appear on the slopes. To avoid this problem, after the mortar has partially hardened, a groove is made using a spatula between the slope and the frame, no deeper than 5 mm.
A special sealant containing silicone is poured into the resulting recess. This substance allows the gasket to be more elastic and prevents the plaster from cracking when the PVC expands.
Slope plastering technology
Plastering work is quite scrupulous, but following simple recommendations, you can carry out plastering on your own. Compliance with the algorithm for processing and applying the mixture will allow you to obtain a high-quality result with excellent external characteristics.
What materials exist for plaster?
Plastering external slopes is most often done using gypsum or cement mortars. The former are distinguished by their high strength, but their cost is significantly higher.
External characteristics also differ between gypsum and cement mortars, but further coloring will help achieve the desired result.
What tools will you need?
Plastering corners, as well as the main surface, requires the following set of tools:
- priming brush;
- mesh and perforated corners;
- spatulas and trowels for applying and leveling the mixture;
- slats, beacons and level to obtain a perfectly flat surface;
- roller for final painting.
It is necessary to select depending on the parameters of the surface to be plastered. The minimum set is enough to carry out high-quality plastering work. You will also need sandpaper, a rule and containers with a drill for mixing the solution.
Visual inspection of slopes
Initially, it is necessary to examine the condition of the window and door. Before you start plastering, you should remove all unnecessary elements, carry out a complete cleaning, and also remove remnants of old finishes and paint, if any.
Visual inspection
At this stage, the plane is checked and deviations are determined. If necessary, correction is carried out based on visual inspection.
What should we do if the curvature is small?
With their help, you can mask minor defects and ensure proper distribution of the plaster mixture. Also, perforated corners will help correct defects in the outer corner. It is possible to use a lath to level the corners of the walls with your own hands.
Option for slopes with large errors
If there are significant defects, then beacons should be added to the reinforcing mesh. You will also need a rule. With its help, you can apply a thick layer of solution as evenly as possible.
It is possible to plaster surfaces with large flaws in several layers. Each subsequent one should be applied after the previous one has hardened. Work must be carried out strictly according to technology to avoid peeling and further cracking.
Preparing for work and collecting tools
Tools and materials that you will need during the work process:
- construction trowel;
- marker;
- drill and construction mixer;
- sharp knife;
- construction brush;
- container for water and solution;
- plumb line;
- square;
- metal and rubber spatulas of different sizes;
- plaster mixture;
- water;
- painting, plaster or metal mesh and fastening materials for it (staples, screws, dowels, the solution itself will do).
Preparation for work consists of collecting the necessary tools and actually preparing the surface for work. It consists of cleaning off the protruding excess polyurethane foam with a sharp knife. It is advisable to cut the foam level with the window frame; you should not go deeper into the seam. Use a brush to remove as much dust and dirt as possible from the surface where you will be working. After completing the preparatory work, we proceed directly to the main part of the work.
How to make a mortar for plastering
Depending on the humidity of the room and the installation of the part of the window opening in question - internal or external, you choose what to plaster it with. We also need to take into account that we live in a region where the main time of year is winter, which means the composition must be frost-resistant.
In an apartment with high humidity, it is better to choose a composition with cement for external slopes. Please note that it has water-repellent and heat-insulating effects.
Inside the house, gypsum or lime-gypsum mixtures are suitable.
In both cases, you can use acrylic material, but keep in mind that it is not cheap.
You can buy the mixture or make it yourself.
If you decide to use the latter method, remember that incorrectly calculated proportions will lead to poor results: a composition with a high fat content (high amount of binder material) may begin to crack after drying. Insufficient fat content will make the mixture fragile, plastering window slopes with such a composition will be a useless exercise, you will soon have to do all the work again. You should not prepare a lot of solution at once. If you don't use it within an hour, it will harden. When choosing a solution, you need to take into account that the gypsum mixture dries much faster than the cement mixture.
Properly mixed plaster will stick slightly to the spatula.