This is explained by their high characteristics: frost resistance, strength, energy efficiency, reliability and durability.
However, this becomes a reality only if the window unit is professionally selected, installed and systematically maintained.
The best period when it is necessary to carry out maintenance of PVC structures is before the start of the summer and winter seasons.
At this time, not only their main parts and components are cleaned, but also the operating mode is switched: summer or winter. The most extensive maintenance activities for metal-plastic windows are carried out at the beginning of the autumn-winter period.
Removing contaminants and washing PVC profiles
Checking the condition of windows and preparing them for the cold season begins with cleaning and washing the profile. Dust and dirt left for the winter not only spoil the appearance of the structure, but also cause a reduction in its service life (aggressive substances, fungi and microorganisms actively destroy the outer layer and internal structure of the profile). The PVC frame can be washed with ordinary household products that do not contain aggressive components and particles that can damage the surface. Do not use cleaning powders or compounds with a bleaching effect. The ideal solution is professional cleaning solutions offered by window companies.
Cleaning dirt and lubricating plastic window fittings
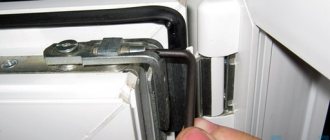
Start insulating your windows for the winter by inspecting the window fittings. Remove dirt, especially from the top of the window sash. All folds must be cleaned of deposits and dirt, especially cement and plaster residues. Direct exposure of the fittings to moisture and contact with cleaning agents should be avoided. Then lubricate the window hardware. Lubrication points for PVC windows are marked with special markings. How to lubricate a plastic window? The most common ones are WD-40, machine oil, grease. Do not under any circumstances lubricate with sunflower oil or olive oil or anything else! Edible oils dry quickly into a sticky substance that will break the window mechanism. After this, rotate the fittings in different modes several times to distribute the lubricant. Wipe off excess oil from the window.
Washing glass unit
Double-glazed windows are washed with glass cleaning products or ordinary soapy water, cloth rags or paper napkins (towels). Rags should be soft, not fluffy and not have hard seams that leave scratches. You should wash and wipe double-glazed windows carefully, remembering the fragility of glass and its vulnerability to mechanical damage.
Working with fittings
Checking the condition and functionality of the fittings is the next important stage in preparing PVC windows for winter.
The first step is to inspect all the elements, make sure that they are intact and have no external damage. Next, you should look at how each unit works: whether the doors close/open well, whether they are pressed tightly against the frame. If individual problems are detected, the fittings need to be adjusted. You can do this yourself (if you have professional skills and experience) or call a specialist from a window company. The adjusted fittings are lubricated from the outside and inside at the locations of the moving elements. Lubricants are sold by manufacturers or suppliers of plastic windows - they can be ordered complete with window systems or purchased separately. It is recommended to treat the fittings with special compounds at least twice a year: when preparing plastic windows for winter and before starting operation in summer mode.
Before lubricating the fittings, you need to remove dirt and dust from the working parts. This can be done with a regular brush or a vacuum cleaner in combination with a brush - this will quickly and effectively remove most contaminants.
If the fittings are adjusted by a specialist from a window company, ask him to also check the condition of the other elements of your window.
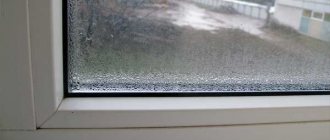
Checking the tightness of a plastic window (how to check where it is blowing from a plastic window?)
If in summer the problem of window ventilation worries us little, then in winter we don’t want to freeze at home. So, three ways to detect the blowing of a plastic window. We check the windows for ventilation, look for where the wind is blowing from the window.
The first way to check the tightness of the window : using a sheet of paper, half an A4 is quite enough. We open the window sash slightly and expose half of the sheet to the street, close the sash, and lower the handle all the way down. Important! The sheet of paper should not fall on the locks that are installed on the window frame, otherwise it will simply be bitten and the experiment will be carried out incorrectly. We pull out the sheet. Three options: the sheet flies out with a whistle, the sheet comes out with difficulty, it feels like the sheet is about to tear. Important! Thus, the entire perimeter of the window sash is checked. If in most places of such a check the sheet comes out freely (flies out with a whistle), the seal needs to be replaced. If the sheet comes out with difficulty in most places of inspection, the problem of window tightness can be solved by adjusting and lubricating the window. If the sheet is about to tear in most places of inspection, you do not need to do anything to the window. You won't be able to blow from this window!
The second way to check the tightness of the window : using a soap solution. Do you remember how you were looking for a hole in a bicycle tube?))) We make a soap solution. Spread around the perimeter of the window. Where the bubbles appear is where it blows.
The third way to check the tightness of a window : using a candle flame. Carefully move a burning candle around the perimeter of the window. Where the flame fluctuates, that’s where it blows from the window.
Preparing the seal
The window seal is hardly noticeable against the background of other structural elements, but plays one of the main roles in providing thermal insulation.
It is this that prevents flows of cold air, moisture, dirt from entering the room and reduces the volume of street noise. Seals are made from different polymers and therefore react differently to ultraviolet radiation, precipitation and temperature changes. Caring for plastic window seals involves cleaning and treating them with special compounds that prevent cracking and tearing of the material. The minimum frequency of seal treatment is 1 year. It is advisable to carry out the work while independently preparing PVC windows for winter, as this can affect the frost resistance of the entire structure.
Before lubrication, the sealing contours are cleaned of dirt and wiped with a damp cloth or sponge. Soapy water may be used. Treatment is carried out with silicone-based solutions and sprays, or with ordinary glycerin. The listed substances allow the material to maintain elasticity and not crack or tear even in severe frost. It is not recommended to use machine oil, talc, petroleum jelly and cosmetics containing glycerin.
Areas of the seal with identified cracks and breaks should be replaced before the onset of frost. If a visual inspection reveals that the seal has fallen out of the groove, you need to put it back in with your own hands or contact a specialist.
Save as much daylight as possible
As you know, in winter the days become shorter, and allowing maximum daylight into the house, which is so scarce during the cold season, is one of the main tasks facing the homeowner. Today it has become the norm to install mosquito nets, but if in the summer this is a very useful accessory, then with the onset of cold weather it loses its functionality. Therefore, before proceeding with other procedures, it must be removed - the mosquito net can be easily dismantled. This measure also prolongs its life, since under the influence of precipitation in low temperatures, the structure of the mosquito net can be damaged.
The removed mesh should be vacuumed, washed with warm soapy water, dried and stored in the pantry until warm days arrive. Pay special attention to ensure that the place where you store the removed mosquito net is free from rodents, since in the spring there is a possibility of encountering an annoying nuisance - the net may be damaged by insidious mice.
Cleaning the drainage system
The window drainage system is a set of small holes and channels in a PVC profile, the main purpose of which is to drain the condensate that forms outside. Before the onset of frost, you need to check how the entire system functions and whether the holes and passages are clogged. Ineffective drainage can lead to icing of windows in winter and the appearance of mildew or mold. Drainage holes and channels can be cleaned with wire that combines the necessary flexibility and rigidity.
Mosquito nets in winter - remove or leave?
Despite the fact that modern mosquito nets are made from materials that are resistant to negative factors, experts still recommend removing them before the onset of winter. Why do you need to do this?
- Firstly, synthetics (from which most meshes are made) tend to stretch and the size of the cells can increase significantly due to regularly formed ice. A mesh with large cells will protect against fewer insects and allow midges and other small insects into the room;
- Secondly, ice or icicles can tear the fabric, and the mesh will have to be completely retightened;
- Thirdly, under the influence of negative weather factors, the mesh frame will quickly lose its attractive appearance (the paint will crack, the base will fade, etc.).
The removed nets do not take up much space - they can be stored behind cabinets, on mezzanines, or on a glazed balcony.
Before storing the nets, wash them in water with non-aggressive household products using a sponge or soft-bristled brush. In autumn and spring, external fasteners for the mesh should also be cleaned of dirt - this will extend their service life and maintain aesthetics longer.
Preparing wooden windows for use in winter
In general, preparation for wintering for wooden windows is not much different from the care process for their PVC counterparts. A significant difference is observed only in relation to wooden frames, which are more sensitive to care and require special preventive procedures:
- Identifying and eliminating cracks and other surface defects - the wood’s susceptibility to rot requires prompt elimination of problems (application of protective compounds, coatings, “patches”);
- Thorough cleaning of the joints and areas where the profile adjoins the glass unit - the maximum amount of dirt and moisture accumulates in the joint areas, due to which rotting processes quickly develop.
Wood profiles should be wiped regularly with dry cloths, paper napkins or towels.
Both when preparing wooden windows for winter and in other seasons, wet cleaning with products intended for wood care is recommended. You need to select a product taking into account the type of paint coating. In principle, these are the main stages of how to prepare plastic windows for winter without significant material costs in a short time. If the above list seems too long, and the upcoming implementation of all stages does not arouse enthusiasm, turn to the financial side of the issue. High-quality preparation of windows for the season will allow you to significantly save on heating and spend money on other important (or pleasant) purposes.
Adjusting plastic windows
As plastic windows operate, along with lubrication and cleaning, sometimes there is a need to adjust them. The reasons why this is done may be loosening of individual parts of the structure, violation of the technique of use, deformation of fasteners or shrinkage of the room. In such cases, you can try to correct the situation yourself, armed with the necessary recommendations.
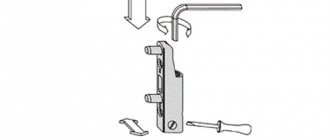
Window settings are possible at five points:
- Lower canopy. The vertical position of the sash is adjusted.
- Near the lower canopy. To adjust the lower horizontal angle.
- In the area of the upper canopy. Horizontal adjustment of the top of the sash.
- Eccentric locking pin. Changing the window pressing density.
- Lower locking pin. Function similar to the previous one.
Arrangement of elements for window adjustment
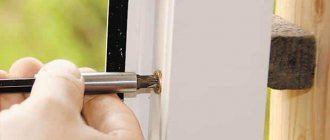
Horizontal adjustment
To move the frame or correct a slight bevel, horizontal calibration will be required. For these purposes, the lower and upper hinges are equipped with hexagonal holes. At the bottom, adjustment can be made with the window open and closed: if you turn the key clockwise, the sash and hinge will tighten. As a result, this will provoke the rise of the opposite bottom of the sash. If you twist in the opposite direction, the reverse process will occur. A similar adjustment can be made on the top hinge, with the window closed. The limit for moving the sash in this way is no more than 2 mm.
Horizontal window adjustment
Vertical adjustment
Vertical calibration of the system is carried out using the lower canopy. Before this, it is freed from the plug, under which there is a hexagon. To raise the sash, the hexagon should be rotated clockwise; to lower it, apply reverse rotation (the shift limit here is also limited to 2 mm).
Vertical window adjustment
Setting the degree of pressing of the shutters
To determine whether the window closes securely, you need to bring a lit match to the area where the sash and frame meet: the vibration of the flame will indicate the presence of a small gap. To calibrate here you will need pliers or a hex wrench. With their help, the eccentrics are rotated, which are responsible for the tight fit of the valves: they can have a different appearance, located around the perimeter. As a rule, the pressure is increased in winter and weakened in summer.
Adjusting the degree of pressing of the shutters
Tilt and turn sashes use a top hinge to further adjust the fit. An adjusting bolt specially designed for this purpose is located on the top hinge fittings: it is best viewed in the top ventilation mode. To increase the pressure on the sash, the regulator is rotated clockwise, to loosen it, counterclockwise. This adjustment can be made in the range of 1-2 mm: as a rule, weakening or strengthening of the pressure is seasonal.
Window awning calibration
You can increase the level of functionality of a folding plastic window using a pair of hinges. There is a horizontal screw on the bottom element for adjustment. Calibration of the upper canopy is carried out in ventilation mode, with only the upper flap open. During this procedure, the sash needs additional support by hand, since only the lower hinge will hold it. By calibrating the canopies, you can regulate the level of air supply into the room: with increased pressure on the window and hinge, a decrease in the air flow penetrating inside will be observed.
Adjusting the clamping canopies