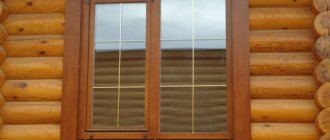
The choice of window systems is a fundamental decision when building a house. The finishing of windows in a wooden house is especially important; the choice of materials determines whether it will be warm inside the building in winter, and whether cracks will form after shrinkage of the log structure.
Windows should not only be beautiful, but also fulfill their main function - to bring light into the house and not let the cold in. Source th.decorexpro.com
In order for the windows to serve for a long time and without additional annual repairs, it is necessary to take into account some features when installing the double-glazed windows themselves, as well as finishing the window slopes from the outside in a wooden house. When installing turnkey window systems, professionals will offer several options for the customer’s choice of window frame materials, profiles, and fittings.
Features of installing PVC windows in a wooden house
In order to avoid deformation of the window frames when the timber shrinks, it is necessary to follow the installation rules. Professional installers who specialize in installing plastic windows in wooden houses will definitely offer the customer to install a casing structure, in other words casing. This element of the house structure allows you to prevent deformation of the opening and the window itself, and also not to interfere with the operational properties of window fittings.
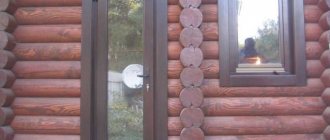
When a customer chooses wooden windows, one should not think that casing will not be required. Its installation is required not only in new houses, but also in those structures that have already suffered major shrinkage.
Casing is necessary in any case; you can’t do without it Source nl.decorexpro.com
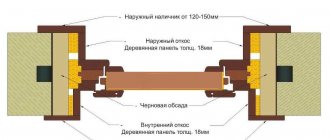
The casing is a wooden box that is inserted into the opening where the window is mounted. A very important installation step is to leave a gap between the timber and the casing. Due to this space, the structure of the house does not damage or deform the window when shrinking. However, this gap must be sealed. It is prohibited to use polyurethane foam; the ideal material is tow or other breathable material that does not form cracks or crevices when compressed.
See also: Catalog of companies that specialize in installing windows and doors.
Disadvantages of wooden slopes
Although window frames made of natural wood have become widespread, we should not forget that such products are still one-piece things, and by definition they cannot be cheap. In addition, the price of the slope is determined by the type of wood. The point here is not even in the performance characteristics of this or that variety. Rather, we are talking about the availability of material. For example, pine is a popular building material because it is easy to reproduce, which is not the case with oak. So, the main disadvantage of the widespread use of wooden slopes is their high cost.
Selection of casing materials
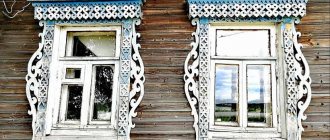
Depending on the choice of casing type, the material of the product is selected. If the customer chose the cheapest type, such as a socket in a embedded block, then he will need to cut a dry edged board 50x150 mm, and the block itself 50x50 mm in a given length. But it is worth considering that this type of casing must be subsequently lined, both from the inside and the outside. The exterior finishing of plastic windows in a wooden house is made with platbands, both wood and MDF, upon request. The moisture content of lumber should be 8-12%
Platbands can be of different shapes and have a carved structure Source kelo-wood.ru
For finishing casing, a material such as glued gun carriage is used. It does not require cladding.
All types of casing are made according to the tenon-groove principle; there are four types :
- In the embedded block , this is when a groove is cut along the perimeter of the opening and a block is driven through the vapor barrier to which the frame from the edged board is directly attached with self-tapping screws.
- T-shaped joint , a similar method to the previous one, but the tenon is solid-sawn, and no additional fastening with self-tapping screws is required. This design is considered more reliable and does not form cracks in the joints. Between the casing and the beam, a vapor barrier is also necessary.
- U-shaped casing , also called “casing in a deck”, is a monolithic structure in which a groove is cut and a tenon is cut along the perimeter of the opening. It is made of solid wood or laminated veneer lumber, thereby increasing the strength of the structure, which allows the use of panoramic windows.
Methods for installing a pigtail Source zen.yandex.ru
- Finish casing is made from glued blanks and has a beautiful appearance. Does not require additional cladding, only painting of polished platbands. The workpiece has a finished appearance and assumes the absence of internal and external finishing.
Metal slopes. Installation of metal slopes and ebbs
Metal slopes
Finishing with a metal slope is a set of works for the installation of auxiliary elements designed to extend the service life of the entire structure and improve its functionality. Slopes also cover holes between the frames and partitions of the house. The installation of such slopes, depending on the type, is classified as external or internal decoration of the apartment.
In winter, the slope does not allow cold to pass through and retains heat, creating a comfortable microclimate in the house. This detail of the opening insulates seams and closes microcracks, improving the sealing of the apartment
This is especially important given that polyurethane foam breaks down quite easily and quickly. By the way, the same functions are performed by internal slopes, which are moisture resistant if the room is ventilated or there is a radiator in the window sill niche
Currently, steel slopes are especially popular for windows and doors in private homes, as well as on the ground floors of offices and high-rise buildings.
Dimensions and design
Since slopes are made individually, measuring each window or doorway, the parameters of the product can be very different. The same applies to the level of complexity of the design. However, the metal slope is always solid and exactly fits the measurements, so high protection of the seams from water and sun is guaranteed.
The following types of slopes may have an unusual design:
- For ventilated facades or siding facades. In this case, the slopes will have protruding elements and shelves for fastening.
- For a brick facade. The slope will have a Z-shape.
Slopes for different facade windows, for example, can have a width of 2-60 cm. The length varies from 10 to 300 cm. Standard lengths are 125 cm, 200 cm and 300 cm. The thickness of the metal varies from 0.4 to 0.8 mm.
Advantages/disadvantages
Metal slopes are extremely popular on the market because the plates do not crack like plaster, do not swell like drywall and do not fade like plastic. If the main part of the materials is suitable only for creating internal slopes, then with metal it is also possible to produce external slopes. The main advantages of steel slopes include the following characteristics of the product and the material itself:
- High-quality sealing. Good metal-based slopes protect assembly seams from natural precipitation, as well as the very inside of the walls from dampness and mold processes.
- Long operational period. It is enough to invest in the installation of window slopes once, and you will be able to enjoy their quality for several decades in a row.
- High strength. Slopes on windows or doors made of metal perfectly overcome the negative influence of the external environment, be it high humidity, ultraviolet exposure, strong winds or temperature changes.
- Simple rules of use and care. To ensure that the metal slope retains its beautiful appearance and usual shine, it is enough to wipe it occasionally with a damp cloth. Unlike other materials, metal does not need to be repainted regularly.
- Home decoration. Laconic and stylish slopes for doors and windows complement the overall design of the apartment and become a decorative frame for each opening, because they have a special three-dimensional shape. Currently, there are different color solutions for steel slopes, so you can choose a part to suit any interior. The most common are white slopes for plastic windows and doors and brown ones for frames imitating wood.
Window installation stages
To ensure high-quality installation of windows in a wooden house, all technological steps must be followed:
- Selecting the type of casing;
- Installation of casing using vapor barrier. Specialized material is laid in the joint between the tongue and groove. This allows you to seal and insulate the gap without interfering with the technological breathing of the log house.
- A plastic double-glazed window is installed in the casing box; after fixing the frame with self-tapping screws, polyurethane foam is used to isolate the gaps.
- Install slopes for plastic windows in a wooden house.
- Platbands are installed outside.
Features of slopes: summing up
Slopes for windows made from different types of wood are a modern, aesthetic and functional style solution, the only disadvantage of which can be considered the high cost compared to plastic. But if we take into account the expected service life of wooden products, and this is more than a dozen years, even if we are talking about parts made of pine or spruce, then the price is not so high. But throughout the entire period of operation, the window will look noble and perform its functions properly.
The price of slopes depends on several factors - the size of the windows, their number, the complexity of the configuration, as well as the selected material. But whatever you choose, you will be offered competitive prices and extensive experience in the production and installation of window and door structures. To find out how much it costs to install slopes on windows, contact our experts by phone or fill out an application on the website, and we will soon contact you.
Final finishing: materials for platbands and their installation
After the mounting foam has dried, the stage of installing the platbands begins. The market offers a large selection of materials for finishing plastic windows in a wooden house.
Platbands are attached last Source rosmontag-okna.ru
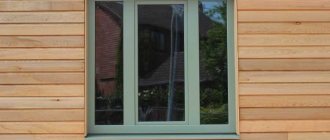
External platbands can be chosen from wood. They look harmonious in wooden houses. When installing, it is necessary to take into account that the seams are sealed so that moisture does not get under the cladding and damage the material. However, plastic finishing is also not inferior in popularity; modern models can imitate wood. Plastic is good because it is not subject to corrosion and rotting.
Depending on the taste of the customer, platbands can be in different styles and with a variety of treatments. For example: carved, painted wood frames, or polished in the Scandinavian style, or plastic imitating wood. In general, the choice is extensive. There are also metal models, but they are usually not installed in wooden houses.
In order not to spoil the appearance of the platbands, they are nailed onto finishing nails; they do not have heads and therefore remain invisible.
To avoid deformation of the platbands during shrinkage of the house, they must be mounted on the casing.
Drywall slopes
Finishing slopes with plasterboard is quick and does not require special construction skills. Installation is possible using polyurethane foam or putty as an adhesive or on a metal frame. Drywall for windows must be marked GKLV.
Drywall on slopes can be mounted on a metal frame
(function(w, d, n, s, t) { w[n] = w[n] || []; w[n].push(function() { Ya.Context.AdvManager.render({ blockId: "RA-510923-1", renderTo: "yandex_rtb_R-A-510923-1", async: true }); }); t = d.getElementsByTagName("script")[0]; s = d.createElement(" script"); s.type = "text/javascript"; s.src = "//an.yandex.ru/system/context.js"; s.async = true; t.parentNode.insertBefore(s, t) ; })(this, this.document, "yandexContextAsyncCallbacks");
It is characterized by the following positive qualities:
- environmental friendliness;
- affordable price;
- simple installation;
- decorative effect when finishing with any materials;
- smooth, durable surface;
- durability;
- possibility of designing arched openings.
Preparatory work
Surface preparation consists of the following steps:
- foam removal;
Removing foam residue - taking measurements of future products;
The sides are measured from the outside and inside - manufacturing of parts;
Using a stationery knife, cut sheets according to measurements. - sealing base defects and leveling the surface;
Level the surface of the slope - surface primer.
Using polyurethane foam, you can finish a window opening without having any construction skills. It is important to remember that drywall is a fragile material, so the necessary parts must be cut out of it carefully, without any effort .
To get smooth edges at the cut points, it is necessary to make an incision along the drawn line on a sheet of drywall, applying a ruler, using a sharp construction knife. You need to cut the top paper layer and a little inside. Then you can lightly tap along the cut - the drywall will break itself along the intended line.
Foam mounting
- foam is applied to the part and the wall;
Apply a layer of foam to the panel - the fragment is applied briefly and removed until the foam expands again. Then they put it in place;
The part is applied to the slope for some time - All fragments are secured in this way and left to dry, securing the structure with masking tape;
Use masking tape to secure drywall - after 24 hours the joints are puttied;
After a day it is necessary to putty the joints - A decorative corner is attached to the corners.
The corners are covered with a decorative corner
Interior window decoration
Depending on the interior design used in the timber house, the choice of material for slopes and casing indoors will be determined.
The interior decoration of windows should be combined with the design of the room in which it is located Source layout-lidea.ru
In interior decoration, the choice of materials is more diverse, since it is not exposed to the aggressive influence of the external environment.
Finishing options may include wooden lining and cladding, which is a classic in wooden architecture.
Not inferior in beauty and functionality to MDF panels, which are easy to install and have a wide selection of colors and textures.
A popular solution for finishing slopes are plastic panels. They are low maintenance, easy to install, and last a long time. They have a large selection of colors.
Internal finishing of slopes and casing not only gives a finished look to the window, but also protects the fastening elements and polyurethane foam from destruction when exposed to sunlight and changes in humidity. Any type of finish can cope with these functional tasks. The use of one or another option depends on the taste preferences of the customer and his financial capabilities.
Finishing window slopes with sandwich panels.
To cover a window opening inside a house, different finishing options are used. Not so long ago, the choice of finishing materials was limited to plaster and drywall. Today, slope panels are considered one of the most common finishing options.
Why are slopes needed?
Finished window slopes hide installation seams and give a neat appearance to the window and complete the aesthetics of the interior.
Advantages of finishing with sandwich panels over other types
Sandwich panels have the following advantages over possible types of slope finishing:
- ensuring optimal insulation of the cold walls of the opening from the microclimate in the room, which cannot be achieved if you make a window slope from gypsum plasterboard;
- reducing the noise level in the room when plastering slopes, we are not talking about any insulation of heat and noise;
- improved illumination thanks to reflective surfaces;
- light weight of the finishing material less than 2 kg/m2 versus 10 kg/m2 of plasterboard with the same thickness;
- the possibility of a strong connection with the PVC frame, which cannot be achieved by plastering the slopes;
- not subject to temperature changes and direct sunlight, so such slopes are suitable not only for windows, but also for doors;
- the impossibility of cracking, while cracking of a plastered window slope is a common phenomenon;
- no need to treat the surface with putty, unlike finishing with plasterboard (no wet finishing work);
- carrying out installation work with a minimum amount of construction waste, which is impossible to imagine when using gypsum board or plaster;
- the ability to use detergents to remove contaminants, which simplifies the care of the surface of the slopes.
Features and choice of material
The name “sandwich” best characterizes the structure of the material. The panel, assembled according to the principle of the most successful sandwich, consists of three layers: two external layers represented by sheets of polyvinyl chloride and an internal heat-insulating filler (often polyurethane foam or polystyrene foam). Panel thickness 10 mm.
Advantages and disadvantages of the product
Among the advantages of the finishing material, it is worth highlighting the following properties:
- zero thermal conductivity;
- energy-saving effect achieved through the use of extruded polystyrene foam in a multilayer structure;
- optimal combination of thickness and soundproofing properties;
- light weight of products;
- ease of installation, allowing you to install the slopes yourself;
- easy surface cleaning from dirt.
Despite its many advantages, the finishing material also has disadvantages:
- the cost of sandwich panels is higher than that of plastic panels;
- insufficient strength for use in public, crowded places.
Preparatory work
It is advisable to start constructing window slopes from sandwich panels by preparing the window opening. Such preparation involves the following work:
- Covering the window sill with plastic film or newspapers.
- Trimming excess polyurethane foam with a sharp knife.
- Cleaning the window frame from any remaining foam in the areas where the panels are installed.
In addition to preparing the surface, it is worth taking care of the tools and materials that should be at hand at the right time. To work you will need:
- sandwich panel;
- starting U-shaped PVC profile;
- PVC corner 30x30 mm;
- depending on the installation method, polyurethane foam or liquid nails (and a gun for them), wooden slats;
- masking tape;
- transparent adhesive sealant;
- screwdriver;
- self-tapping screws “seeds”;
- pencil and tape measure;
- mounting knife;
- goniometer;
- construction level (preferably laser);
- jigsaw;
- square
Installation of multilayer panels
The sandwich panel is mounted on slopes in several ways:
- Using wooden slats.
- Using polyurethane foam.
However, some types of work are performed in the same way when choosing either method. So, in any case, the installation of sandwich panels on plastic windows begins with measuring the slopes and cutting the finishing material. The width of the sandwich panel is cut 5 mm less than the width of the slopes. To ensure that the panel does not protrude beyond the wall into the room. It is better to carry out cutting by placing the sandwich panel on a table or stool. Make markings using a pencil and a square. Then cut with a jigsaw.
Regardless of the chosen method, a starting U-shaped profile is mounted. Installation begins with securing the upper starting guide. After that, the side U-shaped profiles are screwed on using “seed” self-tapping screws. The joint between the window sill and the side panel is sealed with liquid plastic.
There is also the option of installing a sandwich panel without a starting profile. To do this, the panel is placed behind the window frame and pressed against the frame. But this is doable if the gap between the frame and the wall is not foamed to its full depth.
Each method of finishing windows with sandwich panels has pros and cons. To choose the best option you need to learn a little more about them.
Installation using wooden slats
The sequence of work is as follows:
- First, we screw 20x40 mm wooden slats flush with self-tapping screws along the edges of the walls and the top of the window opening. At the same time, we make sure that they fit tightly to the base.
- The starting U-shaped profile, cut to size, is secured along the outer edge of the window frame using self-tapping screws, which are screwed in in increments of 15 cm.
- We check by level whether the slats are installed evenly.
- We insert the edge of the top panel into the starting profile.
- We insert mineral wool-based insulation into the space between the wall and the panel.
- We screw the other edge of the sandwich panel with self-tapping screws to the previously fixed rail.
- We install and fasten the side panels to the rail in the same way.
- We glue the edging corners to the junction of the sandwich panel and the wall and secure them with masking tape until the glue sets completely.
Installation on polyurethane foam
- We secure with self-tapping screws every 15 cm, pre-cut starting U-shaped profiles.
- We remove dust and moisten the surfaces on which we will apply polyurethane foam by spraying water from a spray bottle (the foam sets from moisture).
- First we insert the top panel into the U-shaped profile.
- We foam the space between the slope and the wall.
- We align the panel in a horizontal position along the beam of the electronic level and fix it with pieces of masking tape.
- We do the same with the side panels.
- Let the mounting foam harden.
- Remove the tape and foam the remaining voids.
- First, the side edging PVC corners measuring 30x30 mm are glued to the junction of the panel and the wall.
- Then the top corner is glued.
- The corners are also fixed with masking tape until the adhesive-sealant completely sets.
- The joint between the side and top corners is made at 45 degrees.
Manufacturers of plastic windows have met everyone halfway who wants to improve their home by offering lamination of classic white frames. Laminated sandwich panels were created especially for them so that the windows become one with the window opening. In modern houses and apartments, this method of finishing has long become commonplace.
Fastening slopes to polyurethane foam
You can finish slopes using foam in a wooden house after 12 hours from the moment the window block is installed, since the foam needs to dry completely. At the end of 12 hours, you should begin installing the cashing and do not delay the work, since under the influence of moisture, temperature changes and wind, the foam can become loose and even begin to collapse.
It is recommended to install the slopes 12 hours after installing the window
You need to measure and cut the wooden planks to the required shape and size. The corners should be as straight as possible. Based on experience, it is worth noting that even with ideal design, a house cannot have two absolutely identical window openings: therefore, in each specific case, the design of slopes and casing will have certain features.
Having installed and secured the finishing strips at the corners of the frame, using self-tapping screws and a screwdriver, you should make sure that the corners remain even, since you will no longer be able to influence this in the future. The resulting opening must be foamed; the amount of foam must be taken into account, because its volume will increase by approximately 2.5-3 times. Any polyurethane foam that turns out to be excess is cut off immediately after drying using a stationery knife. The main thing is that after finishing the slopes in a wooden house and installing cashing, there are no cracks or holes anywhere for exposure to moisture or wind.
The choice of window systems is a fundamental decision when building a house. The finishing of windows in a wooden house is especially important; the choice of materials determines whether it will be warm inside the building in winter, and whether cracks will form after shrinkage of the log structure.
Windows should not only be beautiful, but also fulfill their main function - to bring light into the house and not let the cold in.
In order for the windows to serve for a long time and without additional annual repairs, it is necessary to take into account some features when installing the double-glazed windows themselves, as well as finishing the window slopes from the outside in a wooden house. When installing turnkey window systems, professionals will offer several options for the customer’s choice of window frame materials, profiles, and fittings.
Features of installing PVC windows in a wooden house
In order to avoid deformation of the window frames when the timber shrinks, it is necessary to follow the installation rules. Professional installers who specialize in installing plastic windows in wooden houses will definitely offer the customer to install a casing structure, in other words casing. This element of the house structure allows you to prevent deformation of the opening and the window itself, and also not to interfere with the operational properties of window fittings.
When a customer chooses wooden windows, one should not think that casing will not be required. Its installation is required not only in new houses, but also in those structures that have already suffered major shrinkage.
The casing is necessary in any case, you can’t do without it
The casing is a wooden box that is inserted into the opening where the window is mounted. A very important installation step is to leave a gap between the timber and the casing. Due to this space, the structure of the house does not damage or deform the window when shrinking. However, this gap must be sealed. It is prohibited to use polyurethane foam; the ideal material is tow or other breathable material that does not form cracks or crevices when compressed.
On our website you can find contacts of construction companies that offer the service of installing windows and doors. You can communicate directly with representatives by visiting the “Low-Rise Country” exhibition of houses.
Selection of casing materials
Depending on the choice of casing type, the material of the product is selected. If the customer chose the cheapest type, such as a socket in a embedded block, then he will need to cut a dry edged board 50x150 mm, and the block itself 50x50 mm in a given length. But it is worth considering that this type of casing must be subsequently lined, both from the inside and the outside. The exterior finishing of plastic windows in a wooden house is made with platbands, both wood and MDF, upon request. The moisture content of lumber should be 8-12%
Platbands can be of different shapes and have a carved structure
For finishing casing, a material such as glued gun carriage is used. It does not require cladding.
All types of casing are made according to the tenon-groove principle, there are four types
:
- In the embedded block
, this is when a groove is cut along the perimeter of the opening and a block is driven through the vapor barrier to which the frame from the edged board is directly attached with self-tapping screws.
- T-shaped pigtail
, a similar method to the previous one, but the tenon is solid-sawn, and additional fastening with self-tapping screws is not required. This design is considered more reliable and does not form cracks in the joints. Between the casing and the beam, a vapor barrier is also necessary.
- U-shaped casing
, also called “casing in a deck”, is a monolithic structure in which a groove is cut and a tenon is cut along the perimeter of the opening. It is made of solid wood or laminated veneer lumber, thereby increasing the strength of the structure, which allows the use of panoramic windows.
Methods for installing a pigtail
- Finishing casing
– made from glued blanks, has a beautiful appearance. Does not require additional cladding, only painting of polished platbands. The workpiece has a finished appearance and assumes the absence of internal and external finishing.
This might be interesting!
In the article at the following link, read about finishing a log house.
Window installation stages
To ensure high-quality installation of windows in a wooden house, all technological steps must be followed:
- Selecting the type of casing;
- Installation of casing using vapor barrier. Specialized material is laid in the joint between the tongue and groove. This allows you to seal and insulate the gap without interfering with the technological breathing of the log house.
- A plastic double-glazed window is installed in the casing box; after fixing the frame with self-tapping screws, polyurethane foam is used to isolate the gaps.
- Install slopes for plastic windows in a wooden house.
- Platbands are installed outside.
Final finishing: materials for platbands and their installation
After the mounting foam has dried, the stage of installing the platbands begins. The market offers a large selection of materials for finishing plastic windows in a wooden house.
Platbands are attached last
External platbands can be chosen from wood. They look harmonious in wooden houses. When installing, it is necessary to take into account that the seams are sealed so that moisture does not get under the cladding and damage the material. However, plastic finishing is also not inferior in popularity; modern models can imitate wood. Plastic is good because it is not subject to corrosion and rotting.
Depending on the taste of the customer, platbands can be in different styles and with a variety of treatments. For example: carved, painted wood frames, or polished in the Scandinavian style, or plastic imitating wood. In general, the choice is extensive. There are also metal models, but they are usually not installed in wooden houses.
In order not to spoil the appearance of the platbands, they are nailed onto finishing nails; they do not have heads and therefore remain invisible.
To avoid deformation of the platbands during shrinkage of the house, they must be mounted on the casing.
This might be interesting!
In the article at the following link, read about a turnkey house with communications and finishing.
Interior window decoration
Depending on the interior design used in the timber house, the choice of material for slopes and casing indoors will be determined.
The interior decoration of windows should be combined with the design of the room in which it is located.
In interior decoration, the choice of materials is more diverse, since it is not exposed to the aggressive influence of the external environment.
Finishing options may include wooden lining and cladding, which is a classic in wooden architecture.
Not inferior in beauty and functionality to MDF panels, which are easy to install and have a wide selection of colors and textures.
A popular solution for finishing slopes are plastic panels. They are low maintenance, easy to install, and last a long time. They have a large selection of colors.
Internal finishing of slopes and casing not only gives a finished look to the window, but also protects the fastening elements and polyurethane foam from destruction when exposed to sunlight and changes in humidity. Any type of finish can cope with these functional tasks. The use of one or another option depends on the taste preferences of the customer and his financial capabilities.
Finishing windows inside a house made of timber is detailed in this video:
This might be interesting!
In the article at the following link, read about the exterior decoration of a house made of foam blocks.
Conclusion
When building a house made of wood, there are a lot of nuances and features. To avoid fatal mistakes and not pay twice, a wise decision would be to turn to professionals. For customers, it should be especially noted that a company that provides this type of service must be certified. You should not trust the construction of a house to the so-called “shabashniks”; in cases of defects discovered after the completion of the project, there will be no one to file a claim with. And no one guarantees the safety of living in such a house. When deciding to build a house made of wood, you must remember that the miser pays twice.
Rate the article, we tried our best for you
Features of PVC and wood material
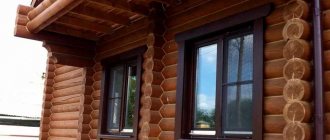
Finishing plastic windows in a wooden house with PVC slopes is a fairly popular option. This practical material will serve you for a long period of time; the plastic has an attractive appearance and is resistant to moisture.
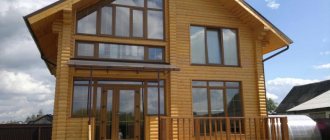
Finishing slopes in a wooden house from the outside on the facade side will last for many years without losing its functions. The main advantages of plastic include the following:
- reliable protection of wood;
- resistance to temperature changes;
- variety of shades: from natural to bright;
- ease of care: without additional chemical cleaning agents, you can quickly remove dust and various types of dirt.
Plastic slopes reliably protect wood from moisture
Wooden materials have their advantages:
- attractive appearance;
- natural material that does not cause allergic reactions;
- durable, has a long service life, subject to proper installation and maintenance;
- the ability to paint the slope in any color based on the color of the interior or facade of the building.
How to make your own PVC windows
If the windows are not wooden, but consist of PVC material (plastic), then the following instructions are relevant:
- Attaching the starting guides. To do this, prepare the holes with a hammer drill for fastening with self-tapping screws.
- Ensuring symmetry, especially the guides. Using a level to check indicators.
- Preparation of slope dimensions.
- Insertion into starting slope guides.
- Filling the resulting cracks and empty spaces with construction foam.
- The sealing areas must be covered with special tape (only after the foam has dried).
- Installation of corners.
- Remove excess foam using a knife and cleaning agent.
Internal slopes for wooden windows, as for PVC material, will be a wonderful decoration, but for this you need to do the work carefully and act symmetrically.
Do-it-yourself wooden slopes on plastic windows are installed in accordance with these simple rules. It should be noted that there are many installation features. Much depends on the condition of the windows, coating and other parameters, asymmetry, and defects.
How to make wooden slopes on plastic windows so that they look aesthetically pleasing? There are two simple rules for choosing a color. First, you need to take into account the features of future wall decoration. If the frame and windows are PVC, without lamination (white), then the wooden slopes can also be made white. If the wall has a dark finish, then dark slopes will suit even light windows.
The installation of wooden slopes on plastic windows itself does not take much time. On average, it will take a day to complete the work, and this takes into account the drying of the foam. If you notice that there is not enough of it, and some of the cracks were not filled, there is no need to leave it as it turned out. Buy a regular acrylic compound that can be used to cover imperfections. It does not shrink in size, does not spread, and is durable.
Do-it-yourself wooden slopes for plastic windows are made taking into account the mandatory rule: it is important to handle the joints well. Do this with sandpaper
The material is rubbed to perfect condition, so fixation will be required. How to make wooden slopes on plastic windows so that they do not begin to collapse? The lining is often offered with a varnish coating, but it will not be available in the cut areas. It is better to take this point into account and prepare the coating in advance.
Installation work
In order for the external and internal finishing of window slopes to be reliable, everything must be installed according to the rules. Before you begin the step-by-step installation of wooden or plastic window slopes, you should check the quality of the materials. The finished surface will be smooth and without cracks only if you install plastic or wood that has not been subject to deformation. Exclusively with this option, external slopes will provide reliable protection for windows and openings.
Plastic panels are secured around the perimeter using self-tapping screws
To begin installation work with your own hands, you will need the following materials and equipment: slope strips made of wood or PVC, corners, screwdriver, sealant, stapler, screws. Having acquired all the required building materials and tools in advance, you can begin to work. Such instructions will be relevant for creating both external and internal cladding.
External finishing of slopes with plastic panels in a wooden house is not difficult work - this is due to the clear and even cut of window openings in such buildings, which means they are quite smooth.
Sheathing work using screws is carried out in this way: the external and internal finishing of the window usually begins around the perimeter by securing a strip, called the starting strip; the panel is mounted using self-tapping screws, which are screwed into the bottom and top of the entire structure using a screwdriver; this is necessary for maximum camouflage capabilities.
Following these instructions, you can install the panels at the top of the opening. If the width of the slopes to be finished is significantly greater than the width of the panel itself, you need to use several panels, the fastening of which occurs using the tongue-and-groove technique.
After installation is complete, you need to move on to securing the corners. They are installed using a special installation adhesive or liquid nails.