Types of roller blinds
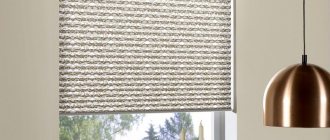
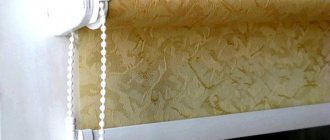
Fabric roller shutters are a straightened fabric sheet that is wound onto a shaft placed above the window. The bottom of the canvas is lowered and raised depending on the need for shading. There are several types of fabric roller shutters on sale, differing in size, mounting location and installation principle.
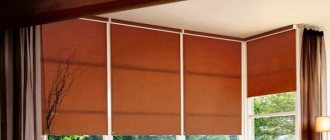
Classic open
The system of classic open curtains is best suited for wide openings, panoramic windows and bay windows.
They are mounted on the wall, ceiling, or in the opening. They move using a chain or spring mechanism.
Advantages:
- cheap, the cost depends on the area of the canvas;
- cover a large glass area at once;
- take up minimal space from the room.
Flaws:
- when lowered, they interfere with opening the window;
- get dirty faster with dust;
- require drilling into walls or ceilings.
The classic open curtain system is best suited for wide openings, panoramic windows and bay windows.
UNI cassette blinds closed
A shaft with a fabric roller shutter in a plastic box matching the color of the window frame.
The shaft with the wound fabric is hidden in a plastic box the color of the window frame on which it is attached. The blade adjustment is controlled by a spring or chain mechanism.
Advantages:
- the frame and guides merge with the contour of the window frame; when folded, the curtains are invisible;
- the guides are installed on the glazing bead, the canvas is almost adjacent to the glass;
- does not interfere with window opening;
- do not take away the window sill area;
- can be used on roof windows;
- You can install two boxes at the same time in the upper and lower positions.
Flaws:
- the most expensive design of fabric roller shutters
MINI roller blinds open
MINI open roller blinds are mounted on a window frame or sash.
They are mounted on a window frame or sash. Adjustable by chain mechanism.
Advantages:
- fastened without drilling the window profile;
- the guides are a stretched invisible fishing line;
- do not interfere with window opening;
- do not take up window sill space.
Flaws:
- require careful handling;
- glue can “float” in hot weather
An interesting variety of mini roller blinds is double day-night roller blinds. This is a canvas made of alternating dense and transparent strips of the same width, unwinding in two layers. Shading is done by combining stripes in layers. The main advantage of the model is the smooth regulation of natural light.
Day-night roller blinds smoothly regulate the level of natural light
When deciding which type of roller blinds to choose for a particular room, you should take into account the interior design, size and position of the windows.
Recent posts Soldering or crimping electrical wires Why is there humidity in the apartment and what to do Chopped at home: technical features and advantages
- The space of deep window openings and window sills is usually used for decorative and functional purposes. It is recommended to install cassette roller blinds in them, which occupy a minimum of space and do not distract attention.
- It is better to decorate shallow openings without a window sill and narrow windows with curtains over the opening. A long cornice and a wide canvas matching the color of the walls will visually increase the size of the window.
For all types of roller blinds, it is possible to integrate an electric drive for automatic adjustment of the position of the curtain.
Installation on tape
4.1. Place one piece of tape on both platforms.
4.2. Insert the MINI brackets into the adhesive tape platforms.
4.3. Mark the proposed attachment points, degrease them and glue the brackets with the platforms. The brackets must be installed horizontally. The protrusions on the platforms for attaching the additional profile should be located at the bottom.
4.4. Install the inserts into the control mechanism and into the plug in the pipe. Insert the product into the brackets until it clicks. The roll of fabric should be visible.
4.5. Insert plugs into the additional profile on both sides. Install an additional profile on the protrusions of the cap brackets.
4.6. Insert plugs into the lower tube on both sides.
4.7. Insert the bottom tube into the fabric.
4.8. Check the functionality of the product by lowering and raising the blade.
4.9. Set the chain stops to the upper and lower extreme positions.
Fastening methods, choice of fixation type
Classic roller blinds are mounted on plastic brackets using dowels driven into the base. Depending on the design, roller blinds can be attached to plastic windows, or the base can be the horizontal surface of the ceiling or opening, the vertical surface of the wall or opening.
Classic roller blinds are mounted in the opening, behind the opening to the wall or ceiling
Cassette and mini-rollo are fixed to the window profile with self-tapping screws. But more often, models with fastening without drilling are used. The shaft, guides and clamps are glued to the profile with double-sided foam tape, and on the opening doors the shaft is additionally secured with a clamp.
The position of curtains with a spring mechanism is fixed by the spring itself. When the canvas is pulled down, the spring does not hold it. As soon as the tension has stopped, the mechanism clamps the shaft in the specified position. To raise the curtain, it is pulled slightly, releasing the clamp, and then released, allowing it to rise to the desired level.
The position of the blade in the chain mechanism is held by a pair of clamps placed on the chain. To prevent the chain on the opening window from drooping, a clamp is attached at the bottom of the profile into which it is tucked.
Taking measurements for “mini” curtains
In order to attach roller blinds to a plastic window you must:
- Measure the width of the glass and glazing beads, and then the length of the window sash;
- Decide on the mechanism. It is usually located on the side of the window hinges;
- Select the option to attach the curtain. Differences may arise and can be changed if the sash opens or is closed tightly.
Preparation for installation
Before installing roller blinds on a plastic window, it is necessary to determine the dimensions of the product for each double-glazed window. The fabric should cover the glass well, but not extend beyond the frame.
- The mini-rollo canvas should be 3 cm wider than the glass. On the sash, the overlap on the handle side is 1 cm, and on the hinge side - 2 cm.
- The size of the blade in a system with U-guides mounted on a glazing bead exactly matches the size of the glass. If the glazing bead is oblique or rounded, the guides are glued to the frame. In this case, the size of the fabric is equal to the outer perimeter of the glazing beads.
- The canvas mounted in the opening should be 4 cm narrower than it. Measurements are taken at the window frame.
- The size of the curtain mounted on the wall or ceiling is determined depending on the design solution. It should be 10 or more centimeters wider than the opening, and its edge can go down to the window sill or to the floor.
All roller blinds are produced in the form of a designer kit with all the necessary components. There is no need to buy additional materials.
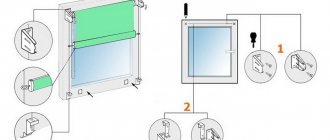
1 — Control mechanism for raising and lowering the curtains. 2 - Brackets. 3 - Guide line. 4 — Chain stops in the extreme positions of the blade. 5 - Bracket area with adhesive tape. 6 — Magnetic latches of the bottom bar
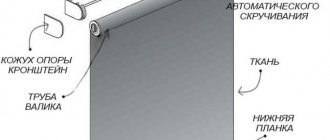
What does the roll system consist of and how does it work?
The basic package of mini curtains includes a shaft with a diameter of 19 mm, a rectangular fabric sheet, a lower weight, a chain control unit, a chain holder, blind travel limiters and two brackets. When purchasing a ready-made kit or ordering custom sizes from the manufacturer, the compact curtain mechanism can be supplemented with guide lines for folding windows, magnets for fixing the bottom strip, and snap-on or adhesive fastenings.
Tip: The availability of all parts must be checked or clarified in advance, because not all manufacturers include additional accessories in the kit for mini roller blinds by default.
The material is lifted using a chain, and the fabric is automatically fixed at the desired height. The tension of the web is ensured by installing a metal weight strip with a rubber gasket along the lower edge. This prevents noisy lowering onto the windowsill. Mini roller blinds of the economy version are equipped with a plastic weighting material.
How to attach roller blinds to plastic windows
Tools
- Drill or hammer drill (depending on the base material).
- A set of drills or drills for concrete, bits (depending on the base material).
- Screwdriver.
- Screwdriver Set.
- Dowels.
- Level.
- Pencil.
Operating procedure
- Remove the curtain and accessories from the packaging.
- Assemble the roll: insert the chain mechanism into the shaft with fabric at one end and the plug at the other; Attach the brackets to the shaft according to the diagram included in the package.
- Attach the roller blind to the mounting location, center it relative to the opening, and adjust the horizontal position according to the level.
- Using a pencil, mark the drilling points through the mounting holes in the brackets.
- Remove the brackets from the shaft.
Stages of installing roller blinds on a window frame - Drill mounting holes, drive in dowels, screw in brackets.
- If the curtain model has cable guides, thread the ends of the cable into the grooves of the brackets, tie with a double knot, and cut exactly in the middle.
- Insert the roll into the brackets with the canvas facing the window.
- Pull the free ends of the cable into the loops at the ends of the fabric plumb line.
- Screw the cable clamps to the wall below. Pass its free ends into the grooves and tighten with the adjusting screw.
- Insert the shaft clamps.
In a house with small children and animals, it is recommended to install fabric roller shutters with a spring mechanism. They don't have long plastic chain loops that kids and pets can get caught in or break.
Video: installing curtains outside the window
Installation with drilling.
2.1. Break off the upper part of the adjustable brackets. Drill two holes with a diameter of 3 mm on the protrusions of each bracket.
2.2. Insert the MINI brackets into the throw-on brackets. The holes must match.
2.3. Mark the proposed mounting locations for the brackets. The brackets must be installed horizontally. Screw the brackets with screws so that the protrusions of the throw-on brackets for attaching the additional profile are located at the bottom.
2.4. Install the inserts into the control mechanism and into the plug in the pipe. Insert the product into the brackets. The roll of fabric should be visible.
Installation in a window opening
Tools
- Drill or hammer drill (depending on the base material).
- A set of drills or drills for concrete, bits (depending on the base material).
- Screwdriver.
- Screwdriver Set.
- Dowels.
- Level.
- Pencil.
When installing a roller blind into an opening, using a spirit level is mandatory! Seemingly straight walls may turn out to be crooked, causing the curtains to become skewed, causing problems and looking unsightly.
Roller blinds installed inside the opening look aesthetically pleasing
Operating procedure
- Remove the curtain and accessories from the packaging.
- Assemble the roll: insert the chain mechanism into the shaft with fabric at one end and the plug at the other; Attach the brackets to the shaft.
- Attach the roller blind to the mounting location and level it horizontally.
- Using a pencil, mark the drilling points through the mounting holes in the brackets.
- Remove the brackets from the shaft.
- Drill holes, drive in dowels, screw the brackets.
- If the model has a guide line, thread the ends of the line into the special holes in the brackets, tie with a double knot, and cut in the middle.
- Insert the roll into the brackets with the canvas facing the window.
- Pull the free ends of the fishing line through the loops at the ends of the plumb line.
- Screw the fasteners for the guide line to the side walls of the opening, insert the free ends of the line into the special holes, and tighten them with the adjusting screw.
- Insert the shaft clamps.
- Attach the stops to the chain at the extreme positions of the blade.
Fastening
Mounting is carried out as follows:
- Remove the protective film from the self-adhesive strip of the shaft.
- The canvas is wound onto a shaft and unfolded along the side of the window.
- The fastening is carried out on the shaft in a horizontal position to avoid distortions.
- Fold 50 mm of the top part, getting a fold.
- Place the shaft in the fold with the strip facing up.
- Afterwards it is rolled to the top.
- The canvas is folded to ¾ of its length and the bottom rail is inserted into the finished hole. It is ready to install.
- The construction is carried out by inserting its end with the control mechanism into the bracket, then the other end is inserted.
To learn how to assemble roller blinds, a video is provided.
How to hang a MINI open roller blind on a window frame
Tools
Installation tools will only be needed for roller blinds attached to the frame with self-tapping screws:
- Drill with a thin drill bit.
- Screwdriver.
- Screwdriver Set.
- Pencil.
The procedure is the same as when attaching a roller blind to a wall, with the difference that a hammer drill, bumpers and dowels are not needed. Most MINI models are fixed without drilling the window profile.
Operating procedure
- Remove the curtain and accessories from the packaging.
- Assemble the roll: insert the chain mechanism into the shaft at one end and the plug at the other, attach the brackets to the shaft.
- Attach the shaft to the frame, center it relative to the glass.
- Use a pencil to mark the outer sides of the brackets.
- Remove the brackets from the shaft.
- Degrease the mounting points. Attach pieces of double-sided foam adhesive tape to the profile according to the marks.
- For rolls mounted on sashes, connect the brackets to the clamp.
Installation of MINI roller blinds - Glue the brackets to the tapes, pressing the parts firmly against the profile.
- Insert the roll into the brackets.
- If the model has a guide line, thread the ends of the line into the holes in the brackets, tie with a double knot, and cut exactly in the middle.
- Insert the roll into the brackets with the canvas facing the window.
- Insert the shaft clamps
- Pull the free ends of the fishing line through the loops at the ends of the fabric plumb line.
Roller blinds for installation on the window sash without drilling are additionally fixed with a clamp - Stretch the fabric to the bottom. Attach the fasteners for the guide line to the bottom profile with double-sided tape. Insert the free ends of the fishing line, tighten them with the adjusting screw
- Attach the stops to the chain in the extreme open and extreme closed positions of the blade.
- For curtains on a sash with a chain mechanism, glue the chain retainer to the profile at a height of 10 cm from the window sill.
On windows of small height, you can do without a guide line. To ensure that the closed curtain does not move away from the window in the ventilation position, magnetic latches should be used. They are mounted on the lower profile of the frame and on the plumb line of the canvas.
To open such a curtain, do not forget to first disconnect the magnets and then pull the chain.
If you want to remove roller blinds from a PVC profile, you will face the problem of cleaning the plastic from glue. Take a household hair dryer and a cloth soaked in solvent. Heat small areas of glue with a hairdryer at maximum temperature and immediately wipe them off with a rag.
Detailed assembly sequence
The process of assembling and installing curtains is quite simple, but requires precision and accuracy
Note! It is recommended to attach the curtain to the sash based on the width of the material. Double-sided tape can only be applied once. Although they are installed quickly in this way - in 10 minutes.
If you are not confident in your own abilities, it is advised to turn to specialists. It is recommended to call a surveyor by leaving a request on the appropriate website.
Another roller blind assembly is proposed, step by step instructions below. There are the following stages of installation on a “blind sash” using adhesive tape:
Installation of cassette structures
Cassette roller blinds with U-shaped guides merge with the window profile
Operating procedure
- Remove the curtain and accessories from the packaging.
- Degrease the glazing bead and profile using the alcohol wipes included in the kit or a rag soaked in alcohol.
- Remove the protective film from the U-shaped profile and, pressing firmly, glue it onto the vertical beads.
- Remove the back of the box from the protective film.
- Release 10–15 cm of fabric from the box.
- Bring the box to the upper profile of the frame, thread the ends of the plumb line into the guides.
- Glue the box to the frame.
- Remove the box from the glued fastening corners. Press the corners firmly against the profile for security.
- Place the box in place.
- Attach limiters to the chain to allow the curtain to fully open and close.
- Hang a decorative weight on the bottom loop of the chain.
Installing roller blinds yourself at home or in the office is not that difficult. It will be much more difficult to choose from a huge variety of fabrics suitable for the interior.
Larisa Chaika