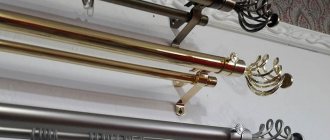
A cornice is used to attach curtains to the interior of any home. This is a device whose main elements are guides, curtain mounts and so-called decorative tips. The latter are used to prevent the rings from jumping off the bar.
Another important element of this design is the bracket, which serves as a support for the guide rod. It, among other things, performs a decorative function and takes the load from the mass of the curtains and the entire cornice.
There are a number of requirements for brackets, the most important of which are reliability, ease of use and strength.
Varieties
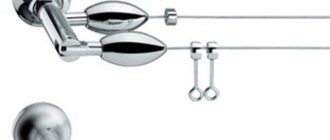
There are two types of brackets - open and closed. The first are a lock or clamp in the form of a half ring, the second are a ring with an inserted rod. The number of holders for it depends on which model the bracket is used in. Depending on the type of fastenings, single and double brackets for curtain rods are produced.
Mounting methods
Depending on where you plan to place the cornice, the following types of brackets are distinguished:
Direct wall-mounted – fixed on walls (including above the window) and side openings between walls.
Lateral - attached to two surfaces located opposite each other (for example, in a window opening, or between a pair of opposite walls). Often, fastening a rod in a window opening is used when it is necessary to fasten light curtains such as a mesh or attic.
In addition, there are versions of curtain rods that are fixed to window frames. This method is used in cases where the window takes up a lot of space and there is not enough space on the sides to attach the curtain rod bracket to the wall. In this case, curtains or blinds that are planned to be hung on such a cornice should not be too heavy.
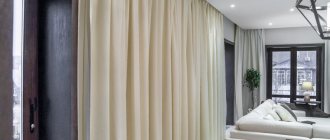
Ceiling - as the name suggests, they are attached to the ceiling. Such brackets are used in cases where the window is high enough and does not allow fixing the cornice on the wall.
How to remove a curtain
So, how to remove a curtain that was installed earlier. The procedure is as follows:
- Stand on a stable stepladder.
- Remove the curtains. If possible, remove them along with the sliders, this will speed up the process.
- Remove the side roundings (usually they are fixed with retaining screws, which must first be unscrewed).
- Gradually unscrew the screws alternately on each side until one central screw remains.
- Slowly unscrew the central screw while holding the cornice.
The pitch of the fasteners is determined by the weight of the curtains.
However, you should not hope to securely secure curtains with heavy curtains by simply increasing the number of dowels. When choosing curtains, pay particular attention to reliability and durability. There must be some reserve. In other words, the curtain should be able to withstand a little more weight than the curtains themselves. Indeed, during operation, someone may pull the curtain with a little more force.
To make the best choice, you need to take into account the size of the room and window opening. For spacious rooms with large windows on a long wall, curtains are chosen 50-60 cm wider than the window opening. In this case, they are installed symmetrically to the window.
According to experts, the most reliable designs of ceiling curtains are attached directly to the base ceiling with anchors. And the most unreliable options are string curtains. Very often they are not able to support even the mass of curtains and sag unsightly in the middle. And in addition to aesthetic problems, this creates inconvenience in operation.
First of all, you need to think in advance about what kind of curtains you are going to decorate the window of your room with. What width is expected, what weight, how many rows will they be arranged in? Based on these parameters, you can choose the most suitable model of ceiling cornice.
Installing ceiling curtains is a serious process, but even a beginner can cope with such work. Having the necessary tools and instructions, you can install the curtains beautifully and securely.
Materials for production
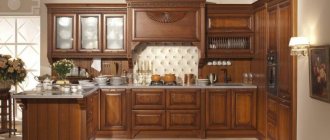
Brackets are made from the same materials as cornices: wood, plastic or metal. Of course, metal products are the most durable; they are highly wear-resistant and not subject to deformation.
However, modern technologies make it possible to produce brackets from equally durable polymers, the main advantage of which over metal is their immunity to corrosion. But in terms of aesthetic and environmental indicators, wooden brackets have no equal.
Currently, combined models in which different elements are made of several materials are very popular. They allow products to be successfully integrated into the interior, both in appearance and in physical properties. Below are photos of brackets for curtain rods made from various materials.
What is important to consider when buying a baguette
Before you figure out how to install a curtain rod on a wall, we’ll tell you what to look for when purchasing a product. There are different designs on the market:
Expert opinion
Romanova Ksenia Petrovna
Interior design expert and fabric store manager
Each of them has its own advantages and disadvantages. They definitely need to be taken into account. But the installation is greatly influenced only by the type of brackets that come with the products. Depending on the material, there are several options:
- Plastic. The cheapest, but the most fragile. They are great for tulles and light curtains. When hanging a heavy canvas, the fastening sags and eventually breaks.
- Wooden. They help bring vivid design solutions to life. Their strength directly depends on the quality of workmanship. Therefore, components must be carefully inspected to ensure there are no knots, chips or cracks.
- Metal. The most reliable and durable curtain rods. If your budget allows, preference should be given to them.
Each option has its own design features. Many of them only affect appearance. But the type of mounting plate determines the reliability of fastening to the wall:
- Three-point. Makes it possible to firmly secure the structure and avoid turning the rod holder. This is ideal for installation in concrete and wood. If the holes are located close to each other, installation in porous materials becomes more difficult: aerated concrete, hollow brick and others. A fragment of the weakened surface may crumble or break off.
- Single point. The only hole for the dowel is in the middle of the installation “cup”. In this case, under the weight of heavy curtains, the bracket may tilt down slightly. But this makes it possible to firmly screw it to a surface made of hollow materials. It is enough to choose a dowel of the desired type and length.
If you have to attach a three-point “cup” to a hollow base, drive the load-bearing dowel only into the upper hole. We screw small self-tapping screws into the other two to avoid turning the bracket.
Colors
The color scheme of the brackets depends on the material, but it is not always easy to understand by the color what material the bracket is made from. The wood is characterized by natural shades from yellow and honey to wine and darker colors.
Not far behind wooden brackets are metal ones, the color range of which is no less wide and allows you to choose plain bright colors and metallic shades. Brackets for plastic curtain rods can have almost any color and shade.
Installation features
At least two brackets must be used to secure one curtain rod, but additional fasteners may be required. So, to fix wooden, plastic and metal cornices, the brackets supporting them are attached every one and a half, or even two meters, and for string ones - 0.9 - 1 m.
It is necessary to keep in mind the length of the bracket. In conventional ceiling and wall cornices, the distance between the surface and the cornice is 15 cm. If a larger distance is required, ceiling fastenings or fixation between two walls are used.
For exclusive products, brackets 40cm or more in length can be used. Most often, the installation of heavy metal curtain rods is carried out by qualified specialists.
Today you can find both adjustable and non-adjustable brackets on sale.
If the ceiling is plasterboard
If it was decided to install a ceiling cornice at the renovation stage, most likely there is a special niche in which it is installed. In this case, it is attached to the ceiling, and how to attach the ceiling cornice to concrete and wooden floors is described above. It will be a little more difficult, since freedom of action is limited, but not critical.
Attaching the cornice in a niche is a little more inconvenient
There may be a second option - without a niche. A wooden beam is fixed at the place where the cornice is installed. It is located between the drywall and the main floor. In this case, the ceiling cornice is attached to the beam through plasterboard. You need to use wood screws of sufficient length so that the body of the beam contains at least 2/3 of the length (preferably more).
But if you decide to replace the cornice with a ceiling one after the repair, you will have to look for special fasteners. These are the so-called butterfly and snail dowels. Both are characterized by an increased contact area with the material, due to which the load is distributed over a larger surface. But it’s still better not to use heavy fabrics.