Any major renovation of a house is completed by installing doors between rooms. But door frames do not always completely cover the thickness of the openings, and in such cases one more step is required: plastering the slopes or installing extensions on interior doors and framing them with platbands. Extras are the more preferable option and after reading the article to the end, you will understand why. And learn how to install them.
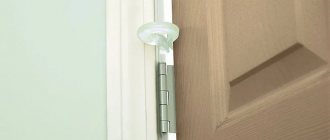
Interior door before and after installation of accessories Source www.durvjupasaule.lv
Characteristics of the door panel
First you need to understand what extensions for interior doors are. This is an element of framing the slopes of the doorway, which allows you to do without leveling them with plaster and forms a single ensemble with the door and platbands. That is, if the thickness of the walls in the opening is greater than the thickness of the installation box, then the remaining open plane is decorated with extensions - straight rectangular planks.
The advantages of this design method:
- ease of installation and a minimum of time to bring the opening to a clean state;
- aesthetic appeal;
- the ability to design all interior transitions in the same style by selecting decorative strips to match the color of the doors;
- the mechanical strength of slopes and their resistance to damage, in contrast to those plastered and painted or covered with wallpaper;
- increasing noise insulation between rooms by filling the cavities behind the extensions with insulating materials.
Extensions can also be used to trim openings without doors Source autogear.ru
What will you need for finishing?
To finish a doorway, you need to have on hand a small repair kit consisting of the following tools:
- roulette;
- hammer;
- construction square;
- masking tape;
- tape for framing the edges of the plank;
- foam for installation;
- electric saw or jigsaw;
- saw with miter box;
- fasteners in the form of liquid or regular nails and self-tapping screws;
- ready-made or homemade boards.
If the plans are only to close the slopes without replacing the door leaf, the following materials will be useful for the manufacture of extensions:
- wood boards;
- pieces of wood fiber sheets (MDF);
- several long chipboard strips;
- plastic elements.
When cladding with natural wood, it is recommended to pre-treat the surface with a special impregnation. The antiseptic composition retains the properties of the material over many years of use.
Attention! In terms of external characteristics, resistance to moisture and temperature fluctuations, wood or MDF panels are more suitable for finishing external entrance openings. Indoor use of particle boards is allowed.
When installing plastic inserts, it is better to use panels with a metal base.
What are they?
The door extension does not have a wide variety of shapes, sizes and design features. And yet it can be classified according to at least two criteria: material of manufacture and profile shape.
Materials
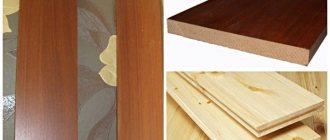
These products are made from the same materials as door leaves. This is mainly solid wood, MDF and chipboard:
- Wooden extensions can be uncoated, painted or varnished. The former are cheaper and can be finished to your liking. The latter, as a rule, are sold together with door leaves and frames and have a texture and color similar to them.
- Slats made of wood-like materials are always finished with artificial or natural veneer, lamination, and paint. And they are also produced to match the main products.
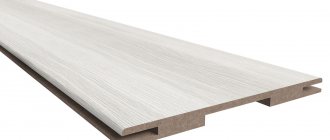
Veneered MDF panels Source images.ua.prom.st
For reference! Extensions for entrance doors are made from the same materials, but of greater thickness, since they have to withstand more serious loads in the form of random mechanical impacts, and work in more difficult temperature conditions. But they try not to use chipboard, since it is not resistant to moisture and is quite fragile.
Profiles
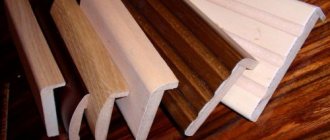
If you look at the cross section, you can also find differences. There are two types of them: simple and type-setting (or telescopic):
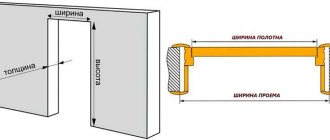
- Simple ones have a rectangular cross-section and are a regular flat plank with or without a decorative coating on the front side. Their standard thickness is 10-16 mm, the width varies from 30 to 200 mm from different manufacturers, and the length corresponds to the height of the door frame - from 1900 to 2300 mm. Sometimes simple extensions are produced with an unfinished end edge.
- Telescopic extension for a door: what it is can be understood if you know how wall panels or lining boards are connected to each other. It always has a groove on one long end, and the same groove, straight edge or ridge on the other.
Extensions: with edge, without edge and telescopic Source vseprodveri.ru
Since typesetting products are more functional, we will tell you more about them. They do not differ in length and thickness from simple ones, but on the edge they may have additional slats that form a groove. The width can be 90, 100, 120, 130, 150 and 170 mm. By combining these dimensions, a panel of the required width is assembled. You can slightly change the size by tightly moving or pushing apart the extensions - this can be done by long ridges or connecting strips that are inserted into opposing grooves.
Note! Such extensions can only be installed in boxes with a groove cut at the factory and framed with L-shaped platbands.
This is what the frame of the opening with assembled telescopic molding looks like Source satkastroymaterialy.rf
How to choose sizes
Is it worth choosing the size especially carefully if any material can then be adjusted and trimmed? An important nuance: the wider and longer the structure, the more expensive its cost. For telescopic extensions, the width of the decorative strip starts from 60 and reaches 80 mm. And the width of the shelf that is inserted into the grooves is usually 40-50 mm. Standard length of the set: 2 trims of 2.2 m each and one of 1.2 m. An additional additional strip can have a width from 80 to 100 mm. The length of the slats is standard and corresponds to the main casing.
The main installation steps can be seen in the video.
Installation features
Before installing the door extensions, you need to select them. At the same time, paying attention to the following points:
- compliance with the material of the canvas. If it is made of solid wood, then it is better to make decorative elements from the same material. If they are veneered or made of MDF, the wood in the opening will look unnatural;
- color and texture. It is most logical to purchase both the door and all the accompanying elements at once. As a rule, they are always in stock in the store. For uncoated wooden products, select a suitable paintwork;
- size. First of all, you need to look at the width of the extension so that it covers all the free space of the opening. For example, if there is 160 mm from the box to the wall, then take simple strips 200 mm wide and cut off the excess.
When measuring the thickness of the opening that needs to be lined, do this on all sides - on the sides and on top. Moreover, in each plane at least 3 measurements should be taken at different levels. They may differ due to the unevenness of the walls. In this case, they focus on the maximum value.
Attention! If the box has grooves for mounting telescopic extensions, their depth must be taken into account.
Measuring and preparatory work
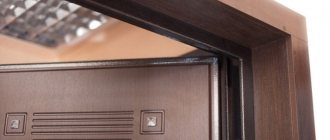
The installation of the extensions is necessary first of all in order to securely fasten the platbands. Correct fixation of the platbands can be carried out if the products are placed with their end faces towards the plane of the wall. It is best to take measurements when the box is assembled and installed. After this, the actual installation of the accessories is carried out.
Initially, you should place the ruler on the platform of the box and hold it strictly perpendicular to the wall. It is necessary to determine the dimensions of the upper and lower parts of the product. At the same time, the width of one extension in different parts may differ, since the walls are almost always imperfect. All data should be recorded on paper so as not to confuse the product parameters.
Many experienced specialists use a more accurate method. All additions are measured using a square and a straight line . The first device is installed in the seat, and the second is applied to the plane of the wall. Where the square intersects with the rail there will be a width indicator. The size of each slope must be carefully checked, since an error can be made at any stage.
After these manipulations, they begin to cut the board. This is easy to do with a hand saw. A jigsaw and bench saw also work well, provided you have them.
Video description
This video shows how to take correct measurements and install the frame:
Installation can begin after the foam has dried around the already installed door frame.
See also: Catalog of companies that specialize in the sale, installation and finishing of windows and doors
Installation of simple extensions
A corner for access can be selected on the door frame; it must be completely cleared of foam and debris. If there is no recess, the foam behind the block is cut to a depth of 1-2 cm, making a groove of the same width in it.
Installing extensions on interior doors is done as follows:
- Adjust the planks to size, starting from the top, cutting them to length and width if necessary. The edge that goes behind the box is cut in width, and the bottom end that touches the floor is cut in length. The joint between the vertical and horizontal strips should be smooth, at an angle of 90 degrees;
- all elements are inserted into the opening in the designed position, laying the top panel on the side panels and inserting the cut edges into the prepared recesses;
- the parts are wedged, achieving a tight fit to the box along the entire length;
- again with a level they check the correct position of the extensions;
- The space between the walls of the opening and the cladding is carefully filled with polyurethane foam with a small coefficient of expansion when hardening.
Filling voids with polyurethane foam Source gid-str.ru
It is better to foam a few points first, and when the product sets, fill the remaining voids with it. To prevent the foam from pushing the panels inward during the polymerization process and deforming them, it is advisable to install spacers between the parallel planes.
If the door is installed in the opening of a wooden wall or a wooden frame is pre-made in the opening, the extensions can simply be screwed on with self-tapping screws, after drilling them and countersinking the holes for the caps. After installation is completed, these holes are closed with matching plastic plugs.
Pre-assembly of the box along with additional elements
In some cases, it is possible to assemble all the elements, including the door frame, even before installation in the doorway, and then install the entire structure there. This procedure is performed in the following order:
- A factory-made door frame, or assembled on site, is laid on a horizontal surface, and the part on which the extensions will be installed should be facing upward.
- The rectangle of the box is checked for perpendicularity in the diagonals and using a corner. In order to check the diagonals, instead of a tape measure, it is better to use a pre-prepared thread of a certain length - it should be stretched without excess in both dimensions.
- To attach future extensions and their rigid positioning, it is necessary to mount something like a slipway - the entire perimeter of the box is sheathed with pieces of plywood, forming a stencil for installing additional elements.
- All additional items are prepared in accordance with the above description.
- Using the existing stencil, the elements begin to be fixed onto liquid nails or other adhesive compositions for this material. The assembly of the structure should begin with the lintel - the upper part, and after it - two long side boards.
- In accordance with the instructions for using the glue, it is necessary to wait a certain time for it to dry, and check that the structure is unchanged with light force.
- Upon completion of the work, the temporary stencil is carefully removed from the door frame, leaving only the assembled structure to fill the opening.
- The entire resulting structure is carefully installed in the doorway with vertical positioning and foamed in the same way as the previous method.
Rice. 7. Assembling the frame structure on the floor
The drying of the foam indicates that doors can be hung in the frame, and all the cracks along the perimeter of the junction of the wall and the extensions can be closed using platbands.
Regardless of the method of assembly and fastening of the structure, the same effect is achieved - a fully framed door frame is formed in the wall, which is strong, reliable and easy to use. These processes do not require special skill - you just need to have enough free time, patience and minimal skill when working with simple tools.
Installation in non-standard situations
If there is no groove in the box, and the opening is very deep and cannot be covered with a simple addition, you can choose any of the options below:
- Use the telescopic system by placing the first plank behind the box, wedging it and fixing it with polyurethane foam, as is the case with simple extensions. After the foam has dried, add a second row, foam it, and again wait until it dries completely. And so on until the opening closes.
- Shields of the required width are assembled from the extensions, fastening them on the reverse side with transverse slats or overlays every 40-50 cm.
Shield of two additional parts Source i.ytimg.com