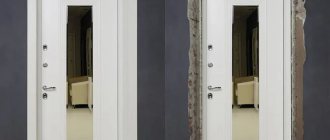
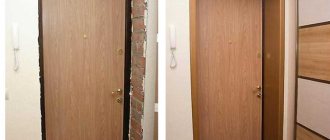
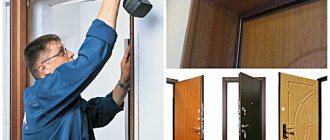
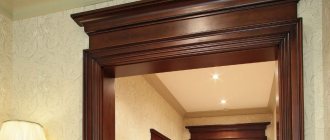
It is not necessary to complete the design of the doorway by installing an additional structure if the wall is of small thickness or the slopes are well leveled and plastered. However, with this detail, an important part of the interior gets a more respectable look. If the design uses telescopic extensions for interior doors and entrance doors, the assembled opening and door frame will look just perfect.
The thickness of the extensions for interior doors
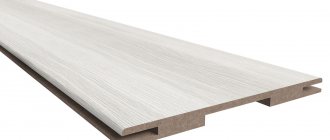
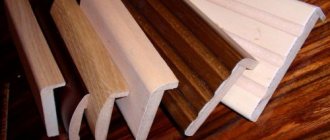
The thickness of the extensions that it produces ranges from five to forty millimeters. These extensions make it possible to install door frames in doorways of any thickness, while imparting solidity to the entire structure and an attractive appearance. If necessary, you can change the standard size of the extensions by making them to order. But in most cases, it is still more appropriate to use telescopic extensions. This telescopic molding element provides more modern technological solutions than installing a door block in a traditional style.
This extension is also intended for the required expansion of the door frame in cases where the frame beam is smaller in width than the thickness of the opening in the wall. The difference between a regular extension panel and a telescopic extension is that the telescopic extension has special grooves on both sides. They are intended for connection with other components of the telescopic door molding - platbands and frame beams. They are also equipped with appropriate elements for connection and, together with telescopic extensions, form a structure that allows you to design a doorway without resorting to the use of nails to fix the structure. The corresponding elements are simply glued into the groove.
Installation recommendations
First of all, we note that in order for the door block, along with the extensions and platbands, to look neat and presentable, it is desirable for the room to have smooth walls. But since ideal evenness of walls is rare, most often it is necessary to bring the width of the extension to mind using wedging. Therefore, when installing these parts, an excellent eye, accuracy, slowness, and attentiveness are required.
Telescopic extensions can be installed in three ways:
- with the top horizontal part located between two side vertical ones.
- In such a way that the top bar rests on the side ones.
- With joints cut at 45 degrees.
The last option for doing it yourself is quite complicated: therefore, if you want to do the work yourself, it is better not to consider it. It can be done by experienced craftsmen for whom installing doors is their profession. In addition, this type of installation requires a rotary saw, which is not found in every home.
This video will help you understand how to install extensions and trim on interior doors.
When installing extensions, you can fasten each part separately, but you can assemble the entire structure in the shape of the letter P on the floor and install it entirely. For self-installation, we recommend choosing the first option, as it is simpler.
In order for telescopic extensions to be installed correctly, it is necessary that the parts fit tightly into the grooves. But they do not require additional foaming or gluing, which reduces the cost, speeds up and simplifies the work.
Preparing the doorway
A doorway designed in this way has no traces of fasteners, which makes it much more attractive. This method of fastening also allows you to fasten platbands without adjustments to a wall that is not vertically aligned in the same plane, ensuring maximum adherence to it. It would not be amiss to add that the telescopic extension can be connected to similar elements using connecting keys, which will allow you to create a doorway wall of unlimited thickness.
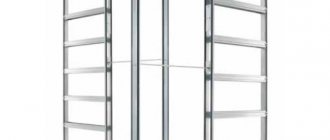
standard telescopic extensions with a length of 2.15 m are produced, but if necessary, the company can also produce non-standard extensions up to 2.5 m long. Extensions are produced in widths of ninety, one hundred twenty and one hundred and fifty millimeters, and the thickness is equal to the standard twelve millimeters.
How to choose the right additional elements?
Today, almost all retail outlets offering interior doors also offer door accessories. Therefore, there should be no problems with the choice of color and texture of these components.
When choosing the size of additional strips, you need to make simple calculations. To do this, you will need to know the width of the wall (WW) and the width of the door frame (WW). Knowing these values, you can easily calculate the width of the extension (SD): ШД = ШСТ - ШК.
Attention! To obtain more accurate calculations, the width of the wall should be measured at several points, at least four. The measurement with the highest indicator must be inserted into the formula.
Also, when choosing extensions, you should pay attention to the design of the door frame. If it has a special groove for installing an additional board, then its thickness should correspond to the thickness of the groove.
Accessories for doors
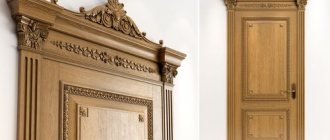
Telescopic extensions are wrapped on three sides with veneer and coated on top with durable polyurethane varnish, which reliably protects the extensions from moisture penetration and damage. The texture and color of the veneer that is used matches all the colors of the manufactured door panels. The “groove-wing” connection of the door moldings works as a lock and allows you to quickly install any door without using nails. This is the result of the K-DOORS policy - to bring to life everything new that has been developed in production, that can satisfy the tastes of the most demanding consumers.
Door trims and their varieties
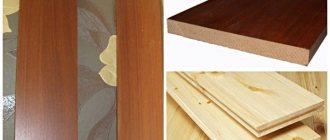
An extension or additional board (plank) is a flat rectangular board. For its production, solid wood and laminated or veneered MDF boards are most often used.
This product does not differ in the variety of types. All additional elements can be divided into two groups:
- ordinary;
- telescopic.
Ordinary additional planks look like an ordinary board, and differ from each other in the material from which they are made, color and width. The market offers extensions with a width of 100, 120, 150 and 200 mm.
Telescopic extensions are similar in installation principle to lining. This type of plank is equipped with a groove on one side and a ridge on the other. This allows you to line doorways of any width. On sale you can find telescopic extensions with a width of 90, 120 and 150 mm.
It is also worth mentioning the decorative corner, which combines the functions of an additional board and a platband. This product is used only with a door frame of a special design. At its ends there are deep grooves into which the platbands are mounted. It is convenient to use additional elements of this type when the width of the door frame is not enough, up to 50 mm. They are not suitable for wider openings.
Telescopic molding
What is telescopic molding? Telescopic moldings are a telescopic platband and a telescopic additional strip (extension). The telescopic platband differs from the usual one by the presence of a special wing directed perpendicular to the platband. The telescopic extension strip has a groove into which this “wing” is inserted.
This connection (wing-groove) works as a lock and allows you to install the door quickly and without the use of fasteners such as glue and nails, and also, such fasteners make it possible to mount a set of extensions on uneven walls, since it can be pulled out or pushed in, and this is accurate will come in handy, since we haven’t encountered smooth walls yet.
So, telescopic molding greatly simplifies the process of installing an interior door, especially in the case of uneven walls, and improves the final result. At the same time, the cost of telescopic moldings, as a rule, does not differ much from conventional ones.
Many manufacturers of interior doors offer a choice of regular and telescopic moldings; in other cases, such a choice is not provided and you have to be content with what you have, so when ordering, especially if you plan to install it yourself, ask the sellers what additional options are available.
How to install a telescopic extension
As we have already mentioned, the installation of a telescopic extension is much simpler compared to the installation of its straight counterparts. The main thing here is to choose the right size of the bar, and then everything is elementary simple. Below you will see how to install extensions on an interior door.
As a rule, all telescopic extensions are initially equipped with grooves on both sides. So you need to cut off or break off the back part of the groove from the side of the door frame and insert the remaining whole tenon into the groove of the door frame.
In order for the extension to fit into the groove on the door frame, part of the groove on it must be removed.
After this, all you have to do is insert the L-shaped trim into the extension groove and adjust so that everything fits evenly. If the platband will be attached to the wall, then there is no point in installing the additional strip with glue, plus the unglued structure can be disassembled if necessary. The video in this article shows the entire installation clearly.
Read on to find out more!
How to make handles for a mosquito net yourself
Where can I purchase interior doors made from eco-veneer?
How to design window slopes indoors
Sliding windows and their area of application
What you shouldn’t save on when installing PVC windows
Enameled doors: a worthy choice
- 2.54
Rating: 2.5 out of 5 Votes: 195
- 7
Reply
6 years ago
6 years ago
Quote
Excellent article, all aspects of installing a telescopic door sled are covered. Leave your questions and comments.
Rashida
6 years ago
Quote
During the renovation, when the doors were being replaced, I learned what extensions are. Modern technologies create doors and windows of such beautiful and high quality that you can forget about the old ones, which need to be put in order and painted almost every year.
Seryoga
6 years ago
Quote
As an installer of interior doors, I can emphasize the convenience of telescopic moldings. Since the installer’s work is piecework, installation time also plays a big role. If a regular door frame must be kept for several hours after foaming, otherwise hammering nails will move the frame, then the telescopic molding can be adjusted immediately after installing the door frame. Still, the article was useful, as was the video.
Sergey
6 years ago
Quote
Installing a door frame with a telescopic extension is somewhat reminiscent of laying parquet or laminate - there, too, the elements are fixed into grooves. In principle, after familiarizing yourself with the technical process in the video, it is quite possible to install the box in a non-standard opening yourself.
Hope
6 years ago
Quote
We were looking for a suitable door option and came across this video on installing telescopic doors. What a find! Now you can independently replace the existing ancient copy, which remains from your ancestors. Quite economical and affordable.
Konstantin
6 years ago
Quote
Telescopic extensions are a brilliant invention. I work with door installation, and I know about the problems of doorways from my own experience. Now there is no need to order different sizes, now everything is much simpler. I bought a certain amount, and then I assembled the width I needed.
Tasha
6 years ago
Quote
During the renovation we encountered a problem with the design of the doorways. We ordered good doors and telescopic extensions for them. It turned out very neat and beautiful. It would not have been possible without extras, because... The house is old, the thickness of the walls is from 20 to 60 cm. A good craftsman installed both the doors and the extensions very quickly and efficiently. Carefully calculate the required width of the extensions before ordering doors and components! The ideal option is still one extra. The telescopic “ladder” helps, but too big, in my opinion, is not very good.
Guidelines for choosing telescopic models
It would seem that nothing could be simpler than choosing a cladding system that is adjustable in width. However, everything is far from so simple.
The assortment includes models that differ in materials used in production, dimensions and decorative design. To ensure that additional strips do not cause difficulties during installation, especially so that they do not need to be dismantled and new ones purchased, you need to carefully prepare for the process of searching for a model.
Manufacturing materials
In the production of telescopic systems, only solid wood, chipboard sheets or MDF panels are used for lining doorways.
Unlike conventional additional structures, plastic and metal are never used in this area.
The first option is too fragile for a reliable connection, the second is too heavy because the telescopic system does not use thin sheets.
Each of the materials used in manufacturing has advantages, but there are also disadvantages:
- Wood. An elite, expensive material, the purchase of which is justified only if the door frame, along with the door leaf, is also made of solid wood. Such additions for decorating interior openings are installed only in bedrooms and living rooms. Entrance areas, bathrooms and kitchens are not equipped with structures made of natural wood, not because it is too expensive, but because wood constantly changes its dimensions due to temperature and humidity fluctuations, swelling and shrinking. And in the listed openings you need a stable cladding and door frame, otherwise it will jam or leak through.
- MDF. Boards made from wood fibers bonded under high temperature pressure with a natural binder are recognized as the best solution. The material is waterproof, resistant to mechanical and chemical influences. It will not warp if the surface is constantly exposed to steam and moisture; it is suitable for arranging the entrance opening, bathrooms and kitchens. There are models, the front side of which is covered with veneer, thanks to which the extensions are perfectly combined with products made from natural wood; in order to save money, it is not a shame to buy them for arranging an opening with a door structure made of natural solid wood.
- Chipboard. The budget variety attracts mainly due to its price. He is afraid of fluctuations in humidity and temperature; when arranging openings in rooms with characteristic differences, they do not install extensions made from it. The laminated surface is not particularly aesthetically pleasing. If possible, it is better to buy a more expensive design.
The best option is considered to be telescopic extensions for interior doors made from MDF, as are the door structures themselves.
They have acceptable technical characteristics and a reasonable price. A strong argument in favor of the purchase is its versatility, which allows you to equip all types of end walls framing the door.
Geometric parameters
The design specifics of telescopic extensions, in particular the presence of grooves, dictate restrictions on the thickness of the board.
To ensure that the locking connections do not lose their original strength and reliability, the thickness of a panel with a groove in the end cannot be less than 10 mm. Otherwise, she will not be able to support the load.
However, in the range of additional constructions, there are also those in which the thickness of the main board is only 7 mm, but the internal part of the locking connection of such models is made of an overlay strip.
The most suitable thickness of additional boards for arranging interior openings is considered to be 10-14 mm.
For entrance structures, this size varies between 15-25 mm. Experienced installers admit that such additions for cladding the ends of a load-bearing wall will serve for a long time and will not cause another replacement or repair.
Models are now available for sale that have an additional strip with a width in the range of 90-400 mm, thanks to which you can select a set of parts for arranging openings in load-bearing and interior walls. The most popular for interior work is 90 mm in the southern regions of the country, 130 mm in the middle zone, 170 mm in the northern regions.
Owners of private houses who require a telescopic extension of an interior door that is non-standard in thickness and width can order the design in unique sizes, but it will cost significantly more than in-line proposals.
Installation specifics
Professional door system installers and inexperienced home craftsmen prefer the telescopic option, because it is an extremely simple and efficient method of installing cladding on the ends of doorways.
The whole process consists of combining tongue-and-groove locks and fixing the panels at the ends of the doorway in the method preferred by the contractor. The boards are fastened using polyurethane foam, less often nails or self-tapping screws.
A platband is installed on the outside, covering the side part of the structure assembled from boards. A selection of photos will introduce you to the results of the installation work, clearly demonstrating the priorities of using telescopic extensions.
Installation features
The installation of this type of platbands is somewhat different from the installation of standard platbands. The entire process of fixing to a doorway consists of several stages:
- Adjustment of additional slats and platbands;
- Installation of extensions;
- Installation of platbands.
Adjustment of additional strips of platbands
The fitting procedure consists of cutting all the strips to the required parameters of the door frame. Both the width of the additional slats and the length of the planks with telescopic platbands are cut off.
At this stage, accuracy is important. Even a seemingly insignificant error in measurements or when cutting products can lead to the formation of large visible gaps when installing the structure in the areas where horizontal and vertical planks meet. In this case, the product will be damaged because it will not look like a single whole.
When working with telescopic platbands, the first priority is to correct the additional strips. And until they are installed and securely fastened, the platbands themselves are not cut off.
Cutting the extension can be done by making a straight cut, or at an angle of 45 degrees. However, if you have no experience in making precise corner cuts, you should not start learning with telescopic trims. For a new carpentry novice, it is best to make a straight cut.
Installation of extensions
According to the standard, on the back of the box, on one of the sides there is a seat in the form of a selected quarter for installing an additional strip. It is in this hole that the strip will be installed. To install it, you simply need to insert it and wedge it using wedges or pieces of slats in the area of the selected quarter.
The main condition for such installation is to ensure that there are no wedges protruding beyond the walls. After the wedging procedure, the remaining space between the doorway and the extension rail is blown in using polyurethane foam.
It is worth remembering that when using polyurethane foam, when it expands during the blowing process, various deformation processes may occur in the structure. To prevent them, it is necessary to use special spacers. If you do not want to space the extensions using jumpers, you can use a polyurethane type sealant. Such substances have a small pressure created during the solidification process of the mass. In most cases, these sealants are standardly marked with the number 65.
Installation of straight telescopic trims
To ensure correct and reliable installation of platbands, their precise trimming is very important to avoid the appearance of cracks. The installation procedure itself involves inserting products into the grooves intended for this purpose in the extensions or in the door frame itself.
The procedure for driving the strip into the groove is best done by tapping the product with a rubber mallet. An ordinary hammer can also be used for this purpose, but in this case it is necessary to use light translational movements through the spacer in the form of a block of soft wood. Since in most cases these elements are inserted very tightly, there is no need to use additional fasteners.
If situations arise when the grooves are unable to reliably hold structural elements, it is permissible to use other fastening measures in the form of gluing with assembly adhesive or nails. When using adhesive compositions, it should be taken into account that dismantling the product with this fastening method will only be possible by breaking the structural elements. And for fastening with nails it is better to use special nails. They have virtually no head, which allows for reliable installation with fastening of the structure without obvious traces of installation.
When installing straight telescopic trims, problems often arise with the awnings and the strike plate of the locking system. The essence of the problem lies in the presence of fastening screws that interfere with the installation and fastening of the telescopic casing. In such a situation, there are two options for solving the problem.
The first method is to make minor cuts at the points of contact with the screws. This will ensure free passage and fastening of parts. The second method is to remove all existing structural elements that impede installation. In this case, after installation, the fasteners will be mounted back. The second method is more preferable because it ensures the integrity of all structural parts. At the same time, not only the lock strike plate and awnings, but also the telescopic platbands themselves will be fixed using self-tapping screws.
Required tools and materials
When installing extensions, a minimum set of tools is used:
- level;
- roulette;
- pencil;
- saw or jigsaw;
- plane;
- hammer;
- sharp knife.
Necessary materials:
- polyurethane foam;
- fasteners (screws, nails or “liquid nails”);
- additional strips.
As a rule, extensions are purchased together with the door leaf, but if the doors are not going to be replaced, but only plan to close the slopes, for the manufacture of extensions they use:
- wooden planks;
- pieces of MDF;
- long pieces of chipboard;
- plastic.
If natural wood is used, it is pre-treated with antiseptic impregnations to extend its service life.
Homemade panels made from regular MDF will differ from factory ones, since in industrial designs the interior between two thin fiberboards is filled with cellular material.
Chipboards are inferior to wood and MDF in appearance and durability, but chipboard boards can be used indoors.
Plastic is rarely used as a material for making accessories. And if it is still used, then especially durable, metal-reinforced PVC panels are selected.
Extensions can be made of natural wood, chipboard, MDF panels or plastic