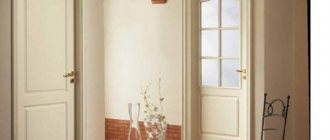
Interior doors are an essential element in any room. Manufacturers produce taking into account all fashion trends and requirements in interior design. In addition to the door leaf itself, an important point is the finishing of the entire doorway. One of the decorative elements was the ceiling rail, which expands the possibilities for realizing ideas. This trend came from past centuries. Previously used to decorate columns.
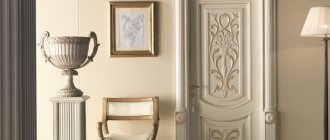
Capital over the door
Mounting options
Capitals can be attached to the door leaf on two or one side of the opening in several ways:
- installation for additional installation;
- installation of milling of the top crossbar slats.
Extensions are called planks or slopes. These designs are made in the same color scheme and from the same material as the crossbar. They have a groove for the comb, which is located on the platband. To secure the capital to the additional strip, you need to use nails and a hammer. All other parts are connected by a groove. The installation is durable and easy to do yourself.
The second method is used if there is no groove in the crossbar. You need to do it yourself. For this operation you will need a machine with a cutter. The tool makes a notch (groove) along the entire length of the crossbar (on the back side). Then the part is tightly inserted into the additional slope using the formed groove.
If you need to attach a metal decorative element to the canvas, then the slats and trim panels are cut to the required length. An aluminum crossbar is mounted above them, after trying them on. It is inserted into ready-made grooves and, for reliability, is fixed in them with polyurethane foam.
Interior doors with capitals installed by yourself will delight the home owners and their guests for a long time with their luxurious appearance.
What are door capitals?
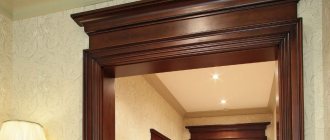
A door frame under the ceiling (capital) is a fashionable trend in modern design. This solution arose in the door industry recently, but modern manufacturers of decorative elements for interiors have already taken care of popularizing the new product. Capitals are considered a type of door frame, but is this fair? On the one hand, they look like a decorative element that is installed under the ceiling, on the other hand, they are located in close proximity to the door and serve an aesthetic function. Therefore, capitals can easily be classified as door frames.
Product with cornice
It is worth distinguishing between two types of rack profiles for the ceiling:
- With cornice. The design represents a specific frame for the entrance, forming a kind of ledge above the door. This solution looks like a canopy installed on columns.
- Without cornice. Such solutions are distinguished by the fact that they visually do not run into anything. Therefore, such capitals look like independent columns at the door.
Note! In the upper part, immediately below the ceiling, a lintel is installed. It is similar to a classic interior door frame. It should not be confused with the cornice for the capital.
Variety of species
The capital and platband can be made in any style using various materials and textures. Most often, carved elements are used, as well as voluminous figured decorations. There are also no requirements for capitals to standardize sizes. You can find various examples on the building materials market.
The capital material for interior doors is MDF with veneer or solid wood.
Capitals for interior doors are more expensive if they are made of solid wood. The advantage of this type is strength, durability, and resistance to external influences.
The most common capitals are made of wood fiber fabric. The cost is acceptable for most people, but the quality is significantly lower. The best option for installation above an interior door in a private apartment.
Briefly about the history of the capital
It is almost impossible to find a room where there is not a single interior door. This element of the interior is one of the central ones, and is constantly used by the owners and guests. Such a design must meet all the requirements of functionality and safety and be visually attractive. Manufacturers now offer various door leaf variations.
There are also door decoration options available in the market. Thus, manufacturers popularized the slatted profile (capital, pilaster, platband for the ceiling), creating new opportunities for decorating rooms.
Aluminum capital as a decorative element
For many centuries, capitals were used exclusively to decorate columns. But now they have begun to be used as an element of interior decor. Manufacturers have made sure that aluminum decorative panels become widespread.
Nowadays capitals in a minimalist style are in demand. But the capital for modern interior doors in the form in which it was used in ancient times is no longer relevant. Therefore, aluminum and plastic panels for the ceiling have become an indispensable element of the interior. Modern designers like to experiment with such details, using slatted profiles in any stylistic direction.
How to use it in the interior
Capitals are used in classic interiors. Interior doors and trims are made of natural wood, so the ceiling rail must match the overall style. It is acceptable to use high-quality imitation of natural material. To avoid strong differences that will spoil the interior, it is necessary to use the same material.
It is ideal to use a white capital with an interior door of a similar color. The classic style involves the use of carved ornaments depicting vegetation.
High-tech involves using non-classical materials. The capital can be made of metal, plasterboard or other material. Wood is used, but must at the same time maintain modernity in the interior. The color should be as restrained and strict as possible.
Pop art style is a bright spot in the interior. The color, material and shape should be memorable. It is good to use the contrast method.
White doors with capitals will add antique grace to the interior. Gold elements are used for decoration. White in decor is laconic, makes the space lighter and airier, even voluminous and relief elements can remain elegant in white.
Production of capitals from different materials
Despite the fact that the capital is used solely for decorative purposes and does not perform any practical functions, the material from which it is made plays a very important role. Today, these decorative elements are made from:
- aluminum;
- solid wood;
- MDF;
- polystyrene foam;
- plastic.
Each of them has its own advantages and disadvantages. But if you are looking for a golden mean, then this is definitely MDF. In terms of its aesthetic qualities, it is never inferior to wood. After all, the material has characteristics that allow the designer not to restrain his imagination, implementing all possible elements of different shapes and sizes on the capitals. At the same time, it is significantly stronger than plastic and foam, which allows MDF capitals to maintain their impeccable appearance for a long period of time, even if you accidentally hit them with a chair or, for example, a stepladder.
How to choose a capital
The main rule is combination with the overall style of the room. Decorative door trims should not cause dissonance. Harmony in the interior is created through a competent combination of all elements.
Tastefully chosen stucco molding will complete the integrity of the interior door, add chic to the decor and attract attention. White doors with a capital will suit almost any taste.
The presence of columns implies the installation of door decor accordingly. Modern designers eliminate the need for identical pilasters on both columns and doors. Classic styles require a complete combination.
How to install a capital for interior structures: stages of working with doors
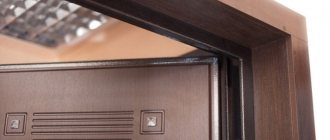
The capital is the top part of the decorative trim of the door. Such a rack profile is also installed in the lower part of the structure, but the standard installation is carried out under the ceiling. Sometimes capitals are attached simultaneously with platbands.
Capital on a column
The slatted profile for the ceiling, or capital, performs only an aesthetic function: it visually increases the massiveness of the door. Therefore, it is better to install such structures in rooms with high ceilings. If the distance from the floor to the ceiling is insignificant, then it is better not to use a capital. In such situations, an ordinary arched door is suitable, which will visually enlarge the ceiling.
Self-installation
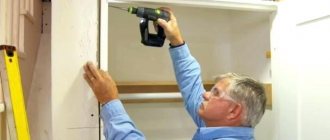
Installation is easy to do on your own. When installing the door leaf and trim by professionals, it is recommended to take care in advance of purchasing a decorative strip for simultaneous installation.
Two working methods:
- Fixation to an additional element. What does it mean? You need to worry in advance and purchase extensions with special grooves. Essentially, the decor is secured with nails. Decorators believe that the method is categorically unacceptable, since the result will have visual flaws.
- Using a router to prepare the stucco. The capital rail is processed for subsequent connection with the grooves.
Milling is also done by hand. Even with or without simple operating skills, achieving the desired effect is easy. It is enough to walk through the desired area several times. It is recommended to try to make a connection after each pass. A tight connection is required.
The video will show you how to install a capital with your own hands.
Doors with a capital in the interior look special and individual. They add grace and pomp to the style. Thus, the trim on the door with a capital will not be the only element that gives the canvas neatness.
provides customers with a wide range of interior doors, metal entrance doors, as well as capitals and arches. Photos of the assortment can be viewed in the catalogue. “Zodchiy” is a large company whose employees will not only help you choose a special element for the interior, but will also be able to professionally install it.
Zodchiy provides its customers with guarantees of product quality and installation. Installing a capital on the door will be a quick and simple change to the interior.
Scheme of attaching an aluminum rail to the canvas
Installing an aluminum rail or panel will not take much time. To ensure the installation is successful, do the following:
- First of all, after selecting the capital, it is necessary to cut the aluminum or plastic slats and panels to the required length. To do this, the top rail or panel above the door leaf is first installed, but there is no need to finally fix the element. Marks are placed on the panel or aluminum strip for further cutting.
Attaching an aluminum strip to the ceiling
- The next step is the actual installation of the aluminum panel.
- The slats themselves are attached using additional sizing foam, which is applied lengthwise to the door leaf. This is done in small strokes.
- Next, the lower groove is installed on the door leaf. A part of an aluminum strip is inserted into it, which is adjacent to the floor. However, this panel should not be glued to the door leaf. But the main part of the capital must be firmly inserted into the groove, then pressed and secured with foam.
- At the end of the installation of the structure, the rail should be attached to the side using an additional piece.
INSTALLATION OF INTERIOR DOORS
| Service | Price |
| Measuring openings | FREE 1 |
| Delivery and lifting to the floor | To know |
| Installation of doors (from 2) | from 1800 rub. |
| Single door installation | 3300 rub. |
1 Valid when ordering 2 or more doors including installation.
For WWII veterans, pensioners, disabled people and large families there is a 5% discount
for all services.
The warranty applies to all types of work and is for a period of 6 months
.
Full price list
| Name of service | Price |
| One door | 3300 rub. |
| From 2 doors without fittings | 2300 rub. |
| From 2 with embedded fittings | 1690 rub. |
| Double door | 3300 rub. |
| Sliding door | 3000 rub. |
| Accordion door | 2300 rub. |
| Door "book" | 4000 rub. |
| Glass door | 4000 rub. |
| Enamel matte/glossy | from 3500/4500 rub. |
| Solid oak door | 5000 rub. |
| Interior arch | 2400 rub. |
| Name of service | Price |
| Add up to 5 cm | 800 rub. |
| Add up to 5 cm on a double door | 1200 rub. |
| Transom above the door | 2500 rub. |
| Opening expansion | from 500 rub. |
| Mortise locks | from 350 rub. |
| Filed the door | 800 rub. |
| Cutting the casing lengthwise | 150 rub./m.p. |
| Glass installation | 500 rub. |
| Setting the threshold | from 300 rub. |
| Door dismantling | 300 rub. |
| Polyurethane foam | 250 rub. |
| Automatic threshold | 1400 rub. |
| Undercut the baseboard | 250 rub. |
| Cutout for switch with installation | 1500 rub. |
| Laying wires in the opening | 100 rub. |
| Inserting an additional loop | 200 rub. |
| Hidden hinge insertion | 1000 rub. |
| Installation of closer | 500 rub. |
| Door frame correction | 400 rub./m.p. |
| Telescopic frame | 500 rub. |
| Inserting an additional crossbar | 250 rub. |
| Installing a capital on a door (one side) | 700 rub. |
| Glass sealing | 300 rub. |
| Groove cut for seal | 150 rub./m.p. |
| Removing the doors | 200 rub. |
Standard installation of swing doors includes:
- cutting two loops;
- insert of interior tongue;
- installing a handle;
- installation of the canvas;
- box installation;
- installation of platband on both sides.
Door sizes and components
There are strict state standards in any field of production, especially in construction. This also applies to interior doors. The door, made according to GOST, corresponds to the established dimensions: width, height, thickness. Parameters may differ in different countries, which must be taken into account when choosing a manufacturer.
When building a private house, it is better to initially include non-standard dimensions of doorways in the project to create an individual design. Doors for such projects will have to be ordered.
For apartment buildings, changing the size of the opening is most often prohibited, because redevelopment may simply be impossible due to the characteristics of the wall and the structure of the house. In this case, you can always find a suitable ready-made door for any room in the store, knowing the dimensions of the doorway.
Russian manufacturers adhere to the following standards:
- canvas width: 60/70/80/90 cm;
- canvas height: 200 cm;
- opening width: from 63 to 160 cm;
- opening height: from 206 to 209 cm.
About the correct installation of platbands
Door trims are installed for one purpose, to close the gaps formed when installing the door frame in the opening. Before you find the answer to the question of how to install platbands on doors, you need to understand the rules for selecting platbands and become familiar with the technology for their installation.
Where to begin?
In order to install platbands on doors, you need to choose them correctly. To do this, cash must be selected according to width, texture, and color. When choosing the color of the trim, give preference to the one with which the door leaf is also finished. When choosing the width, try to choose platbands, the installation of which will harmoniously close all the gaps. By the way, gaps always form when installing a door frame in a doorway. There is no escape from them. It is impossible to make a box that fits absolutely exactly in the doorway. More precisely, you can make an exact box and an opening measured to the millimeter, but the costs will be quite high. Is this necessary? It is cheaper to close the resulting gap with platbands. Various materials are used to make platbands. Platbands can be made of wood, MDF boards, plastic, veneered or laminated. Let's try to figure out how to properly install platbands on the door. Installation of cashing begins after completion of all repairs. The installation of platbands is a final operation and is performed with or after the installation of skirting boards. It is similar to attaching cornices, in the sense that it is performed after all finishing work has been completed.
Installation of platbands
To make the process of installing platbands clear to everyone, we will divide it into several stages.
Preparatory stage It is necessary to check the evenness and flatness of the walls adjacent to the doorway. If there is a large curvature, the walls must be leveled. And this must be done.
Attention! When leveling the walls, carefully monitor their relative position. The walls must not only be leveled, but also placed in the same plane on both sides of the opening.
Failure to comply with this recommendation leads to the appearance of small gaps between the platbands and the wall.
Platbands can hide irregularities and cracks up to 3 mm. But it will no longer be possible to cover differences in unevenness of more than 3 mm with the help of platbands. Knowing how to attach cash correctly, you can hide all the irregularities and gaps.
The use of platbands not only gives the room an aesthetic appearance, but also creates completeness of the room. The importance of installing platbands can be compared to installing skirting boards or nailing cornices.
The right tool A few words about the tool used. When installing platbands, the main problem is fitting the mating parts at the desired angle. Platbands are installed either at right angles, but most often at an angle of 45°. It is best to use a miter box.
A miter saw is used to cut the material. It ensures an even cut of platbands made of any material.
But cheap models of machines have play and error, so it is still preferable to use a miter box for installing platbands with your own hands. The auxiliary tools you will need are a pencil, a ruler, a square, a level, and a plumb line.
Correct choice of material for platbands When choosing platbands, pay attention to the structure of the material. The appearance of the trim must match the pattern on the door. Since various materials are widely used for the manufacture of cash registers: wood, plastic, MDF boards, it is not difficult to select trims for doors. Installed platbands can be covered on the outside with a laminated film, painted, varnished, or sealed with veneer. Platbands are available in various shapes, allowing you to solve extensive design problems.
When purchasing, it is very important to check the platbands for bending and curvature.
Rules for installing platbands
The rules are given for those who want to learn how to properly install platbands on interior doors. When installing platbands, you should ensure that the parts fit together without gaps. The simplest option is to install platbands of a simple rectangular shape. Ultimately, you just need to ensure that the mating parts are joined at right angles.
Most platbands are produced in more complex shapes and are joined at an angle of 45°. Attention! To ensure the required angle, it is recommended to use a special device called a miter box.
Step-by-step installation of platbands Below are step-by-step instructions on how to attach platbands to interior doors.
First, the platbands are installed on the side from which the door opens towards itself.
- 1. Take two side trim blanks and attach them to the box.
- 2. Mark the bottom notch of the corner on them. It is marked 5 mm above the door frame.
Attention! Do not forget that it is necessary to correctly mark the left and right cuts.
- 3. Saw the platbands at an angle of 45º.
- 4. Install the trim on the door frame. Constantly monitor the distance between the platbands. It is best to control this size with a specially cut strip of this length. The distance at the top and bottom of the nailed trims should be the same.
- 5. Platbands are fastened with nails whose heads have been bitten off or with special hardened nails. Before attaching the platbands, mark the attachment points on them in 0.5 m increments.
Attention! The platbands are nailed at a distance of 5 mm from the edge of the box.
- 6. To ensure better adhesion of the platbands to the door frame, glue should be applied to the inner surface. Transparent silicone sealant is perfect for these purposes.
- 7. Now you can proceed to installing the top trim.
Some nuances when installing a decorative door element
Features of installation of the platband:
- The fastening points can be sealed using a special pencil that matches the color, as well as acrylic sealant.
- If there is wear at the joint then this can be corrected by using a finishing nail.
- All cracks that appear in the door structure can be filled with acrylic sealant or shaded with a pencil with a special composition.
- The width of the platband included in the door frame can be up to 12 cm. If this is not enough to cover the shortcomings, then you can order according to individual measurements.
By installing the trim on the door correctly, the entire design of the room changes and improves.
INSTALLATION OF INTERIOR DOORS
| Service | Price |
| Measuring openings | FREE 1 |
| Delivery and lifting to the floor | To know |
| Installation of doors (from 2) | from 1800 rub. |
| Single door installation | 3300 rub. |
1 Valid when ordering 2 or more doors including installation.
For WWII veterans, pensioners, disabled people and large families there is a 5% discount
for all services.
The warranty applies to all types of work and is for a period of 6 months
.
Required tools and materials
When installing extensions, a minimum set of tools is used:
- level;
- roulette;
- pencil;
- saw or jigsaw;
- plane;
- hammer;
- sharp knife.
- polyurethane foam;
- fasteners (screws, nails or “liquid nails”);
- additional strips.
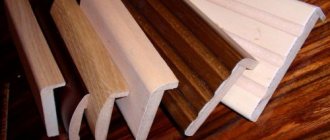
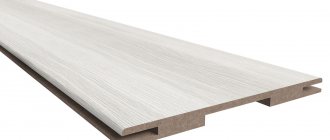
As a rule, extensions are purchased together with the door leaf, but if the doors are not going to be replaced, but only plan to close the slopes, for the manufacture of extensions they use:
- wooden planks;
- pieces of MDF;
- long pieces of chipboard;
- plastic.
If natural wood is used, it is pre-treated with antiseptic impregnations to extend its service life.
Homemade panels made from regular MDF will differ from factory ones, since in industrial designs the interior between two thin fiberboards is filled with cellular material.
Chipboards are inferior to wood and MDF in appearance and durability, but chipboard boards can be used indoors.
Plastic is rarely used as a material for making accessories. And if it is still used, then especially durable, metal-reinforced PVC panels are selected.
Extensions can be made of natural wood, chipboard, MDF panels or plastic
What is included in the list of possible services
The GURU company installs doors of any complexity in Podolsk. We also carry out a number of related work, which allows us to provide the customer with turnkey services. You don't have to rack your brains about minor issues. Entrust all the work to us. Installation includes:
- Dismantling the old door structure;
- Preparing the opening. Cleaning from old foam and rags;
- Installation of the door frame;
- Loop insertion. We also install butterfly hinges;
- Insertion of handle and locking mechanism, lock;
- Installation of door leaf;
- Platbands, additions and other related aspects;
- Checking and delivering the result to the client.
When ordering services from us, you can be sure that we will install any doors. For this we have all the necessary professional tools and equipment. You can order installation of entrance, interior swing and sliding doors from us, including compartment doors built into partitions. We install structures made of MDF, metal, PVC, glass and other materials.
Main characteristics
Modern designs for interior doors have their own characteristic features. Here are some of them:
- Can be used to design portals.
- Most often, natural wood veneer is used in production.
- Can complement the design of the room.
- Large selection of shapes and patterns.
Both before and now, the houses of wealthy people are decorated with similar elements to emphasize their taste and status. The design assumes the presence of several elements: astragalus (combination of a roller with a shelf), abacus (thick square tile), echinus (transition from the column trunk).