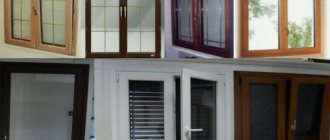
Modern plastic windows have excellent technical characteristics and, subject to operating rules, are able to perform their functions for many years without breakdowns. However, all the advantages of translucent structures can become useless if errors were made during their installation, for example, inappropriate fasteners were used. Quite strict requirements are imposed on fasteners for installing windows, since during operation the products are subject to strong, varied loads. A poorly secured window can fall out of the opening from a strong gust of wind or from accidental pressure on it from the inside or outside. In addition, incorrectly selected fasteners can cause a violation of the tightness of the window system, a source of cold air and street noise entering the room. Let's look at the most common types of fasteners and evaluate their advantages and disadvantages.
General installation requirements according to GOST
PVC windows must be installed in compliance with the norms and standards of GOST.
An expensive luxury window with multi-chamber double-glazed windows reduces its functionality if it is installed in violation of the rules. The standards were developed by technologists to ensure that after installing PVC windows in accordance with GOST, the room has an optimal microclimate. There should be no risk of the frame falling out of the opening.
There is a document that determines the correct installation of windows - GOST 30.971 - 2002. It contains technical conditions for organizing an installation seam between the window frame and the end of the walls.
The junction seam includes:
- an outer layer that insulates from moisture but allows steam to pass through;
- central - reduces heat loss;
- internal - isolates from household vapors.
The layers combine functions, for example, the outer one additionally protects from the cold, which is taken into account when calculating the performance of the window frame. The design and composition of the assembly seam are established in working annexes, which are included in the text of GOST. Installation rules are developed in accordance with building rules and regulations, taking into account standard requirements.
Requirements for the technology of installing plastic windows:
- The seams must withstand operational loads, for example, precipitation, heat, frost, wind, and not collapse when the structure shrinks.
- Materials for joints must be resistant to deformation, sedimentation, and temperature changes in the dimensions of blocks and wall ends, while taking into account the design degree of compression.
- The installation seam has such a thermal protection indicator that the internal surface of the slope has a temperature not lower than the standard according to SNiP.
- the insulation material cannot have sound insulation properties and water resistance lower than the corresponding indicators of the window structure.
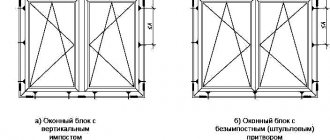
- The seams are made straight if the end of the opening does not have a quarter, or angular if there is no quarter.
According to the standards, it is correct to install external protection of seams in the form of flashings, flashings, and slopes. Inside, the gaps are covered with plaster or panel cladding is made, for example, from plasterboard or plastic.
Window connection profile
Connecting profiles are an important component when installing window structures. It is on the quality of the window profiles that the compliance with the declared characteristics of the double-glazed window will depend: the tightness of the structure, the absence of blowing, freezing and other problems associated with non-compliance with installation technology. A large plastic window, consisting of several blocks, necessarily needs to be strengthened with this element.
The elements that ensure the connection of window blocks are responsible for the correct joining of double-glazed windows at the required angle. Most often they are used when installing non-standard glazing: facade, bay window, veranda, terrace, creating dimensional structures and combining, for example, a balcony door and a window.
Preparatory work
Dismantling must be carried out so as not to damage the external slopes.
Dismantling of existing window frames for the installation of plastic windows in accordance with GOST is carried out carefully or sawed into pieces. In the first case, old windows can be used in other buildings.
Dismantling begins with freeing up the working space:
- remove flower pots from the windowsill;
- remove curtains;
- The area around the window is covered with construction cellophane.
Prepare an extension cord so that the electric tool can reach the outlet.
Dismantling sequence:
- Remove the moving parts of the window.
- In the blind parts, the glazing beads (longitudinal elements supporting the glass) are removed.
- Remove the window sill so that the integrity of the window opening is not damaged.
- Remove the external ebb.
- Remove the frame by cutting it.
The frame must be smaller than the opening so that there is room for the mounting foam.
Installation of PVC windows according to GOST assumes that the opening is cleared of the main and finishing parts of the old block. Concrete window sill slabs are broken in the middle with a hammer, the exposed reinforcement is cut, and the halves are then removed from the side openings. Window sills are removed with a hammer drill, assisted by a hammer if they are made of plastic, wood, MDF, or metal.
The ebbs can be attached to the frame or window sill; they are unfastened by removing the hardware. After removing the tides, the window structure is removed. The work is carried out with a mounting cutter for professionals or using an electric jigsaw or a simple hacksaw for wood. The frame is removed in parts as it is freed. After this, the interfering mortar deposits are removed and the old insulation is removed, since it will not be needed.
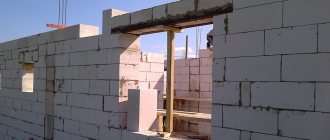
Check the installation opening in the wall where the window will be installed. It should have the same dimensions horizontally at the top and bottom, as well as vertically on the right and left. The error is allowed up to 1.5 - 2.0 cm. If the opening is curved, the frame may not fit into it. Otherwise, the window block will dangle; the anchors or dowels will not be long enough to secure its sides.
Features of dismantling the old block
Before installing a new structure, you need to remove the old frame with glass. You need to do this with your own hands:
- Remove furniture and household appliances from the premises or cover them with plastic.
- Prepare tools - an electric jigsaw, a pry bar, a hammer, a chisel and a hacksaw.
- Remove the smallest sash or window.
- Pull out the large sash.
- Saw the internal partition and remove it from the frame.
- Disassemble the lower part of the product and dismantle the remaining sections.
- Prepare the surface for the new plastic window by removing any uneven surfaces with a chisel and hammer.
- Form grooves.
- Clear the opening of debris and treat the finish with primers.
Advice! Use a hammer drill instead of a chisel and hammer.
Required tools and materials
Tools for installing PVC windows
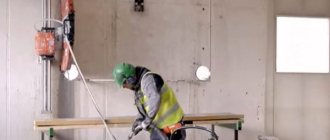
For dismantling, in addition to a hammer and a jigsaw, you will need a crowbar, a grinder with a metal circle (for fittings). The insulation is removed with gloved hands; you can use a construction knife and a spatula to separate the glued material from the ends.
Beat the solution from the planting site using a hammer drill with a spatula attachment. To unscrew self-tapping screws, a screwdriver is used, nails are removed with a nail puller, and dowels and anchors are sawed through with a grinder.
To install PVC window blocks you will need the following tools:
- hammer drill, drill bits with pobedit tips, screwdriver, drill;
- drills with a diameter of 6 mm are used for mounting windows on mounting plates, and size 10 is used for drilling for anchors;
- foam construction gun;
- cardboard knife, hammer;
- construction or laser level, 5 m tape measure, pencil, plumb line;
- metal scissors, pliers, Phillips and flathead screwdrivers, chisel.
A hammer drill is needed to make holes at the end of the opening for dowels and anchors. It is better to screw in self-tapping screws with a screwdriver. For wooden walls, a hammer drill is not needed; a drill and metal drills of different sizes will do. To install the window sill and ebb, some of these tools will also be needed.
Materials for mounting frames with double-glazed windows:
- spacers and mounting wedges made of thick plastic, the quantity is taken so as to install the elements around the perimeter of the window;
- mounting foam based on polyurethane foam with a low expansion rate to fill the space between the frame and the wall;
- vapor-permeable seal (PSUL) to organize self-ventilation and protect against moisture from frozen foam;
- waterproofing tape for installation inside a room based on polyethylene with a thin aluminum layer;
- diffusion tape to protect the installation seam from precipitation and rays.
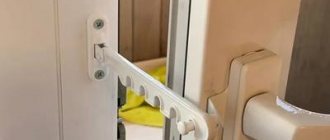
Simple or adjustable anchors, screws, and dowels are used as fasteners. The modern method involves mounting the frame on plates. In addition, you need supporting consoles, silicone sealant, and a stand profile.
Content
- 1 Metal frame dowel
- 2 Plastic dowels with locking screws
- 3 Mounting (construction) screws
- 4 Flexible anchor plates
- 5 Participant contribution
Make marks on the frame:
- for drilling holes for anchor bolts or for attaching anchor plates;
- Make marks on three sides of the box with a pencil for installing the PSUL tape at a distance of 3-5 mm from the edge of the quarter.
The minimum distances between fasteners should not exceed:
- for wooden window frames - 800 mm;
- for boxes made of aluminum alloys and white PVC profiles - 700 mm;
- for boxes made of colored PVC profiles - 600 mm.
The distance from the inner corner of the window block frame to the fastening element is (150-180) mm, and the distance from the mullion connection to the fastening element is (120-180) mm.
Drill holes for fasteners according to the marks on the frame.
Do-it-yourself window installation according to GOST
When installing without a quarter, heat loss increases.
A plastic window frame and the end of a concrete or wooden wall have different expansion coefficients, so the material of the installation seam is selected so that cracks and cold bridges do not appear during shrinkage or deformation.
This is a problem with single-layer walls, for example, made of expanded clay concrete or solid brick. In this case, the weak area is the wall near the frame due to the high heat conductivity. Areas prone to condensation and mold formation. If the ends are without a quarter, heat loss increases. GOST recommends installing boxes with a thickness of at least 13 cm if the method without quarters is used.
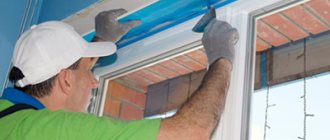
Installation procedure according to GOST standards (with glass unit removal):
- select mounting anchors taking into account the strength of the walls;
- remove the movable sashes, remove the double-glazed windows from the blind parts of the window;
- in the walls and quarters, PSUL tape is attached before installation;
- the frame is set horizontally and vertically;
- the frame profile is checked through and attached to the end of the opening with a metal anchor;
- install spacer wedges and foam the gaps;
- they hang the sashes and install double-glazed windows;
- cut off the foam after hardening.
Anchor bolts must be at least 5 - 7 cm long.
According to the standards, anchors are placed every 50 - 70 cm, the anchor is buried in concrete by 4 cm, stone and lightweight concrete are drilled by 6 cm. Fixation begins from the bottom of the frame. The anchors are not immediately tightened, but the block is installed correctly, and then the fasteners are pressed until they stop. If a misalignment occurs, release the anchors, level the frame and repeat the steps.
Installation without removing sashes and double-glazed windows is carried out on special plates, which are simultaneously attached to the side of the frame and fixed to the end of the wall. This method allows you to avoid drilling the box, and you can easily adjust the installation level. But the plates are not suitable for large windows.
Windows can be opened immediately after installation is completed. For large sashes there is a limitation - you need to wait 24 hours after installation, only then bring the glass panels into the open state.
Installation of plastic slopes and accessories on windows
Slopes in panel houses can be installed on the day of installation of windows.
PVC slopes are installed on the day of installation of windows in block and panel buildings; in brick buildings they are installed on the second day.
Use options:
- sandwich panels;
- slopes made of plastic with removable platbands.
The first type can be placed in such a way that you get slopes with dawn (at an indirect angle to the plane of the window). This is what GOST recommends to increase the flow of light into the room.
The second type is installed if you need to finish the walls, but there are already slopes. The edges of wallpaper or other wall material are carefully placed under the casing. If a room is being renovated at the same time as installing windows, sandwich panels are installed after the renovation is completed.
It is recommended to immediately order a mosquito net
The category of accessories includes elements:
- stepped ventilator;
- mosquito net;
- retainer;
- droppers;
- blinds, other devices to improve performance.
The window sill is installed after the frame is installed, but before the slopes are made. If there is already a side trim, grooves 1–6 cm deep are made in it, into which the ends of the window sill board will fit. The installation seam is made using foam. A gap of 8 cm is foamed several times, making intervals of 7 - 8 minutes.
During the installation of slopes and window sills, the glass on the sashes is covered with cardboard or film.
Self-tapping screws are driven into the substitution profile at a distance of 1.8 - 2.0 cm from the bottom of the edge. Large gaps are preliminarily sealed with a layer of plaster. When adjusting the size of the window sill board, allowance for free movement in hot or cold weather is taken into account; the panel is made 1 cm shorter.
Supporting elements are placed under the window sill every 50 cm, they are secured against shifting with self-tapping screws. The board is placed, the level is controlled so that there is a slight slope towards the room of 2 - 4 cm, depending on the width of the panel.
Where to order a window connecting profile in Moscow
- an expert in glazing of any complexity of residential buildings, office and industrial buildings, and other buildings. In addition to selling ready-made double-glazed windows, we supply high-quality mounting elements and fittings, and also sell connecting window profiles in Moscow. There are enough reasons to apply with us:
- a wide range of connectors of various parameters and dimensions;
- high quality of products sold and only certified products;
- affordable prices;
- if necessary, qualified installation;
- competent consultations on choice;
- guarantee.
To order a PVC window profile in the required size with the required parameters, place your order from the website pages. A manager will promptly contact you and advise on the properties of the product and its delivery time.
You can order from us not only the connector, but also other additional components for double-glazed windows. Also, you can invite our specialist to the site in Moscow to take measurements and select the optimal option.
The cost of plastic windows, doors and balcony frames depends on a number of parameters: the size of the glazing, its configuration, equipment, options and methods of opening, profile brand and the number of cameras in the double-glazed window.
Regardless of how busy our production is, your order will be manufactured, delivered and installed on time without compromising product quality.
Installation work is carried out in strict accordance with the requirements of GOST 30971-2012 “Installation seams of joints connecting window blocks to wall openings.”
A comprehensive 6-year warranty applies to all PVC windows and doors produced by us, balcony glazing, as well as to installation work performed.
Application of PSUL and vapor barrier tapes
Vapor barrier tape for PVC windows
Using PSUL tape allows you to begin forming the installation seam even before installing the window. It is attached to a self-adhesive base around the perimeter of the opening. This creates protection from external moisture, and the foam after such treatment is not squeezed out beyond the contours of the frame. SNiPs regulate the production technology of products for the installation of ventilated gaps when installing PVC windows.
Tape properties:
- resistance against ultraviolet rays;
- tolerates heat and cold in the range -45 - +85°C;
- inert reaction to chemical irritants in the air, fats;
- does not lose elasticity during use;
- repels moisture;
- fungus, moss, and mold do not grow on the surface;
- transmits steam of the order of 0.15 mg/(m·m·Pa).
The tape is made from cellular polyurethane foam, which is impregnated and coated with a special compound. An adhesive layer is applied on one side. The tape is sold in rolls, which are unwound before installation so that the material does not lose its properties. After removing the film from the surface, the impregnation reacts with oxygen and the product increases in size. Use tape along the width of the side of the box.
The surface of the slope is cleaned of dust for better adhesion, and porous materials are additionally primed. The expansion process is affected by temperature. At room temperature, the tape expands in half an hour, and in cold weather the process continues for two days. After this, the installation gap with the installed tape is blown with foam.