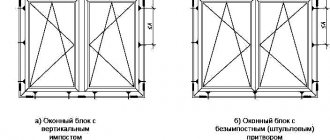
Plastic windows have long ceased to be considered a rarity and a demonstration of the financial potential of the owner.
Now the requirements for installing PVC windows with multi-chamber double-glazed windows have been included in state programs for energy saving of residential buildings, so they have become mandatory for installation during the construction and reconstruction of residential and public buildings.
Installation of such window structures is a very complex and responsible matter. Even the smallest mistakes made in this process lead to a deterioration in their performance, after which noise, dust, drafts appear in the apartment, and glass and slopes become covered with drops of water.
To avoid this, the PVC window must be installed in the wall opening, in accordance with the requirements of GOST and other building regulations. You can do the work yourself, but it’s better to invite specialists so as not to lose the multi-year warranty from the manufacturers for this new unit.
Regulatory regulation of installation technology
In order for PVC windows to be durable, warm and not pose a threat to people’s lives, building standards :
- SNiP No. 23-02, edition 2003;
- GOST No. R 52749, edition 2007;
- GOST No. 30674, edition 1999;
- GOST No. 30971, edition 2012
The requirements imposed by these regulatory documents must be met by all organizations that produce and install PVC window structures in terms of:
- basic requirements for designs, materials, sizes and number of packages determined for different climatic zones;
- requirements for the location of the window in the wall opening, the windows must be placed evenly, with a vertical/horizontal deviation of no more than 3 mm on one side and 1.5 mm per 1 linear meter. along the length of the frame;
- requirements for the transportation and installation process, for strong fastening in the opening, the windows are installed on support blocks, and on the sides they are fixed with spacer blocks, the frames are fixed to the wall using anchor dowels and mounting plates, with an interval of 700 mm;
- the size of the installation seams, it must be three-layer with a seam width from the corner of 150-180 mm;
- sealing seams;
- safety regulations.
GOST, SNiP and SP requirements for PVC structures
The main documents regulating the design requirements for PVC windows and balcony blocks are:
- GOST No. R 56926, published in 2016;
- SP No. 131.13330;
- GOST No. R 1.0, published in 2012
These documents include all current European requirements regarding the production and installation of PVC windows:
- EN No. 12600, published 2015;
- EN No. 14351-1, published 2010;
- EN ISO 10077-1, issued 2009;
Main requirements for window units:
- They must transmit the visible spectrum from 760 to 400 nm and UV radiation from the sun from 200 to 360 nm. Such characteristics must be ensured throughout the entire period of operation, subject to the implementation of the mandatory maintenance package.
- Provide a continuous thermal contour adjacent to the technological opening of the outer wall.
- Correspond to the calculated value of thermal resistance in m2 °C/W, which is indicated in the energy passport of the house or cottage.
- Ensure the strength characteristics and invariability of the outer structural shell from the effects of wind and precipitation.
- The ratio of the total window area to the floor area should be no more than 1:5.5 and no less than 1:8.
- The window unit must have a closed frame structure with an area of up to 6 m2.
- The fastening scheme and positioning of the PVC window must correspond to the hinged fastening scheme of the PVC frame with the 1st degree of freedom in order to ensure the calculated thermal expansion without bending the frame from the opening.
Arrangement of junction points for window blocks
The choice of a constructive solution for the junction of a window (door) block to the opening of an external wall is carried out at the stage of developing architectural and design solutions, taking into account the existing loads and is confirmed by appropriate calculations (clause 5.1.3 of GOST 30971-2012).
Examples of design solutions for junctions of window blocks to wall openings are given in Appendix B of GOST 30971-2012 and Appendix A of GOST R 52749-2007 (when using PSUL - insulating self-expanding vapor-permeable tapes).
Let us highlight the most common junction points of window blocks:
Figure B.1 GOST 30971-2012 - Unit for the top (side) connection of a window block to an opening with a quarter in a brick wall using PSUL tape without finishing the internal slope. 1 — insulating self-expanding vapor-permeable tape (PSUL); 2 - foam insulation; 3 - anchor plate; 4 - vapor barrier sealant
Figure B.2a GOST 30971-2012 - Unit for the upper (side) connection of a window block to an opening with a quarter in a brick wall using a vapor-permeable sealant with finishing of the internal slope with plaster mortar. 1 - vapor-permeable sealant; 2 - frame dowel; 3 — decorative plug; 4 - sealant; 5 - foam insulation; 6 - vapor barrier sealant; 7 - plaster mortar.
Figure B.4 GOST 30971-2012 - Unit for the upper (side) connection of a window block to an opening without a quarter in a single-layer concrete panel wall using sealants and finishing the internal slope with a moisture-resistant plasterboard sheet. 1 - vapor-permeable sealant; 2 - foam insulation; 3 - frame dowel; 4 - vapor-tight sealant or vapor barrier tape; 5 - PVC corner; 6 - polyethylene film; 7 - painted plasterboard sheet; 8 - PVC corner
Figure B.5 GOST 30971-2012 - Unit for the lower connection of a window block to an opening without a quarter in a single-layer concrete panel wall using a vapor barrier tape. 2 — noise-absorbing lining; 3 - foam insulation; 4 — support block; 5 - PVC corner; 6 - vapor-tight sealant or vapor barrier tape; 7 - support block; 8 - PVC window sill; 9 - plaster mortar Figure A.3 GOST R 52749-2007 - Unit for the side connection of a window block to an opening with a quarter of a layered brick wall with effective insulation and finishing of the internal slope with plaster mortar. 1 - foam insulation; 2 — insulating self-expanding vapor-permeable tape (PSUL); 3 - flexible anchor plate; 4 - sealant; 5 - vapor barrier tape; 6 - plaster layer of the internal slope (with a chamfer for the sealant layer); 7 - reinforcing mesh; 8 - dowel with locking screw
Figure A.4 GOST R 52749-2007 - Assembly of the lower connection of the window block, window sill and drain to the opening of a layered wall with effective insulation. 1 - window sill board; 2 - foam insulation; 3 - vapor barrier tape; 4 - flexible anchor plate; 5 — support block for the window sill board; 6 - plaster mortar; 7 - dowel with locking screw; 8 - liner made of antiseptic lumber or leveling layer of plaster mortar (recommended only for the lower unit); 9 — waterproofing, vapor-permeable tape; 10 — noise-absorbing gasket; 11 - drain; 12 — insulating self-expanding vapor-permeable tape (PSUL); 13 - thin layer of sealant
Requirements for window blocks made of PVC profiles according to GOST
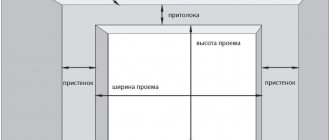
Standard sizes of window and door openings according to GOST
Rules for plastic windows
Let's consider the main points that need to be taken into account when installing windows.
Opening requirements
According to GOST 30971, published in 2012, replacing an old block with a new one begins with preliminary measurements and assessment of the condition of the walls, which must be cleaned of all contaminants. In the case where there are noticeable unevenness on the surface, they are leveled with putty.
The size of the window structure is determined as follows: the width of the window is equal to the width of the window opening minus the double width of the connecting gap - 3x2 cm, a similar calculation is made for the height.
In the case where it is planned to install a window with a quarter, measurements are taken from the outside. When determining the height, the height of the window sill is also taken into account, which is approximately 40 mm.
PVC window standard
- single-leaf - 1200 * 1200 mm;
- double-leaf - 1450 * 1500 mm;
- three-leaf -2040 * 1500 mm.
How deep do you need it?
In order to prevent condensation from forming on the slopes, PVC frame, or double-glazed windows during the cold season, you need to correctly install the window unit along the depth of the wall.
Options for placing a PVC window in the opening depending on the type of wall material:
- Single-layer wall: brick, concrete and expanded clay concrete blocks, standard wall thickness - in the middle of the opening.
- In a 2-layer wall (stone + heat insulator), a PVC window is installed closer to the outer plane directly behind the heat insulator.
- In a 3-layer wall (finish + heat insulator + stone) - windows are installed in the plane of the heat insulator.
- Prefabricated walls - PVC frame is installed in the center.
- Insulated log walls (finishing + insulation + logs) - windows are installed in the plane of the insulation;
- Single-layer log walls - in the middle of the wall.
Dew point calculation
The formation of a dew point on the surface of a PVC block depends on 3 parameters in the ambient air :
- atmospheric pressure;
- temperatures;
- humidity.
It has been proven in practice that the maximum condensation process occurs at low temperatures and high relative humidity. Therefore, this negative process cannot occur in a warm, dry room, and the PVC window must be installed in a “warm” zone.
The following data was obtained experimentally: at room t = +22 C and humidity = 50%, water vapor condenses upon contact with a surface having t < 12 C, and to prevent condensation from falling on the surface, the 10 ° C isotherm must be located inside the wall, namely Therefore, windows in wall openings are moved to the zone of positive temperatures or the joint is thermally insulated.
When calculating the dew point and insulation thickness,
the easiest way is to use tables of ready-made values depending on the temperature of the air and its relative humidity.
If the temperature in the room is 22 C, near the floor it will be lower, about +20 C, and under the ceiling, on the contrary, higher and can reach +27 C. The outside temperature outside the window for the northern regions is T = - 15 C, for the central regions T = - 15 C, and southern T=-7 C, calculated humidity is assumed to be 50%.
For example , for Sochi, with Tc = +22 C, Tn.v = -7 C and humidity 50%, the dew point will correspond to T on the surface = 11.1
How deep should the window sill be?
The depth of the window slab is measured from the substitution profile into which the window sill rests. It should be 5 mm longer than its length.
Is it possible to cut to depth?
It is recommended to trim the concrete window sill in depth only in cases of absolute necessity. The fact is that it is not possible to detach the window sill board from the frame, clean it of mounting foam, carefully trim it and reinstall it under the window while maintaining the original appearance. All of the above operations will negatively affect not only the appearance of the window sill, but also the quality of installation as a whole.
Installation diagram
Before you begin installing windows, an appropriate diagram must be drawn so that when performing work you do not violate the requirements for the location of fasteners and other structural elements, in order to protect the structure from deformation during significant temperature changes.
In this case, the maximum distances between fasteners and frame structures are :
- white profile, 700 mm;
- PVC profile, colored, 600 mm;
- gap from the window corner: 200 - 250 mm;
- from the impost connection to the fasteners: 150 - 180 mm;
- the smallest depths in concrete, 40 mm;
- on traditional brick, 40 mm;
- on hollow brick, 60 mm;
- on concrete blocks, 50 mm;
- concrete blocks, 60 mm.
Colored PVC windows must be secured exclusively with anchor plates. This is due to the fact that colored structures have a linear expansion coefficient that is 2 times higher than white ones. In addition, the anchor plate must be fixed to the wall, and not to the plaster and slope. It is placed under sealing mounting tapes.
When is the best time to install frames?
With the use of modern frost-resistant materials, it is possible to install PVC windows in practice in any weather, however, experts limit the operating temperature range from +35 to -10 C; work can only be performed in calm weather.
Working at subzero temperatures, companies began to use special protective screens, so that during the installation of the unit the temperature in the room does not drop significantly.
Requirements for the installation conditions of PVC windows at subzero temperatures:
Preheat the slopes with a blowtorch or a hair dryer so that the sealant sets. Due to the temperature difference between the sealant and the surface, it may not “set”.- Preheat the foam before application for 10 minutes on batteries.
- Before installation, the windows must be in a warm place so that when anchored, the fasteners do not lead to cracking of the plastic.
Detailed information in this article.
General recommendations
- PVC windows are checked for compliance with the load before the start of all work. It is strongly recommended to entrust installation work to specialists from the company from which the plastic windows were purchased. In this case, there will be a guarantee for possible errors during installation;
- Installation in accordance with GOST implies compliance with a number of conditions, in particular, the mandatory sealing of the window structure using slopes. For sealing, various sealants, silicone sealants such as Steez or polyurethane foam are used. It is important that the insulating elements are unable to change under the influence of climate. Bitumen mastics are also not suitable for the reason that they interfere with the breathing of wood. Rotting and dampness are unlikely to be part of the owner's plans;
Attention! The correct selection of sealing will not only prevent the appearance of dampness, but will also retain heat in the room. The sound insulation it provides is also important.
- The installer must draw up a work plan indicating all materials so that the owner can control its quality and compliance with GOST;
- According to fastening requirements, the use of adhesives or liquid nails is prohibited. Only special fixings with crossbars are used to reliably resist shrinkage of the house;
- The protective film from PVC products is removed no earlier than after a week;
- It is not recommended to paint joints.
In order for PVC windows to be used for a long time and without complications, installation work is recommended to be carried out in accordance with the requirements of GOST. Since many conditions must be met, it is better to entrust the installation of double-glazed windows to professionals. Otherwise, there is a high risk of incorrect installation. The latter may lead to unnecessary material costs.
Materials, consumables and tools
The set of materials and tools that the contractor needs to prepare for the installation of PVC windows depends on the scope of work with or without the preparation of wall openings.
In the first case , you will need to additionally purchase :
- scrap;
- axe;
- hammer;
- spatulas;
- containers for solution.
Building materials, tools and accessories for installing PVC windows:
- perforator;
- chisel;
- screwdriver for fixing the frame to the walls;
- file;
- knife for working with the seal;
- measuring tools and pencil;
- jigsaw for preparing the window sill and slopes to size;
- scissors for working with cast metal;
- clamp for straightening PVC frames;
- glazing spatula;
- gun and construction foam;
- external moisture-proof and vapor-permeable sealant;
- internal vapor-tight sealant;
- set of fasteners, according to GOST No. 30674.
More information here.
In what ways is it possible?
There are two common ways to install a PVC frame without a stand profile and with a stand.
Without stand profile
In the first option, a number of through holes for anchors are drilled in the frame for fastening in the opening, using a 10 mm drill with the direction of the holes perpendicular to the profile.
I place such holes along the profile axis, with a gap of 180 mm to the inner corner, and 150 mm at the point where the impost is attached.
The drilling direction is maintained from the outer wall to the inner one, this will help create holes of the correct shape.
Sometimes there is no reinforcing liner in the frame profile in the drilling area. When drilling from inside the room, this defect will not be identified, but if on the contrary, then the absence of the liner can be detected.
In this case, you need to make a new hole in the frame, moving 40 mm. These measures are necessary to avoid installing the anchor without a liner, otherwise it will fall inside the chamber.
For standard two- and three-hung windows, fastening is carried out with 11 anchors. In this case, you need to pay attention to the drill; it must be pre-sharpened in order to drill through the internal reinforcing liner.
Advantages of installing metal-plastic windows without a support profile:
- faster installation;
- low installation cost.
Disadvantages of installing a frame without a support profile:
- the ebb is attached to the frame, which creates conditions for moisture to enter the room;
- the tightness of the installation is broken, the wall will freeze;
- the fastening of the window sill is broken;
- The thermal density of the window is disrupted.
With stand profile
When installing a PVC frame, a special profile is attached to the lower end - a stand; after installation, this element cannot be seen, but it fulfills the very important energy-efficient characteristics of the window. In addition, a slope is attached to it from the outside, and a window sill from the inside.
The stand profile is placed in a specially designated groove at the bottom of the frame and secured in it with self-tapping screws and special clamps.
Advantages of a wildcard profile:
- provides thermal protection of the seam together with construction foam;
- increases the service life of the PVC block;
- strengthens the structure of the installed frame;
- protects the opening from moisture and biological damage by mold.
Oddly enough, many experts believe that when installing PVC windows this element is not required, since the main heat and moisture protection is provided by foam. The disadvantages of installing a PVC window using a substitution profile include:
- high cost of installation work;
- extended installation time.
How far should it protrude from the wall?
The window sill board should protrude 5-7 cm from the wall. The width of the protrusion is selected so that its edge is above the central part of the radiator. The larger protrusion blocks the heat from the battery, preventing the circulation of thermal air.
Can it be without a protrusion?
Installing a window sill without a protrusion is quite possible, based on the wishes of the customer or the specific layout of the room. But using a protruding window sill is much more rational for several reasons.
- Heat from the radiator should not flow directly to the window, otherwise there is a high probability of condensation occurring, which will lead to damage to the structure.
- The wall under the window sill is reliably protected from mechanical damage and accidental moisture.
DIY instructions
The main task of installing PVC windows on your own is to securely fasten the structure and insulate the connecting seams. This will depend on how accurately the contractor follows the manufacturer’s recommendations for installing such a unit.
Standard installation of PVC windows consists of the following operations:
- The window is glazed, the moving sashes are removed from their hinges, the glazing beads are removed from the blind sashes and the PVC frame is turned over.
- Place the stand profile with glue in the place where the window frame will be installed.
- A layer of vapor barrier membrane is glued to the inside of the PVC frame either along the general contour of the whole film, or in separate overlapping pieces.
- Drill holes in the frame.
- Insert the frame with technological gaps of 2.5 cm at the top and bottom.
- The position of the PVC frame is adjusted by level in 2 planes using special construction and installation wedges.
- After completing the process of fixing the frame, put the sashes in place with the fittings and check the quality of the sashes.
- Fill the seams with construction foam.
The subtleties of installing metal-plastic windows must be taken into account depending on the wall material, since the strength of different types differs from each other, so in some cases it will be necessary to use special reinforcing technologies.
Read more about installing PVC windows yourself in this article.
In a house made of aerated concrete
To install PVC windows in such walls, only galvanized special fasteners for aerated concrete are used , since the usual one is not able to guarantee the immobility of the frames under high wind potential. For installation efficiency, a quarter is installed in such walls - a protrusion along the outer plane of the wall, covering the opening by 60 mm along two vertical and upper horizontal slopes.
In walls made of aerated concrete blocks, the quarter is installed not during the process of laying the blocks, but after leveling the window slopes. Pieces of 100 mm blocks are glued along the window perimeter. Internal and external adhesive seams are reinforced with plastic mesh.
The installation of such quarters in the opening makes it possible to more thoroughly seal the openings and reliably protect the construction foam from exposure to UV rays.
In a panel building
These houses are distinguished by a very thin wall, which, however, does not indicate the low energy efficiency of such structures. The heat resistance of the walls is ensured by multi-layering with the use of effective heat-protective materials, but it is quite difficult to reliably install a PVC window in such wall structures.
For these types of walls , you will need to choose the correct installation width of the profile , as wide as possible in order to increase the contact area between the wall and the window.
The temperature in a narrow wall is distributed less evenly than in a traditional brick wall. Therefore, the contractor must push PVC windows deeper into the insulated interior of the rooms, so as not to lose heat, thereby reducing the possibility of condensation on the glass and slopes.
Experts believe that the profile thickness for such walls should not be less than 70 mm. Only in this case will the heat transfer resistance of the window unit be maximized. In addition, since the double-glazed window with such an installation scheme will be located in the “cold” plane of the opening, it will additionally be necessary to install glass with increased energy-saving characteristics into the double-glazed window.
In a wooden household
The peculiarities of installing metal-plastic windows in a house with wooden walls are due to the fact that such structures cause serious shrinkage. In order to reduce the negative impact of this process on the structure of the windows, they use a “pipe”, which is also called casing in everyday life .
When installed, the window structure will become independent from the shrinkage and movement of the wooden walls of the house. That is, the walls will still be subject to shrinkage, but they will not be able to create pressure on the window structure.
The full article on the installation of structures in wooden households is here.
In brick
These houses are distinguished by different sizes of window openings, wide internal slopes up to 50 m and correspondingly wide window sills, which are further increased by making a free projection of 1 to 2 cm, that is, in pure size the window sill will have a width of up to 40 cm.
PVC window in a brick wall extends at least 1/3 inside from the outside; if this distance is violated, the windows will fog up.
The structures are fixed using dowels or anchor bolts; they are secured through pre-prepared wall holes.
More information here.
In a frame building
Experts insist that the installation of PVC windows in a frame house must be carried out in the area where the heat insulator is located. In the case of external thermal protection with a ventilation gap, the window is installed flush with the casing. If there is no external insulation, the window is installed 1/3 of the width of the thermal insulation layer.
You cannot install a frame in frame walls if there is no lateral insulation ; such blocks will be cold and susceptible to condensation of water vapor.
In addition, when installing window frames in such houses, it is necessary to install a support profile, inside of which insulation is preliminarily laid.
For frame cottages, it is allowed to use 2 types of fasteners - self-tapping screws and anchor plates. The former are stronger, but take longer to install, and the plates are not suitable for non-standard windows.
For these houses, you need to choose high-quality construction foam, which should be applied with a mounting gun to no more than 70% of the volume of the connecting gap, so that there is room for the expansion of the foam.
Also, the structure must be carefully treated with layers of hydro and vapor protection . External waterproofing is glued directly onto the PVC profile before the frame is installed in the opening; the waterproofing is placed inside the structure, leaving allowances for construction foam.
Read more about installation in a frame house in this article.
In the bath
For those who doubt the possibility of installing PVC windows in a bathhouse, experts have given a comprehensive answer - for many bathhouse premises such windows are allowed for installation , these include:
- steam rooms with wet steam with T=+60 C and not higher;
- rest rooms;
- showers;
- washing;
- dressing rooms;
- Japanese steam rooms, where no steam is used at all.
At a higher temperature in the room, PVC windows begin to emit harmful substances that have a detrimental effect on the health of visitors and prematurely destroy the structure of the block, since the high temperature leads to deformation of the frame and destruction of the glass.
The technology for installing PVC windows in bathhouses made of timber or logs is no less complex. The wood of the walls very quickly absorbs water and then releases it, as a result of which the window opening can change in size. In order to protect the window frame from these negative processes, a casing is installed - an independent frame that holds the window block. To install the casing, special grooves are made in the walls.
After installing the casing, the installation of the frame is carried out in the usual way, the mounting slots are filled with foam, then heat and vapor protection is performed at the joints and slopes and they are covered with finishing.
More details about installing windows in a bathhouse can be found here.
Finishing the inside and outside of the opening
When installed in accordance with the requirements of GOST, it is not enough to securely fix the window in the opening and foam it. Installation of the window sill, ebb and flow and facing of the slopes must also be carried out according to certain rules. These requirements are often ignored and work is carried out on a residual basis. This approach is fraught with serious consequences:
- the appearance of a loud knock from the low tide during rain and thaw;
- destruction of foam from the street side and gradual depressurization of the assembly seam;
- freezing of internal slopes and the formation of condensation, ice, and fungus on them;
- fogging of windows.
To avoid heat loss and condensation, to protect against noise and mold, you need to take a comprehensive approach to finishing work, as well as select the right auxiliary elements.
Window sill installation
A PVC window, the installation of which includes the installation of a window sill, should not fog up during operation.
To do this, in winter it must be constantly warmed up by flows of warm air emanating from the radiator. According to the standards, the window sill must protrude at least 50 mm from the front plane of the load-bearing wall. However, it cannot prevent the rise of warm air. GOST 30971 allows the edges of the window sill to be placed on the wall at a distance of 50 to 100 mm. Under the lower profile of the frame, the window sill is usually placed 20 mm deep. In the place where it adjoins the stand profile, you need to apply a transparent or white sealant (silicone). This will avoid blowing in the event of partial depressurization of the assembly seam. The basic standards are additionally regulated by GOST number 34378-2018. The updated set of rules states:
- the maximum permissible panel length is up to 3 meters;
- permissible slope of the window sill - 1°;
- the overlap of heating devices is not 2/3 of the total depth of the radiators.
In addition, it is recommended to install windows according to GOST, taking into account the optimal distance between the floor and the window sill. However, there are no strict restrictions at the moment. After all, today they build objects with glazing at the full height of the opening or low parapets. Each option has specially designed heating systems. The recommended distance between the radiator and the window sill is 60 mm.
Low tide installation
Before installing this structural element, GOST requires determining the wind load.
This data is necessary to calculate the optimal distance by which the ebb should protrude beyond the plane of the wall. If there is a strong wind load, rainwater will flood the wall, so the projection must be larger. On average, the value of this parameter varies from 30 to 80 mm. Accurate measurements using special equipment are extremely rarely carried out, so during the installation process it is recommended to use weather observations from the owners of the apartment or house. The PVC window, the installation of which is carried out in accordance with GOST in the lower zone, is equipped with a stand profile. It allows you to fix the ebb correctly and at the right angle. Thanks to this configuration, moisture does not get under the frame. The ebb in this case is at an angle of 5-8 degrees to the horizontal and is placed under the lower profile of the frame. To ensure the required level of waterproofing, its edges must extend under the vertical slopes. According to GOST, a vapor barrier tape must be laid under the ebb on the side of the installation seam.
To effectively dampen vibrations and protect interior spaces from noise, it is necessary to install flashings made of steel with a thickness of at least 0.5 mm. You will also need to take a number of additional measures:
- treat the back side of the ebb with sound-absorbing mastic;
- fill the voids with polyurethane foam;
- provide compensation tides along the edges of the long ebb.
In addition to steel and aluminum models, manufacturers produce plastic castings. They more effectively dampen the noise from falling drops, but are not suitable for use in regions with harsh winters. In severe frosts, plastic moldings become brittle.
Installation of slopes
These elements of the window structure are installed after the window sills and ebbs. They not only decorate the opening, but also protect the installation seam and also interfere with the heat transfer process. There are several options for facing the internal and external sides:
- putty;
- drywall;
- sandwich panels;
- natural wood;
- slope systems;
- MDF panels.
Putty and other types of building mixtures are mainly used for lining the outside of the opening.
From the inside, it is recommended to use other materials and technologies that allow leaving a small gap between the slope plane and the opening wall. The resulting cavities are filled with polyurethane foam, polystyrene foam or mineral wool. This allows you to reduce heat loss and reduce the risk of condensation and ice formation. Plastering openings from the inside is fraught with the rapid appearance of cracks. The reason for their formation is different values of thermal expansion of concrete or brick and the materials that make up the installation joint. As a result, multidirectional forces act on the plaster or putty in the area where the slopes adjoin the frame, leading to the formation of cracks. When used for cladding wood, plasterboard and panels of all types, preliminary installation of load-bearing profiles (lathing) is recommended. They can be metal, wood or plastic. The choice and dimensions of the material depend on the characteristics of each window opening. The panels must overlap the installation seam, but not interfere with the free opening of active sashes and not interfere with the clamping beads. When installing external slopes using building mixtures, additional protection of the installation seam will be required. Cracks constantly form in this area, and the facing seam crumbles the fastest. Sometimes even the use of mixtures specially designed for these purposes does not help. In the harsh Russian winter, they also cannot withstand unfavorable operating conditions and crumble.
The most effective way to protect the installation seam on the outside of window and door units is with the help of strips. They are corners with different sides, which can be made of plastic, wood or painted sheet steel. They also produce flashings, which are a wide flexible tape. These elements are attached around the perimeter of the opening, with the exception of the lower zone if a drip or window sill is installed there. The strips are screwed to the frame profile or wall, and also glued to liquid nails. These elements of the window structure on the street side protect the installation seam from wind, rain, snow, and ice. Inside, they hide the gap that forms between the frame and the slopes of plasterboard or plaster. In fact, flashings prevent depressurization of window and door blocks even with minor violations of the assembly seam caused by shrinkage of the building and other factors.
How long does it take to work?
Installation of PVC windows can take from 2 to 10 hours. The duration of installation work directly depends on the following factors :
material of wall structures, work is completed faster in panel houses, where the window opening is initially made more carefully;- level of premises preparation;
- level of preparation of the window unit;
- number of floors and distance from the waste site;
- time for delivery of the window and accepted consumables.
The preparation of the workplace is carried out by the customer; the more thoroughly it is carried out, the faster the installers will work.
If all conditions are met to the greatest extent, then the main operations for installing a PVC window will take :
- dismantling the old unit - from 25 to 60 minutes;
- window opening preparation - 30 minutes;
- installation at the level of the window frame - 30 minutes;
- installation of sashes and fittings - 15 min;
- window sill insertion - 10 min;
- installation of ebb tides - 15 minutes;
- installation of slopes with panels - 30 min;
- compaction - 15 min;
- total from 2 hours 50 minutes to 3 hours 25 minutes.
Installing accessories on windows
At the final stage, a double-glazed window is installed in the window frame and the sashes are hung. Additional accessories are installed, additional fittings and components are attached, such as: step ventilator, clamp, mosquito net, blinds, etc.
The window is ready. Upon completion of all work, a work acceptance certificate is signed. In it, if necessary, the customer indicates his comments on the work performed, if any.
Almost immediately after all the work is completed, the PVC window can be used. The exception is windows with large opening sashes, which are not recommended to be opened within 24 hours after installing a PVC window.
In terms of functionality, a plastic window is much better than old wooden windows. If you follow simple instructions for its care and use, it will last you forever.
Gaps and their sealing
The free space between the wall opening and the frame is called a gap; it cannot be very large or small. Large openings during the installation of PVC windows lead to increased consumption of construction foam, and the seam itself will not be strong; the frame may warp if there is a high wind potential.
And with a small gap, on the contrary, it will be impossible to foam the seam, and therefore there will be gaps along the entire perimeter of the frame, which will increase over time under the influence of adverse atmospheric factors.
The photo shows the installation seam diagram:
In this regard, the standard value of the gaps between the wall and the frame is established by standards and should be in the range from 2 to 4 cm, regardless of the wall material and window design. The distance between the quarter and the frame is also regulated from 5 to 20 mm.
For those developers who order the installation of PVC windows through third-party organizations, the size of the gap must be specified in the installation contract, as well as in the PVC window installation flow sheet.
More information about filling gaps in the article at the link.
How to check the quality of window installation
Control is necessary both during the installation process and after its completion. It is the inspection at the end of the work that allows serious flaws to be detected. After all, the ultimate goal of installing plastic windows in accordance with GOST is not so much compliance with all standards, but rather ensuring the necessary thermal characteristics of profile structures. Quality control consists of several stages.
Checking the tightness of the assembly seam
Even foam that has not had time to completely harden should not allow air to pass through. At the stage of handing over the windows, the installation seam has already had time to form and harden on the outside. If the seal is broken in some place, the seam will not close on its own. You cannot believe the assurances that after installing the external and internal slopes the window will not be ventilated - depressurization will make itself felt one way or another. The defect must be corrected immediately. Checking the tightness is simple - you need to hold a lit candle, match or lighter around the entire perimeter of the opening. The flame should not deviate either towards the street or towards the room. Any stably repeating vibration is a sign of a leak. In this case, it is necessary to properly blow out the seam with foam.
Checking the stability of frames and double-glazed windows
The blocks in the opening are held in place by both fasteners and hardened foam, which acts as a continuous spacer between the frame and the walls. If the installation of PVC windows and doors is carried out even in partial compliance with GOSTs, this should not affect the stability of the structure. A wobbly frame or door frame is a sign that the installation was carried out by amateurs and all technologies were violated. Since during transportation and installation, double-glazed windows are often first removed from the light openings and then returned to their place, it is necessary to check the reliability of their fixation. To do this, you will need to conduct a visual inspection of the glazing beads. They should fit snugly around the entire perimeter of the light openings without cracks or bends. The stability of double-glazed windows is checked by lightly pressing the glass. There should be no backlash after it.
Checking active leaves
At this stage of control, you will need to open and close windows several times in all modes.
When moving, active sashes should not cling to frames and imposts, and the fittings should not make sounds of unknown origin. Grinding, clicking and jamming when turning the handle is a cause for concern. Promises that a mechanism will be developed must be ignored. The fittings should operate smoothly and quietly. The tightness of the valves is checked using a sheet of paper. It is inserted in the area where the sealing contour adjoins the frame, and then the window is closed. After turning the handle, the sheet should remain in place. If it has slipped down, the sash pressure is insufficient. This means that the window will be ventilated. The malfunction is eliminated by adjusting the fittings.
Checking window sills and ebbs
It is necessary to assess the reliability of the panels' fixation and measure with a tape measure how much the edges of the window sills and ebbs protrude beyond the walls. According to GOST, the maximum distance in the first case should be 60, and in the second - 80 mm.
If a wide window sill is installed, which is planned to be used as a study or dressing table, shelf or bench, ventilation grilles must be cut into it. Through them, warm air will rise up to heat the double-glazed windows.
Main mistakes
Despite the apparent simplicity of window installation, novice performers make many mistakes in this process, which lead to unsatisfactory functionality of the unit and its premature failure.
The most common mistakes in installing PVC windows:
- Improper thermal and waterproofing of window openings leads to the creation of “cold bridges” at the joints and moisture condensation on the surfaces of the block.
- Poor-quality deposition of the frame in the wall: a decrease in the permissible gaps leads to the impossibility of sealing in these places, and a large gap creates an excessive load on the fasteners, causing their deformation with subsequent possible loss of the block.
- A closed drainage hole in the frame destroys the window structure and reduces its tightness.
- There is no protective strip on the window sill, which allows water to get under the window frame, dampening the wall and causing corrosion of the fasteners.
- If the fastening to the wall is installed poorly, with an insufficient number of anchors, the window can be torn out of the opening by wind pressure.
- The frame was installed without supporting wedges, which will lead to destruction of the plaster and deformation of the block, and through the resulting cracks, moisture and drafts will enter the rooms.
- Small volume of filling joints with construction foam, violation of the thermal resistance of the window.
- A vapor barrier membrane is not installed on the inside and a vapor-permeable membrane on the outside of the frame, which destroys the thermal insulation, with subsequent penetration of moisture and drafts into the room.
- The dimensions of the block are measured incorrectly; in principle, with such an error, in most cases it is impossible to install a window; the window opening will need to be changed, which in multi-storey buildings is very problematic, since it will require additional coordination with the operating organization.
- Poor preparation of the window block, a dirty surface does not allow the mounting foam to firmly adhere to the gap.
- The fastener installation pattern is not consistent; the frame can be squeezed out of the opening by the wind.
- The drip tide is not secured with metal brackets and does not have a sound-absorbing gasket; water can get inside the room and create increased noise during rain.
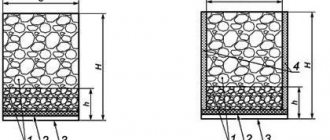
Three layers of seam sealing
The content of the main part of the standards is devoted to the rules for filling the installation gap between window blocks and openings according to the principle “the inside is tighter than the outside.” Each installation unit must have three layers of sealing: on the outside - protection from climatic influences, in the middle - insulation, on the inside - vapor barrier. You can use different materials for the outer layers and different mounting foams, but, in one design or another, these three sealing planes must be present.
Outer layer
is designed to protect the insulation layer from moisture penetration into it, and must be vapor permeable in order for the insulation to be ventilated through it. That is, the outer layer must be waterproof and vapor permeable.
These requirements are due to the fact that when moisture penetrates into the insulation, its thermal insulation qualities decrease. PSUL (pre-compressed sealing tapes) best meets modern requirements for the outer layer. These are special mounting tapes that are glued to the window frame before installing it in the opening, and then, expanding, they fill all the leaks in the quarter in the opening.
Despite serious advantages: optimal construction physics and technological simplicity, they also have disadvantages. It is convenient to use these tapes in new construction when the opening has good geometry. But when replacing windows in old houses, when the slopes are uneven, and even more so, plastered, their use is difficult. Another drawback is that PSUL cannot be covered with plaster.
To a limited extent, silicone can be used outside. In this case, certain rules must be observed: the thickness of the silicone layer must be half the width of the seam being filled, and the silicone must be glued only on two sides and work in tension, the remaining sides must remain free.
Sealant can be used when insulating the installation seam. Although it is not clearly stated in GOST, there is no ban on its use, no matter how much the supporters of mounting tapes might want it. An example of using silicone outside and inside a room is shown in node A.14 in GOST 30971-2002. It is unacceptable, of course, as can sometimes be observed on objects, to simply spread silicone on top of the foam - this is an imitation of seam protection, but not the protection itself.
Central layer
– thermal insulation. Currently, polyurethane foams are used for its implementation. It is best to use foams designed specifically for window installation. Such foams fill the joint evenly and do not need to be trimmed after hardening. After installation, other foams hang in clumps from the side of the room, and they are cut off, breaking the protective outer crust.
Inner layer
– vapor barrier. Its function is to protect the insulation (foam) from the penetration of moisture vapor from the room. For these purposes, when plastering slopes, vapor barrier tapes, mainly butyl-based, are used, as well as paint-based vapor barriers for moisture-resistant plasterboards. It is possible to use silicone according to the rules mentioned above.
What to do if the frames were installed incorrectly?
If errors are noticed during the installation process, they can be corrected before the window unit is permanently fixed.
If such errors are detected during operation, for example, due to moisture condensation on the window and slopes, blowing through the block or depressurization of the glass unit, the cause of the violation must be identified.
If the window is not under warranty service and the owner performed the installation himself, then in this case the inspection and correction of errors can be carried out either independently or with the involvement of a specialized installation organization.
If the PVC window is under warranty, then only the organization that installed the structure should be involved in the inspection and elimination of errors.
On one's own
Unfortunately, most errors can only be corrected by a radical method involving dismantling and reinstalling the window.
List of works to correct defects in PVC windows that can be performed without removing the frame:
- re-sealing the assembly seam;
- finishing of external slopes;
- low tide sealing;
- re-installation of the window sill;
- glass unit sealing;
- setting up fittings.
Invited specialists
If unsatisfactory performance of a PVC window is discovered during the warranty period, you should immediately invite company representatives to eliminate the defects.
The warranty service procedure and application procedure are usually prescribed by the terms of the contract, but if there are no such sections in the contract, and the customer did not pay attention to this in a timely manner, then the dispute is resolved in accordance with legislative norms regarding the protection of consumer rights.
Sample claim:
First, the customer submits a written claim to the organization to the contractor, by registered mail with notification. Reputable companies, as a rule, immediately send their representative to the site, who diagnoses the technical condition of the PVC window, its operating conditions and decides to carry out repairs or replace the old unit with a new one.
If the organization voluntarily refuses to correct the defects or replace the window, the dispute can be resolved in court with compensation to the customer for all material and moral losses.
A dispute over the protection of consumer rights is not subject to state duty for claims up to 1 million rubles.
What does the price consist of?
Pricing for installation work of PVC windows depends on many factors, which include :
- wall material;
- condition of the window opening;
- the need to dismantle the old window;
- window size;
- installation floor;
- brand of window block;
- window class: economy, standard and elite;
- quality of consumables;
- additional installation work, for example, making slopes, installing ebb and flow sills;
- transport invoices.
The installation price of window structures is determined per 1 m2 and for standard equipment is:
- window installation from 850 rub./m2;
- installation of slopes from 400 rub./m.p.;
- installation of window sills from 800 rub./m.p.;
- remote opening of sashes from RUB 5,500/set;
- anti-burglary fittings from RUB 7,000/set.
Read more about pricing in the article here.
Removing the old frame
Once the room is ready for dust and debris to appear, begin dismantling the old window frame.
The sashes are removed from the window. Window casings are dismantled. If necessary, the slopes are dismantled (knocked down).
The old window frame is dismantled, which usually causes serious damage. If you want to use old windows, for example in a country house, you should specify the option of preserving the old windows when ordering.
The old sill and the old window sill are dismantled.