The architectural significance of windows and doors in a building is very great. The impression of the building, its overall expressiveness, compliance with its purpose - its architectural image - largely depend on their correct arrangement, proportions and sizes, as well as their location on the facade and in the interior.
The nature of windows and doors, their design, location and size significantly influence the ease of orientation in the building, the working and living conditions in it, the illumination and ventilation of its individual rooms, their sound insulation, as well as the conservation of heat in the building, which is directly related to the amount of operational expenses for its maintenance.
The materials for windows and doors can be wood, metal, reinforced concrete, glass and plastic. The use of a particular material is related to the purpose of the building, its temperature and humidity conditions and architectural appearance.
The most common material in mass housing construction at present is wood; in a number of public buildings, especially with large light openings, metal (steel or aluminum) is often used. In the near future, in connection with the development of the chemical industry, a transition to the production of these products from plastics is planned.
Until recently, the manufacture and installation of windows and doors made of wood absorbed up to 11% of all labor costs for the construction of a building, more than 15% of all wood consumed annually in capital construction and, in monetary terms, accounted for 8-12% of the cost of constructing a building.
Therefore, the issues of reducing wood consumption, labor costs and the cost of these products are of great importance in our mass construction. For this purpose, a number of new progressive designs of windows and doors are being developed that have characteristic advantages - increased light activity, reduced material consumption, reduced weight and labor intensity of manufacturing, and reduced operating costs.
Such designs include: paired sashes, combined window blocks, windows using double-glazed windows, windows made of glass blocks, windows without sash, windows using plastics, doors made of stalinite and a number of others. They are gradually beginning to be introduced into our construction practice.
General installation requirements according to GOST
PVC windows must be installed in compliance with the norms and standards of GOST.
An expensive luxury window with multi-chamber double-glazed windows reduces its functionality if it is installed in violation of the rules. The standards were developed by technologists to ensure that after installing PVC windows in accordance with GOST, the room has an optimal microclimate. There should be no risk of the frame falling out of the opening.
There is a document that determines the correct installation of windows - GOST 30.971 - 2002. It contains technical conditions for organizing an installation seam between the window frame and the end of the walls.
The junction seam includes:
- an outer layer that insulates from moisture but allows steam to pass through;
- central - reduces heat loss;
- internal - isolates from household vapors.
The layers combine functions, for example, the outer one additionally protects from the cold, which is taken into account when calculating the performance of the window frame. The design and composition of the assembly seam are established in working annexes, which are included in the text of GOST. Installation rules are developed in accordance with building rules and regulations, taking into account standard requirements.
Requirements for the technology of installing plastic windows:
- The seams must withstand operational loads, for example, precipitation, heat, frost, wind, and not collapse when the structure shrinks.
- Materials for joints must be resistant to deformation, sedimentation, and temperature changes in the dimensions of blocks and wall ends, while taking into account the design degree of compression.
- The installation seam has such a thermal protection indicator that the internal surface of the slope has a temperature not lower than the standard according to SNiP.
- the insulation material cannot have sound insulation properties and water resistance lower than the corresponding indicators of the window structure.
- The seams are made straight if the end of the opening does not have a quarter, or angular if there is no quarter.
According to the standards, it is correct to install external protection of seams in the form of flashings, flashings, and slopes. Inside, the gaps are covered with plaster or panel cladding is made, for example, from plasterboard or plastic.
Safety during work
Safety rules must comply with the requirements of GOST 30971-2012.
Installation of plastic windows should be carried out by professionals! We strongly advise against performing this process by anyone who does not have sufficient experience and relevant skills. Please remember that structures and their components are heavy and have sharp corners and edges, which can cause serious injury and damage!
When carrying out work on installing installation joints, as well as when storing insulating and other materials, the requirements of building codes and safety regulations in construction, fire safety rules during construction and installation work and SSBT standards (system of occupational safety standards) must be observed. Safety instructions must be developed for all technological operations and production processes (including operations related to the operation of electrical equipment and work at height).
Application of the set and general provisions
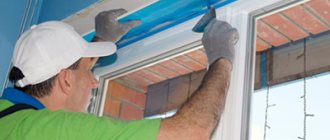
The window installation seam must be made according to a three-layer scheme, according to the principle “the inside is tighter than the outside.” This scheme ensures reliable and efficient operation of the assembly seam throughout the entire design service life. In order for the installation seam to correspond to the indicated diagram (see Fig. No. 5 and Fig. No. 6), “ROBIBAND PSUL” and “ROBIBAND NL 120” tapes must be used on the outside of the seam (from the street side), since both of these products are vapor-permeable, and on the inside of the installation seam (from the room side) vapor barrier tape “ROBIBAND VM 120” and “ROBIBAND VM 100” is installed. Plastic wedges are used as a means of temporary fixation, as well as support and spacer blocks. Anchor plates are used to fix the window block in the window opening. The tapes must adhere to the surfaces of the mounting gap tightly, without peeling or gaps. The quality of the final result will largely depend on the care taken when gluing the tapes.
Composition and description of the kit components
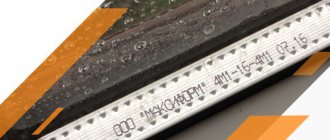
| Item Image | Name, quantity and brief description |
| Robiband "PSUL" 50+ 15/8*5- 5 linear meters, Vapor-permeable self-expanding sealing tape, used to seal the outer layer of the installation seam of a window structure (see Fig. 5) | |
| Robiband VM V 120 – 5.5 linear meters Robiband VM B 100 – 2 linear meters Vapor barrier tape made of metallized film backed with non-woven material. The tape is intended for internal vapor barrier of assembly joints, followed by plastering of slopes or finishing using dry methods (sandwich panels, plastic slopes, etc.). (see Fig. No. 5 and Fig. No. 6) | |
| Robiband NL V 120 – 2 linear meters, Waterproofing, vapor-permeable tape made of membrane-type synthetic non-woven material. The tape is intended for waterproofing the installation seam of a translucent structure under low tide, as well as any other construction seams and joints. (See Fig. No. 6) | |
| Mounting wedge 20x170x40 – 10 pcs., used when installing a window block as a support and mounting block | |
| Anchor plate 150 mm – 12 pcs.. used for fastening a window block into an opening in accordance with the requirements for the placement of fasteners | |
| Dowel-nail 6x40 – 24 pcs., used for attaching an anchor plate to a window opening (2 pieces per 1 plate, see Fig. No. 2 and Fig. No. 3) | |
| 4.2x25 Self-tapping screw with press washer, drill – 9 pcs., 4.2x51 Self-tapping screw with press washer, drill – 3 pcs., used for fixing the anchor plate to the window block (see Fig. No. 2 and Fig. No. 3) |
The set does not include polyurethane foam insulation (spray foam).
Work order
The process of installing a window and (or) balcony door block into an opening of a reinforced concrete wall panel consists of several stages. The given technological process is the most general and can vary depending on a large number of factors, such as climatic parameters, wall design, window block design, method of finishing external and internal slopes, etc.
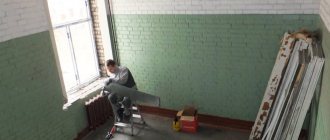
5.1 Preparation of the workplace
It is necessary to prepare the workplace. All unnecessary objects (furniture, household appliances, etc.) must be removed from the work area. If it is impossible to remove foreign objects, it is necessary to take measures to protect them from contamination and damage, for example, cover them with durable plastic film.
Be sure to protect your floors!
5.2 Control measurement
Before installing the old window, you need to take a control measurement and make sure that the new structure has the required dimensions.
5.3 Removing sashes and fixed glazing from a new window block
The sashes and fixed glazing elements must be removed from the frame to reduce its weight and to ensure safe work. The removed elements are placed in a prepared place where their safety and absence of damage will be guaranteed. It is necessary to mark each element removed from the window structure so that during the assembly process, each element ends up exactly in the same place as it was originally.
5.4 Dismantling the old window unit
During the dismantling process, be especially careful with every movement! It may be necessary to partially or completely remove plaster from the slopes (if any), which is inevitably accompanied by a lot of noise and debris. Take care of garbage bags in advance and think about how the garbage will be disposed of. The most dangerous moment is removing the frame elements of the old window structure from the opening. During the dismantling process, make sure that pieces of debris (plaster, wood, glass, etc.) do not fall outside the window onto the street!
This can lead to very serious consequences!
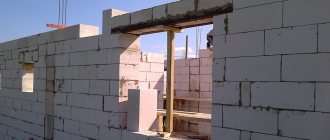
5.5 Preparing the opening for installation
Before starting the installation process, you need to prepare the opening. Preparing the opening involves cleaning the surfaces from all types of contaminants: pieces of plaster, putty, paint, etc. Chips and potholes are repaired with quick-hardening, water-resistant compounds. If the surface is dusty and crumbling, then it is necessary to perform priming to strengthen it and remove dust. Ultimately, the surface should be fairly smooth, dry and clean.
Preparing the window block frame for installation
It is necessary to determine the location of the PSUL tape, which should be recessed relative to the side surface of the quarter by 2 - 6 mm - this is its ideal location (see Fig. No. *). For such precise positioning it is necessary to perform preliminary markings. To carry out the markings, the protective film is removed from the outside (street) side of the box, the box of the window unit is placed in the prepared opening and pre-aligned vertically and horizontally, i.e. fix it the way it should be fixed. Mark with a pencil on the outer surface of the box. After this, the box is removed from the opening. All necessary holes for fasteners are drilled in the box.
The location of the holes must comply with the requirements of GOST 30971 regarding the location and number of fasteners.
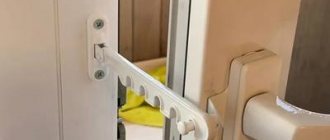
Gluing “ROBIBAND” tapes to the window block box
Vapor barrier tape “ROBIBAND VM” is glued to the side surfaces (outer edges) of the window frame, to the vertical and upper horizontal sections. The tape is glued to the box with a narrow adhesive strip. The tape should stick tightly, without peeling. It is necessary to make overlaps in the corners of the box so that the tape can cover the installation gap.
Do not glue the tape without overlaps, since in this case the tape will not be able to cover the installation gap in the corners! On the vertical sections of the box, the tape should also overlap downwards, since it is also necessary to cover the lower installation gap.
On the outer plane of the box, according to the pre-made markings (see paragraph 6), the “ROBIBAND PSUL” tape is glued. When gluing the tape, do not pull it out. The tape pieces are butted tightly together, without overlapping. Corner joints are also made tightly end-to-end, without overlaps or fractures. First, the vertical sections of the tape are glued, and then the upper horizontal section. At the bottom, the tape should reach the very bottom of the box, and if a stand profile is used, then to the very bottom of the stand profile.
Number and location of fasteners
Rice. No. 1
For window frames made of white PVC profiles:
- A – 150-180 mm (from the inner corner of the window frame) or 190-220 mm from the outer edge of the frame;
- B – no more than 600 mm (between elements);
- C – 120-150 mm (from the inner edge of the impost) or 160-190 mm from the center of the impost;
- The anchor plates are fixed to the window with a vapor barrier tape glued to it, a window self-tapping screw with a 4.2x25 press washer on the vertical and upper horizontal planes, and in the lower part of the window they are screwed through the stand profile onto a self-tapping screw with a 4.2x51 press washer.
| Rice. No. 2 | The anchor plate is fixed to the wall TWO dowel nails 6x40 mm. (See Fig. No. 2) Rice. No. 3 |
Number and location of mounting wedges
| — Support and spacer block. It cannot be removed after installation. -Temporary spacer block. After mechanical fixation of the window frame, the window is removed. |
Rice. No. 4
Mounting wedges are installed under all vertical elements of the window frame - these are vertical trims and vertical imposts. Distance (side) blocks are installed at a distance of about 200 - 250 mm from the corners of the window frame; the dimensions of the side blocks are selected similar to the dimensions of the lower support blocks. Installing spacer blocks in the very corners of the window frame is unacceptable, since the blocks will prevent thermal deformation of the window during seasonal and daily changes in the air temperature and the window itself.
Aligning the window block frame vertically and horizontally, temporarily fixing it in the required position
The frame of the window structure, together with the tapes glued to it, is placed in the opening and, using plastic wedges, is aligned vertically and horizontally and is pre-fixed.
Final fixation of the window block frame in the opening
Holes for fastening elements are drilled in the wall. The frame of the window structure is finally fixed to the wall with fasteners. When installing fasteners, be careful that the box is not stretched by the fasteners!
Gluing tapes at the bottom of the window structure
Carefully remove any dust generated when drilling holes in the wall. Prime those areas of the opening surfaces to which the tapes will be glued. Wait for the primer to dry. Vapor barrier tape “ROBIBAND VM V 100” is glued to the lower surface of the opening. When gluing, the tape should be directed towards the room. The length of the tape piece must be sufficient to cover the entire length of the lower horizontal assembly seam, taking into account the formation of overlaps or edges at the corners for reliable sealing of the corners. “ROBIBAND NL 120” tape is glued to the outer plane of the stand profile or the outer plane of the rebate intended for installing the drip lining with a narrow adhesive strip. When gluing the tape, it should be directed towards the street. The length of the tape segment must be sufficient to cover the entire length of the lower horizontal gap, taking into account the formation of laps or edges at the corners for reliable sealing of the corners.
Filling installation seams with polyurethane foam insulation
A container of polyurethane insulation (PPU) is prepared for use in accordance with the instructions for use of the specific foam. It is recommended to use polyurethane foam with high initial and low secondary expansion. Before filling the installation gap with polyurethane foam, it is necessary to moisten the surfaces of the installation gap with water by spraying. Do not wet the areas of surfaces to which the tape will stick, as nothing will stick to a wet surface! After moistening, the installation gaps are filled with polyurethane foam. The degree of filling the gap depends on the degree of expansion of a particular PU foam. Test releases are recommended. The amount of polyurethane foam in the seam should be enough so that the polyurethane foam, when it expands, pulls the tape, but does not tear it off.
Before gluing tapes onto wet foam, re-wet the surface of the foam, since otherwise large voids may form in the foam!
Gluing “ROBIBAND VM” tapes to the opening
The protective paper is gradually removed from the adhesive strip of the vapor barrier tape “ROBIBAND VM 120”, glued to the vertical and upper horizontal sections of the window frame, and the tape is glued to the surface of the window opening. Make sure that when gluing the mounting foam does not get between the tape and the surface of the opening. The protective paper is removed from the “ROBIBAND VM 100” vapor barrier tape located in the lower part of the opening, and the tape is glued to the front plane of the stand profile or to the front plane of the rebate intended for installing the window sill. Edges (sides) are formed in the corners of the opening to reliably protect the joint. The protective paper is removed from the “ROBIBAND NL 120” tape, and the tape is glued to the bottom of the window opening. Edges (sides) are formed in the corners of the opening to reliably protect the joint.
Installation of ebb and window sill
A sill and a window sill are installed on the window block. All operations must be performed carefully to avoid displacement of the window frame.
Hanging sashes and installing fixed glazing
The sashes are hung and fixed glazing is installed. The doors close. All operations must be performed very carefully to avoid the frame of the window structure from moving.
Quality control
Quality control is carried out after 24 hours. Quality control consists of checking the tightness of the tapes along the entire perimeter of the installation seam, both from the indoor and outdoor sides. If the tape is glued tightly, without peeling or gaps, then we can assume that the installation was done efficiently.
The PSUL tape should expand and completely cover the gap.
Slope finishing
The finishing of the slopes is carried out in accordance with the adopted constructive and design decisions.
Rice. No. 5 |
|
Rice. No. 6 |
|
Preparatory work
Dismantling must be carried out so as not to damage the external slopes.
Dismantling of existing window frames for the installation of plastic windows in accordance with GOST is carried out carefully or sawed into pieces. In the first case, old windows can be used in other buildings.
Dismantling begins with freeing up the working space:
- remove flower pots from the windowsill;
- remove curtains;
- The area around the window is covered with construction cellophane.
Prepare an extension cord so that the electric tool can reach the outlet.
Dismantling sequence:
- Remove the moving parts of the window.
- In the blind parts, the glazing beads (longitudinal elements supporting the glass) are removed.
- Remove the window sill so that the integrity of the window opening is not damaged.
- Remove the external ebb.
- Remove the frame by cutting it.
The frame must be smaller than the opening so that there is room for the mounting foam.
Installation of PVC windows according to GOST assumes that the opening is cleared of the main and finishing parts of the old block. Concrete window sill slabs are broken in the middle with a hammer, the exposed reinforcement is cut, and the halves are then removed from the side openings. Window sills are removed with a hammer drill, assisted by a hammer if they are made of plastic, wood, MDF, or metal.
The ebbs can be attached to the frame or window sill; they are unfastened by removing the hardware. After removing the tides, the window structure is removed. The work is carried out with a mounting cutter for professionals or using an electric jigsaw or a simple hacksaw for wood. The frame is removed in parts as it is freed. After this, the interfering mortar deposits are removed and the old insulation is removed, since it will not be needed.
Check the installation opening in the wall where the window will be installed. It should have the same dimensions horizontally at the top and bottom, as well as vertically on the right and left. The error is allowed up to 1.5 - 2.0 cm. If the opening is curved, the frame may not fit into it. Otherwise, the window block will dangle; the anchors or dowels will not be long enough to secure its sides.
Types of plastic windows
First you need to choose a suitable window, which is not so easy to do, because these products are available in a wide variety of designs.
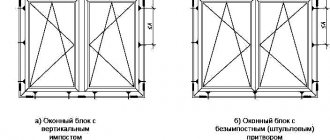
Number of leaves
Windows up to 1.5 x 1 m in size are usually made single-leaf, larger ones - double-hung, and the widest and tallest - three-hung. In some cases, when the window dimensions exceed the standards, there may be more sashes. “Multi-folding” should be avoided if possible, since the partition between the sashes - the so-called impost - due to the characteristics of the frame profile is quite wide, especially if the sashes open.
Main components of a plastic window assembly
For example, in a three-leaf window they reduce the glazing area by about 10%, and also significantly increase the weight of the product. It is advisable to install windows in an apartment with no more than 2 sashes.
Sash type
The following options are available:
- Deaf. The simplest and lightest design, but fixed windows are used extremely rarely, since they are difficult to clean from the outside.
- Rotary (swing). Such sashes open in the same way as regular wooden window sashes.
- Folding. The sash rotates relative to the lower horizontal edge, while its upper part moves out of the frame. This opening mechanism is simpler than a rotary one, but it is only suitable for ventilation. To make it convenient to clean the window from the outside, there must be at least one swing sash next to the folding sash.
- Combined (swing and tilt). Today they are the most common. Thanks to the use of a complex mechanism, by turning the handle to one position or another, the sash can be turned into either a folding one (in everyday life this is called “ventilation mode”) or a rotary one.
One window block may contain different types of sashes
If there are several sashes in a window, they may be of different types. For example, in a tricuspid, the outer leaves can be rotary or combined, and the middle one can be blind.
Number of cameras in the frame
During the manufacturing process of the profile, from 3 to 7 longitudinal cavities are formed in it - they increase the thermal resistance of the product. If the building is located in a region with a warm climate or is unheated (outbuilding or garage, warehouse), a 3-chamber window can be installed in it.
In residential buildings in regions with cold climates, it is necessary to install windows from a 5-chamber profile or at least a 4-chamber profile.
Profiles with 6 and 7 chambers are significantly more expensive than 5-chamber ones and are heavier, but at the same time they have almost the same thermal resistance, so purchasing them is not recommended. It would be more rational to install a double-glazed window with a larger width.
Profile type according to wall thickness
For use in residential premises, a type “A” profile is intended, in which the outer wall has a thickness of 2.8 mm and the inner wall is 2.5 mm thick. In rooms where the microclimate is not so important, for example, in industrial areas, you can use windows from type “B” and “C” profiles with a smaller wall thickness.
Number of cameras in a double-glazed window
A double-glazed window can be assembled from 2, 3 or 4 sheets of glass, respectively, it can have one, two or three chambers. The more chambers, the higher the thermal resistance and sound insulation. In residential buildings today, in most cases, 2-chamber double-glazed windows are installed.
The most common are two- and three-chamber double-glazed windows
3-chamber ones are slightly superior in thermal resistance and noise insulation, but they cost and weigh much more, so purchasing them is not recommended. Single-chamber double-glazed windows are used only on balconies, in various unheated buildings, shops, etc.
Speaking about the “intimacy” of a window, it can mean the number of cameras both in the double-glazed window and in the frame. Therefore, if we are talking about a 3-chamber window, you need to clarify which element has three chambers.
We recommend paying attention to double-glazed windows with increased sound insulation, in which the glass is installed at different distances from each other. It is selected so that sound waves are damped by their own reflection.
Glass type
Today, along with conventional glass, energy-saving glass is used in metal-plastic windows. They have an absolutely transparent metal coating that reflects infrared radiation. Energy-saving glass is also called I-glass. The glass unit assembled from them is filled with an inert gas instead of air - argon, xenon or some other.
Together with spraying, this results in an increase in thermal resistance by 10-15%.
Some unscrupulous manufacturers offer customers double-glazed windows filled with argon or xenon, but made of ordinary glass. Such double-glazed windows are presented as energy efficient and are sold at a higher price. In fact, the difference in thermal resistance with a conventional “air” double-glazed window is a maximum of 2%. Therefore, when purchasing, check whether the glass is coated.
Also, double-glazed windows are made from tinted, tempered (if damaged, they crumble into small safe fragments) glass, as well as triplex.
Form
Along with rectangular ones, triangular, trapezoidal, hexagonal, arched, round and oval windows are manufactured.
Plastic windows can have the most unexpected configurations - from simple geometric shapes to their bizarre combinations
Frame appearance
The frame can be not only white, but also colored, as well as laminated with a polymer film with a pattern imitating the texture of wood.
Required tools and materials
Tools for installing PVC windows
For dismantling, in addition to a hammer and a jigsaw, you will need a crowbar, a grinder with a metal circle (for fittings). The insulation is removed with gloved hands; you can use a construction knife and a spatula to separate the glued material from the ends.
Beat the solution from the planting site using a hammer drill with a spatula attachment. To unscrew self-tapping screws, a screwdriver is used, nails are removed with a nail puller, and dowels and anchors are sawed through with a grinder.
To install PVC window blocks you will need the following tools:
- hammer drill, drill bits with pobedit tips, screwdriver, drill;
- drills with a diameter of 6 mm are used for mounting windows on mounting plates, and size 10 is used for drilling for anchors;
- foam construction gun;
- cardboard knife, hammer;
- construction or laser level, 5 m tape measure, pencil, plumb line;
- metal scissors, pliers, Phillips and flathead screwdrivers, chisel.
A hammer drill is needed to make holes at the end of the opening for dowels and anchors. It is better to screw in self-tapping screws with a screwdriver. For wooden walls, a hammer drill is not needed; a drill and metal drills of different sizes will do. To install the window sill and ebb, some of these tools will also be needed.
Materials for mounting frames with double-glazed windows:
- spacers and mounting wedges made of thick plastic, the quantity is taken so as to install the elements around the perimeter of the window;
- mounting foam based on polyurethane foam with a low expansion rate to fill the space between the frame and the wall;
- vapor-permeable seal (PSUL) to organize self-ventilation and protect against moisture from frozen foam;
- waterproofing tape for installation inside a room based on polyethylene with a thin aluminum layer;
- diffusion tape to protect the installation seam from precipitation and rays.
Simple or adjustable anchors, screws, and dowels are used as fasteners. The modern method involves mounting the frame on plates. In addition, you need supporting consoles, silicone sealant, and a stand profile.
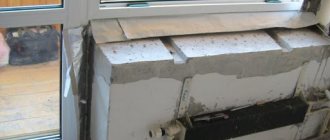
Installation of window sill and drain
With one adhesive layer the tape is glued to the window frame, with the other it is glued to the wall (quarter), the corners are especially carefully sealed, rolled with a roller, then the drain is installed.
The final step in installing a new window is installing the sill plate and drain. Before you begin to install a vapor-permeable outer layer, you need to apply polyurethane foam under the drain and in front of the window sill board. Before installing the drain, sound-absorbing tape along its entire length is glued to its inside. When the window drain is installed, the assembly is sealed with sealant.
Before installing the window sill board, insulation is carried out from the pair of lower horizontal seams under the balcony door and under the window by gluing adhesive vapor barrier metallized tape.
Installing window and door units with your own hands will save your finances, and if, on top of that, you install windows taking into account all the nuances of the technology, they will serve you for many years!
Do-it-yourself window installation according to GOST
When installing without a quarter, heat loss increases.
A plastic window frame and the end of a concrete or wooden wall have different expansion coefficients, so the material of the installation seam is selected so that cracks and cold bridges do not appear during shrinkage or deformation.
This is a problem with single-layer walls, for example, made of expanded clay concrete or solid brick. In this case, the weak area is the wall near the frame due to the high heat conductivity. Areas prone to condensation and mold formation. If the ends are without a quarter, heat loss increases. GOST recommends installing boxes with a thickness of at least 13 cm if the method without quarters is used.
Installation procedure according to GOST standards (with glass unit removal):
- select mounting anchors taking into account the strength of the walls;
- remove the movable sashes, remove the double-glazed windows from the blind parts of the window;
- in the walls and quarters, PSUL tape is attached before installation;
- the frame is set horizontally and vertically;
- the frame profile is checked through and attached to the end of the opening with a metal anchor;
- install spacer wedges and foam the gaps;
- they hang the sashes and install double-glazed windows;
- cut off the foam after hardening.
Anchor bolts must be at least 5 - 7 cm long.
According to the standards, anchors are placed every 50 - 70 cm, the anchor is buried in concrete by 4 cm, stone and lightweight concrete are drilled by 6 cm. Fixation begins from the bottom of the frame. The anchors are not immediately tightened, but the block is installed correctly, and then the fasteners are pressed until they stop. If a misalignment occurs, release the anchors, level the frame and repeat the steps.
Installation without removing sashes and double-glazed windows is carried out on special plates, which are simultaneously attached to the side of the frame and fixed to the end of the wall. This method allows you to avoid drilling the box, and you can easily adjust the installation level. But the plates are not suitable for large windows.
Windows can be opened immediately after installation is completed. For large sashes there is a limitation - you need to wait 24 hours after installation, only then bring the glass panels into the open state.
Preparing the opening
Immediately before installing the product, dismantle the old filling.
Removing old windows
Performed in the following sequence:
- Platbands, if any, are dismantled. Here it may be difficult to remove the fasteners. If nails were used for this purpose, you need to pry the frame with a nail puller or a thin chisel and pull slightly towards yourself to slightly pull the nails out of the frame. If you then return the platband to its place with a hammer, the heads of the nails will stick out from it, so that you can grab them with a nail puller or pliers. When unscrewing screws, the tip of the screwdriver must be pressed into the grooves on the head as hard as possible so that they do not get “licked off”.
- The remains of the plaster on the slopes are knocked down with a hammer drill with the already mentioned “shovel”.
- Next, the sashes are removed.
- Insulation and fragments of plaster mortar are removed from the gap between the frame and the wall.
- The window sill is dismantled. The layer of cement mortar underneath is knocked off with a chisel.
- The frame fastening is unscrewed, after which it is pulled out of the opening. You should not save the old window, as it is usually thrown away. Therefore, if necessary, the frame can be cut.
Video: dismantling an old window
Removing old doors
Old doors are removed from the opening in the same way as windows.
Next, the opening needs to be cleared of debris, paint and dust. The floor in the doorway is also cleaned, since the threshold is an integral part of the metal-plastic door. The floor covering must be firmly attached to the base.
After this, the wall is treated with a deep penetration primer.
Video: how to dismantle an interior door
Installation of plastic slopes and accessories on windows
Slopes in panel houses can be installed on the day of installation of windows.
PVC slopes are installed on the day of installation of windows in block and panel buildings; in brick buildings they are installed on the second day.
Use options:
- sandwich panels;
- slopes made of plastic with removable platbands.
The first type can be placed in such a way that you get slopes with dawn (at an indirect angle to the plane of the window). This is what GOST recommends to increase the flow of light into the room.
The second type is installed if you need to finish the walls, but there are already slopes. The edges of wallpaper or other wall material are carefully placed under the casing. If a room is being renovated at the same time as installing windows, sandwich panels are installed after the renovation is completed.
It is recommended to immediately order a mosquito net
The category of accessories includes elements:
- stepped ventilator;
- mosquito net;
- retainer;
- droppers;
- blinds, other devices to improve performance.
The window sill is installed after the frame is installed, but before the slopes are made. If there is already a side trim, grooves 1–6 cm deep are made in it, into which the ends of the window sill board will fit. The installation seam is made using foam. A gap of 8 cm is foamed several times, making intervals of 7 - 8 minutes.
During the installation of slopes and window sills, the glass on the sashes is covered with cardboard or film.
Self-tapping screws are driven into the substitution profile at a distance of 1.8 - 2.0 cm from the bottom of the edge. Large gaps are preliminarily sealed with a layer of plaster. When adjusting the size of the window sill board, allowance for free movement in hot or cold weather is taken into account; the panel is made 1 cm shorter.
Supporting elements are placed under the window sill every 50 cm, they are secured against shifting with self-tapping screws. The board is placed, the level is controlled so that there is a slight slope towards the room of 2 - 4 cm, depending on the width of the panel.
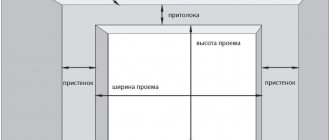
Non-standard size of window opening in the house
Modern technologies and the preferences of owners make it possible to create house designs that use windows of non-standard shapes. Windows in a cottage, the sizes of which depend on the characteristics of the structure, can be triangular, trapezoidal, semicircular, round or arched. Such products give the house individuality, but their layout and installation have their own nuances.
Application of PSUL and vapor barrier tapes
Vapor barrier tape for PVC windows
Using PSUL tape allows you to begin forming the installation seam even before installing the window. It is attached to a self-adhesive base around the perimeter of the opening. This creates protection from external moisture, and the foam after such treatment is not squeezed out beyond the contours of the frame. SNiPs regulate the production technology of products for the installation of ventilated gaps when installing PVC windows.
Tape properties:
- resistance against ultraviolet rays;
- tolerates heat and cold in the range -45 - +85°C;
- inert reaction to chemical irritants in the air, fats;
- does not lose elasticity during use;
- repels moisture;
- fungus, moss, and mold do not grow on the surface;
- transmits steam of the order of 0.15 mg/(m·m·Pa).
The tape is made from cellular polyurethane foam, which is impregnated and coated with a special compound. An adhesive layer is applied on one side. The tape is sold in rolls, which are unwound before installation so that the material does not lose its properties. After removing the film from the surface, the impregnation reacts with oxygen and the product increases in size. Use tape along the width of the side of the box.
The surface of the slope is cleaned of dust for better adhesion, and porous materials are additionally primed. The expansion process is affected by temperature. At room temperature, the tape expands in half an hour, and in cold weather the process continues for two days. After this, the installation gap with the installed tape is blown with foam.