Nowadays, more and more attention is paid to the correct layout of the building. People want to use every square meter of their home comfortably and profitably. Often, to expand the living space, people arrange a room on the second floor of the house. But in order to build a room on the second floor, you need to choose the right type of roof.
There is a single-pitched, gable or hipped roof. The most common is the gable roof type. In this article we will learn how to build a gable roof with your own hands. In addition, for ventilation of the second floor and good lighting, it is necessary to install dormer windows. But first, let's find out how to build a gable roof.
Characteristics of attic windows
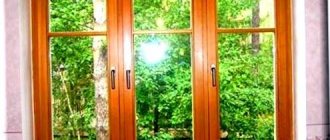
The attic floor is formed mainly by the slopes of the roof and the vertical window blocks in the gables are not enough to cover the room's need for natural light. To “get it”, special roof windows are installed directly in the roof. Due to this arrangement, window structures are exposed to increased exposure to external factors. Therefore, they must have increased resistance to the effects of natural phenomena: rain, snow, melt water, wind. Standard double-glazed windows are not suitable for such conditions of use, as are standard profiles. Dormer windows have increased technical and operational characteristics.
- Minimum thermal conductivity - due to energy-saving double-glazed windows and filling with inert gases (mainly argon). Average heat transfer resistance values for base segment structures are 0.71-0.91 R₀ [m²C/W].
- Strength – thanks to tempered glass and reinforced profile, they can withstand peak snow loads of 630 kg/m² (base).
- Tightness - achieved by a combination of specialized seals with an insulating flashing (subject to installation technology).
Despite the fact that roof windows are initially designed for inclined installation and direct contact with rain and snow, difficulties during operation may arise due to the characteristics of the roof, and not the disadvantages of the block design.
rpmForumHouse Member (Syktyvkar)
Do I need to shovel snow around my skylight? And then someone wrote in the thread that in the spring everything flows. The roof slope is 33 degrees, the roofing is metal tiles.
The “fashion” for gentle slopes up to 40 degrees came from countries with mild climates, where there is practically no snow. In regions with a high snow load, the recommended angle is 40-45 degrees so that snow does not accumulate on the roof. When installing a roof window in a roof with a smaller angle, manufacturers advise installing a snow guard above the block.
Window waterproofing device
An insulating apron is included in the package. A piece of sheathing is cut off from above the window being installed on both sides, which is equal to the width of the drainage gutter, and in the middle of this place the material for waterproofing is cut. A gutter is placed under it and placed in the gap between the sheathing. As a result, water will begin to flow from the film into it, rather than onto the window.
Next, the apron is unrolled and placed around the window so that it prevents leaks. It is attached to the frame, top sheathing, rafters and beams with a stapler, after which the edges are placed under the sheathing, while the upper part is placed under the gutter. Now the roofing material under the window can be returned to its original place.
Types of structures
When attics first came into use with the light hand of the French architect Francois Mansart, the only way to add light was dormers (cuckoos). These are superstructures extended beyond the roof into which ordinary windows are installed. By specialized roof windows we usually mean inclined-type structures in slopes, and not light tunnels or vertical window blocks and extensions in cuckoos. Varieties of dormer windows are divided according to several parameters.
Profile material
- PVC.
- Wood.
Mansard-type window blocks are initially an order of magnitude more expensive than conventional vertical structures, but within the category, the price range between basic and premium can be tens of thousands. To a large extent, the difference is due to technical “bells and whistles”, and the profile material is secondary. In private country houses, both metal-plastic and wooden roof windows are used equally. If you compare prices, a plastic frame does not provide significant savings, and some PVC lines are even more expensive. Visually, modern polymers have almost any texture and range, and reliably imitate valuable wood species. The choice depends on personal preferences, the type of room and interior design - in a bedroom lined with natural wood, a wooden window is more appropriate.
In the bathroom, where there is consistently high humidity, use plastic.
Opening method
The operation of dormer windows implies the possibility of opening the sash for ventilation and washing; blind blocks are less practical and are much less common in modern houses. To make windows convenient to use under different conditions, blocks are produced that open in different ways.
- With a central axis or mid-rotation - the most common group; any opening angle on both sides, up to a full rotation of 180 degrees, is provided by friction hinges installed in the center of the frame.
- With an offset, raised axis - thanks to the opening mechanism at the top of the frame, such windows can reach a height of 2.5 meters. Washing is more problematic, but if the view from the window is decent, you can tolerate the inconvenience, they provide maximum visibility.
- Panoramic (double-leaf) - a solid lower sash and an opening upper sash, also of non-standard dimensions. For comparison, the standard height of a dormer window is 140-160 cm, a panoramic window is up to 255 cm. In the premium segment, panoramic-type structures with one sash and an improved design.
- Combined ones are a compromise solution, and you can watch without restrictions, and it’s easy to care for, just move the sash from the top to the central position.
- Balcony type - for views of areas with a fascinating perspective, if you open the window completely, it will turn into a small balcony due to the retractable lower sash. Top leaf with combined mechanism. The most expensive type of attic windows.
Service hatches, intended for maintenance and emergency evacuation, are not full-fledged skylights and consist of a frame with a hinged polycarbonate lid. If necessary, they are installed in cold attics.
Number of double glazed windows
The number of double-glazed windows varies from one to three; the basic configuration provides high energy saving parameters, which are quite sufficient even in dank Moscow and similar climatic zones. Therefore, basic single-chamber double-glazed windows are most in demand. But for houses with skylights located in cold regions with snowfall, double or triple glazing is recommended. For very harsh conditions and rooms where it should always be warm (in children's rooms), you can install a heated roof window.
Classic species and their new varieties ↑
Window designs for attics differ, in particular, according to the type of roof:
- Flat. This design requires the installation of additional gutters for drainage, which will ensure comfortable operation. The roof above it has a slight slope - about 5–15˚. Provides maximum lighting and ventilation of the under-roof space;
- Single-pitch. The slope of the roof in the shape of a rectangle or trapezoid in this case starts at 15˚;
- Gable (hip). Attic windows (photo below) of this type allow you to further increase the space under the roof, so they are often installed in a residential attic;
- An option is also possible, inscribed in the slope, without a roof at all. They have a significant drawback - they are absolutely not protected from the effects of precipitation.
Among other things, the presence of attic windows and their shape add some zest to the design of the house.
- Triangular or quadrangular models located at the end part can be without side walls and a visor. This function is performed by the roof slopes themselves. They look quite attractive. The absence of a large number of joints simplifies waterproofing. This is undoubtedly very valuable, but we should not forget that if the top of such a window is the top of the triangle, then the level of illumination will be slightly lower.
- Complex attic windows usually have an unusual geometric shape and add a certain style to the house. On the one hand, they fit perfectly into the roof, and on the other hand, they interestingly change its shape and design.
- The round window looks like a porthole. It is made either entirely of glass or in the form of stained glass - this is how mansions are often stylishly decorated. For flat roofs, dome structures are sometimes chosen using translucent materials.
- A rather interesting solution is a semicircular shape, which is distinguished by smooth, elegant lines of the roof. For example, a “bull’s eye” design is impossible not to notice, it is so impressive. In addition, it is very functional.
What to look for when choosing
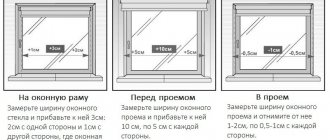
When the attic is planned by the project, there are no problems when choosing and installing windows: the dimensions of the window opening and the block are consistent, the roofing is compatible, there is no need to reinvent the wheel. During the process of forming the roofing pie, installing a roof window is much easier than inserting it into a finished roof. If the need to convert the attic arose after a while, it is technically more difficult, but possible. In this case, the choice of design will depend on the distance between the rafters - it is easier to install a smaller window with a universal mounting system on the sheathing than to remake part of the rafter system for a larger frame. With a standard rafter spacing of 60 cm, there will be no difficulties at any stage; the majority of manufacturers produce windows with a standard width of 55 cm, leaving 2.5 cm for installation seams, as in the advice of professionals. But there are other nuances.
- The angle of inclination of the slope - the proportion of glazing depends on the area (1/10), and the height of the dormer window is selected based on the steepness of the roof. The flatter the slope, the higher and opposite the window should be. For an angle of 15-40˚, the recommended block height is 160 cm, for 30-55˚, 140 cm, for 40-65˚, 118, for 55-85˚, 98 cm is sufficient. The standard installation height from the floor level is 90 -120 cm.
- The type of roof is a dormer window; this is a system that includes not only a frame and a double-glazed window, but also a flashing consisting of a set of drainage gutters and a protective apron. It is responsible for the tightness of the structure and is required for proper installation of the window unit. Flashings are selected for a specific roofing covering and differ in profile height. Standard insulating flashings are of the following types: for flat roofs (up to 10 mm), for profiled coverings (up to 45 mm), for roofing materials with a high ridge (up to 90 mm).
- Ventilation system - any living space needs sufficient air exchange, especially those located in the attic. If the house has a natural ventilation system, an alternative to manual ventilation is a built-in ventilation valve. When the system is forced, with recovery, they do without using blocks with valves.
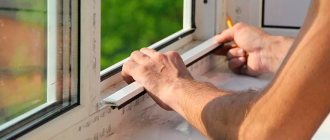
Preparing a place for a window
There is a certain procedure for how to make a roof window in a house correctly. In the case when the roof is ready, but there is no interior finishing, the location of the opening is marked from the inside of the room on the waterproofing material. The distance from it to the elements of the rafter system should not exceed 2-3 centimeters.
In this situation, the window is mounted on the rafters and lower beam. Next, its lower location is outlined; for profiled materials, 9 centimeters are indented, and for flat materials – 4-6 centimeters. Then mark the top point of the window structure and set aside 9-15 centimeters upward.
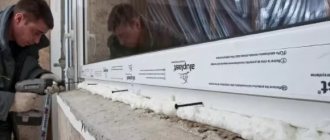
When cutting out the waterproofing film, a 20-centimeter margin is left around the perimeter. The remains of the canvas are wrapped inside the attic, the roofing is removed or a hole is cut in it. The sheathing elements are cut off at a distance of 2 centimeters from the rafters.
At the bottom of the window, a mounting beam with a thickness of at least 50 millimeters is placed at a distance of 8–10 centimeters from the sheathing. It is mounted horizontally according to the level. The lower end of the waterproofing is fixed to the timber with a stapler, and the upper end to the sheathing. In this case, the side edges are pulled out.
Installation nuances
In ninety percent of cases, problems with roof windows are not related to defects in the blocks, but to a violation of installation technology. Even if you follow the manufacturer's instructions and professional installation, moisture leaks are possible, mainly due to the accumulation of snow in the lower part. If installed correctly, the situation can be corrected by timely cleaning of the window; if necessary, lubrication of the seal may be required if it has become deformed due to ice. But when the installation of a roof window is carried out incorrectly, we are no longer talking about seepage - about full-fledged leaks, the elimination of which will require much larger investments.
Regarding do-it-yourself installation, opinions differ; manufacturers unanimously insist on the need to involve professionals and only professionals. Self-builders retort that examples of “crappy” installations carried out by installers for considerable sums are all too common, and “it’s not the Gods who burn the pots.”
The truth, as usual, is somewhere in the middle, but it is practical experience that is interesting, and not just theoretical recommendations.
Do-it-yourself installation of a roof window
vareniks FORUMHOUSE Member
Greetings, what follows is my opus on self-installation of a roof window from a well-known manufacturer. I advise similar self-builders to familiarize themselves with it in order to avoid the rake of others who have already mastered it. Roof pie from top to bottom: soft tiles, underlayment, sheathing (inch board), counter batten, protective membrane, thermal insulation 20 cm, cross insulation 5 cm, along the sheathing (block 5 cm), vapor barrier, vertical sheathing made of inch boards and GSP.
When choosing a roof window, there were two main requirements - double-glazed windows and a non-standard width, since it would illuminate the stairs and the hall of the first floor. Having opted for a cheaper design, vareniks did not delve into the technical details, which led to additional problems.
Roof windows with a universal mounting system can be mounted on various bases, including in a finished roof. The purchased window was “sharpened” only for the sheathing. But vareniks did not despair, talked to a consultant and, despite all the difficulties, decided to save 11 thousand on installer services and install a roof window with his own hands.
vareniks FORUMHOUSE Member
I waited until the weekend and boldly began installing the window. On the inside, part of the roof pie was deliberately left unfinished to make it easier to install the window - there were only rafters and the first layer of insulation. I added another rafter leg from the inside, narrowing the opening by 8 cm. Further, more: I cut the membrane, cut a hole into the sky - an opening smaller than the original one, through which I climbed onto the roof and dismantled the flexible tiles 30-40 cm further than the intended frame. I cut out an opening for the frame, cut out pieces of OSB less than 30 cm wide around the frame. The depth of the cut was set according to the thickness of the OSB in order to preserve the sheathing.
Then:
- secured wooden support bars (5×10 cm) from the outside and from the inside;
- I screwed an inch on top of the bars so that the beams were flush with the sheathing;
- I cut out a counter-lattice above the frame and installed a homemade metal drainage gutter made from an end strip (not included in the delivery package for flexible roofing, but the consultant advised installing it).
Then, “without a second thought,” according to the instructions, I mounted the support corners on the frame at the indicated level V, stapled the insulation, fitted the frame, adjusted it to the level and screwed it on. According to the technology, the window block is installed into the frame twice - fitting for calibration and final installation of the attic window after assembling the thermal insulation and waterproofing circuit. Omitting the details of the “dancing with tambourines” associated with lifting a heavy structure, lack of scaffolding and technical nuances, we get.
vareniks FORUMHOUSE Member
The fitting of the window into the frame exhausted me so much that following the algorithm and installing it again seemed like an impossible feat. All further manipulations were performed without removing the block: inserted the side insulation, nailed the moisture barrier, screwed the OSB into place, applied mastic, laid the underlayment, filled the tiles to the lower level of the frame. Things are finally getting closer to installing the protective flashing. a huge disappointment awaited me - between the flashing and the frame there was a gap exactly the thickness of an OSB sheet.
The frame of this model of attic window should be attached specifically to the sheathing, and not to the slab base, and there were no clear instructions in this regard in the instructions. vareniks, due to inexperience, decided that there was no fundamental difference, and the salary could be adjusted, but he was mistaken. Expert advice based on the consultation - the window needs to be either completely reinstalled, or the frame needs to be raised and gaskets made from OSB. The second option was implemented with careful dismantling and new assembly of the window with your own hands using four gaskets for the supporting corners.
Result: taking into account the rework, the installation took 4 days and 1,600 rubles (I bought additional underlayment and a package of tiles). Despite all the nuances, vareniks considers its experience successful. The window in the attic was installed with high quality, the design was not damaged, and the best proof is a year and a half of “normal flight without complaints.” And this takes into account the St. Petersburg weather, which is generous with precipitation.
Do-it-yourself roof frame installation
Window products always include instructions from the manufacturer on how to make a skylight. It is necessary to follow it, since the design of window products for attics and the methods of their installation are different.
For example, in some cases the brackets are rectangular in shape and need to be fixed only to the rafters, while in others they are angular and attached to the sheathing or rafters. But the main thing is that these products are fixed on the frame in different positions.
To make it easy to install the sash, it should be removed as described in the instructions. It is necessary to leave the bare frame, so if there is a frame on the window, remove it.
Brackets are installed on the frame. Next, mineral wool is usually placed on its upper part and secured with a stapler. At the bottom of the window, the insulation is placed on the timber, after which the frame is inserted into the opening and the insulation is pressed down.
The lower brackets need to be secured completely, but the upper ones not completely, since the frame will still have to be adjusted. The sash is returned to its place, covered and checked for distortions. Adjustment is made using the top mount. As a result, the window should stand absolutely level, and the sash should fit evenly on all sides. In the future, it will be impossible to eliminate the shortcomings.
After completing the adjustment, all fasteners must be tightened securely. Next, the side waterproofing is fixed to the window frame, and the excess is cut off. Insulation is placed in the side openings.
Are there homemade roof windows?
No matter how much you would like to save total money, it is unrealistic to make a roof window with a sash yourself in makeshift conditions. You can “share” a blind block using ready-made components (double glazed windows, tempered glass) and assembling a wooden frame. As one of the portal participants with the nickname Indestructible Cliff did.
The second option: turn an ordinary metal-plastic structure with an opening sash into a roof window. The window block is installed with the sash facing outwards, tempered glass is mounted on top of the profile using a combined method, using glue and hardware. Both the handles and the opening mechanism will have to be “finished with a file”, plus you will need a homemade flashing to protect against leaks. It is cheaper to assemble such a roof window yourself, but you cannot expect factory performance from it. And the feasibility is questionable.
Alex2051FORUMHOUSE Member
...I approve of various handicrafts, but there must be a reason, at least a minimal real need for the invention of the wheel. Saving is an excellent reason, but is it there in this case? If you want to save money, look for a used factory roof window on the Avito website, I’m sure you’ll find it, and it will turn out better and cheaper. The frame (preferably new) can be bought there. In total, it’s realistic to spend 5 thousand rubles for a set in excellent condition. You can do everything yourself, but there are a lot of rakes, and the cost in case of a mistake is a damaged roof with further serious repairs.
What types can be made?
At home, each user has the opportunity to make the following types of attic window blocks:
- Wooden blind translucent structures with reinforced double-glazed windows. This work is performed using a standard milling cutter and other semi-professional tools, without the need to use a numerically controlled machine.
- Window blocks made of natural materials with hinged or mid-turn sashes. Provided you purchase a complete set of factory-made fittings, its installation in window frames with subsequent adjustment will not cause problems.
- PVC window structures for installation in a roof pie , if the master separately purchases profiles of the required thickness for their further cutting and assembly of an orthogonal frame.
- Any attic translucent elements , subject to the availability of assembly diagrams and a complete set of working drawings with specifications of materials.
Considering the need to carry out complex welding work using argon, aluminum window blocks are not recommended to be assembled at home, as this violates safety regulations and requires increased skill.
Examples and diagrams of the most accessible designs
At home, consumers usually make the following types of roof windows:
- Blind window blocks in wooden frame with dimensions 580 x 800 – 1100 mm. These designs are the most popular, since the standard pitch of the rafter legs of a pitched roof is 600 mm, which allows you to easily install such windows in a pre-prepared opening.
- Standard window units for installation in built-on cuckoos or gables - provided that these structural elements are included in vertical walls. In such situations, the consumer does not have to order hardened translucent blocks and purchase reinforced mechanisms.
- Hinged window structures with locking elements that provide unobstructed evacuation exit to the roof surface. In such cases, it is sufficient to use standard hinges to install a swing sash.
In addition, every home craftsman can make and install with his own hands folding transoms with a rotating mechanism and an opening limiter, as well as louvered dormer windows for ventilating the attic floor.
Eventually
Dormer windows not only provide a comfortable level of natural light in living spaces, but also make the house more attractive. To ensure that no problems arise during operation, and that the structures reach their long-term service life, it is necessary:
- When choosing, take into account the characteristics of the roof and the technical nuances of windows of various models.
- Strictly following the technology for preparing the opening and installation, proper waterproofing, is the key to reliability and durability.
- Don’t be lazy about removing snow, if the need arises, if the slopes are flat and the roof is metal, it’s worth taking into account the advice of experts and proactively installing snow guards.
In previous materials, in as much detail as possible - about the installation of roof windows, as well as design and selection. The video contains complete instructions for installation in a finished opening.
Subscribe to our Telegram channelExclusive posts every week
Materials for work
Not every roof window can be made with your own hands. At home, it is possible to make structures of this category from the following types of materials:
Wood is a natural material that can be easily processed and cut.
For the manufacture of window blocks, types of wood such as pine, oak, beech, teak, larch and cedar are used.For long-term use of the window, the best solution would be to use dead wood, since such materials are not subject to drying out.
- PVC profiles . It is not possible to make these elements yourself. At the same time, in the construction markets you can always find polymer products with different thicknesses and numbers of internal chambers, both in measured lengths and in the form of shipping marks.
- Angles, square or rectangular rolled sections with box section. Such products can be easily cut and welded using a standard electric arc apparatus.
When installing steel window blocks, it is necessary to pre-treat the profiles with paint and varnish and anti-corrosion coatings, and also insulate the internal cavities with insulating materials.
Approximate costs
When creating a roof window unit with your own hands, the home craftsman will need to purchase a certain amount of material.
To do this, it is necessary to include the following costs in the production plan (using the example of an opening window with a mid-turn mechanism with dimensions of 580 x 800 mm):
- Double-glazed window with an external tempered translucent element - from 3.5 to 4.5 thousand rubles.
- A wooden block made of dead pine with dimensions 70 x 70 mm, length 7 - 8 m - from 600 to 1100 rubles.
- If you purchase a product made of larch or oak, the price of the bar will be from 1300 - 2000 rubles.
- When making a window from a PVC profile with a thickness of 70 mm, the cost of this factory-made element will be from 1200 to 2000 rubles.
- Metal profile of a closed rectangular section 40 x 60 mm - from 1000 to 1600 rubles.
- A set of accessories of a high reliability class - from 2.5 - 3.0 thousand rubles. for a complete set with fasteners.
- Polyurethane foam, self-tapping screws, anchor plates, sealing compounds and tapes - from 1.0 to 1.4 thousand rubles. per set.
- Thin slats for glazing beads - 3.5 m - from 200 to 600 rubles. (depending on the material).
- Polymer seals – 200 – 300 rubles. for 1 roll.
- Paint and varnish compositions - for wooden windows - from 500 rubles. for 1 l.
- Consumables for assembling a window unit - drills, abrasives, screws - from 300 - 400 rubles.
Thus, when making a window unit with your own hands, the consumer will have to spend from 6 to 8 thousand rubles, excluding the cost of the tool. At the same time, when purchasing the same structures from the most famous Russian manufacturers, you will have to pay at least 15 - 20 thousand rubles.
Decoration of dormer windows
The easiest way to decorate is with the help of a lower and upper cornice. For decoration, it is better to choose the lightest tulle or curtain that will not sag. If they are located almost at the intersection of the fold of the roof, and the curtains are too low, then it is better to fix the cornice higher, even on the ceiling. Decorating with cafe cornices will look impressive, as they do not distract attention from the beauty of the entire structure and curtains, for example, pleated curtains.
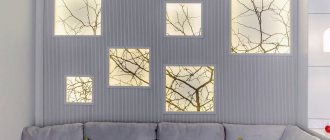
design of dormer windows photo
If there is a very large bevel or windows with a large slope, then roller blinds or Roman blinds are suitable. They are convenient because they are easy to open and close, even if the glass unit is tilted, and they do not require careful maintenance. Austrian roller blinds will look beautiful.
If you like an ascetic interior, then you can completely abandon any textiles. On the attic floor, such a solution will look as natural as possible.
Oblique-shaped structures in the attic can be decorated with bending models of cornices made of polymer materials or corner ones with rotating elements.
dormer windows photo design
Advantages and disadvantages of dormer windows
A dormer window located on the roof gives the building a more comfortable and aesthetically attractive appearance. It is easy to maintain the window, and if necessary, it can be used to get onto the roof to install equipment, antennas, or for routine repairs. If there are no design flaws, dormer windows will provide the under-roof space with natural light. This is especially important for residential attics and technical premises.
Triangular dormer
Among the main disadvantages of dormer windows and lucarnes are the following:
- increasing the likelihood of leaks in the roof at junction points;
- the formation of snow bags and increasing load on the rafter system;
- transmit less light than skylights of the same area, while the area of the illuminated floor surface is smaller due to the more obtuse angle of incidence of light;
- increased costs for roofing work.
Although there are disadvantages, the absence of a dormer window will be a more serious problem than its existence.
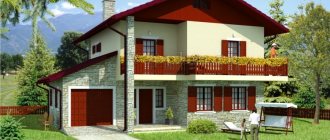
Dormer window of a concrete house
The dormer window must be part of the hipped roof project; this will avoid unforeseen expenses, both during the construction process and during the operation of the building. The choice of dormer window design requires special care and consideration of whether the attic space will be residential or non-residential. When creating a frame, it is imperative to strengthen the rafter system in the area of the dormer window. All this will help you get the maximum benefit from having such a complex structure on the roof of your house.
Why is there a window on the roof?
If you look at a dormer window from the street, the answer to the question of why it is on the roof comes by itself: in many cases, to decorate the overall appearance of the building.
The builder will explain the need to build a window with practical benefits, citing several purely technical arguments as proof.
A person living under a roof in an attic will talk about the comfort that a dormer window creates. In particular, it will tell you about the daylight and fresh air coming through it, and most importantly, about the opportunity to look at the world from a point of view other than through the windows below.
Here we can draw an analogy between buildings and people - some hairdresser will transform his client so much with an elaborate hairstyle that his own mother will hardly recognize him. A dormer window on the roof, just like the bouffant on a fashionista’s head, can be one and only.
Over time, fashion trends have not bypassed this element of the roof structure. The ornate dormer windows, into which residents of cozy attic spaces looked out three hundred years ago, have been replaced by inconspicuous dormer openings in rapidly constructed houses of the last century.
But fashion and freedom of thought are now making themselves felt again with the appearance on the roofs of many private houses, seemingly a thing of the past, “houses for a gnome” and a “bull’s eye” look.
Our time has not been able to wash away the patina of centuries from the dormer windows, except that it has added a few changes in the form of double-glazed windows in the frame and automatic closing of the window in case of bad weather.
But for the attic space not equipped for housing, the dormer window remains exactly the same and performs the same functions: maintaining the performance qualities of the roof structure and the material covering this structure.
The definitions by which dormer windows are classified correspond to the visual characteristics of the roofs installed over a particular opening.
For example:
- flat roof. It is used mainly for purely technical purposes and does not affect the appearance of buildings. The angle of inclination relative to the main roof ranges from 5 0 to a maximum value of 15 0;
- the roof is pitched. Very similar to flat, but differs in the angle of inclination, starting from 15 0 and increasing in parallel with the increase in the slope of the main roof;
- gable. In addition to the mandatory functions, it also has architectural significance for the appearance of the building;
- hip roof. A type of gable roof, with a cut front slope located at the same angle as the main roof;
- triangular roof. Minimal daylight source;
- glass roof. Designed to provide maximum access of daylight to the attic;
- semicircular roof. The famous "bull's eye". A stylish option that differs from all others not only in its attractive appearance, but also in the significant cost of work on its installation.
Acute dormer window
A dormer window with a triangular or, as it is also called, a “sharp” roof can often be found on buildings of historical value.
The main task when installing windows with such a roof is to ensure that they are not too large or too small in relation to the total volume of the roof. Their sides should have the same angle as the main roof. If these conditions are not met, the triangular window will look like a foreign fragment on the roof.
Another condition for the compliance of acute-angled windows with the general style of the building is the correctly selected locations for their installation. They must be on the same axis with the façade windows located below them.
The advantage of these dormer windows over other options is that they can be located at a higher level.
Another advantage of acute-angled windows is the simplicity of waterproofing the junctions. Since the roof covering of the window is connected at a straight angle to the main roof, their joint is designed as an internal connection on ordinary sloping roofs - internal and external.
Installing triangular dormer windows does not significantly increase the volume of the attic space, and this factor is their main disadvantage.
Is there a GOST for vent windows in the attic?
We deal with the roof and attic, how to place vent windows in the attic. Is there a specific GOST for placing these windows in the attic?
This definition of spirit is found in the works of Shklovsky and Leo Tolstoy.
In all likelihood, you are interested in the rules for installing vents in private housing construction. Historically, regulatory documentation for the construction of private houses is either absent or not available at all stages of construction. Accordingly, having spent a significant amount of time studying the issue of the rules for installing ventilation systems for private houses, it was not possible to find any GOST. With apartment buildings it is easier in this matter - there is SNiP 01/31/2003 “RESIDENTIAL MULTIPLE APARTMENT BUILDINGS”, where paragraph 9.10 states that
Therefore, I advise you to be guided by the provisions of this SNiP when installing an attic vent.
At the same time, you must understand that there must be at least two vents, located on opposite sides of the attic. If you have a cold attic and the roof is made of corrugated roofing material and the junctions of the waves are not sealed with anything, then the area of these openings will be quite sufficient for normal ventilation of the attic space of your house.
Fastening the frame to the roof
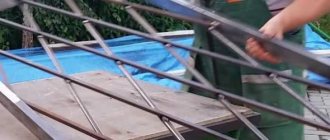
It is necessary to install the rafter system for the dormer window simultaneously with the installation of the general roof frame. In the case of a gable window, such a frame will be a separate roof in miniature. It is noteworthy that near the openings where the dormer windows will be located, reinforced rafters should be installed that can withstand the additional load transmitted by their rafter system.
Cross members are mounted on top of the rafter legs: the upper one will correspond to the dimensions of the window, and the lower one should be located at the level of the external wall of the building. Vertical supports are attached to the lower beam, connected at the top by a transverse beam. The result is a frame that needs to be connected to the upper beam placed on the rafters using longitudinal beams. After this, the rafter legs for the dormer window will be attached to this frame.
What to consider?
The main thing is the total area of the lucaren, which is necessary for proper ventilation and lighting. It is a ratio of 1:300.
The remaining points relate to the shape of the structure and other architectural issues.
Steepness of the slope
This issue must be resolved for single-pitch models. The minimum value for “single slopes” is 15 °. However, in the case of installing such windows on flat vaults, this parameter must be increased to 25-30 °.
The angle depends on the roofing material: the smoother it is, the smaller the angle is needed for normal snow and moisture shedding.
Form
This parameter is important if the homeowner needs to allocate usable space, which is larger for simple lean-to variations.
Triangular shapes are more convenient and reliable than others in terms of waterproofing, so they are often chosen when modeling dormer windows.
The remaining options are purely architectural solutions.
Location
Any element in the design of the house must be in harmony with the overall appearance of the building. Recommendation from experts: place dormer windows at least 1 m in vertical projection between structures if they are made in a checkerboard pattern.
Triangular window frame
When placing lintel bars, it is not advisable to fasten window parts by cutting them into the rafters of the main roof rafter system, so as not to weaken the load-bearing capacity of all parts.
All frame components are secured using galvanized steel fasteners. After checking the strength and reliability of the frame in the horizontal and vertical planes, you can begin placing the ridge beam and small rafters for the dormer window.
To significantly simplify the labor intensity of the work, the rafters are cut according to a pre-made template. The walls on the sides are sewn up with moisture-resistant building material.
The window roofing is installed at the same time as the installation of the roof covering on the entire roof.