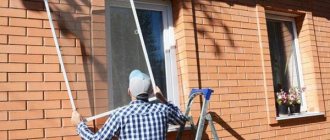
Summer brings not only positive emotions and relaxation, because we shouldn’t forget about annoying flies and dangerous mosquitoes that try to fly into an open window. A mosquito net is inexpensive, but if you consider that there are several windows in the house, then the end result is quite a decent amount, which, if desired, can be saved. A DIY mosquito net can be made quickly and inexpensively.
Types of window screens
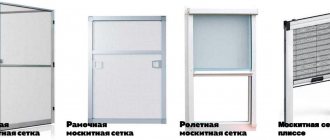
All those grids that manufacturers offer users can be divided into:
- swing;
- sliding;
- pleated (gathered with an accordion);
- and roll mesh roller blinds.
Pleated nets and roller blinds are the most compact and do not require removal for the winter.
Any of the above industrial designs is quite expensive and technically complex. You need hinges, you will need special locks and mechanisms. You won’t even be able to install them yourself; this requires skills, experience and special tools.
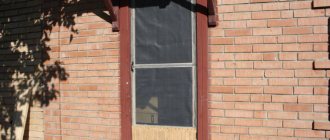
It’s easier and cheaper to make a mosquito net yourself. But this will be a fixed frame or frameless option, which, of course, will not open/close, but is guaranteed not to allow a single mosquito into the room, and will delay the penetration of fluff, dust and dirt.
The frame mesh can be external or internal, as well as insertable. In a frameless version, such a design can only be internal.
Additional features
Special meshes for roof windows are very different from the meshes for standard windows. It not only has a different visual appearance, modern manufacturing technology, and different fasteners, but it also has slightly different, broader functions.
Due to the fact that the mesh has the ability to open, it can serve you in its original form for a very long time. When the window is opened, it lowers and actively protects the room from insects and dust. There are many different meshes, but the highest quality ones that are worth purchasing are from the following companies: Roto, Velux, Fakro.
The advantages of these designs:
When purchasing a mosquito net for a roof window, it is recommended to choose companies that are well-known and provide a guarantee on the product.
The mosquito net is not afraid of exposure to sunlight, it is not subject to deformation and is resistant to high humidity. It’s hard to live without bridge nets in the hot season. For roof windows, the use of classic grids will be very inconvenient. It is for this reason that special mosquito nets are used, because they provide excellent protection against insects, dust and dirt.
Which mesh to choose for making it yourself?
When choosing which mosquito net to make for your window, you should focus on the following points:
- the material from which the window itself is made (wood or plastic);
- type of sashes, if the structure is plastic (they are hinged, tilted or combined);
- type of housing (private house or apartment in a high-rise building);
- number of floors of the building, if we are talking about an apartment;
- window opening mode (frequency);
- presence of pets.
Based on the specified conditions, the following are already selected:
- cloth material;
- mesh design (whether it will be framed or frameless);
- frame design and material for it (if this option is chosen);
- method of fastening.
Important: Only external frame mesh can be installed on plastic windows with tilting sashes. Unless, of course, the sashes from such windows are completely removed for the summer.
Advantages and disadvantages
The advantages of anti-mosquitoes for roof windows are obvious. They are not afraid of sunlight, do not deform due to temperature changes and are moisture resistant.
They also have the following qualities.
- They protect against the smallest insects and dust, and allow you to comfortably ventilate the room at any time of the day.
- Protect from branches, leaves and debris getting inside.
- Practical and easy to use.
- Aesthetic design.
- Easy to use and maintain.
- Long product life.
Disadvantages include the high cost of some types.
cloth
The main thing for a home-made mosquito net is to choose the right cloth. The maximum possible mesh size is 3.7 x 3.7 mm . If the cells are larger, insects (in particular, mosquitoes) will easily overcome this barrier. As for the minimum dimensions, they can be limited only by the conditions of air and light transmission for residential premises. On a balcony, for example, if the ventilation regime is observed, nets with a mesh size of 2 x 2 mm will work perfectly.
Where you have to escape exclusively from mosquitoes (say, in central Russia), a mosquito net with a mesh size of 3 x 3 mm will be reliable protection. And in Siberia, where midges plague people in cities and villages, smaller barriers will be required - mosquitoes 2 x 2 mm and smaller. If we talk specifically about the anti-dust “defense” of a home, then only a mesh with a cell of 1 x 1 mm can help.
Note! Some “the old fashioned way” choose to create an anti-mosquito net for a window using fiberglass (another name for fiberglass) with a PVC coating, but this is not the best solution, since the material, although durable, demonstrates very low light and air permeability. In addition, its thick threads are destroyed quite quickly under the influence of ultraviolet radiation coupled with dust. As a result, the mosquito net turns into a dust collector, which itself “dusts” with tiny fiberglass needles. In fact, such a mesh must be replaced every season, which is completely unprofitable.
It is better to choose a more modern, reliable and environmentally friendly polyester fiber to create a mosquito fly with your own hands . It is available with cells of various shapes and sizes - you can choose the one that suits each specific case. For example, material with rectangular cells is durable and cheap, and perfectly repels street dust without accumulating it. However, such a cell does not transmit air and light very well, so manufacturers offer a similar material, but with a hexagonal-shaped cell (1.5 mm in diameter), which also resists air and light flows, like braided fiber with a cell size of 2.7 x 2.7 mm. That is, with this option there will be much more light and air in the house, with high-quality protection of the room from dust and insects.
And yet, to make their own mosquito nets for windows, consumers most often purchase polyester fiber with rectangular cells, choosing from the following options:
- Mesh type “Standard” with normal strength and cells 3 x 3 mm.
- Anti-dust material with mesh options of 1 x 1 mm and 1.5 x 1.5 mm, having a smooth, dust-reflecting structure. This fiber is intended for use in southern regions without forests, with a high degree of insolation and air dust. It can also work as an anti-nasal protective net in populated areas of the taiga and tundra.
- Anti-cat mesh of increased strength with a mesh size of 2.5 x 3.5 mm. It is usually used as a second layer on a mesh that protects against mosquitoes and midges. It protects from the increased attention of pets from the inside and/or outside. It prevents them from damaging the mosquito and injuring themselves. Withstands the antics of cats (and even dogs) of medium size and an average degree of violence, as well as small domestic rodents, decorative mice and rats, and guinea pigs.
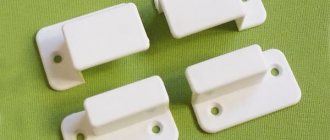
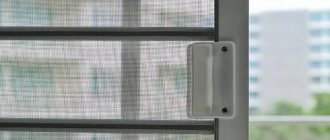
Mosquito frame with flag clips
Fastening mosquito nets using rotating clips (flags) is gaining popularity every day. Simplicity of design, reliability and quick installation of the mesh panel - all this attracts owners of houses and apartments.
Flags are L-shaped rotating metal plates. They are attached with self-tapping screws to the frame of the protective frame. The clips are also made from durable polymer. With a mesh height of up to 1.4 m and a width of up to 0.6 m, two flags are screwed on the sides, and one clip at the top and bottom.
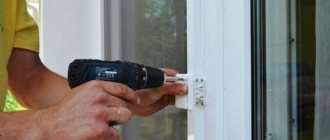
Installing MC on swivel clips
- The panel is placed outward from the window, holding it by the handles. Then unfold it to the desired side and press it tightly around the perimeter of the window opening.
- Holding the panel by the handle with one hand, use the fingers of the other hand to turn the plates inside the opening so that the flags clamp the elastic band.
- By turning the screws on the clips with a screwdriver, you adjust the degree of pressing of the MS to the surface of the window opening.
- If there is bending of the frame elements, the frame is removed and an additional plastic strip is inserted into its middle.
What color should I choose for anti-mosquito fabric?
This is not only a matter of taste, but also of visual comfort. Diffraction distortions of the light flux should be taken into account. So, if a white mosquito net is installed on the window, the picture outside the window blurs and loses clarity and contrast. But from the street, through such a mesh you can clearly see everything that happens indoors.
That is why, when making mosquitoes yourself, experts recommend choosing cellular fabric in dark shades: black, gray, brown. Then visibility from the inside will improve significantly, but from the outside it will worsen.
Framed or without?
Anti-mosquito canvases without a frame, made by yourself, do not adhere very well to windows. They are also limited in use due to the impossibility of their frequent removal.
The most budget option for such a mesh (will cost about 100 rubles) is when the tailored panel is placed in place of the standard window seal (which is previously removed), where it is fixed using a regular linen cord. True, in this case you may encounter a situation where the sealant “sticks” to the grooves in PVC windows over time. But even if the window structures are new, after a season or two there is a possibility that you will encounter the problem of unsealed windows, which means leaks and air leaks. And then the repairs will cost an amount that is many times more than what we managed to save on the mosquito net by undertaking to create it with our own hands without a frame. That is why it is better to make a frame mosquito net for residential premises.
Tips from experienced installers
When choosing a profile, pay attention to its UV resistance. The higher it is, the longer the mesh will last. A cheap box will begin to crack within 2-3 years, and it is not advisable to buy one that is too expensive.
Instead of Z-shaped brackets, corner stops can be used to attach the mosquito screen. They are cut with a grinder from a stainless steel sheet 0.5–0.7 mm thick.
By following these recommendations, you can easily make mosquito nets for windows and balcony doors with your own hands. The main thing is to carry out all operations carefully, without unnecessary haste. And then the finished mesh will last for many years, reliably protecting your home from insects. It’s worth working hard for such a result, isn’t it?
Fastening
It’s not enough to just take measurements and cut the mesh; you need to think about its installation and fastening. So, for example, a frame mosquito can be attached to a plastic window in 3 ways:
- Using plungers — spring-loaded rods with heads. This is easy to do: you first need to move the heads, then position the mesh as needed, and then lower the heads. In this case, the heels of the rods seem to “jam” the mosquito in the openings. The mosquito net can be attached to the plungers from the inside and outside, but such fastening has a number of disadvantages. It:
- holds the mosquito rather weakly (the wind can push it in or blow it out);
- does not support natural load (the mesh is constantly and noticeably fluttered by the wind, and because of this, the rod heels in any frame “drill” holes);
- weakens the frame with holes for the rods;
- is not cheap due to the price of the plungers and the need to use special tools.
- Z-profiles. When fastened in this way, the nets are compact (and take up minimal space during winter storage). However, independent installation of a manufactured frame mosquito net on such a profile on the upper floors of high-rise buildings is extremely dangerous, since a person must lean out of the window almost halfway and at the same time try to install/secure something else. In addition, it will be necessary to drill the frame, which means there is a high probability of losing the warranty on the plastic window and creating a source of negative biological activity in the wooden window with your own hands.
- On the staples. This type of fastening is similar to the Z-profile fastening, but the thickness of the mesh bag on the brackets during winter storage is very large. In addition, the grids will have to be covered with cardboard so that they do not tear each other’s panels with staples. But the window frame remains intact. Therefore, a frame mesh on brackets is the best option for making protection against dust and insects for windows with your own hands. But only for wooden window structures and if the mesh frame is assembled from scrap materials.
How to install a ready-made
Let's say you decide to save only on the installation of the mesh. Self-installation of a mosquito net on a plastic window is possible in several ways. The most reliable is on the outside in the corners, pos. 1a next rice: no wind will tear off the net. But installing mosquito nets in this way is only possible in private homes or if the supplier of new windows offers nets as a gift. The fact is that marking the holes for the mounting angles with your own hands in this case is only possible locally, because It is necessary not to get lost in 2 directions at once.
Methods for installing mosquito nets on windows
If the windows are not yet in the walls, then nets are placed on their frames, drilling holes for fasteners are marked, corners are installed, and only then the windows are installed in the wall openings. It is impossible to do this on already installed windows on the upper floors without experience of working at heights and without climbing equipment, and from the first floors the nets can simply be stolen.
Note: factory-made mosquito nets for outdoor anti-theft installations are often equipped with internal rotary latches. But, firstly, the latch tongue damages the frame over time (don’t forget, the wind frays the mesh). Secondly, the tongue of a simple latch is simply retracted from the outside with a thin nail or wire pushed through the mesh, and latches with locks are expensive.
Fastening with Z-profiles is described above and shown in pos. 1b Fig. It can be done outside on the upper floors, although at the risk of life, or with reliable insurance with a fitter’s belt and a halyard. But a strong side wind can move the net, immediately twist it and break it. It is still more reliable to fasten with brackets, pos. 2. Frame mosquito nets with brackets, external and inserted, differ not only in the size of the mesh frame, but also in the height of the shelf of the mounting brackets. In the designations of standard profiles it is given, in mm, by the last 2 digits; for standard plastic windows - resp. 13 and 7 mm. Therefore, before ordering the mesh, you need to measure the height of the window slope threshold - in case it is not standard. Then you need to inform the craftsmen to select the right profile, otherwise the mesh will either dangle or not fit into place at all.
Note: the upper fastener of the frame mosquito net is placed 1.5 cm deeper than the lower one, pos. 3 in Fig. Why is clear from the poses. 4, which shows the process of installing the mesh into the mounts.
Measurements
Making your own mosquito net begins, of course, with the necessary measurements.
Under Z-profile
If the window is wooden, measure the width and height of the light opening. They do this in several places, and the smallest indicator becomes relevant.
If we are talking about PVC construction, then for a mosquito net on Z-profiles, the width and height are also measured, but in the center (and if the opening is more than 2 mm wide, then at the narrowest point of the light opening) between the inner edges of the seals .
Under staples
To make a mosquito net for installation on brackets, you should take almost the same measurements as indicated above. But you will have to adjust the dimensions of the frame taking into account the width of the brackets used (from 12 mm). Because of this, the light opening will narrow slightly, but in order to expand it, you should not use U-shaped brackets, which allow you to make the frame flush on the inside of the window frame. The latter will be damaged in this case.
Important: The height of the bracket shelf must be equal in height to the threshold of the window slope with the seal. And the legs of the upper brackets should be longer than the lower ones.
Homemade frames
To assemble such a mosquito net you will need the following set of parts:
- 2 drains;
- 2 crossbars;
- impost (additional transverse beam);
- impost connector;
- metal or plastic corners, 4 sets;
- detailed fasteners in the required quantity;
- cord.
Imposts and fasteners for them are ordered optionally - one such element is placed every 60-80 cm in height of the frame.
The material from which the fastening units and profiles are made matters. For example, steel corners are cheap, but susceptible to corrosion over time. The PVC coating, which soon wears out, does not save them either. It is better to use plastic ones - they are good in all respects.
As for frame profiles, they can be made of PVC or propylene . The former are cheaper and not so durable, the latter are more expensive, but they last up to 10 years if the anti-mosquito inserts are changed in a timely manner.
Frames on steel corners are fastened with through bolts, and on plastic ones - with self-tapping screws or standard latches. Additionally, they can be secured using hardware.
Plastic profiles for frames can also be purchased in long lengths - 3 or 6 m each. If you need to install frame mosquitoes on several windows at once, this is the best option. Sold by the meter and a special elastic ribbed cord, which allows you to place the mesh panel in the grooves in the most reliable way, with even pressure.
An excellent frame for a mosquito net is made from plastic cable channels (boxes) with a width of 10 to 60 mm. The cross-section of such boxes for external mosquito nets in Z-profiles should be square, then the frame will be strong and rigid. If the frame is supposed to be mounted on brackets, channels with an oblong cross-section are suitable. These frames are assembled on steel corners and secured with bolts by removing the box covers.
An impost, if required, is made from the same cable channel (the required length is cut off), its lid is sealed with stronger glue (say, construction Moment or Titan), and the ends are caulked with wood plugs. Such an impost is placed into the frame using through wood screws.
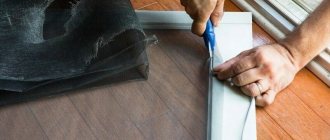
Laying the canvas
The finished frame is placed horizontally, with the open groove facing up. The selected cellular fabric is cut out with an allowance (from 3 cm, but better if 10-15 cm). Then the finished panel is placed on top of the frame. It is straightened out and pressed along the contour with weights.
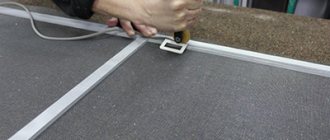
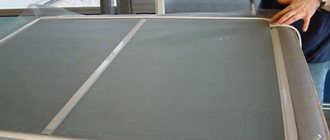
If the frame is made of a special profile, a cord is placed over the groove along the canvas and rolled with a roller until it is completely pressed into the groove. The excess mesh is cut off, leaving approximately 1 cm (above the groove).
If the frame was created from cable channels, then the covers of the narrow sides are first placed on the mesh spread over the frame. Then they are carefully pressed along their entire length until they snap into place. Long lids are applied and pressed in the same way.
Handles and staples
The external mosquito net cannot be put in place without handles. You can use soft and thin ones made of cheap plastic. They are placed on the frame even before the mesh and pressed into the profile grooves along with the cord. The disadvantage of such handles is that they often break, and the sections of the cord above them become flattened. And you can’t put such handles on a frame made of cable channels - you’ll have to look for something stronger and fix it with self-tapping screws.
Also, for an external homemade mesh you will need bracket holders. Plastic ones do not damage the frame, but are fragile and can break at any moment. Steel spring brackets are more reliable, but by pressing the mesh tightly against the window, they can scratch the frame. The best option is a spring bracket with a piece of heat-shrinkable tubing stretched over it. You can fix such a tube on a spring by heating it with a hairdryer or over a gas burner (very carefully).
Without frame
There are situations when it is only possible to install a frameless mosquito net of your own making on a window. Such meshes are secured in place using:
- “burdock” adhesive tape (Velcro);
- or special magnetic strips.
Each of these fastening systems has its own advantages/disadvantages, as well as scope of application.
Velcro
Velcro tape holds mosquitoes very well. One half of it (the one with hooks) is attached to a wooden frame, and the second (the fleecy one) is sewn onto a honeycomb fabric along the entire edge. On a plastic window, such a tape is placed along the contour of the slope (internal, when viewed from the seal). For winter storage, mosquito nets are stored rolled up, and if you sew a hooked half of velcro to the cloth, in the spring such a roll will not be able to unfold - the hooks will grab tightly together. Therefore, you must act strictly as recommended.
There are many disadvantages to using duct tape. And the most significant of them, no matter how strange it may seem, is the reliability of the fastening. The hooked part of the tape is glued to the frame with super strong glue, so it is almost impossible to remove it without damaging the frame. Often, when removed, this half of the Velcro tape pulls the second half of the Velcro tape along with it, the fleecy one, tearing it off the mosquito cloth. That is why velcro mesh is most often placed on balcony frames, where it safely serves the entire season without removal.
Magnets
A homemade frameless mosquito fly fits well on magnetic holders:
- single-pole for fastening steel;
- and bipolar for attachment to a non-magnetic base.
Grids with single-pole magnets are installed on car windows. In such cases, the magnetic tape is hidden in a drawstring made of dense thin fabric and sewn along the edge of a honeycomb anti-mosquito fabric, cut to the required size and shape. The finished structures are simply applied to the windows, where they fit quite tightly along the contour, without damaging the base at all.
Bipolar holders stick together very tightly, so they are perfect for installing mosquito nets on windows and doors indoors. Such magnets can be purchased in ready-to-install kits, where the polarity of the strips is pre-marked, and one of them is already attached to Velcro. It is this that is attached to the fat-free base, and the second is hidden in a fabric sleeve and sewn along the edge of the anti-mosquito fabric.
You can make a bipolar holder yourself from a pair of unipolar magnets. Additionally, you only need double-sided tape. You will first need to mark the polarity of the tapes so that they do not stick together or bounce off each other when installing the frameless mosquito net.
A mosquito net with bipolar magnets is the best option for decorating windows and doorways in country houses, in tourist seasonal boarding houses and in houses at recreation centers. Such magnetic holders are also suitable for attaching mosquito nets to the bottom and middle of a balcony door in an apartment. Provided that at the top and sides this mesh is secured to the frame of the balcony door using “burdock” Velcro.
( 82 votes, average: 4.90 out of 5)
How and with what to wash suspended ceilings
How to make a cabinet with your own hands?
Related Posts
What it is
The mosquito net is the greatest invention of mankind. Protects not only from insects, but also from poplar fluff in summer and leaf fall in winter. The use of new technologies has greatly expanded the properties of the product.
Now consumers are offered “anti-dust” fabrics, which trap even cigarette ash flying from the upper floors. And also a fine-mesh “anti-pollen”, specially designed for people prone to allergic reactions.
For pet lovers, the “anti-cat” option is suitable, it has increased strength, can withstand the weight of an animal in a jump and avoid falling from a height.
A reflective sunscreen with a thin aluminum coating reflects up to 85% of the sun's rays, which makes it possible to avoid additional tinting of the windows.
The Fiberglass mesh is made of reinforced fiberglass composite and is designed for areas with unfavorable climatic conditions with a predominance of strong winds.
Transparent, high-strength, non-flammable ultraviolet material allows you to improve visibility by 25 - 30% and was created specifically for non-standard glazing.
In addition to the main functions, the devices have the following qualities.
- let in as much light as possible;
- are characterized by low weight and increased strength;
- practical to use.
Due to the ease of installation, installing products on inclined surfaces indoors will not take much time and effort.
The design of the mesh for the roof window is divided into types:
- classical;
- roll;
- roller shutter;
- pleated;
- automated with remote control.
It is worth taking a closer look at each type to know the advantages and disadvantages.
Classical
If the window openings are located at the optimal height for a person and access to them is not difficult, you can get by with the classic version of an anti-mosquito.
The functions of the product are the same. It is made from the type of canvas at the request of the customer.
Pleated
Plisse is installed in the same options as the classic one and has the same advantages. A distinctive feature of the model is that the guides are located horizontally.
Additional advantages include the functionality and practicality of the product coupled with an aesthetic appearance.
Roll
Anti-mosquito roller blinds are considered a universal option. Provides maximum protection against sunlight and falling branches from trees. This is relevant due to the location of window openings.
It is practical, looks presentable and easy to use.
The system can be easily installed above a window indoors. Thanks to a special device, the curtain can be easily removed for the winter. The fabric is stretched smoothly along the guides of the structure without gaps.
The production uses high-strength ultraviolet fabric with improved light transmittance.
Roller shutter
A rather complex protective system, which consists of a shaft with a fine mesh. The curtain moves along guides, which ensures a tight fit, and is secured at the bottom with clamps.
The guides are equipped with brushes that close gaps and remove debris from the surface. Thanks to the bristles, the folding mechanism is reliably protected against moisture and dust.
Movement is possible both manually and electrically. The built-in braking mechanism ensures smooth running. During production, types of fabric are used at the request of the customer.
Automated
In cases where the openings are high and access to them is difficult, roller and roller blinds are equipped with an electric drive. The advantage is that the canvases are securely fixed without the help of holding devices.
They have both stationary and remote control, which is necessary for high window openings. If there are several windows, synchronous control is possible.
They have a stylish design and can be used in any room.