Installing a mosquito net on a plastic window is not a difficult task; any home craftsman can handle it. There are several reliable and effective installation methods - on hinges, on flags, on corners and even with Velcro. There are removable and stationary nets, with and without protection. We will tell you about the most popular and simple fastening methods - they can be used on both Euro-windows and ordinary wooden ones.
To the corners
Corners, also known as pockets or ears, are removable plastic grooves. They are chosen to match the color of the frame so that visually the frame and pocket appear as one whole. Pockets are placed on the outside of the window.
This fastening method is quite reliable - the mesh will not fall out of the grooves, it will not warp or be torn off by the wind. But if you often remove the netting - for example, to let the cat out - it is better to choose another option.
To install a mosquito net, you need:
- buy 4 pockets;
- try the mesh on the window, mark the corners of the frame with a pencil;
- fasten the lower pockets (with low sides) exactly along the intended boundaries;
- move the top ones (with high sides) 1–1.5 centimeters up and secure. The height of the offset is slightly higher than the height of the sides of the lower grooves. But at the same time, the mesh placed in the lower corners should not fall out of the upper corners.
To hang a mosquito on a window, insert it into the upper grooves and lift it up until it stops. Place the mesh exactly above the bottom corners and lower.
To avoid making mistakes in your calculations, first attach the lower pockets, then insert the mesh into them, and only after that mark the location of the upper ones.
If you did everything correctly, the upper and lower ears will securely hold the structure.
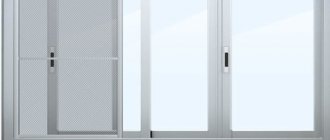
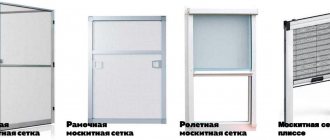
Design and purpose of mosquito nets
An anti-mosquito net that is attached to a PVC window is most often a frame product:
Basic elements of a mosquito stack
- The mesh frame is made of lightweight polymer (PVC) or aluminum profile. Plastic structures are less durable, which is why more and more manufacturers are switching to aluminum profiles. At the same time, a special coating protects aluminum elements from external influences.
- At the corners, the frame elements are connected with special corners. Thanks to this, the rectangularity of the frame is maintained, since plastic inserts give the product the necessary rigidity.
The size of the holes is such that a mosquito will definitely not get through
- A mesh made of synthetic fabric is stretched over the frame (fiberglass is most often used). The mesh is most often fixed into the profile groove due to the elasticity of a special cord, so if necessary, the damaged mesh can be removed and replaced with a new one.
Usually the canvas is painted gray. Neutral coloring makes sense: it is in this case that the weaves of the mesh are least noticeable in any lighting level.
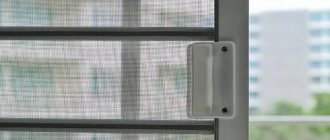
- On the inside of the frame of the mosquito net, two handles are fixed, intended for installing the product and removing it from the opening. Plastic handles in 90% of cases disappear after about two years of use, and structures made from a polymer strip rolled into a ring last a little longer.
This loop handle is more reliable, but more cumbersome
As the name suggests, a mosquito net provides protection against the entry of flying insects - flies, mosquitoes, etc. into the room. The cross-sections of the holes in most nets are selected so that their size is less than the wingspan of the most common insects.
In addition, structures with tension fabrics installed in the sash of a window opening or on the window frame provide shading of an apartment or balcony. Despite the high transparency, the mesh material effectively absorbs the sun's rays, so in the heat the mesh is a good help, especially in the absence of curtains and blinds.
There are many options for fixing mosquito nets on the window
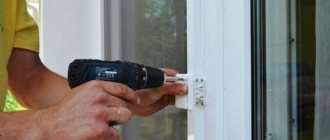
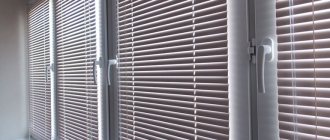
On the hinges
This option is ideal for a balcony door, but it is often used on windows. This is especially useful if you remove the mesh frequently. The frame simply opens - just like a regular window sash. It is held in the closed position by a special latch.
We recommend: Where stationery clips can be saved and how they can come in handy - 11 brilliant ideas for the home
It’s easy to install the hinges yourself:
- lean the mesh against the frame and mark the contours;
- on one side of the frame mark the places where the hinges will be located, on the other - the holder for the latch;
- screw the hinges to the frame and attach the mesh to them;
- on the other side of the window, fix the holder with self-tapping screws;
- Place a latch on the mesh, its handle should be located on the inside, and the tongue should be on the outside.
Methods for repairing mosquito nets
Replacing the mosquito net fabric can be done in two ways.
Option 1 is to call a specialist from a window company or window repair company. The method is simple, but it will require time waiting for a specialist and financial costs. The cost of a specialist’s visit and work + the cost of materials starts from 1,500 rubles per 1 piece.
Option 2 – replace the blade yourself. To do this, you need to buy a canvas or a kit for repairing/making mesh at any construction hypermarket or market. The repair kit includes a blade, a fastening cord and handles, and the cost of such kits is about 500 rubles. To replace the canvas with your own hands, in addition to the materials, you will need a very sharp knife, for example a construction knife or a stationery knife with break-off blades.
To the checkboxes
There are 2 types of checkboxes:
- small metal Z-shaped fasteners;
- L-shaped PVC parts.
Hanging a mosquito on flags is simple: fasten the elements to the window frame - 2 on top and two on the bottom. If strong winds blow in your region, check 6 flags to be on the safe side. Position them so that when turning the plates, the mesh is pressed tightly against the window. The rotary axis for the plate is a self-tapping screw.
This design is incredibly simple, making it yourself is easy. But flags break quickly, especially plastic ones. In addition, it is difficult to restore the fastenings - the screws will begin to fall out of the loose grooves. This option is suitable only for those who rarely remove screens from windows.
Build process
The material used to produce mosquito nets for windows is fiberglass, PVC or fiberglass. Next, it is inserted into an enameled aluminum profile with special fasteners or rods on each side. You get a reliable and highly durable model, created according to your requirements. It is protected from precipitation, corrosion, and mechanical damage, so it will last for many years. Some components are imported from Holland, which guarantees their durability.
A mosquito net on a window becomes simply indispensable in the hot season. High temperatures force windows to be opened. For insects, this is literally a signal to action. With the anti-mosquito system, you will forget about night buzzing and itchy bites. Such a barrier does not create significant problems for air circulation and penetration of sun rays. Accordingly, the room will still be well ventilated and warmed up as before.
Sources
- https://bayplus.ru/moskitnaya_setka_na_okno_s_krepyezhnoy_lentoy_na_lipuchkakh.html
- https://www.obi.ru/okna/moskitnye-setki/c/2203
- https://setki-fpk.ru/vidy/33-vidu-beskarkasnie-na-lipychkah.html
- https://setki-fpk.ru/na-okna/17-na-okna-na-fortochku.html
- https://balkon.guru/osteklenie/moskitnaya-setka/moskitnaya-setka-na-lipuchke-na-strazhe-okon.html
- https://oknanagoda.com/okna/otveti/moskitnaya-setka-na-lipuchkakh-dlya-plast.html
Velcro
You can attach the mesh fabric with Velcro. It sounds strange, but this economical method is very convenient, especially for those who often remove protection from windows.
To secure the fabric to the frame yourself, stock up on:
- textile Velcro fastener - it is sold in any sewing store;
- dense mesh fabric;
- with reliable glue or a glue gun, if you have one.
The installation procedure is extremely simple:
- measure the perimeter of the window and cut the Velcro strips to the required length;
- degrease the frames;
- stick a piece of textile fastener with microhooks on them;
- Glue tape with micro loops onto the prepared panels of mesh fabric along the perimeter.
Ready. Now you just need to align the stripes of the textile fastener.
There is also a simpler option - glue the mesh to regular double-sided adhesive tape. This is a one-time option, but very fast and inexpensive. But such a design is very unreliable - it will be torn off by the first strong gust of wind.
We recommend: A friend told me how to peel potatoes with a vegetable peeler in half the time
What color should I choose for anti-mosquito fabric?
This is not only a matter of taste, but also of visual comfort. Diffraction distortions of the light flux should be taken into account. So, if a white mosquito net is installed on the window, the picture outside the window blurs and loses clarity and contrast.
But from the street, through such a mesh you can clearly see everything that happens indoors. That is why, when making mosquitoes yourself, experts recommend choosing cellular fabric in dark shades: black, gray, brown. Then visibility from the inside will improve significantly, but from the outside it will worsen.
On magnets
This method is very similar to the Velcro option, only instead of adhesive tape we use magnetic fasteners:
- Buy magnetic fasteners - at least 6 pieces.
- Divide them into halves.
- Glue one half of the elements to the window frame, the other to the mesh.
- To hang the mosquito net, simply align the halves of the fasteners until they “stick together.”
Conclusion
Now you know what kind of mesh there is for plastic windows, how to replace a mesh that has become unusable, and even how to make it yourself. For greater clarity, I have included photos and videos in this article. If they are not clear enough, or you have your own unique experience in manufacturing and installing mosquito nets that you would like to share, write in the comments and we’ll talk.
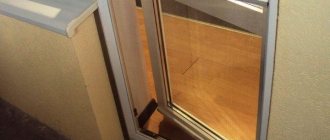
Frame with hooks on a standard plastic window.
Source
Plungers
The plunger fastening is one of the most reliable. The structure is secured with spring clips; they are installed directly into the frame of the mosquito net. With the free end they are securely fastened to the window frame. To do this, holes are drilled in the profile in those places where the plungers rest.
To prevent dust from entering the house, it is advisable to additionally seal the structure around the perimeter with a sealant.
Making a plunger design can be a challenge for an inexperienced craftsman. In addition, the light opening will be slightly reduced.
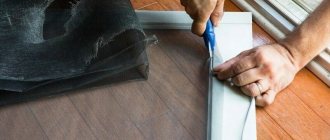
Step-by-step instructions for replacing mosquito net fabric
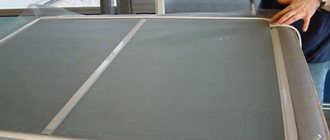
- Place the mosquito net on a flat surface (on a table or floor)
- Use a knife or screwdriver to pry the edge of the fastening cord and carefully pull it out of the profile groove, freeing the blade.
Photo: pry up the old cord and pull it out of the groove, freeing the blade
- Place the new canvas on the mesh frame so that there are equal allowances on all sides.
- Starting from one of the corners, begin to press the cord into the groove on top of the canvas. If this is difficult to do manually, you can use a blunt object, such as the handle of a knife.
Photo: press the cord over the new canvas
- Gradually pressing the cord around the perimeter, it is necessary to ensure uniform tension of the fabric. If the canvas begins to sag or warp, pull out the cord and start the procedure over.
- In the center of the frame, you need to insert handles between the cord and the canvas and press them down with the cord.
- When the cord is inserted around the entire perimeter and the fabric is evenly stretched, you can trim off the excess fabric and cord with a sharp knife blade.
Photo: cut off excess fabric with a sharp knife Before purchasing a repair kit, you need to check the dimensions of the fabric in it. Usually this is a standard size of 700x1600mm. If this size is smaller than the size of the existing mesh, you will have to buy the canvas separately. The fastening cord can be reused - in this case, you need to pull it out of the old mesh carefully so as not to stretch or tear it.