With the arrival of warmer weather, hordes of insects come back to life and you can’t live without mosquito nets. Only they are able to protect the premises from the ubiquitous insects. And then some copies manage to leak somewhere. But since the nets are for some reason very short-lived, they have to be replaced or repaired. You won’t call a company representative every time and pay pretty decent money for a job that only takes a couple of tens of minutes. That’s why they try to make/repair/install a mosquito net with their own hands.
Which mesh fabric to choose?
The easiest way to protect yourself and all household members from external “intrusions” is to order mesh frames from a specialized company. But if the home has 5 – 10 or more windows, then a package of frames will cost quite a lot of money. It will be much cheaper to make mosquito nets yourself.
First of all, you need to choose the type of filter fabric. The retail chain offers it in rolls of various widths and lengths. The mesh can be green, blue, red or another color. It is best to use light gray material. A product made from it will not heat up in the sun and will not darken the room.
Important! To prevent mosquitoes and other insects from getting inside the home, the cells of the fabric should be about 1 mm in size, and the thickness of the weaving thread should be 0.3 mm.
When heated by sunlight, a low-quality mosquito net emits an unpleasant aroma that quickly spreads throughout the room. When purchasing, you need to get closer to the material and “listen” to your sense of smell. If you smell even the slightest chemical smell, then it is better to pass by this product. High-quality canvas is made from a special type of fiberglass coated with a layer of PVC in different colors.
Types of grids
In Russia, two types of fabrics are used for the manufacture of mosquito nets, the characteristics of some are presented in the following table:
For a detailed article about the types of mosquito nets, their sizes, and how to take correct measurements, read the article at the active link.
Which is better - homemade or purchased mesh?
Buying a mosquito net for all the windows in the house is not a very cheap pleasure. The price of one product usually reaches 1500-2000 rubles, so many are forced to save money and abandon windows with ready-made designs. If you prepare high-quality material and carry out all the work carefully, the homemade mesh will be no worse than the factory one. It will perform all the functions of its “relative” - it will protect against insects, even the smallest ones, and will catch large debris and some dust from the street.
Mosquito nets for plastic windows
Preparing for assembly
Before manufacturing an anti-mosquito product, a number of preparatory measures must be carried out.
Measuring the light opening
Open the window sash and measure the width and height of the opening with a tape measure. Dimensions are taken between the inner side surfaces of the window block. Draw a rectangle on a piece of paper and mark the length of the posts and crossbars with numbers.
Watch how to measure windows to order mosquito stacks in the video.
Area
To assemble a mosquito net, you need to prepare a workplace. It can be a workbench in a home workshop or just a large table.
Tool
To work you will need the following;
- screwdriver;
- crosshead screwdriver;
- square;
- level;
- tape measure, ruler;
- marker or pencil;
- miter box and saw for him;
- construction knife.
Materials
- Plastic profile;
Frame element
- four connecting corners;
Mounting bracket
- canvas;
Mosquito net fabric
- sealing cord;
- self-tapping screws;
- two handles;
Pens
- brackets for attaching a mosquito net;
Brackets
- self-tapping screws
Measurements for structures using Z-fasteners
Using a regular tape measure, measure the height and width of the opening along the edge of the elastic band. The data obtained should be recorded to the nearest millimeter. The finished product will exceed the dimensions of the frame by 2 cm horizontally and vertically.
This is what Z-mounts look like
Before deciding how to measure a window for a Z-mount mosquito net, it is worth checking how deep the window frame is installed. If the slopes are very close to the frame, or the box is strongly set under a quarter, then installation of the finished structure may be difficult. Such points should be taken into account during measurements and planning, and if necessary, order a structure with a different type of fastening.
Step-by-step instructions for assembling a mosquito net
- a profile is laid on the desktop tabletop;
- Markings are applied with a pencil and tape measure. The segments should be 40 mm smaller than the light opening measurements taken;
- using a miter box and a saw, cut the plastic length into two vertical posts and two horizontal crossbars;
Cutting with a saw through a miter box
- adjacent sides of the frame are connected by corners, the outer protrusion of which is 20 mm. Therefore, the segments are made 40 mm shorter;
Installed corner
Carefully. When assembling the frame, be sure to pay attention to the fact that the channels for the seal are facing inward, and the protruding side is facing the outside of the frame.
- lay the polymer veil on the frame;
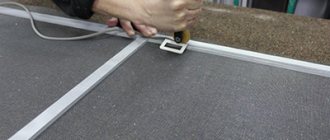
- begin to press the sealing rubber into the channel through the canvas from the corner of the frame;
- During installation, the tension of the mesh is controlled. If it bends when lightly pressed by hand, then the elastic should be pulled out and installation should begin again;
- Use a construction knife to cut off the remainder of the sealing cord and remove the protruding strips of mesh;
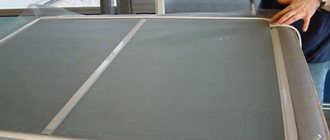
- the finished product should not have any bends. If any are found, the plastic is bent with your hands;
- if it is impossible to eliminate the surface unevenness defect by hand, install an additional crossbar in the middle of the opening;
- in the center of the profile width, swivel brackets are secured with self-tapping screws using a screwdriver - two on the uprights and one on the cross members of the frame;
- In the middle of the MS height, handles are screwed on both sides.
Note. You don't have to buy holders. They are quite easy to cut out of suitable plastic with a construction knife. Punch two holes in the handle with an awl for the self-tapping screws.
DIY mosquito net for a wooden window
If a wooden window opening has been installed a long time ago, then its surface must be prepared for installing a mosquito net. To do this, putty, primer and painting are used. This is necessary so that the mesh frame fits tightly to the window block.
A characteristic feature of wooden windows is the presence of an outer beveled strip at the bottom of the sash - ebb. It is this detail that prevents the traditional installation of a mosquito net. The casting part will rest against the mesh fabric and will not allow the fabric to fit tightly to the window opening.
There are two types of window opening - turning the sash outward and inward. Both options involve removing the mosquito net each time the window is closed. If your house or apartment has such windows, then the way out of this situation will be anti-mosquito fiberglass fabric with Velcro.
The textile fastener is sold in the form of a tape of different widths. In this case, you will need a 20 mm wide Velcro strip and the mesh itself.
Velcro production and installation
Proceed as follows:
- Adhesive tape is attached around the perimeter of the window opening on the inside. This can be done in two ways:
- glue Velcor with some polymer glue;
- shoot the Velcro with a stapler.
Velcor tape
Additional Information. In both cases, when dismantling the tape, traces will remain on the window block in the form of peeled paint or small holes from paper clips. The second fastening option is more preferable since the holes are very small and will be hardly noticeable.
- The mesh fabric is laid in an even layer on the table.
- According to the measurement of the opening with Velcro, cut out the required piece of mesh with a knife.
- A second strip of Velcro is sewn around the perimeter of the fabric. It is better to sew it with a sewing machine in two tracks.
- Open the sash and press the mesh against the tape around the perimeter of the opening.
MC on Velcro
We stretch the mosquito net onto the timber frame
You can make a mosquito net on a wooden frame. To do this, we select a beam so that its depth is equal to the width of the side surface of the window frame. According to the measurement of the window clearance, a frame is assembled from four pieces of slats, fastening its adjacent elements with screws.
If it is possible to use a router, then they cut a groove around the perimeter of the frame with a depth and width equal to the sealing gum. The mesh is stretched by pressing its edges with an elastic band into the recesses. The swivel brackets and handles are screwed in the same way as in previous cases. The mosquito net is ready for use; all that remains is to insert it into the window.
MS on wooden frame
DIY mosquito nets for 12 rubles.
This is a pretty ingenious way to make a mosquito net with your own hands. The amount of 12 rubles is symbolic, emphasizing the cheapness of this method. Costs only include the cost of a piece of fiberglass mesh fabric. Pulling the mosquito net will require some dexterity and dexterity.
Installing a mosquito net on a plastic window
- Remove the rubber seal around the entire perimeter of the window block.
- The seal is thoroughly washed with warm water and soap, removing dust deposits and grease from its surface. After washing, the cord is dried.
- Measure the perimeter of the grooves for the rubber band. The dimensions are transferred to a sheet of paper. Add 30 - 40 mm to two adjacent sides of the rectangle. Get the dimensions of the canvas.
- Cut out the desired piece of mesh.
- Place the fabric on one of the upper corners of the opening.
- The rubber band is pressed into the groove through the mesh using any blunt object, be it the handle of a screwdriver or a knife.
- Laying is done from the corner to the sides, constantly monitoring the tension of the fabric.
- If the seal accidentally breaks, installation is continued with a second piece of elastic. The grid is ready.
Upon completion of installation, check the reliability of the fasteners. The MS will serve perfectly until the end of the summer season. Its dismantling is quite easy. You need to pull one end of the seal and it will come out of the recess, releasing the canvas.
In some cases, the sealing rubber can be replaced with a textile linen cord of the same diameter. It is also pushed into the recess of the frame through the mesh fabric.
How to assemble a structure from component parts
You can purchase and install a ready-made structure, but self-assembly will be much cheaper. Before deciding how to assemble a mosquito net, you should purchase components. For the design you will need a frame profile, corners for connection, a central cross member and two connectors, a rubber sealing cord, 2 handles and a mesh fabric.
Do-it-yourself construction will cost less
