Today, owners of houses and apartments are massively replacing old wooden windows with practical and durable PVC structures. And this choice is quite justified for a number of reasons:
- Due to increased thermal insulation, material costs for heating are significantly reduced.
- High functionality and modern materials make it possible to avoid additional window maintenance work: tinting the frames to give them an aesthetic appearance; caulking cracks to insulate windows for the winter; removing the insulation from the window in the spring; pulling gauze over the sashes to protect against mosquitoes and other midges and other work that is implied in the operation of wooden window structures.
- A sealed double-glazed window well insulates the room from noise, allowing you to maintain home comfort and protect the peace of the owners.
- The structures have a long service life while maintaining impeccable functionality and aesthetic appearance.
- The cost of a plastic window is lower than a similar wooden product. For example, the price of an unpainted double wooden frame without glass measuring 120x90 cm is 3,600 rubles, and a plastic window is 5,500 rubles. However, a wooden window will still need to be glassed and painted, which means additional time and materials. Whereas the plastic window is already ready for installation.
Those who are going to take on the task of installing plastic windows with their own hands often lack basic knowledge of how to do it correctly. That’s why we present this article here in the form of instructions to help owners who want to carry out the installation themselves.
Installing plastic windows has a number of nuances. For example, PVC windows are not such universal designs. And their use has a number of limitations. Thus, it is not recommended to use plastic windows in cold rooms without heating (verandas, canopies, attics, garages, bathhouses, etc.). By the way, window production and installation companies prefer not to talk about this. In addition, problems may arise when installing PVC window profiles in multi-storey buildings above the 4th floor.
When choosing a contractor to replace windows in your house, you may encounter the fact that the craftsmen simply will not delve into the intricacies of this issue. There are only a few people who have control over the situation and can comprehensively cover it.
Window components and arrangement
To understand which plastic windows are better, you should at least begin to understand the structure of the window structure.
The main structural elements common to all profile windows:
- Window frame.
- Double-glazed window or sandwich (found on balcony doors).
- Movable and (or) static sashes.
- Seals.
- Glazing beads (fix glass).
- Imposts (attached to the frame, placed between the sashes, dividing the windows into 2-3 parts) or frames (attached to the sashes).
- Accessories (handles, hinges, clamps, locks).
Regulatory regulation of installation technology
In order for PVC windows to be durable, warm and not pose a threat to people’s lives, building standards :
- SNiP No. 23-02, edition 2003;
- GOST No. R 52749, edition 2007;
- GOST No. 30674, edition 1999;
- GOST No. 30971, edition 2012
The requirements imposed by these regulatory documents must be met by all organizations that produce and install PVC window structures in terms of:
- basic requirements for designs, materials, sizes and number of packages determined for different climatic zones;
- requirements for the location of the window in the wall opening, the windows must be placed evenly, with a vertical/horizontal deviation of no more than 3 mm on one side and 1.5 mm per 1 linear meter. along the length of the frame;
- requirements for the transportation and installation process, for strong fastening in the opening, the windows are installed on support blocks, and on the sides they are fixed with spacer blocks, the frames are fixed to the wall using anchor dowels and mounting plates, with an interval of 700 mm;
- the size of the installation seams, it must be three-layer with a seam width from the corner of 150-180 mm;
- sealing seams;
- safety regulations.
GOST, SNiP and SP requirements for PVC structures
The main documents regulating the design requirements for PVC windows and balcony blocks are:
- GOST No. R 56926, published in 2016;
- SP No. 131.13330;
- GOST No. R 1.0, published in 2012
These documents include all current European requirements regarding the production and installation of PVC windows:
- EN No. 12600, published 2015;
- EN No. 14351-1, published 2010;
- EN ISO 10077-1, issued 2009;
Main requirements for window units:
- They must transmit the visible spectrum from 760 to 400 nm and UV radiation from the sun from 200 to 360 nm. Such characteristics must be ensured throughout the entire period of operation, subject to the implementation of the mandatory maintenance package.
- Provide a continuous thermal contour adjacent to the technological opening of the outer wall.
- Correspond to the calculated value of thermal resistance in m2 °C/W, which is indicated in the energy passport of the house or cottage.
- Ensure the strength characteristics and invariability of the outer structural shell from the effects of wind and precipitation.
- The ratio of the total window area to the floor area should be no more than 1:5.5 and no less than 1:8.
- The window unit must have a closed frame structure with an area of up to 6 m2.
- The fastening scheme and positioning of the PVC window must correspond to the hinged fastening scheme of the PVC frame with the 1st degree of freedom in order to ensure the calculated thermal expansion without bending the frame from the opening.
What characteristics should you consider when choosing?
The choice of windows for an apartment in an apartment building or housing in a private house will vary:
House
The number of chambers in a double-glazed window is of greatest importance: the level of noise insulation and thermal insulation depends on this.
- If the house is warm and located in a quiet area, a standard three-chamber double-glazed window will suffice.
- For cottages with access to a highway or city street, four or five-chamber models are suitable - they provide better protection from noise and dust.
The number of air chambers also depends on the climate of residence: in the hot South, a single-chamber or two-chamber is suitable; in central Russia with mild winters, a three-chamber will cover the glazing function; in harsh Siberia, give preference to 4-6 chambers.
Apartment
Since living spaces in apartment buildings differ little from each other, manufacturers have long ago developed the formula for the ideal urban plastic window: 2-3 chambers, profile up to 70 mm.
These indicators are suitable for most Russian apartments. The exception is the northern strip; residents of this area are better off giving preference to 3-4 chamber packages with a profile width of up to 90 mm.
Wherever installation is intended, you should pay attention to 5 characteristics:
- Number of cameras. More is not always better; in most cases, 3 cameras in a profile are enough.
- Profile width. The thicker it is, the greater the distance between the street and the living room, the warmer the house will be in severe frosts. Standard - 58-70 mm.
- Glass thickness. The minimum recommended value is 4 mm, the standard is 5 mm, the best sound absorption is ensured by the thickness of the external glass 6 mm.
- Ventilation. Companies solve the issue of ventilation in their own way. The highest quality option is intra-profile, when the flow of fresh air is ensured without allowing cold, drafts, or extraneous sounds.
- Gain. Reinforcing liners guarantee the durability of the plastic window: such structures are not afraid of temperature changes, strong winds, and other weather anomalies.
How long does it take to work?
Installation of PVC windows can take from 2 to 10 hours. The duration of installation work directly depends on the following factors :
material of wall structures, work is completed faster in panel houses, where the window opening is initially made more carefully;- level of premises preparation;
- level of preparation of the window unit;
- number of floors and distance from the waste site;
- time for delivery of the window and accepted consumables.
The preparation of the workplace is carried out by the customer; the more thoroughly it is carried out, the faster the installers will work.
If all conditions are met to the greatest extent, then the main operations for installing a PVC window will take :
- dismantling the old unit - from 25 to 60 minutes;
- window opening preparation - 30 minutes;
- installation at the level of the window frame - 30 minutes;
- installation of sashes and fittings - 15 min;
- window sill insertion - 10 min;
- installation of ebb tides - 15 minutes;
- installation of slopes with panels - 30 min;
- compaction - 15 min;
- total from 2 hours 50 minutes to 3 hours 25 minutes.
Which profile should I choose?
The basis of any plastic window is a profile. Frames and sashes are made from it. We briefly talked about width in the previous paragraph, now it’s time to understand the technical classes:
- C. Poor quality, cold, subject to deformation. Not recommended for residential premises.
- B. The thickness of the external walls is 2.5-2.8 mm, the internal ones are 2-2.5 mm. Average quality, low deformation resistance.
- A. The highest quality of those listed. The walls are from 2.8 mm on the outside, from 2.5 mm on the inside. They guarantee excellent heat and sound insulation.
Important! The class is indicated in the product certificate and on the profiles. If you see the Object marking, it means the seller is trying to sell a low-quality structure that is not suitable for houses or apartments. Often such materials for industrial premises are presented as economical options, offered for purchase at a very attractive price.
In addition to width, thickness, class, when accepting, be sure to pay attention to the appearance: the smooth, uniform surface of the plastic emphasizes the high quality of the product.
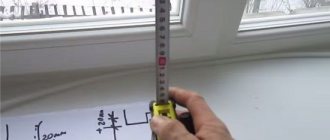
Video description
This video shows in detail how to measure a window to replace it with plastic ones:
All the above information applies only to standard rectangular windows. It is not recommended to measure plastic windows for non-standard openings yourself, since manufacturers of plastic structures have their own requirements for the maximum and minimum diameter of arched vaults, the dimensions of tilt-and-turn sashes, etc.
The services of a specialist will certainly be required in cases where the customer needs to reduce or enlarge the opening or change its configuration. If the house is residential, this must be done immediately before replacing old windows with new ones, since living with empty openings while new windows are being made is not an option.
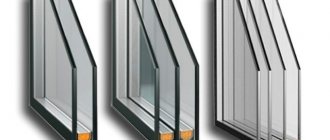
Which double-glazed window should you choose?
The second most important detail after the profile is glass. You should choose according to the number of glasses, thickness, distance between layers, filling of the chambers.
Number of layers
- 2 (1 camera). They can sweat, let in cold in winter, heat in summer.
- 3 (2 cameras). More reliable, stronger than the previous ones. Considered the gold standard - suitable for most conditions. Among the advantages are average weight, resistance to loads, good heat and sound insulation.
- 4 (3 cameras). Heavy compared to the previous ones, so be sure to take into account the strength of the base. They are warmer (resistant to cold), recommended for use in extremely low temperatures.
Thickness
We have already said that for operation in conditions of increased noise, you should replace the regular glass on the outside with reinforced glass - 6 mm. In other cases 4-5.
Distance
Both a small and too large gap are equally bad. A chamber with a thickness of less than 10 mm does not retain heat, as does one thicker than 24 mm. The optimal size is 1-1.5 cm.
Filler
Inside the chambers there can be not only air, but also gas - it is warmer than ordinary air, so if you install “gas” plastic windows, heat loss will be reduced by a minimum of 1.5 times (argon) and a maximum of 4.5 (xenon).
Carrying out the necessary measurements
Not everyone knows how to install a plastic window in a wooden house with their own hands. But everyone knows where to start - take measurements. The calculation of the dimensions of the frame frame is based on the parameters of the technological opening. The window is installed in strict accordance with the horizontal and vertical levels, so the supporting walls must also be level. After identifying the discrepancies and installing the beacons, you can begin to determine the perimeter.
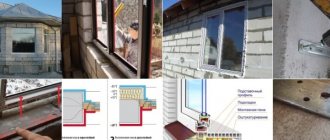
An installation gap of 10-15 mm is arranged between the side, top profiles and the base of the opening. It compensates for possible dynamics and shrinkage of the building. It is subsequently filled with foam. The lower bar rises by no less than 15 mm, taking into account the setting of the low tide.
As a result, based on the state standard number 30971-02, the following will result:
- the vertical profile is equal to the actual height minus 40-60 mm;
- the horizontal frame is narrower than the opening width by the same 40-60 mm.
Installation clearances Source oknadost.ru
Measurements should be taken relative to the internal and external planes. This is due to the possible difference between the results and this will affect the manufacture of the window. In addition, the location of the frame in the technological opening has a different effect on the insulating properties of the binding. So, if the double-glazed window is located closer to the street, then the room is quieter, but the heat leaves faster. Internal approach has the opposite effect. More often, ⅔ of the room is considered.
The solution to how to install a plastic window in an opening with projections lies in understanding what a quarter is. Previously, when laying a façade with bricks, to prevent windows from falling out, they formed edges around the perimeter of the window opening about 6 cm wide, which is equal to ¼ of the length of the brick. Today, a similar architectural technique has been preserved, but its dimensions may differ from those originally designed. Thus, the window frame should be hidden behind the projections without direct contact with the walls of the opening as follows (in mm):
- from the sides by 20-30;
- from above by 20;
- from below to 20.
Quarter in the window opening Source handspc.ru
See also: Catalog of house projects made from hand-cut logs with panoramic windows.
The width of the ebb is measured taking into account a similar parameter of the external slope. Additionally, an overhang of about 30-40 mm is considered. The length of the element is based on the size of the profile and the bends on the sides to form the tray. To do this, add 25 mm on each side. If you intend to install plugs, then minus 10 mm for them.
Regarding the window sill, the parameters of the area within the opening and the protruding part are considered. The width and depth of the canvas are taken into account. The latter cannot be less than 5 cm. To ensure that the warm air from the heating equipment does not encounter an obstacle, the limit value of the protrusion is monitored. It is equal to ⅓ of the radiator width.
Correct position of the window sill Source img.aviarydecor.com
Taking measurements for balcony glazing
The approach to the question of how to install a plastic window on a loggia with your own hands differs slightly from wall openings. The process also begins with taking measurements. It is difficult to install beacons on the balcony in strict accordance with the level. Therefore, the height and width are measured at several points. The main thing is that the tape measure has a horizontal or vertical position. The minimum value obtained is taken as the reference point. For plastic windows, 30 mm is subtracted from the results for each installation seam. Areas with large gaps will need to be expanded with plaster mortar or planks.
Extended opening Source designstil.info
Consequences of an erroneous measurement
How to insert a plastic window with exceeding parameters is a common problem due to erroneous measurements. There is only one solution - expanding the walls. The wood is hewn down, and the concrete, brick and blocks are knocked down, ground down or cut off.
Other options will also require subsequent infusions. Either you will have to increase the opening, or repair the mechanisms from frame distortions. Depressurization of windows, cracks in double-glazed windows, loose closing of sashes with damage to profiles may also occur. In winter, due to the significant installation gap, freezing, condensation, and damage to slopes are possible.
Which seal material is better?
Protection from noise and dust is guaranteed not only by the glass with the profile, but also by a small accessory: a sealing harness. Features depend on the material of manufacture.
Rubber
Rubber is an excellent sealant. If you want them to last for more than 25 years without deforming due to temperature changes or bad weather, it is recommended to choose rubber seals. The only drawback is the color, exclusively black.
Silicone
Modern material that provides good insulation for 35-40 years. Environmentally safe, not afraid of frosts up to 40 degrees, heat, sun. A negative property is a low level of resistance to mechanical wear, for example when frequently opened for ventilation.
EPDM
Based on ethylene propylene diene rubber. To serve the stated time (18-20 years) it requires care.
TRE
According to the stated characteristics, thermoplastic elastomer resembles soft rubber and provides reliable protection in corners and hard-to-reach places where previous options may sag.
Installation diagram
Before you begin installing windows, an appropriate diagram must be drawn so that when performing work you do not violate the requirements for the location of fasteners and other structural elements, in order to protect the structure from deformation during significant temperature changes.
In this case, the maximum distances between fasteners and frame structures are :
- white profile, 700 mm;
- PVC profile, colored, 600 mm;
- gap from the window corner: 200 - 250 mm;
- from the impost connection to the fasteners: 150 - 180 mm;
- the smallest depths in concrete, 40 mm;
- on traditional brick, 40 mm;
- on hollow brick, 60 mm;
- on concrete blocks, 50 mm;
- concrete blocks, 60 mm.
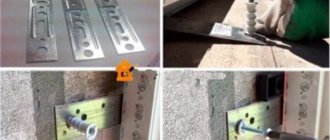
Colored PVC windows must be secured exclusively with anchor plates. This is due to the fact that colored structures have a linear expansion coefficient that is 2 times higher than white ones. In addition, the anchor plate must be fixed to the wall, and not to the plaster and slope. It is placed under sealing mounting tapes.
Recommendations for choosing fittings and accessories
Correctly selected and installed fittings only seem like a trifle, but in fact it is 50% of the success of a plastic window. If, when ordering, you choose an excellent profile and double-glazed window, but install a cheap frame, you will hardly be able to enjoy using the windows in the future.
Trunnions
Press the sash against the frame. They protect plastic windows from burglary: they are made of metal, there are three classes - WK3 is considered reliable.
Circuit breakers
The standard ones do not allow the sash to fall out in the position between modes. There are also child locks - for example, to prevent a child from opening a window on his own.
Microlift
A small addition that helps extend the service life of plastic windows and fittings by distributing the load from the hinges and frame.
Pens
The shape and design have more of a decorative function. The exception is a convenient handle with a lock, which helps protect the sash from being opened by a child.
Loops
They take on the main weight of the sashes, so they are selected depending on the profile and glass unit: for heavy multi-chamber ones, reinforced ones would be the right option.
In addition to the listed basic accessories, there are also add-ons in the form of automatic transoms, holders, clamps and other bells and whistles. If you want to make the design more convenient, tell the seller your requirements and he will select the appropriate fittings.
Installation of windows with and without unpacking: sequence, features, advice from professionals
The installation of plastic windows is specific, so this work requires a special set of tools and materials, without which it is almost impossible to install windows correctly and accurately. If you can’t buy the things you need in a specialized store, you can contact a window company - the professionals will definitely find what you’re missing.
Below is a list that you can simply print out and take with you when you go shopping for tools and materials:
- plumb and level
- screwdriver and hammer drill
- drill with a set of drills
- gun and mounting foam;
- hacksaw or jigsaw
- small crowbar or pry bar
- silicone gun
- chisel or knife with a wide blade
- mounting wedges
- tape measure and pencil
- roll moisture-proofing material
- sheets of iron (galvanized) and metal scissors (needed for making drains yourself)
The main stages of installing PVC windows:
- dismantling the previous structure and window sill;
- preparing a new window for installation;
- marking the frame for subsequent fastening;
- fixing fasteners to the frame;
- making holes for fasteners;
- leveling the plastic structure;
- securing the structure in the opening;
- installation of low tide (can be done at the end of the process);
- intermediate adjustment of fittings;
- foaming the cavities between the window opening and the frame;
- window sill installation;
- final adjustment of fittings.
Each stage of installing a plastic window should be considered separately.
Dismantling old window structures
- When dismantling a window without sashes, simply remove the glazing beads and then remove the glass. If the windows are opening, then the sashes are removed from the hinges. If it is impossible to do this, remove the sashes along with the glass. However, if the windows are very old and rickety, then it is necessary to remove the glass.
- We saw through the old frame in several sections. This is done with a hand saw or grinder (just take a circle on concrete, other circles jam or break, which is quite dangerous). After sawing, the old frame can be easily removed using a crowbar, hammer drill and other tools. A wooden frame in good condition can be left. Inspect the condition of the block, remove damaged, rotten areas, treat the frame surfaces with fire and bioprotective compounds. However, experience shows that wall material is better for installation: the size of the window increases, a reliable fastening is obtained and there is completely no risk of the frame rotting in the future. The only exception is when the windows are intended for wooden buildings. Then the windows cannot be placed directly into the wall of the house, otherwise they will be damaged when the building shrinks (details here - Installing plastic windows in a wooden house with your own hands).
- We dismantle the wooden window sill in the same way as the frame: saw through it and remove it in parts, helping ourselves with improvised tools. You will need to tinker with the concrete window sill: it is not so easy to break it. Use a jackhammer or grinder. There is no need to break a good window sill, you can leave it. But a plastic window sill is still warmer. In addition, when leaving a window sill, be prepared for the fact that there will be a gap between it and the window frame. It needs to be sealed with a mixture that is thrown over the “skeleton” of mesh. In this case, cracks almost always appear. To avoid this, you can lay tiles at the top of the window sill.
- Cleaning the window opening from dirt, debris and dust.
Preliminary stage: preparing the window for installation
Windows with movable sashes are mounted closed. When installing a window open, there is a risk of deformation of the structure (the foam that will fill the gap between the opening and the frame can bend the frame). After foaming, the window is left for 12 hours, during which it cannot be opened. And to avoid accidental opening of the sash, you can postpone the installation of the handle until the installation of the window is completed.
It is not recommended to remove the tape that covers the surface of the window to protect it from damage until the installation of the structure and finishing of the slopes are completed.
PVC window installation sequence
Marking on the frame for fastening points
We retreat 5-15 centimeters from the corner of the frame and mark a place for the outermost fixing element. The frame needs to be fastened on 4 sides, the fasteners are located every 70-100 cm. If a stand profile is used, the frame is not fastened from below.
Fixing the fastener to the frame
Fastening elements include self-tapping screws, anchor plates, and U-shaped hangers for drywall.
Anchor plates and hangers have the same price - $0.05 (wholesale), $0.15 (retail). However, anchor plates are thicker than hangers. When purchasing, give preference to products made from thicker metal.
The fastener must be tightly secured in the metal frame frame. In order for the element to secure well, the screws must be used for metal. Such products have a drill at the end and a diameter of 4 mm. You can also use simple self-tapping screws, only in this case you need to first mark the holes in the frame with a drill.
Applying recesses for fasteners
We place the frame with the fasteners attached to it in the window opening, then knock out recesses in the opening in the appropriate places (depth 2 - 4 cm, width similar to the size of the fasteners). The fasteners will later sink into these recesses. By completing this procedure, we will make it easier for ourselves to finish the slopes.
Tip: when installing a window without a mounting strip, you should place blocks of wood or other dense material under it so that it rises to the height of the window sill. Then it will be possible to attach the window sill not to the window frame, but under it. If there is a mounting plate, the frame will automatically rise to the desired height. Typically, the mounting strip is already fixed to the frame and does not require additional fixation.
Leveling the window structure
This stage is the longest in the entire window installation procedure. However, by aligning the window in the vertical and horizontal planes, we automatically give it the correct rectangular shape. To level the structure, you need wooden wedges or bars that are placed under the frame. The first pair of lower wedges is set, then you can immediately fix the window from above with an anchor plate. Next we place two wedges at the top, then on the left and right at the bottom and top of the window. If there is an impost, you also need to put a wedge under it. During these actions, it is important to ensure that the vertical posts do not deviate to another plane. It is convenient to level the window with two people, when one supports the structure, the second inserts wedges.
Attaching the window to the opening
Having achieved a perfectly level position of the window, i.e. Having set it correctly in level, we can proceed to fastening the structure. To do this, use dowels (diameter 6-8 mm, length 75-80 mm) or anchors (diameter 6-8 mm). The latter have a higher cost, but provide more reliable fixation. They are recommended to be used if the wall consists of shell rock, brick or foam concrete. Fastening on anchor plates is used if the block structure contains a thermal insert and the frame in the mounting plane cannot be mechanically secured. A dowel driven into concrete can withstand a load of up to 60 kg, which is quite enough to fix a window. For wooden walls, you can use screws with a diameter of eight millimeters.
Advice: do not immediately tighten the screws on the sides of the frame completely, leave 1 cm until they stop. There is no need to screw in the construction screws in the upper part of the structure yet. The frame will not go anywhere, and you will have the opportunity to check the uniformity of the gaps on the sides and, if necessary, move the frame in one direction or another. After the final fastening, this will be more difficult. If the uniformity of the gaps is satisfactory, the horizontal/vertical structure is maintained, you can completely fix the frame by screwing in the screws on top and tightening the remaining screws on the sides. After this, it is worth checking the horizontal and vertical structure again.
Fastening the ebb of a plastic window
Installation of ebb tides can be done at the very end. You can buy the ebb ready-made or make it yourself. It is best to secure this element under the window - this will prevent the penetration of water where it connects to the frame. Upon completion of the installation of the drain, the space between it and the profile is filled with foam. If it is not possible to attach the ebb under the frame, it is fixed directly to it, for which 9 mm metal screws are used.
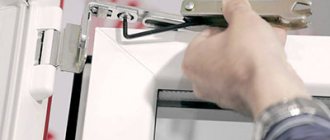
Intermediate adjustment of fittings
It is necessary to tighten or loosen the window hinges so that the sash moves silently and freely when opening and closing. An open sash should not slam shut on its own. Correctly adjusted hinges will allow it to remain in the desired position.
When moving, does the sash “strike” where the locking hardware is installed? Move this element a little lower or higher.
Foaming the gaps between the opening and the frame
It is important to fill the gaps so that there are no voids left. Large cracks (more than two centimeters) are foamed in several stages, with a break between them of two hours. With this approach, there is no danger that the foam will deform the window as it expands. In addition, the consumption of polyurethane foam is saved, there is no excess that has to be cut off, and the quality of the assembly seam improves.
Since the foam hardens under the influence of atmospheric moisture, a lack of humidity in the room can lead to poor-quality polymerization. To avoid this, you need to lightly spray the area between the window opening and the frame with water before foaming, and after filling the cavity, spray the surface of the foam itself with water. If the air temperature during installation does not exceed five degrees, then winter or all-season foam is used. In warmer weather, you can use summer foam.
After polymerization of the foam, it is necessary to protect it from exposure to ultraviolet radiation. This stage can be combined with finishing the slope. But if you don’t want to make slopes yet, or plan to do it later, then the foam needs to be covered immediately, since it quickly collapses due to exposure to direct sunlight. In this case, we prepare a cement-sand mortar at the rate of 1 part cement and 2 parts sand, or dilute tile adhesive and cover the foam with any of these materials. In addition, you can purchase PSUL tape (vapor-permeable self-expanding sealing tape) at a hardware store and cover the polyurethane foam with it. However, the cost of the tape is quite high (from $3 per linear meter), so the first options are used more often.
Window sill installation
1. Trimming. The window sills have a standard length and width and have a good margin, both in length and width. Before installation, the window sill is cut using a jigsaw, grinder or saw with small teeth.
2. Leveling. We move the window sill to the support profile and level it using wooden blocks or other available materials.
We cover the side sections of the window sill with end caps. It is better to glue the plugs to the ends with super glue.
By lightly pressing the window sill with your hand, we make sure that it does not sag. In some cases, the window sill is not installed level, but at a slight angle (no more than 3 degrees) “from the window.” Thanks to this slope, possible condensation does not flow under the window.
We foam the cavity under the window sill.
After foaming, place something heavy on the surface of the windowsill (you can use plastic water bottles or books for this purpose) and leave it like that for 0.5 days.
If you do not press down the window sill with a load, it will bend upward under the influence of foam.
3. One day is enough for the foam to completely harden. After which its remains, sticking out unsightly from the crack under the window sill, need to be cut off using a utility knife.
4. If the window sill was initially uneven, then during installation there may be a gap left between its upper part and the frame. It is carefully filled with silicone. It is worth considering that this material has low biostability and can turn black from fungus. A gap will not appear if galvanized iron plates in the shape of the letter “Z” are fastened to the window sill profile in advance (before installation). In addition to the fact that these plates will allow you to grind the window sill tightly, they will simplify the task of leveling it.
Final window adjustment
At this stage, you can remove the protective tape from the window structure and finally screw on the handle. If finishing the slopes is postponed, do not remove the tape until all finishing work is completed.
What is important to know about manufacturers?
Today there are a great many companies installing plastic windows, but most do not manufacture, but resell designs from well-known manufacturers. Popular companies:
- Veka. Plastic windows made according to German standards: the plastic does not fade, the rubber seal does not crumble in cold or hot weather. Durability and tightness at an average price.
- Rehau. One of the innovators in the field of window production: specialists work annually on safer, energy-saving systems. The products cannot be called cheap or expensive, but rather high quality at an average price.
- KBE. The company has established itself in the market as a manufacturer of modern mechanisms for hospitals and children's institutions. The line includes models for apartments and houses: both at high and low prices.
- Trocal. The production of plastic windows began in the mid-1950s, so the technology is time-tested. They feature eco-friendly Greenline profiles - an excellent option if caring for the environment is one of your priorities.
- Proplex. Russian production with the participation of European specialists: there is not much time on the market, but they compare favorably with competitors by paying attention to the problems and requirements of the local climate.
To ensure the quality guaranteed by well-known companies, be sure to check the documents for the product: it must clearly state the manufacturer, guarantees and other characteristics.
Does it make sense to install a plastic window yourself?
First, let's try to figure out the question: does it even make sense to install PVC windows with your own hands? Contrary to popular belief, installing windows is not that difficult. To perform it, you do not need to stock up on professional equipment or gain special experience over a long period of time. The installation procedure itself consists of two stages:
- dismantling the old structure;
- installation of a new plastic window.
Usually dismantling takes from 0.5 to 1.5 hours. The actual installation of the window (we take an average window measuring 2x2 m) will take another couple of hours. It turns out that it will take a maximum of three and a half hours to replace one window. Therefore, during Saturday-Sunday you can freely change at least 2 windows without resorting to the help of specialists. Considering that installers charge $40-60 for installing each window, we get quite a good saving. Some companies set installation costs as a percentage of the cost of the windows. This amount varies among different specialists and is about 10-40% of the price that is proposed to be paid for the windows. Also, when ordering windows from specialized companies, they can deliver the new structure to your home and dismantle it free of charge.
When entrusting the installation of windows to specialists, you can demand the following guarantees:
- When purchasing windows from a third-party company, installers provide a guarantee only on installation seams and their filling, the correct geometry of individual elements and the functionality of the window structure for 1 year after the work has been completed. Since self-installation practically deprives you of the warranty on window structures, you need to be more careful in choosing products. It is better to prefer windows manufactured at the factory, in compliance with all technical requirements and conditions. Handicraft products are a “pig in a poke”, the quality and functionality of which can present an unpleasant surprise. In this regard, to purchase window structures, it is advisable to contact directly a manufacturing company that has been operating on the market for a long time and has good reviews from numerous clients. By the way, if you order windows in winter or spring (that is, out of season), you can get a significant discount;
- when purchasing windows from a company that carries out installation work, the customer receives a warranty on the fittings - from one to 5 years (the more expensive the windows, the longer the warranty period, as a rule);
- If the windows are installed with your own hands, then a warranty on the fittings must be requested at the place where the structures were purchased. You will have to take full responsibility for the quality of the seams.
Do-it-yourself installation of PVC windows should be done if you have:
- a couple of free days (weekends as an option);
- hard work and desire to learn something new;
- desire to save money.
If all of the above is present, then the recommendations outlined in this article will allow you to successfully replace the windows in your house, doing it no worse than a professional installation team. Actually, a whole team is not required to install the window; two people will be enough, one of whom will carry out the installation, and the other will hold the structure and provide the necessary tools. Despite the apparent complexity, self-installation of PVC windows is a fairly simple process, representing a combination of several simple operations performed in a given sequence. Before you begin installation, you need to order a window, and this requires correct preliminary measurements. So…
What to consider in visual characteristics?
Although it is more difficult to choose windows based on their characteristics, you should also pay close attention to their appearance. For example, deliberately modern models in an old rustic style will look alien.
The shape and number of flaps are determined not only by their appearance, but also by the thickness of the package: the more chambers and the heavier the flap, the more compact it should be.
The color of PVC windows is usually white, but if desired, you can order plastic in any shade: red, yellow, blue, black. Or choose models with an imitation of wood structure - from light to dark.
The color of the glass also plays a role: usually transparent, but in rooms facing south, tinted glass would be appropriate. Although it is more practical and cheaper not to darken the windows, but to tint them with film.
Plastic windows are a technically complex mechanism that requires attention. But you don’t have to study all the nuances yourself; contact a trusted company with good reviews and entrust the choice to specialists.
Main mistakes
Despite the apparent simplicity of window installation, novice performers make many mistakes in this process, which lead to unsatisfactory functionality of the unit and its premature failure.
The most common mistakes in installing PVC windows:
- Improper thermal and waterproofing of window openings leads to the creation of “cold bridges” at the joints and moisture condensation on the surfaces of the block.
- Poor-quality deposition of the frame in the wall: a decrease in the permissible gaps leads to the impossibility of sealing in these places, and a large gap creates an excessive load on the fasteners, causing their deformation with subsequent possible loss of the block.
- A closed drainage hole in the frame destroys the window structure and reduces its tightness.
- There is no protective strip on the window sill, which allows water to get under the window frame, dampening the wall and causing corrosion of the fasteners.
- If the fastening to the wall is installed poorly, with an insufficient number of anchors, the window can be torn out of the opening by wind pressure.
- The frame was installed without supporting wedges, which will lead to destruction of the plaster and deformation of the block, and through the resulting cracks, moisture and drafts will enter the rooms.
- Small volume of filling joints with construction foam, violation of the thermal resistance of the window.
- A vapor barrier membrane is not installed on the inside and a vapor-permeable membrane on the outside of the frame, which destroys the thermal insulation, with subsequent penetration of moisture and drafts into the room.
- The dimensions of the block are measured incorrectly; in principle, with such an error, in most cases it is impossible to install a window; the window opening will need to be changed, which in multi-storey buildings is very problematic, since it will require additional coordination with the operating organization.
- Poor preparation of the window block, a dirty surface does not allow the mounting foam to firmly adhere to the gap.
- The fastener installation pattern is not consistent; the frame can be squeezed out of the opening by the wind.
- The drip tide is not secured with metal brackets and does not have a sound-absorbing gasket; water can get inside the room and create increased noise during rain.
Basic Rules
By providing the company with incorrect dimensions, the customer takes responsibility for the result. Due to data errors, product distortions and other defects may occur. That's why it's so important to know how to measure a window correctly in some situations.
Width and height measurements are taken from outside and then from inside the room to ensure that the dimensions are the same. The width of the window must be measured 3 times - at the bottom, in the middle and at the top. Then the smallest value is taken.
It should be remembered that the measurements must be taken correctly, taking into account the existing features. This can only be done by a specialist who has experience in construction and knows the parameters of PVC products.
What does the price consist of?
Pricing for installation work of PVC windows depends on many factors, which include :
- wall material;
- condition of the window opening;
- the need to dismantle the old window;
- window size;
- installation floor;
- brand of window block;
- window class: economy, standard and elite;
- quality of consumables;
- additional installation work, for example, making slopes, installing ebb and flow sills;
- transport invoices.
The installation price of window structures is determined per 1 m2 and for standard equipment is:
- window installation from 850 rub./m2;
- installation of slopes from 400 rub./m.p.;
- installation of window sills from 800 rub./m.p.;
- remote opening of sashes from RUB 5,500/set;
- anti-burglary fittings from RUB 7,000/set.
Read more about pricing in the article here.