Today, owners of houses and apartments are massively replacing old wooden windows with practical and durable PVC structures. And this choice is quite justified for a number of reasons:
- Due to increased thermal insulation, material costs for heating are significantly reduced.
- High functionality and modern materials make it possible to avoid additional window maintenance work: tinting the frames to give them an aesthetic appearance; caulking cracks to insulate windows for the winter; removing the insulation from the window in the spring; pulling gauze over the sashes to protect against mosquitoes and other midges and other work that is implied in the operation of wooden window structures.
- A sealed double-glazed window well insulates the room from noise, allowing you to maintain home comfort and protect the peace of the owners.
- The structures have a long service life while maintaining impeccable functionality and aesthetic appearance.
- The cost of a plastic window is lower than a similar wooden product. For example, the price of an unpainted double wooden frame without glass measuring 120x90 cm is 3,600 rubles, and a plastic window is 5,500 rubles. However, a wooden window will still need to be glassed and painted, which means additional time and materials. Whereas the plastic window is already ready for installation.
Those who are going to take on the task of installing plastic windows with their own hands often lack basic knowledge of how to do it correctly. That’s why we present this article here in the form of instructions to help owners who want to carry out the installation themselves.
Installing plastic windows has a number of nuances. For example, PVC windows are not such universal designs. And their use has a number of limitations. Thus, it is not recommended to use plastic windows in cold rooms without heating (verandas, canopies, attics, garages, bathhouses, etc.). By the way, window production and installation companies prefer not to talk about this. In addition, problems may arise when installing PVC window profiles in multi-storey buildings above the 4th floor.
When choosing a contractor to replace windows in your house, you may encounter the fact that the craftsmen simply will not delve into the intricacies of this issue. There are only a few people who have control over the situation and can comprehensively cover it.
Does it make sense to install a plastic window yourself?
First, let's try to figure out the question: does it even make sense to install PVC windows with your own hands? Contrary to popular belief, installing windows is not that difficult. To perform it, you do not need to stock up on professional equipment or gain special experience over a long period of time. The installation procedure itself consists of two stages:
- dismantling the old structure;
- installation of a new plastic window.
Usually dismantling takes from 0.5 to 1.5 hours. The actual installation of the window (we take an average window measuring 2x2 m) will take another couple of hours. It turns out that it will take a maximum of three and a half hours to replace one window. Therefore, during Saturday-Sunday you can freely change at least 2 windows without resorting to the help of specialists. Considering that installers charge $40-60 for installing each window, we get quite a good saving. Some companies set installation costs as a percentage of the cost of the windows. This amount varies among different specialists and is about 10-40% of the price that is proposed to be paid for the windows. Also, when ordering windows from specialized companies, they can deliver the new structure to your home and dismantle it free of charge.
When entrusting the installation of windows to specialists, you can demand the following guarantees:
- When purchasing windows from a third-party company, installers provide a guarantee only on installation seams and their filling, the correct geometry of individual elements and the functionality of the window structure for 1 year after the work has been completed. Since self-installation practically deprives you of the warranty on window structures, you need to be more careful in choosing products. It is better to prefer windows manufactured at the factory, in compliance with all technical requirements and conditions. Handicraft products are a “pig in a poke”, the quality and functionality of which can present an unpleasant surprise. In this regard, to purchase window structures, it is advisable to contact directly a manufacturing company that has been operating on the market for a long time and has good reviews from numerous clients. By the way, if you order windows in winter or spring (that is, out of season), you can get a significant discount;
- when purchasing windows from a company that carries out installation work, the customer receives a warranty on the fittings - from one to 5 years (the more expensive the windows, the longer the warranty period, as a rule);
- If the windows are installed with your own hands, then a warranty on the fittings must be requested at the place where the structures were purchased. You will have to take full responsibility for the quality of the seams.
Do-it-yourself installation of PVC windows should be done if you have:
- a couple of free days (weekends as an option);
- hard work and desire to learn something new;
- desire to save money.
If all of the above is present, then the recommendations outlined in this article will allow you to successfully replace the windows in your house, doing it no worse than a professional installation team. Actually, a whole team is not required to install the window; two people will be enough, one of whom will carry out the installation, and the other will hold the structure and provide the necessary tools. Despite the apparent complexity, self-installation of PVC windows is a fairly simple process, representing a combination of several simple operations performed in a given sequence. Before you begin installation, you need to order a window, and this requires correct preliminary measurements. So…
Frame mounting options
It is attached to metal plates or anchor bolts.
The first option is more reasonable, because:
- the camera inside the profile will not supply excess voltage to the glass block;
- water will not flow into the holes in the profile, and the waterproofing will not be damaged.
The fastening plate is secured with self-tapping screws to the installation profile or to the anchor.
Anchor bolts are a simple, inexpensive option. It is often used by installers. Holes are drilled in the frame and anchors are inserted to secure the frame. Although drilling through causes a deterioration in the thermal insulation properties of the window profile and a decrease in the tightness of the chamber. In this case, the aesthetics of the transom are violated, because The heads of the screws will stick out from the profile when the window is open.
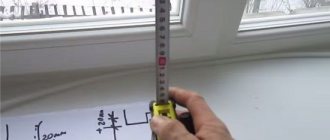
Window measurements: everything you need to know
First, we determine the type of window opening.
It can be of two types: either with a quarter or without a quarter.
Taking measurements of a window without a quarter
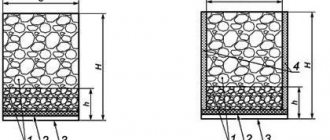
A clean window opening is the easiest to measure. Such an opening is found only in a new house. We measure the opening itself in the vertical plane and subtract 5 centimeters from the resulting figure. We have height. Of these 5 centimeters, 1.5 centimeters will be filled with mounting foam at the top of the window, and 3.5 centimeters will be laid for installing the window sill. Similarly, we measure the opening in the horizontal plane, subtract 3 centimeters for the gaps (1.5 cm on the right and left) and get the width of the window.
Next, measure the length and width of the ebb and window sill. To the resulting dimensions you need to add from 5 to 20 centimeters in order to “embed” the window sill a little into the wall on both sides. If you are getting down to business for the first time, then set the size of the window sill larger - during installation, all excess will be cut off. As a rule, window sills and ebbs have a standardized width (10-60 cm) and length (up to six meters). Having minimal dimensions, installers will be able to select and deliver the most suitable parts.
We take measurements of the window and a quarter
Width: measure the opening in the horizontal plane between the quarters and add three centimeters to the resulting figure (one and a half centimeters on each side). Height: measure the distance from the bottom edge of the opening to the edge of the top quarter. There is no need to add or subtract anything from the resulting figure.
The window sill and ebb are measured, as in the first option.
As a result, after all the measurements made, we should have written down:
- window height and width;
- length and width of the ebb;
- length and width of the window sill.
When replacing old windows, the previous structure is located in the opening, which means that the opening itself cannot be measured. Therefore, it is necessary to take measurements from the window frame, which will subsequently be dismantled.
When ordering a window, try to find out what comes with the windows. Typically the following elements are included:
- windowsill;
- end caps. To choose the right plugs, you need to indicate the width of the window sill (the protruding part from the wall);
- installation profile;
- anchor plates – structural fastening elements.
If these parts are not included in the kit, you will have to purchase them additionally.
In addition to dimensions, other data may be required:
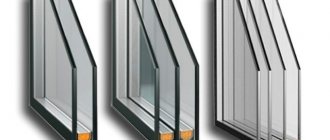
- profile type (number of cameras);
- double-glazed window option (number of glasses and air chambers);
- type of opening window sashes. The most common: swing, tilt and turn with ventilation, combined. In addition, in some cases, blind windows are installed that cannot be opened. The type of opening is determined by the fittings installed in the structure. The ease of use, functionality and durability of the window depend on the type and quality of the fittings. There are several types of window openings. For convenient ventilation, the window should be equipped with tilt-and-turn fittings. Blind versions of the sashes are unsuitable for ventilation; conventional hinged sashes without turning are inconvenient.
Stage 7. Window assembly
Window assembly
Installation of plastic windows
After attaching the anchors, the glass unit is inserted back.
Step 1. The glass is inserted and fixed with glazing beads (the latter should snap into place, for which you can lightly tap them with a rubber hammer).
Step 2. The doors are opened and their tightness is checked. In the open position, arbitrary opening/closing of the sash cannot happen if the window is installed level.
Step 3. The assembly seam is sealed on the sides. Polyurethane foam will provide high-quality waterproofing and prevent glass fogging. Before and after sealing, the seams are sprayed with water to improve polymerization.
Note! The seams are filled to no more than 90%, otherwise the structure will “lead.” If everything is done correctly, after drying the foam will protrude out a few centimeters.
Step 4. The perimeter of the window is glued with a special vapor barrier tape, and material with a foil surface is used underneath.
Stage 8. Installation of the window sill
Installing a window sill
Step 1. The window sill is cut so that it fits into the opening and at the same time rests against the lining profile. There remains a small gap (about 1 cm) for thermal expansion. In the future, the gap is hidden by plastic slopes.
Step 2. Wooden wedges are placed under the window sill. It needs to be laid with a slight slope towards the room, and then applied with something heavy until the foam dries. Additionally, the window sill can be fixed with anchor plates.
Window installed
Video - Instructions for installing plastic windows
Thermal conductivity and sound insulation of the window: so that noise and cold do not sneak into the house
Thermal conductivity of plastic windows
In addition to the manufacturer, when choosing a window, it is also necessary to take into account such quality as the thermal conductivity of the structure. According to SNiPs and territorial building codes, the heat transfer resistance coefficient of a window varies depending on the climatic conditions of the region of residence. Structures that are installed in residential premises should not have a heat transfer resistance lower than that specified for the specific region of residence.
Thermal conductivity directly depends on the design and type of glass used in the double-glazed window. If you order windows with energy-saving glass, the thermal insulation of structures increases by 10-15%. The cost of energy-saving glass is about 250 rubles. for 1 sq. m.
The thermal conductivity of a window may decrease due to poor-quality installation, or less often due to manufacturing defects. Very often, in the process of improper installation, a chip or crack appears on a double-glazed window, and the structure loses one of its main qualities - tightness. Visually, this manifests itself as fogging of the inner surface of the glass. As a result, in winter the room will become colder, and the house will have to be heated more.
To improve the thermal conductivity parameters of the window, you can prepare a support profile. From the point of view of thermal conductivity, the stand profile is the weakest point in the window structure. To attach the drain, you will have to drill it, which will further worsen the thermal conductivity parameters. To normalize the thermal insulation properties of the window, the internal volume of the stand profile can be filled with polyurethane foam. This should be done the day before installing the window so that the foam completely hardens. Foaming of the stand profile is not provided for by GOST; window companies also do not practice this operation.
Soundproofing properties of plastic windows
This parameter is essential if there is a busy highway or railway near the house. However, it is always more pleasant if external noise from the street does not penetrate inside the house. And this cannot be achieved without high-quality window sound insulation.
Answers to possible problems
REHAU specialists have prepared their answers to possible problems that arise due to improper installation of metal-plastic windows. This is a large European manufacturer of modern construction solutions (including window systems). Its employees pay great attention not only to the image of the finished product, but also to the quality of installation materials. And, as we have already found out, just like the quality of window systems, it is of paramount importance.
The first point in the manufacturer’s regulations is strict adherence to technology. Let's look at the key principles on which it is based.
Methods for installing PVC windows: to unpack or not to unpack – that is the question!
When installing windows, you need to choose the type of installation - with unpacking (unpacking) or without unpacking. Want to understand how these two methods differ from each other? Take a look at the diagram of a plastic window.
- The frame is one of the main elements of a window. The frame is formed from a reinforced PVC profile and several sealed chambers. The number of cameras can vary from two or more.
- A double-glazed window is the largest element of a window, occupying about 80% of its area. It is a sealed structure consisting of glass. Depending on the number of glasses and air gaps between them, it can be single-chamber, double-chamber, etc. The double-glazed window fits tightly to the frame due to the seal.
- Glazing beads are parts that allow you to mechanically secure a glass unit to the frame.
- An impost is a separator through which a window is divided into several sashes. There are single-leaf, double-leaf, three-leaf, etc. designs.
- A blind sash is a sash without an opening mechanism.
- A transom is an opening sash.
- Sill (other names: bottom, mounting, stand) profile is a load-bearing element of a window structure. It is necessary for the correct installation and fastening of a plastic window sill and external drain indoors.
- Fittings are all moving parts of the structure designed to open, close, and secure the transom when ventilating the room.
Window installation method with unpacking
(in some regions the term “unpacking” is used, the essence is the same). This method is based on preliminary disassembly of the structure: glazing beads and double-glazed windows. After fixing the frame to the wall throughly, all removed elements are installed again.
To quickly and correctly unpack the structure, you need a strong knife or chisel. We insert a knife blade or chisel between the glazing bead and the frame, and with gentle blows on the handle, knock the glazing bead out of the groove until a gap appears. Then we bend the knife (chisel) and push the elements apart with the wide side. We consistently do this with all the glazing beads that hold the glass unit in the sash. It is not recommended to do this procedure with the sharp end of a knife, since it increases the risk of damaging the window or glazing bead. To remove the glass unit, be sure to wear gloves, otherwise you will injure your hands on the sharp corners of the structure. If the window is not solid and there are sashes, remove them. If there is a transom in one of the sashes, it is easier to remove the entire assembly without removing the glass unit. That's it, the structure is ready for installation.
Disadvantages of the method
: more labor-intensive, takes longer than installation without unpacking (on average, 30-60 minutes are added for each window). Often, fogging of the glass unit occurs in a window installed using this method. In addition, the appearance of the glazing beads may be damaged (scratches, chips) if they are removed/installed carelessly. It is important to perform all actions clearly and carefully. After removing the packages, you need to put them in a safe place where there is no chance of accidentally touching them and breaking them.
Advantages and scope of application of the method
: installation of windows with unpacking is more reliable and provides a strong fixation of the frame to the wall. This method should be chosen in the following cases:
— it is planned to fasten windows in multi-story buildings (from the 15th floor). When installing windows on the lower floors, where there is no wind and gusts of wind, they do not need to be unpacked;
— installation of structures of considerable size is to be done. However, in this case, combined installation is allowed (the balcony block is attached without unpacking).
Window installation method without unpacking
This method does not require disassembling the structure. That is, there is no need to remove double-glazed windows and glazing beads. The frame is secured to the wall not with dowels, but with fasteners pre-installed on the outside of the wall.
Advantages and scope of application of the method:
Installing windows without unpacking saves time, shortening the process as much as possible. This method is recommended for use where there is no need for increased fastening strength: when replacing standard windows in private houses, and also, as mentioned earlier, in multi-storey buildings below the 15th floor.
Preparation algorithm
Correct installation of a window structure begins with preparation:
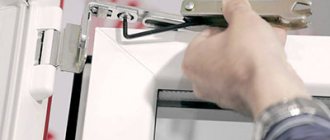
- The shutters are removed from the frame - first, the pin on the hinge on top is pulled out with screwdrivers or pliers. He is picked up and pushed out.
- After removing the top pin, remove the bottom one.
- The glass unit without sashes is removed after removing the glazing beads. You will need a knife or thin spatula. The tool is placed in the hole between the glass and the frame, then smoothly moved to the side.
- The protective film is removed from the outside.
- Markings of fasteners are applied in increments of 0.4 mm. The fixation point is removed from the corner by 15 cm.
- Fixing fasteners for mosquito nets.
- Closing the drain with decorative plugs.
- Gluing vapor-permeable seals that expand independently and waterproofing materials around the perimeter of the frame.
- Sealing of additional parts and support profile with PSUL tape.
On a note! Without sealing, the profile will not fit tightly to the opening.
Installation of windows with and without unpacking: sequence, features, advice from professionals
The installation of plastic windows is specific, so this work requires a special set of tools and materials, without which it is almost impossible to install windows correctly and accurately. If you can’t buy the things you need in a specialized store, you can contact a window company - the professionals will definitely find what you’re missing.
Below is a list that you can simply print out and take with you when you go shopping for tools and materials:
- plumb and level
- screwdriver and hammer drill
- drill with a set of drills
- gun and mounting foam;
- hacksaw or jigsaw
- small crowbar or pry bar
- silicone gun
- chisel or knife with a wide blade
- mounting wedges
- tape measure and pencil
- roll moisture-proofing material
- sheets of iron (galvanized) and metal scissors (needed for making drains yourself)
The main stages of installing PVC windows:
- dismantling the previous structure and window sill;
- preparing a new window for installation;
- marking the frame for subsequent fastening;
- fixing fasteners to the frame;
- making holes for fasteners;
- leveling the plastic structure;
- securing the structure in the opening;
- installation of low tide (can be done at the end of the process);
- intermediate adjustment of fittings;
- foaming the cavities between the window opening and the frame;
- window sill installation;
- final adjustment of fittings.
Each stage of installing a plastic window should be considered separately.
Dismantling old window structures
- When dismantling a window without sashes, simply remove the glazing beads and then remove the glass. If the windows are opening, then the sashes are removed from the hinges. If it is impossible to do this, remove the sashes along with the glass. However, if the windows are very old and rickety, then it is necessary to remove the glass.
- We saw through the old frame in several sections. This is done with a hand saw or grinder (just take a circle on concrete, other circles jam or break, which is quite dangerous). After sawing, the old frame can be easily removed using a crowbar, hammer drill and other tools. A wooden frame in good condition can be left. Inspect the condition of the block, remove damaged, rotten areas, treat the frame surfaces with fire and bioprotective compounds. However, experience shows that wall material is better for installation: the size of the window increases, a reliable fastening is obtained and there is completely no risk of the frame rotting in the future. The only exception is when the windows are intended for wooden buildings. Then the windows cannot be placed directly into the wall of the house, otherwise they will be damaged when the building shrinks (details here - Installing plastic windows in a wooden house with your own hands).
- We dismantle the wooden window sill in the same way as the frame: saw through it and remove it in parts, helping ourselves with improvised tools. You will need to tinker with the concrete window sill: it is not so easy to break it. Use a jackhammer or grinder. There is no need to break a good window sill, you can leave it. But a plastic window sill is still warmer. In addition, when leaving a window sill, be prepared for the fact that there will be a gap between it and the window frame. It needs to be sealed with a mixture that is thrown over the “skeleton” of mesh. In this case, cracks almost always appear. To avoid this, you can lay tiles at the top of the window sill.
- Cleaning the window opening from dirt, debris and dust.
Preliminary stage: preparing the window for installation
Windows with movable sashes are mounted closed. When installing a window open, there is a risk of deformation of the structure (the foam that will fill the gap between the opening and the frame can bend the frame). After foaming, the window is left for 12 hours, during which it cannot be opened. And to avoid accidental opening of the sash, you can postpone the installation of the handle until the installation of the window is completed.
It is not recommended to remove the tape that covers the surface of the window to protect it from damage until the installation of the structure and finishing of the slopes are completed.
PVC window installation sequence
Marking on the frame for fastening points
We retreat 5-15 centimeters from the corner of the frame and mark a place for the outermost fixing element. The frame needs to be fastened on 4 sides, the fasteners are located every 70-100 cm. If a stand profile is used, the frame is not fastened from below.
Fixing the fastener to the frame
Fastening elements include self-tapping screws, anchor plates, and U-shaped hangers for drywall.
Anchor plates and hangers have the same price - $0.05 (wholesale), $0.15 (retail). However, anchor plates are thicker than hangers. When purchasing, give preference to products made from thicker metal.
The fastener must be tightly secured in the metal frame frame. In order for the element to secure well, the screws must be used for metal. Such products have a drill at the end and a diameter of 4 mm. You can also use simple self-tapping screws, only in this case you need to first mark the holes in the frame with a drill.
Applying recesses for fasteners
We place the frame with the fasteners attached to it in the window opening, then knock out recesses in the opening in the appropriate places (depth 2 - 4 cm, width similar to the size of the fasteners). The fasteners will later sink into these recesses. By completing this procedure, we will make it easier for ourselves to finish the slopes.
Tip: when installing a window without a mounting strip, you should place blocks of wood or other dense material under it so that it rises to the height of the window sill. Then it will be possible to attach the window sill not to the window frame, but under it. If there is a mounting plate, the frame will automatically rise to the desired height. Typically, the mounting strip is already fixed to the frame and does not require additional fixation.
Leveling the window structure
This stage is the longest in the entire window installation procedure. However, by aligning the window in the vertical and horizontal planes, we automatically give it the correct rectangular shape. To level the structure, you need wooden wedges or bars that are placed under the frame. The first pair of lower wedges is set, then you can immediately fix the window from above with an anchor plate. Next we place two wedges at the top, then on the left and right at the bottom and top of the window. If there is an impost, you also need to put a wedge under it. During these actions, it is important to ensure that the vertical posts do not deviate to another plane. It is convenient to level the window with two people, when one supports the structure, the second inserts wedges.
Attaching the window to the opening
Having achieved a perfectly level position of the window, i.e. Having set it correctly in level, we can proceed to fastening the structure. To do this, use dowels (diameter 6-8 mm, length 75-80 mm) or anchors (diameter 6-8 mm). The latter have a higher cost, but provide more reliable fixation. They are recommended to be used if the wall consists of shell rock, brick or foam concrete. Fastening on anchor plates is used if the block structure contains a thermal insert and the frame in the mounting plane cannot be mechanically secured. A dowel driven into concrete can withstand a load of up to 60 kg, which is quite enough to fix a window. For wooden walls, you can use screws with a diameter of eight millimeters.
Advice: do not immediately tighten the screws on the sides of the frame completely, leave 1 cm until they stop. There is no need to screw in the construction screws in the upper part of the structure yet. The frame will not go anywhere, and you will have the opportunity to check the uniformity of the gaps on the sides and, if necessary, move the frame in one direction or another. After the final fastening, this will be more difficult. If the uniformity of the gaps is satisfactory, the horizontal/vertical structure is maintained, you can completely fix the frame by screwing in the screws on top and tightening the remaining screws on the sides. After this, it is worth checking the horizontal and vertical structure again.
Fastening the ebb of a plastic window
Installation of ebb tides can be done at the very end. You can buy the ebb ready-made or make it yourself. It is best to secure this element under the window - this will prevent the penetration of water where it connects to the frame. Upon completion of the installation of the drain, the space between it and the profile is filled with foam. If it is not possible to attach the ebb under the frame, it is fixed directly to it, for which 9 mm metal screws are used.
Intermediate adjustment of fittings
It is necessary to tighten or loosen the window hinges so that the sash moves silently and freely when opening and closing. An open sash should not slam shut on its own. Correctly adjusted hinges will allow it to remain in the desired position.
When moving, does the sash “strike” where the locking hardware is installed? Move this element a little lower or higher.
Foaming the gaps between the opening and the frame
It is important to fill the gaps so that there are no voids left. Large cracks (more than two centimeters) are foamed in several stages, with a break between them of two hours. With this approach, there is no danger that the foam will deform the window as it expands. In addition, the consumption of polyurethane foam is saved, there is no excess that has to be cut off, and the quality of the assembly seam improves.
Since the foam hardens under the influence of atmospheric moisture, a lack of humidity in the room can lead to poor-quality polymerization. To avoid this, you need to lightly spray the area between the window opening and the frame with water before foaming, and after filling the cavity, spray the surface of the foam itself with water. If the air temperature during installation does not exceed five degrees, then winter or all-season foam is used. In warmer weather, you can use summer foam.
After polymerization of the foam, it is necessary to protect it from exposure to ultraviolet radiation. This stage can be combined with finishing the slope. But if you don’t want to make slopes yet, or plan to do it later, then the foam needs to be covered immediately, since it quickly collapses due to exposure to direct sunlight. In this case, we prepare a cement-sand mortar at the rate of 1 part cement and 2 parts sand, or dilute tile adhesive and cover the foam with any of these materials. In addition, you can purchase PSUL tape (vapor-permeable self-expanding sealing tape) at a hardware store and cover the polyurethane foam with it. However, the cost of the tape is quite high (from $3 per linear meter), so the first options are used more often.
Window sill installation
1. Trimming. The window sills have a standard length and width and have a good margin, both in length and width. Before installation, the window sill is cut using a jigsaw, grinder or saw with small teeth.
2. Leveling. We move the window sill to the support profile and level it using wooden blocks or other available materials.
We cover the side sections of the window sill with end caps. It is better to glue the plugs to the ends with super glue.
By lightly pressing the window sill with your hand, we make sure that it does not sag. In some cases, the window sill is not installed level, but at a slight angle (no more than 3 degrees) “from the window.” Thanks to this slope, possible condensation does not flow under the window.
We foam the cavity under the window sill.
After foaming, place something heavy on the surface of the windowsill (you can use plastic water bottles or books for this purpose) and leave it like that for 0.5 days.
If you do not press down the window sill with a load, it will bend upward under the influence of foam.
3. One day is enough for the foam to completely harden. After which its remains, sticking out unsightly from the crack under the window sill, need to be cut off using a utility knife.
4. If the window sill was initially uneven, then during installation there may be a gap left between its upper part and the frame. It is carefully filled with silicone. It is worth considering that this material has low biostability and can turn black from fungus. A gap will not appear if galvanized iron plates in the shape of the letter “Z” are fastened to the window sill profile in advance (before installation). In addition to the fact that these plates will allow you to grind the window sill tightly, they will simplify the task of leveling it.
Final window adjustment
At this stage, you can remove the protective tape from the window structure and finally screw on the handle. If finishing the slopes is postponed, do not remove the tape until all finishing work is completed.
Removing blockages
Sometimes the fittings of a plastic window do not work correctly. The first time this happens, it appears that the window is broken, although this is usually not the case. This situation cannot even be called a repair. We just need to get everything back to working order.
The handle does not turn
Sometimes, in some position, the handle of a plastic window “gets stuck” and does not want to turn. Usually the reason is the activation of the blocker. This is a plate that is located near the handle on the side of the frame. The shape of the plate varies among different hardware manufacturers.
Types of blockers on PVC windows
To correct the situation with the handle, you need to return the lock to its normal position. If it is in the form of a long plate, press on the moving part and place it vertically, then turn the handle. Then everything should work fine. Sometimes a plastic window blocker looks like a small tongue. We also press on it and turn the handle to the required position.
If this “treatment” does not help, you need to check whether the blocker fits into the mating part (pictured above). Sometimes, due to heat or cold, inconsistencies begin. If the tongue does not reach the mating part, you need to move it a little closer. The counter plate is unscrewed (there are two bolts), a plate the size of the counter part of the blocker is cut out of white thin plastic, and it is installed between the frame and this plate. If the plastic sticks out somewhere, carefully trim it with a sharp knife. The window should now close.
The sash hangs only on the bottom hinge
This situation occurs if the window is opened in both tilt and tilt modes at the same time. Don’t panic, leaving the sash open, we press the top edge against the frame. Having aligned the top edge with the loop, turn the handle to the “open” position - horizontally. If it does not turn, turn off the blocker.
The plastic window fittings did not work correctly
Close the sash, turn the handle down to the “closed” position. Slowly check the operation in all positions. There are still a lot of nuances associated with blowing from under the window, but all of them are solved mainly through adjustment, and how to adjust a plastic window is written here.
We have described the most common problems with plastic windows, which you can solve yourself without involving specialists.
Possible errors when installing windows
Here we list the mistakes that are often made when installing windows and can negatively affect the ease of use and service life of the structure:
- Installation is carried out with glazing beads facing outwards. This reduces the window's burglary resistance, since in this case the beads can be easily removed from the outside and the glass unit can be pulled out.
- The window is poorly aligned, making it difficult to open and close.
- The polyurethane foam is not protected from the sun's rays, as a result of which it is destroyed.
- Due to incorrect measurements or too low fastening of the window structure, the window sill cannot be placed under the frame and must be attached directly to it.
- The window structure is not fixed by any fasteners and is held in place only by polyurethane foam. Then cracks may appear on the slopes, since foaming is not a full-fledged fastening. Over time, it loses strength and the window becomes so mobile that it can fall out.
We hope that after reading the article you will be able to successfully cope with the installation of PVC windows. And even if you decide to contact an installation organization, you will be able to understand and control this process at all stages.
Tools and materials required for installing window units
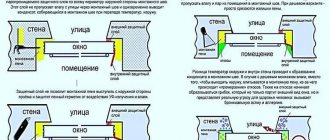
Diagram of the window unit: 1-window box; 2-window sashes; 3-glass; 4-quarters with layouts - pants; 5-drain with drip
- Acrylic one-component vapor-permeable sealant (so that you can seal the installation seam and the junction of transparent structures to the wall openings of the window).
- Polyurethane polyurethane foam (so that it is possible to arrange a mounting seam and a junction of transparent structures to the wall openings of the window).
- Acrylic one-component vapor barrier sealant (so that you can seal the installation seam and the junction of transparent structures to the wall openings of the window).
- Wire brush (to clean window and door openings).
- Sponge for removing dirt and dust from the surface.
- Putty knife.
- Foam gun.
- Paint brush.
- A special container for treating with antiseptic and moistening joints.
- Sealing and insulating tapes (so that you can arrange an assembly seam and a junction of transparent structures to the wall openings of the window).
- Wedges.
- Plaster mortar.
- Building level.
The technology for installing window blocks includes several stages.