Inspire produces high quality roller blinds from natural, environmentally friendly materials. This is a subsidiary of the large joint stock company Leroy Merlin, which operates in many countries, including Russia.
Inspire roller blinds are designed specifically for easy installation on plastic windows
General information about roller blinds for windows
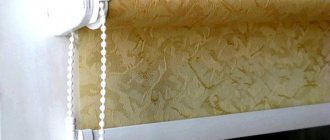
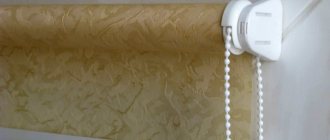
Roller blinds are a simple design. The curtain is a soft material of varying degrees of light transmission. During operation, the fabric is wound onto the shaft using a cassette, spring, chain or automatic mechanism.
When making roller blinds, fabrics are used that do not create gaps.
Heavy curtains and drapes have been replaced by roller blinds.
Main features
The main feature of roller blinds is the method of their fastening, which allows you to fix such products without damaging double-glazed windows or walls. The mechanism is quite compact. The classic design, equipped with a rotating shaft and a fabric wound on it, is easy to use. Due to the holder and chain, it allows you to easily change the position of the curtain.
Benefits of use
Roller blinds are universal, i.e. They can be installed on both fixed and opening windows. Roller blinds do not absorb moisture and dust, so they are easy to clean and do not require special care. The design is easy to install and operate, but is also reliable.
Roller blinds do not take up much space. Models are made from environmentally friendly materials. Manufacturers use fabrics that do not fade when exposed to direct sunlight, so the product retains its appearance for a long time.
Roller blinds are located close to the double-glazed window and in extreme heat reduce the rate of heating of the room.
The advantages of such curtains include a large number of designs, availability and low price compared to classic curtains.
Curtains from Delfa for all types of double-glazed windows
The Belarusian-German enterprise Delfa produces roller blinds of the “Mini” series for all types of niches and double-glazed windows: both windows and doors. The roller blinds are supplied with strings with lower tensioners. This design allows you to fully use the curtains in ventilation mode, with the window open.
A low price is not always a sign of low quality goods: curtains from Delfa are proof of this
According to the manufacturer, certified materials guarantee the color fastness of the fabric and the fabric does not fade in the sun for a long time.
This is a more budget option, since the material contains inexpensive polyester. The fabric allows light to pass through but retains heat.
Main types
Depending on the design features and method of fastening, the following types of curtains are distinguished:
- “Mini” – as simple as possible, with an open shaft with a canvas. Most often, such products are attached with self-tapping screws, but if necessary, they can also be hung with mounting tape. The design is lightweight and economical.
- Cassette curtains are a drum system with a canvas placed inside a special box. Movement is ensured by side cassette guides. The fastening is carried out on the window profile, which eliminates the appearance of gaps and gaps. The box may have different colors. There is no need to drill additional mounting holes during installation.
- Double curtains are a system equipped with a spring mechanism. This allows the curtains to be lowered and raised.
Examples of different types of roller blinds.
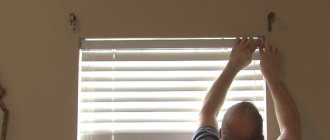
Self-tapping installation
Break off the upper part from the adjustable throw-on brackets. Drill 2 holes with a diameter of 3 mm on the protrusions of each bracket.
Insert the MINI brackets into the throw-on brackets. The holes must match.
Mark the proposed mounting locations for the brackets. The brackets must be installed horizontally. When lowered, the fabric should cover the light opening. Screw the brackets with screws so that the protrusions of the throw-on brackets for attaching the additional profile are located at the bottom.
Install the inserts into the control mechanism and into the plug in the pipe. Insert the product into the brackets. The roll of fabric should be visible.
1. Selecting curtains by size (diagram 1).
The selection of curtain size is done according to the following rule:
the required width of the curtain = the width of the glass of your window + a margin of 2-4 cm.
It is also necessary to take into account the overall width of the curtain. The overall width is 4 cm wider than the width of the curtain (fabric width + adjustment mechanism). This must be taken into account so as not to exceed the dimensions of the window frame when installing on tilt-and-turn windows or in a window opening.
2. Completeness of the product and designation of parts on the diagrams (diagram 2).
- 1 - curtain (1 pc.)
- 2 — chain mechanism (1 pc.)
- 3 — roller (1 pc.)
- 4 – clip (2 pcs.)
- 5 – upper window clip (2 pcs.)
- 6 – mechanism bracket with lock (lock 6.1)
- 7 – mechanism bracket (1 pc.)
- 8 - adhesive tape
- 9 – washer (2 pcs.)
- 10,11,12 – weighting agent
- 13 — upper bar (1 pc.)
- 14 – string (1 pc.)
- 15 – screws (4 pcs.)
- 16 – adhesive tape
- 17 — chain lock
- 18, 18.1 – upper string clamps (2 pcs.)
- 19 - adhesive tape for string fixation
- 20 – fastening the string clamp (2 pcs.)
- 21 – string clamp housing (2 pcs.)
- 22 – fastening (bracket) of the string clamp (2 pcs.)
- 23 – lower string clamp (2 pcs.)
- 24 – cover of the string fastener housing
- 25 fasteners (4 pcs.) Fasteners are selected depending on the materials and design of the mounting location and are not included in the kit !
- instructions
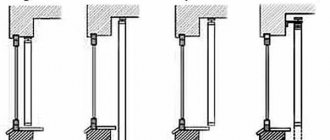
3. Select the installation option that suits your conditions (diagram 3, 4)
- for tilt and turn windows
- to the ceiling
- on the wall
- installation using adhesive tape or clip.
5. installation on tilt-and-turn windows (diagram 4)
— the mechanism bracket with the lock (position 6) must first be inserted into the top curtain bar (position 13). Secure the bracket (pos. 6) with the clamp (pos. 6.1).
— install the upper window clips (pos. 5) on the top bar of the curtain (pos. 13).
— we attach the assembled curtain with window clips onto the tilt-and-turn window.
— install the lower string clamps (21,23,24) according to the preferred option (lower part of diagram 2).
— divide the string (pos. 14) into 2 parts, pass it with restrictions through the upper string clamps (pos. 18) and, after adjusting the strings along the length, secure them to the lower clamps.
Fabrics used in roller blinds
More often, materials are used that are resistant to moisture, various pollutants, ultraviolet radiation, fungi, etc. Another important characteristic is the degree of transparency of the fabric.
Translucent
These curtains have a lightweight fabric made from 1 layer of synthetic fabric. They let most of the sun's rays through, even when the curtain is down. In this case, the light passing through the fabric becomes diffused. It is impossible to see from the outside what is happening inside through such curtains. This type is well suited for windows located on the north side, as well as in cases where the room is too small and light colors and good lighting are required to visually enlarge it.
Translucent roller blinds.
Blackout
Roller blinds of this type have a light-proof curtain consisting of 3 layers of material. The first and last of them consist of natural or synthetic fabric. In this case, the middle layer is represented by a light-proof material. This type of roller blind is more often found in photo studios and rooms intended for presentations.
Blackout roller blinds.
Day Night
The design is equipped with a double fabric, represented by alternating opaque and mesh stripes. These curtains allow you to regulate the level of illumination in the room. In this case, there is no need to lift the canvas to see what is happening outside the window.
Roller blinds "day-night".
Sun protection
- Transparent.
They protect well from “those who like to stare” at the windows and from the sun’s rays. At the same time, the view from the window will not be disrupted. Suitable for windows located on the east side. Transparent roller blinds are used instead of regular tulle - Translucent. This is a lightweight fabric that has sun protection properties, the same as curtains made of thick material. Used to cover windows on the south and west sides. Protects plants in gardens.
Translucent curtains in the interior of a white living room
Areas of use
Roller blinds are now being actively installed in apartments and office spaces; they are used not only to protect from direct sunlight, but also to isolate employees from each other.
In the kitchen
Roller blinds are increasingly used in the kitchen. Apartment owners spend a lot of time in this room, so a cozy interior is extremely important. However, using curtains and tulle here is not very convenient, because... They may become contaminated with stubborn contaminants. In addition, classic curtains are more likely to catch fire. In the kitchen it is better to install roller blinds with mini-mounts.
"Day-night" in the kitchen.
In office premises
Good lighting is important for offices. If it is insufficient, it will negatively affect the performance of employees. In such rooms it is recommended to install roller blinds with a permeability of at least 50%. This will help prevent the office from heating up due to exposure to direct sunlight, but will not affect the light levels.
The light transmission of roller blinds intended for office use must be at least 50%.
In the nursery
It is not recommended to hang classic curtains in children's rooms, because... A lot of dust accumulates on them, which can later provoke the development of allergic reactions and asthma in a child. In such rooms it is better to install roller blinds with bright canvases and illustrations. This will make the nursery more comfortable.
For a children's room, it is recommended to choose brightly colored curtains.
Photos in the interior
Roller blinds made of blackout fabric come in different colors, plain and with patterns. We made a selection of photos to make the description in the article clear.
Selection criteria: what to look for when purchasing
Open mini-structures are more convenient for installation in the kitchen. You can easily secure them with your own hands. In other rooms and office spaces, it is better to use closed cassette or spring models.
The next thing you need to pay attention to is the material from which the canvas is made. If the curtain will be located in a place with high traffic, it is better to choose models with a curtain made of synthetic fabric. In apartments, roller blinds with fabric made of natural material are more often installed. If the room is located on the ground floor, it is better to install double curtains. On the upper floors, single-layer canvases are sufficient.
In addition, when purchasing curtains, you need to clarify the control method. There are both mechanical and automatic models on sale.
Popular brands
The best brands include:
- Inspire.
- Lotari.
- "Escar."
- Cosiness.
Eco-friendly solution from Inspire
The modern market is replete with manufacturers of roller blinds and the range of products is quite wide. The product of the Czech company Inspire deserves attention. The high price of this product is justified by the fact that the curtains are made from natural materials. Due to their environmental friendliness and decent quality, they are very popular among buyers around the world.
In the modern world, ecology plays an important role in the lives of each of us: Inspire took care of this aspect of our lives when creating its mini-curtains
The “Mini” series of blackout roller blinds is available in a wide variety of colors, so it’s easy to choose the right shade for a specific design. In addition, they stand out for their heat-resistant and light-proof qualities.
Installation instructions for plastic windows without drilling
Depending on the design characteristics, the installation process for different types of roller blinds varies slightly.
Mini
Mini curtains are often installed on the window frame.
For installation you need:
- Double-sided tape;
- hook brackets;
- set of roller blinds.
Installation process:
- The surface of the frame and brackets are thoroughly disinfected.
- Make markings and glue the fasteners.
- The shaft holders snap onto the brackets.
- The roll is equipped with a lifting mechanism.
- Mount the shaft on the holders.
- Apply the structure to the window to check for gaps and protrusions.
- Remove the film from the tape on the brackets and fix the roller blind to the sash.
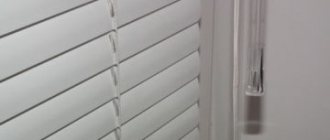
When installing roller blinds, you need to be careful to avoid damaging thin plastic parts.
Cassette
Cassette roller blinds are sold assembled, which simplifies the installation process. Often, mounting tape is already attached to the case. To install such curtains, the window surface is first marked and disinfected. Then remove the protective film, apply the body to the surface of the glass unit and lightly press down.
Models with guides
These models are distinguished by the presence of 2 guides. This design prevents the curtain from sagging when the window is opened.
In the process of installing such roller blinds, the following stages go through:
- The window frame is thoroughly disinfected.
- Markings are applied with a pencil.
- Remove the protective film from the box and attach it to the top of the sash.
- Mount the guides on double tape (strictly according to the markings).
- Place the curtain in the guides.
An example of installing roller blinds with guides.
Roller blinds with fishing line
Roller blinds with a string guide allow you to avoid the movement of the canvas when changing the position of the window sash.
The model is installed as follows:
- Connect all grooves and holders.
- Insert the strings into the lower holes of the clamps.
- The frame is thoroughly disinfected and the grooves are installed.
- A shaft with a blade is installed in the brackets.
- Mount the chain mechanism and plugs.
- At the bottom, fasteners are installed to tension the fishing line.
- Stretch the strings and secure them with clamps.
Installation of roller blinds with fishing line.
Installation WITHOUT drilling - with double-sided tape
Break off the top part from the adjustable throw-on brackets.
Apply one piece of 30x15mm tape to both throw-on brackets. Insert the MINI brackets into the throw-on brackets.
Mark the proposed mounting points, degrease them and glue the brackets. The brackets must be installed horizontally. The protrusions on the adjustable throw-on brackets for attaching an additional profile should be located at the bottom. Install the inserts into the control mechanism and into the plug in the pipe. Insert the product into the brackets until it clicks. The roll of fabric should be visible.
Install an additional profile on the protrusions of the cap brackets.
Insert plugs into the lower tube on both sides.
Insert the bottom tube into the fabric.
Problems you may encounter during installation
Most often, installation difficulties arise due to incorrect measurements. The size of the curtains consists of the parameters of the fabric and the fastening system. These parameters must be taken into account when choosing roller blinds.
Detachment of the model often occurs due to insufficient disinfection of the window surface. In this case, even when pressed tightly, air bubbles and other connection defects remain under the adhesive tape. Subsequently, moist air enters such cavities, which gradually leads to detachment of the structure.
Another common problem is incorrect marking. If the structure is not fixed level, the curtain will hang at an angle. To avoid this problem, it is recommended to use a building level during installation.
Advantages and disadvantages of Inspire curtains
Inspire roller blinds are suitable for small rooms where it is important to preserve every centimeter of usable space. At the same time, they will hide the room from prying eyes from the outside and prevent the penetration of sunlight.
The advantages of these curtains include:
- reliable fastenings;
- simple opening and closing mechanism;
- availability of various colors;
- the ability to choose the type of curtains to suit your needs;
- high quality;
- ease of installation.
The advantages of roller blinds are quite obvious.
Despite all the advantages, such curtains also have disadvantages:
- limited selection of colors;
- price;
- fastenings are not suitable for fixed windows;
- difficult to clean;
- loose fit to the doors.
This type of curtain also has many disadvantages.
When choosing such window decor, you need to decide on the most important points, understand what you can put up with and what is a priority.
Note! Problems with improper fastening and poor fit can easily be resolved by purchasing additional parts.
Operation and care
Curtain material can absorb odors. To prevent this, you should regularly ventilate the room. Several times a month, wipe the box and curtains with a damp cloth or sponge soaked in soapy water. Washing fabrics in a machine is not allowed.
To remove dry stains, it is recommended to use a school eraser. To remove stubborn stains, it is customary to remove curtains and send them to dry cleaning. The use of aggressive stain removers is contraindicated due to the high risk of streaks forming on the canvas.
“Day and Night” or “Zebra”: characteristics
These new generation roller blinds provide good protection from sunlight. They combine the structure and design of both regular blinds and curtains. They consist of a double blade and are controlled using a chain mechanism.
The curtain fabric “Day-Night” is made of textile material combining transparent and opaque stripes
Suitable for plastic and wooden windows. The design of roller blinds “Day and Night” is similar to blinds with dark and light horizontal stripes, which are alternately connected to each other. They have a Teflon coating that protects the surface from the accumulation of dust and other deposits.
The dark stripes are made of dense, natural and synthetic polyester material. Light stripes are made from a plain mesh fabric with a matte, glitter or patterned finish.
For the Zebra roller blind, three options for its use are available - maximum darkening, partial darkening and full room illumination
The curtain is controlled using a chain mechanism. To dim the flow of light, you need to slightly move the stripes. If the dark stripes overlap the light ones, then the window will be completely closed.
How to clean roller blinds “Day and Night”
With regular care, the day night inspire roller blind retains its quality and presentation for many years. A regular dry cloth is suitable for cleaning dust.
Important! Do not use a vacuum cleaner, which can damage the material, pull in the chain mechanism and damage it. Detergents containing chlorine can negatively affect the color and structure of the material. A damp sponge is only suitable for cleaning greasy stains.
If stains cannot be cleaned “dry”, you can try wet cleaning with soapy water.
Disadvantages of roller blinds
The disadvantages of roller blinds include the need to periodically reinstall them. This problem is associated with the gradual degradation of the adhesive composition, due to which the tape loses its ability to hold the structure. Most models can only be installed on windows. Their installation on slopes is often impossible.
At low temperatures and high humidity indoors, fungal colonies often form on natural fabrics. To reduce the risk of such a problem, fabrics should be treated with special means, and moisture absorbers should be used.
Installation WITHOUT drilling - on drop-down brackets
Install the inserts into the MINI brackets until they click into place. Insert the MINI brackets into the throw-on brackets.
Place the latches onto the flap brackets.
Install the bracket assembly onto the sash and slightly compress the latches. Insert the product into the brackets. The roll of fabric should be visible. Align the product on the sash and firmly squeeze the latches.
Preparation
We decide what type of blinds we purchased: horizontal, vertical or roller blinds.
Horizontal blinds are called blinds with slats (slats) parallel to the floor and ceiling, vertical blinds are called blinds with slats perpendicular to them. Roller blinds are sun protection products that consist of a canvas (in most cases fabric) wound on a shaft.
It is necessary to take the measurements correctly, otherwise all the work will go down the drain. If you make a mistake and the lamellas turn out to be too long, then removing the extra lamellas will not be difficult, but on the contrary, you will hardly be able to add them if you have shortened more than necessary.
Installation of vertical blinds. Instructions
- Mark the wall brackets to a height of plus 2 cm. The extreme fasteners should be removed 10-20 cm from the cornice.
- Assemble the bracket with the spring
- Drill a hole 6 mm in diameter with a hammer drill in the wall
- After inserting the dowel and plugs, use self-tapping screws to secure the brackets.
- Install brackets on the cornice to attach the decorative panel
- Next you need to install the cornice. Remember, its front part must be inserted into engagement with the short edge of the fastening spring. Gently press the tail of the spring until you hear a characteristic click.
- Using a rope, move the runners to one side, using a chain, turn them 90 degrees to the longitudinal axis of the cornice
- Attach the slats to the assembled runners
- To prevent the slats from dangling in the wind like strips of fabric, we insert weights into special pockets on them
- Install the decorative panel and the bottom chain.
- We check the assembled structure.
Installation of horizontal blinds in the overlay
We measure the width and height of the window opening; the blinds should exceed it in these indicators by at least 3 cm or more.
If the blinds are mounted on the ceiling, measure the distance from the ceiling to the window sill.
Read also: Ash-leaved maple tree photo
If the window is flush with the wall, the handle may get in the way when opening, so you will have to use brackets. Make sure that they do not touch the mechanisms inside the cornice.
The tools you will need are a hammer drill or a drill and a screwdriver.
- We fix the brackets at the required height.
- Installing the cornice
- We mount the control handle.
- Checking the result