Methods for attaching roller curtains
The variety of roller blinds has led to the creation of many fastening mechanisms, the main ones are described below.
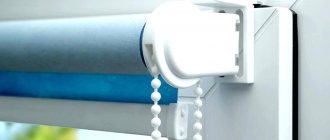
Installation of a mini roller blind on an opening window sash
To understand how to install roller blinds on plastic windows from the “mini” series, you should prepare not only standard tools and devices, but also additionally take double-sided tape, and then follow the following steps:
- Degrease the surface of the window frame.
- Degrease the bracket and stick double-sided tape on its inside.
- Connect the brackets to the holders.
- The lifting mechanism with a chain is put on one side of the roller.
- Place the brackets on the frame, onto which hang the roller with the curtain and the chain device.
- Check the operation of the structure.
“Mini” on a blind window sash
Those who want to know how to attach roller blinds to plastic windows with a fixed sash should know that hook-brackets, which are often used in this area, will not be needed. Here you need to stock up on plates and side brackets and pay attention to the points below:
- Degrease the plates with grooves and glue double-sided tape to them.
- Place the side brackets into the grooves.
- Insert the brackets into the roller and put on the chain.
- Attach the entire mechanism to the degreased frame using tape.
- Check the operation of the entire structure by unfolding and folding the curtains.
Mini roller blinds with and without screws: fastening in two ways
The top of such curtains is not covered with a decorative cassette. The entire structure can be adjusted to size yourself by cutting it. You can find out how roller blinds are attached to plastic windows with self-tapping screws by reading the list below:
- Take measurements.
- Screw the brackets to the frame with a screwdriver or screwdriver.
- Place the control gears and latches into the holder pipe.
- Connect the assembled shaft to the brackets.
- Place decorative caps on the brackets, if provided in the kit.
Mounting on spring brackets
Such holders can be used only in one case - if the window sash opens. The fastening technology does not differ from the standard stages of connection using self-tapping screws. There is one distinctive feature - the absence of corners is replaced by brackets that should be snapped onto the top of the frame.
Attaching roller blinds with Velcro
The cassette of fabric blinds is treated with Velcro and factory-issued security paper. How to attach roller blinds to plastic windows using Velcro? This is the simplest solution for installing roller curtains. Installation steps:
- Connect the shaft to the brackets.
- Degrease the area where future curtains will be located.
- Remove the framing paper and press the curtain shaft tightly against the frame. Ready.
Installation of cassette roller blinds
The set of cassette blinds includes guides that already have double-sided tape attached. The steps below will tell you in detail how to hang roller blinds on plastic cassette windows:
- This type of curtain is installed with self-tapping screws, which means the frame will have to be drilled. So, we drill holes for self-tapping screws with a diameter of 2 mm on the frame and make the same ones on the cassette right through.
- We attach the cassette to the frame and screw in the screws with the entire structure.
- The side guides can be placed on tape, because they do not have to bear much weight. Before fastening, be sure to degrease the surface of the frame.
Mix system: bottom mount
This non-standard system involves the location of the drive shaft not from above, as we are accustomed to, but from below. Yes, and in general, the mechanism can be mounted on any window sash. Such decoration is usually hung in rooms on the first floors in order to hide from the gaze of passers-by by pulling the curtain halfway up from the bottom, and, at the same time, not to rid yourself of sunlight. You should prepare a level; such curtains cannot be installed without it. Attaching roller blinds to plastic windows on the bottom of the frame:
- Take measurements along the outer edges of the window beads.
- The standard kit includes a fishing line, which should be completely unwound and cut into two equal parts.
- You need to insert the cut fishing line onto the plastic part of the lower fastening into one of the two available holes, as if folding it in half. Tie with a regular double knot. Do the same with the second part of the lower fastening and the second part of the fishing line.
- The finished part with fishing line is connected to the bead in the corner of the window on the right using self-tapping screws and a screwdriver, and the other part is connected to the left.
- Installation of the upper fasteners occurs in the corners of the upper beads.
- Insert the fishing line into the curtain shaft from one side and the other.
- The free edges of the fishing line are connected to the upper fasteners and the lock is not tightened too tightly (4 turns).
- The system is ready for use.
Plastic windows for the dacha: what to save on, what to consider
An indispensable attribute of a good country house is modern windows. The question is which frames and double-glazed windows to choose and how to ensure a long service life of translucent structures.
- 1 of 1
On the picture:
Form question
Rectangular windows are more cost effective.
When designing a house, it is better to abandon arched, triangular, trapezoidal, etc. windows in favor of rectangular ones. Prices for plastic windows for non-standard-shaped dachas will be significantly higher. The increasing factor when calculating the cost of such structures sometimes reaches 2.5. In addition, not all fantasies can be realized. Let's say, the minimum angle at which it is possible to weld profiles is 300 degrees, and an angle sharper than 450 degrees will prevent the window from opening (that is, it can only be blind). The bending radius of the arch cannot exceed 5 heights of the box profile. The maximum area of continuous glazing should be calculated taking into account the climatic characteristics of the region, however, the size of windows for a large order costs one square meter. meter has virtually no effect.
Thermal insulation issue
Profiles and double-glazed windows.
At the dacha, an increase in fuel consumption immediately hits the pocket, so warm windows will not be superfluous here. If you plan to travel outside the city in the cold season, it is better to invest in windows made of four or five-chamber profiles with double-glazed windows. If you heat your house with pellets, diesel fuel or electricity, then warm plastic windows for your dacha will pay for themselves in just three to four seasons. Well, for a summer house you can purchase products from three-chamber profiles with single-chamber double-glazed windows.
Question of color
Lamination.
Windows with white frames will go well with brick or plaster, but will not suit a wooden house at all. It is better if plastic windows for a summer cottage made of logs or timber imitate the color and texture of wood. (However, not every architectural solution implies that the windows must be combined with the walls - they can be matched, for example, to the roof). Lamination will come to the rescue of windows with white frames. The effect that can be achieved with its help can exceed all expectations: you can install “rosewood” or “oak” windows in a house made of coniferous timber or logs. Moreover, such luxury is not at all ruinous: double-sided lamination increases the price of the window by only 30-40%. Note that for wood-look windows it is better to choose brown or beige profiles painted in the mixture - then when opening the sashes the contrast between the front and rebated surfaces will not be evident.
Required option
Protection from insects.
You can usually save money on options such as a third sealing circuit, a ventilation valve and noise-proof double glazed windows outside the city, but you cannot do without protection from flying insects. An aluminum frame (can be white or brown and is attached to the window frame on brackets) with a mosquito net can be ordered complete with the window, or can be purchased later, but you will have to install it yourself. The cost of such a mesh is from 800 rubles. for 1 sq. m. Systems in the form of an additional sash and cassette (roll) systems are somewhat more expensive.
What are roller blinds
To correctly install roller curtains, you need to know what elements are included in the design:
- the main element of roller blinds is the canvas, which can be made of fabric, plastic, bamboo, and so on;
- A shaft (axis) is used to wind the fabric. The shaft can be made of metal (more durable structures) or plastic (less durable, but less expensive);
- the shaft is installed on a mounting plate, which is equipped with brackets for fastening and a mechanism that drives the shaft;
- the driving mechanism is combined with a chain that allows you to adjust the level of light in the room by opening/closing the curtains;
- At the bottom of the canvas, a special bar is installed that acts as a load and a control knob.
Components of roller blinds
Attach the curtain with double-sided tape
Working with double-sided tape is even easier:
- The location of all brackets is also carefully measured.
- Then squares of the required size are cut out of tape and glued to the brackets. For some models, the brackets are supplied at the factory with an adhesive layer protected by a sheet of paper or plastic film.
- Grease and other contaminants are thoroughly washed off the frame. A solvent that does not destroy plastic is suitable for this.
- The protective backings are peeled off and the brackets are secured in place. After this, the system is assembled and configured.
There is nothing complicated about attaching roller blinds to plastic frames. Of course, if you still have doubts, you can invite a specialist to perform the installation. But most people cope quite successfully with this work, even doing it for the first time. We hope that our tips will help you!
What types of roller blinds are there?
Manufacturers produce several types of roller blinds for plastic windows, which can be installed without drilling additional holes. Let's look at each model in detail.
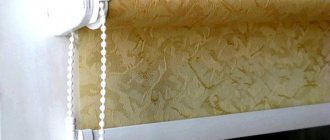
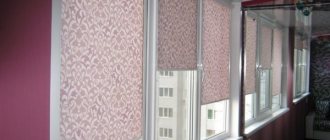
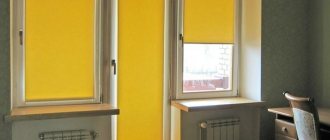
Mini roller blinds
They are characterized by availability and low cost. The shaft onto which the woven material is wound remains open. At the bottom of the canvas there is a plastic weighting material, due to which the curtain falls down, filling the window frame. Mini roller blinds are suitable for window structures of any complexity, they do not take up much space and are easy to clean.
Mini roller blinds
Cassette curtains
They look a little different: the rotating shaft is located under the decorative box. When folded, such a model is almost invisible. In addition, the woven material located under the box is not exposed to sunlight, which avoids fading of the fabric. The shade and design of the box are selected based on the wishes of the customer.
Mini cassette curtains
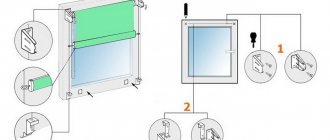
This is a combined model that is mounted on each individual leaf, which allows them to open and close without hindrance. The box, under which there is a rolled curtain, is located in the upper part of the sash. Mini-cassette curtains come in two types:
- The UNI 1 curtain model is suitable for wide glazing beads (a narrow long strip of wood or plastic that serves to strengthen the glass in the window frame). The guides are fastened to the inside of the glazing beads. UNI 1 fit tightly and practically touch the glass.
- The UNI 2 curtain model has a similar design, but the main difference is that the guides are attached to the outer part of the bead. There is a box at the top of the window sash.
Important! Domestic manufacturers of roller blinds produce high quality products that are in no way inferior to their foreign counterparts.
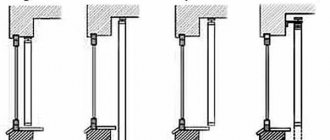
Types of placement of roller blinds on the window
First you need to decide where to hang the structure. Options:
- on the ceiling. Roller blinds from the very top will visually increase the height of the room. But it should be taken into account that such fasteners are not suitable for tension, hanging methods of surface finishing;
- on the wall. A small plastic window can be visually expanded using a system that is much larger than the width of the window sill. According to the standard, there should be at least 20 cm of overlap on both sides. A horizontal solution is not suitable for a room with low ceilings, as it will make it even more squat. The wall where the brackets will be installed must be strong enough;
- into the window opening. Roller blinds are attached to the walls of the slopes inside the opening. This option is the least convenient, but is sometimes found on blind windows without vents or sashes;
- directly onto the window sash. The good thing about this method is that it allows you to rationally use the entire surface of the window sill, does not interfere with opening and closing window sashes, and best helps darken the room. As a rule, lightweight structures are attached to the sash. As a decor, they can be complemented by a cornice with light tulle.
After determining the place where to hang the roller blinds, you need to decide how exactly the fastening will be done.
Mounting options for roller blinds
Where to begin
Choosing curtains is not a tricky matter. It is only important to decide on the installation principle. The canvas completely covers the window opening. In this case, the fastening is made to the ceiling or wall above the window frame. The latter is possible provided there is sufficient width of free space above the frame. Keep in mind that with this option, ventilation with the curtain closed is impossible. If there is an urgent need for ventilation when the curtains are closed, purchase designs that can be mounted directly on the sash.
Having chosen the desired model, start taking measurements using a tape measure. Why is it convenient to buy roller blinds - if the width you need is not on sale, you can buy a product with wider parameters. During installation, excess fabric is simply cut off.
When cutting a shaft, it is important to correctly calculate the required length. To do this, subtract 8mm from the required width (this is the width of the 2 mounting brackets). Trim the strip according to the required width of the curtain. Be sure to trim the canvas unfolded on a flat, hard surface.
Keep in mind that the width of the canvas (with guides) must exceed the width of the glass unit by exactly 3 cm. The curtain should not cling to the handle on the sash - this point is also important to take into account.
Requirements for fastenings
Before you start comparing fastening methods, it is necessary to develop certain universal requirements that can be applied to any model of curtains and to any fastening elements.
Here are the properties that fastenings for roller blinds should provide:
- Reliability. Under no circumstances should a curtain attached to a window frame, wall or ceiling break or fall. After all, a falling structure can frighten a person nearby, injure him, or cause material damage (for example, knocking a flower pot to the floor).
- Ease of use. A fixed curtain should not interfere with attempts to open the window for ventilation or water indoor flowers standing on the windowsill. Also, roller blinds should be easy to open and close using the mechanisms available in the design (cord, chain, etc.).
- Possibility of dismantling if necessary. Before hanging curtains, think about what will remain in their place after they are removed for replacement. It is highly undesirable to choose fastening methods that will leave rough holes or other hard-to-disguise marks on the frame or wall.
Fastening safety becomes especially important if there will be pets or small children in the room. The child will certainly want to pull the hanging cords, and the cat will try to climb higher on the curtain. It is important that the curtain does not fall and that the cord does not cause injury or suffocation.
Based on these requirements, we will consider the main methods of attaching roller blinds to plastic windows and choose the best option.
Main methods and their advantages
Despite the similarity in design of all models of roller blinds, there are noticeable differences between them. Therefore, before choosing a specific mounting method, it is worth studying the roller blinds you are purchasing.
Here are the main points by which such structures are classified:
- Length. The canvas is selected so as to hide the window sill or leave the possibility of its use.
- Canvas material. Not only its ability to reflect sunlight, but also the overall weight of the structure depends on the density of the material. The denser the fabric, the greater the total weight.
- Design features. If the Mini and Classic types are installed at the top of the window, then the Mix type seems to be upside down. Its roll is installed at the bottom, and the fastening, as a rule, is made directly to the frame.
Roller designs combine perfectly with other types of curtains and can only act as part of the window decor. Of course, in this case the installation becomes more complicated, since additional calculations are required so that all the elements do not interfere with each other.
As a rule, the roller shutter kit includes everything necessary to attach it to the wall and prepare it for use. But before starting installation, you must carefully check the completeness. It is better to immediately discover that something is missing and go to the store for the missing parts, rather than waste time on fruitless improvisations.
We fasten the curtains with self-tapping screws
Before attaching the roller blinds to the screws, you must carefully measure the position of each hole. First of all, you need to accurately measure the width. If the brackets are placed on the frame itself, then add 20–30 mm to the frame width as a margin. If you plan to attach the brackets to the window opening, subtract 20-50 mm from the measured width.
Before starting work, you should prepare the tool and check its serviceability:
- For measuring and marking - a pencil, tape measure, level (a bubble-type construction tool is suitable). If you have a laser level, marking will become easier, but you can do without this device.
- For drilling holes - an electric drill.
- To tighten the self-tapping screws, use a Phillips-head screwdriver or a screwdriver.
- To trim components, if necessary, use a construction knife.
Related article: How to remove glass from a plastic window
Self-tapping screws and all other fasteners are usually included in the kit.
Instructions for fixing roller blinds with self-tapping screws:
- First of all, the exact position of each hole is determined. To do this, the assembled system is applied to the mounting location, marking each hole with a pencil. To hang the roller blind strictly horizontally, check its position by level. At the marking stage, you will need an assistant to hold the assembled curtain. But if you have to carry out the installation alone, double-sided tape will help (they temporarily secure the brackets).
- Measure the required length of the guide line. It is threaded into place, the excess is cut off with a construction knife.
- Drill holes for all screws.
- Screw the brackets into place. If you plan to fix them directly on the frame, then the screws are selected so as not to damage the glass unit.
- The roll is attached to the brackets screwed into place.
- Magnetic clamps are attached to the bottom of the frame to tension the canvas.
All that remains is to check all parts of the mechanism to make sure that the curtain closes normally and does not interfere with opening the window. If everything is in order, all that remains is to put the decorative elements in place (bracket covers, roll box, etc.).
If the curtain is attached not to the frame, but to the ceiling or walls, special clamps will be needed. This type of fastening is used for heavy closed structures (Classic models). The algorithm changes slightly: first, the clamps are fastened into place, and then the roller blind is attached to them.
It is better to take aluminum clamps: they are more reliable than plastic ones.
Installation methods
Fabric roller blinds or their wooden analogues can be attached to plastic frames in various ways.
The main role in determining the method of fastening is played by the design of the roller shutter; it is also important to take into account the size of the window opening.
Installing curtains outside the opening to the ceiling or to the wall conceals space, so it is undesirable in cramped conditions of small rooms.
Depending on the configuration, each system has its own installation rules according to the attached instructions. It is possible to assemble and attach roller blinds in several ways:
- On spring brackets.
- Self-tapping screws.
- Attach with double-sided tape.
- On velkro tape (not cassette design).
- On glue (with the exception of glue with cyanoacrylate, which is destroyed by moisture and cold air).
To fasten curtains of closed or open type correctly , you need to act according to the accompanying step-by-step instructions, taking into account the characteristics of each type. Installing fabric curtains directly in the window opening allows you to profitably use the window sill. But everyone chooses the method of fastening according to their own skills and considerations. Scotch tape makes it possible to keep a plastic window frame in its original form. But self-tapping screws are a more reliable and durable option.
To learn how to install a roller blind with your own hands, watch the following video.
We buy blind plastic windows wisely
Fixed windows are inexpensive, but not functional. They are chosen to save money when opening is not needed. Sometimes this choice is justified, and sometimes it is not.
What is your case?
Opening and non-opening windows
Most windows are equipped with sashes to open the opening to allow fresh air into the room. In addition to the convenience of ventilation, the advantage of an opening window is ease of cleaning.
Due to the small dimensions of the opening, it is not always possible to build a window into the frame. This is the first reason to use a non-opening window. However, non-opening windows installed in buildings today are not only small dormers.
Where and for what purpose can non-opening, or, as they are commonly called, fixed windows be used to advantage?
Price issue
The absence of an opening sash and opening hardware mechanisms reduces the cost of a fixed window. Economic attractiveness is the second reason for preferring non-opening windows, which is relevant when the purchase budget is limited.
Advantages of fixed windows compared to opening ones:
- 1. Low price.
- 2. More light.
- 3. More tightness.
- 4. Does not sag or break.
- 5. The risk of falling out is minimal.
- 6. More options in terms of dimensions.
- 7. More options for glass filling.
- 8. PVC fixed windows are highly burglar-resistant.
Sanitary rules and standards for glazing
The living space must have natural ventilation by air flow through vents, transoms, or through special openings in window sashes and ventilation ducts.
— According to SanPin 2.1.2.2645-10 “Sanitary and epidemiological requirements for living conditions in residential buildings and premises”
For external glazing of a residential premises, the cheapest window option - fixed - is not suitable if the room does not have one of the devices:
- window with an opening window,
- air supply vent valve prices for vent valve,
- other ventilation systems.
In order to reduce the cost of a window, an opening and a non-opening sash are made in one plastic frame. This window fully complies with SanPin standards.
Cheap plastic windows - fixed and combined opening windows
The desire to save on purchases and not lose in the ventilation function and ease of cleaning - all together led to the appearance of PVC windows with combined opening: opening sashes alternate with blind ones. But even in this case, maintenance costs can cancel out all the economic benefits of the purchase.
Prices for plastic windows with combined opening
Double-hung window
Three-hung window
Balcony block
Check how much more expensive an opening window is in an online calculator.
Cleaning fixed windows
In the case when the window opening is located on the floor above the first, washing non-opening windows becomes problematic. Exception: if the windows overlook a balcony or loggia.
Do-it-yourself cleaning of fixed windows
When purchasing a blind window, or a window partially consisting of non-opening parts, make the location of the blind parts convenient for washing.
It is very problematic to wash a blind, wide and high sash through small opening sashes.
Even with the use of brushes on telescopic handles and other modern cleaning devices, cleaning a blind sash is not so easy.
Keep in mind that with age, the procedure for washing a blind sash becomes more difficult. Caring for plastic windows
Window cleaning by hired workers
Hiring a cleaning company and window cleaning specialists is not a budget-friendly way to get things clean. Please note that cleaning one window will not interest the company: you will probably be offered a comprehensive cleaning service.
How to save money on cleaning fixed windows
Modern technologies for treating surfaces with hydrophobic (water-repellent) compounds have also penetrated into the field of glazing. By choosing windows with self-cleaning glass for fixed glazing, you will make your life much easier.
Self-cleaning double-glazed windows PVC windows will remain clean for a long time without your participation. To keep them clean, only rain and sunlight are needed. You can find out the cost of plastic windows with self-cleaning glass by calling the manager of the Business-M company by phone. Double-glazed windows more details
How to ventilate a room with fixed glazing
For residential and public buildings, a prerequisite for a comfortable stay in them is the requirement to maintain air exchange.
A window without opening sashes does not let air in from the street, which can seriously disturb the microclimate of the room. Exception: houses with a recovery system or central forced ventilation.
How to solve the problem of ventilation in a room with fixed windows
The supply ventilation system is a direct alternative to ventilation with an opening flap. The ventilation valve is installed on a window or mounted in a wall. Depending on the type, a ventilation valve can be an inexpensive or, on the contrary, more expensive solution than installing an opening window. Ventilation in houses with plastic windows
Installing a blind window in an opening
The easiest way to install a window without disassembling it is to attach the frame to the opening using mounting plates. They, unlike anchor bolts and screws, are attached to the frame from the outside.
To install a fixed window using anchors or screws, you will need to remove the glass unit installed in the frame. For specialists this will not be difficult. In the case when a beginner decides to independently install a plastic blind window in an opening, care should be taken.
Stages of work on installing a fixed plastic window
- Take a special spatula for double-glazed windows and a glazier's hammer. In the absence of a spatula, you can carefully use a spatula and a regular hammer,
- You must first remove the long glazing beads (glazing beads in PVC window construction),
- Place the blade against the joint between the bead and the frame at an angle of 60 degrees,
- Using confident blows, knock the glazing bead out of the groove,
- Remove the glazing beads and glass unit,
- Secure the frame in the opening, having previously leveled it (window installation),
- Upon completion of installation, install the double-glazed window into the frame on the pads and secure with glazing beads.
Fire safety
Fire safety rules should be taken into account when glazing an object with fixed windows. In the event of a fire, when the route to the exit is cut off, evacuation will be difficult. However, “fire windows” are precisely fixed type windows. Fireproof windows in the office
How to care
The way to care for roller blinds depends on the situation and the fabric from which they are made. Typically, the product's operating instructions indicate products that can be used to clean the canvas. If a stain appears, remove it with an eraser. During routine cleaning, non-aggressive detergents are recommended that do not contain acidic or alkaline components that can change the color of the fabric.
It is easier to care for cassette types, since they are in the box most of the day, and no dust gets on them - just wipe the guide strips and the case itself with a damp cloth, and vacuum the canvas.
Tools and materials
To install roller blinds we will need:
- roulette;
- pencil;
- building level and long wooden plank;
- a hacksaw, scissors or a stationery knife (if you need to cut the curtains to width).
If you decide to install a structure with drilling, additionally stock up on:
- electric drill with a 6 mm drill + dowels (for walls or ceilings) or 2.5 mm for wood (for a window system);
- Phillips screwdriver or screwdriver.
To install roller blinds without drilling, you need to additionally prepare:
- solvent for degreasing the surface;
- double-sided tape (if it is not included);
- construction adhesive (for more reliable fixation of elements).
Installation without drilling
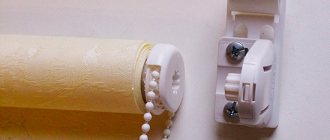
The principle of assembling a roller blind and installing it remains the same. The difference concerns only the features of fastening the brackets - they can be glued to the sash or fixed on its upper edge using special hooks.
Fasteners with a hook are used if the sash with a seal has a suitable thickness. In this case, the bracket is assembled from parts according to the manufacturer's instructions and installed on the upper edge of the open sash according to preliminary markings. Then the roller blind shaft is inserted into the brackets. Make sure that the door with hook brackets closes properly.
Brackets equipped with an adhesive layer are attached to the surface of the sash. To make the fixation as reliable as possible, be sure to degrease the installation site. Additionally, a suitable construction adhesive can be used.
The guides are also equipped with an adhesive layer - remove the protective film from it and attach the bar to a grease-free surface, inserting the upper edge into a special groove in the bracket.
At the end of the installation of the roller blind, limiters are installed on the chain with which the curtain is raised and lowered - small plastic washers with a slot. The first limiter is installed on the chain when the lower edge is raised to the required height, the second - when the curtain is completely lowered.
Video on the topic “how to attach roller blinds to plastic windows”:
Drilling installation
Choose which side is more convenient to position the control chain, since the bracket for installing the control mechanism has a special configuration.
Then mark on the frame, wall, window opening or ceiling where the bracket for the control mechanism will be installed. In accordance with the marks, drill holes for its fasteners. Install the bracket without fully screwing in the screws.
Paste a VALID AdSense code in Ads Elite Plugin options before activating it.
To determine where to install the brackets on the wall or ceiling, determine the central axis of the window opening, set equal pieces to the right and left of it.
Insert a mechanism with a chain on one side and a plastic tip on the other into the ends of the shaft. Install the mechanism in the bracket and, using a building level and a wooden plank, level it horizontally, accurately determining the installation location of the second bracket.
Drill holes for the second bracket, secure both load-bearing structural elements. Insert the shaft with the pre-fixed curtain into the brackets - first the end with the mechanism, then with the plug.
Related article: Do-it-yourself foam window trims
To secure the curtain to the shaft, you need to bend its top edge by 5 cm, forming a fold. The roller with the self-adhesive strip, from which the protective film has been removed, is installed in the fold with the adhesive part facing up, and then rolled towards the top edge. It is important that the canvas adheres strictly horizontally to the shaft.
Then roll the fabric almost completely and insert the bar into the special slot on the bottom edge. Correctly install the mechanism into the shaft - the canvas should be located close to the window.