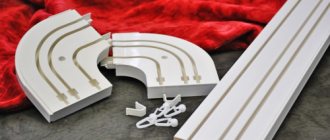
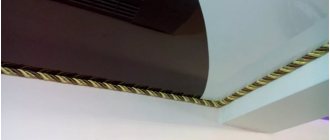
The most common arrangement of curtains is two parallel rows of curtains - made of light, usually translucent, fabric and a denser material. This explains the higher demand for double-row cornices - devices for placing such a combination of fabrics.
Examples of cornice devices
Let's look at the assembly and installation of double-row baguettes for curtains using the most common designs as an example.
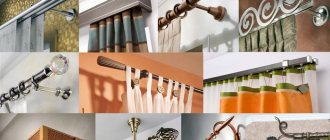
Types of curtain rods
The cornice is not only functional, but also a decorative element. Therefore, you need to carefully consider the choice of product to which the curtain will be attached. To understand which one will suit the room, you need to take into account the material of the cornice and curtains, the design, and the way it is attached above the window.
By type of design
The design of the cornice can be:
- wall;
- ceiling
The wall type is the most popular. It is simple to install and easy to use.
Mounting on the ceiling makes the room visually more spacious. The effect can be enhanced by choosing curtains with a pattern of vertical lines. This design is ideal for rooms with a skylight. It can be harmoniously integrated into any design.
Important! The disadvantage of the ceiling cornice is that it must be selected at the stage of rough repair work. But its advantages cover this nuance.
By mounting method
Curtains can be attached to the curtain rod in different ways.
Possible options:
- Loops that are sewn onto the top edge of the textile fabric and then placed on the curtain rod. They can be made from the same material as a curtain, or made from a different fabric, ribbons, or cords. A convenient solution that allows you to remove curtains at any time, for example, for washing, is to use hinges with buttons.
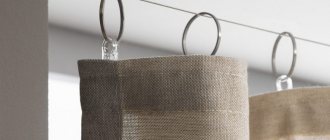
- Eyelets – suitable only for rod structures. Holes are made in the upper part of the canvas into which eyelets (plastic, metal or wooden rings) are inserted, then the cornice is threaded through. You get large beautiful folds.
- Hooks (clamps) – for string construction. Fastening elements - hooks or clothespins - are hung on the string. Then the curtain clings to them.
- Braid with hook loops that is sewn onto the top of the fabric.
- The drawstring is a “pocket” on the canvas through which the cornice rod passes. You can hang the canvas flat or arrange it in folds.
The option is selected, first of all, taking into account the design of the cornice. It is worth paying attention to the density of the fabric, not to miss the compatibility with the interior.
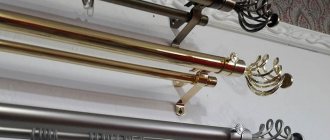
By material
Cornices can be made from the following materials:
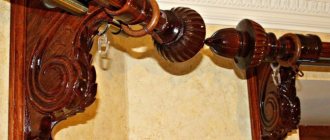
- Wood is a classic and noble material. Can harmoniously fit into almost any interior concept. In production, wood is treated with anti-rotting compounds. Wooden cornices are strong, beautiful and durable.
- Metal is a popular solution. Copper, stainless steel, brass, aluminum, chrome, and nickel are used.
- Plastic is an inexpensive material that does not require special care. Cornices made from high-quality polyvinyl chloride are incredibly wear-resistant and durable.
Any of these three materials is good enough. You should choose based on aesthetic preferences and the overall interior style of the room.
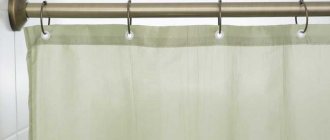
By number of rows
Depending on how the window needs to be decorated and how many layers of fabric will be used, a cornice with a certain number of rows is selected.
They are like this:
- Single row. This option is the easiest to install and use; it is intended for one canvas.
- Double row. This design is most popular due to its functional convenience: a light curtain is hung on the lower part, and a thick, light-proof curtain is attached to the upper part. This makes it possible to provide a comfortable level of illumination in the room at any time of the day.
- Three-row. Used less often than others, it is suitable for interiors that require a multi-layer curtain made of fabrics of different densities. Allows you to hang a lambrequin.
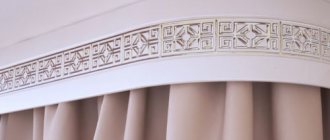
Additional Information! A lambrequin is a decorative element of a window frame. It is located in its upper part and should have a length of no more than 20% of the opening. Previously, a lambrequin was hung in order to hide an unsightly cornice, but now it is used only for decoration.
By control method
Cornices come in string, profile and with a rod:
- String involves the use of metal wire stretched using an adjustment mechanism. The advantages of such a system are simplicity and low cost. But this method is not suitable for thick curtains - under the weight of the textile, the strings stretch, sag or even burst. A wire cornice is well suited for light, transparent curtains; it does not attract attention, creating visual lightness and weightlessness of the window frame.
- Another type of curtain rod is one in which the curtain is fixed to movable elements built into the profile or rail. The fasteners move in the grooves, as if on rails, the design is convenient and durable. It is possible to use rotating elements so that the curtain moves at an angle or with a turn.
- Cornice rod - can have a round or square cross-section. Rings or eyelets are placed on the base.
Please note: in large rooms where you need to use a curtain or drapery on a cornice longer than 4 meters, it is better not to use a rod-shaped design. With such a length, it tends to sag under the weight of the fabric. In such cases, it is better to pay attention to profile structures. They allow the canvas to move without obstacles at any length. Rod ones provide unimaginable scope for design solutions; they can have a complex shape, an unusual surface, and be supplemented with special shaped plugs instead of the usual ones.
Sometimes unusual solutions are the best
In addition to the generally accepted ways to hang forged products, there are two less common types. Combined brackets look attractive from a practical point of view. Due to their design features, such models are suitable for both ceiling and wall mounting. However, they have a limitation: they are only intended for single-row curtain systems. It is impossible to combine several rows in a universal ceiling-wall product from both engineering and geometric points of view.
There are also side consoles - a great way to hang a wall-to-wall curtain rod in a small room. Also, these holders make it possible to install directly into the window opening. However, this method is unlikely. Firstly, a wide window niche is required (the usual minimum length of the rack is 120 cm). Secondly, this version can only be assembled without decorative tips. Namely, the tips, as an important design element, are often the main motive for choosing forged cornices. This option is provided only for curtain compositions with one row of curtains.
However, the variety of means for comfortable and attractive window decoration is not limited to metal cornices alone. Make sure of this by studying the catalog: a wide range, affordable prices, high quality, favorable terms of purchase and delivery will pleasantly surprise you.
Photos and videos for the article were taken from the sites Olexdeco.ru, repaireasily.ru and potolki-info.ru
Features of curtain rod connector
Profile cornices can be installed in absolutely any length and shape using a connecting element for joining. Using this design, it is possible to assemble not only a straight cornice for ceiling or wall mounting, but also various curved or rounded patterns.
To realize your idea, you need to stock up on the required number of profiles and select connectors.
There are two types of cornice profile:
- Moscow;
- Turkish.
Turkish implies that the connector and decorative insert (the plug that ends the cornice prevents the hooks from jumping off the profile) add about 3 cm to the structure.
The Turkish cornice increases the length of the profile with a plug.
The Moscow profile is connected in such a way that nothing is added to the size of the product. Its peculiarity: you need to take the number of profile connectors equal to the number of its rows.
Moscow cornice does not add length to the connecting profile.
User reviews
It seems to me that wooden cornices look much more beautiful than metal or plastic ones. For example, I don’t need curtain rods in damp rooms. I recommend this type.
Vlada
I have rings with curtain holders on my curtain rod. I didn’t know that there were so many types of holders, but I personally think rings are a very convenient thing. Unlike Velcro, they will not fall off (unless you try very hard, of course).
Inga
I like the double-row cornice more than the regular one. It looks more interesting, and the curtain can be attached in different densities, accordingly, limiting the flow of light into the room to the amount required for you. In general, I recommend this type.
Alexey Vladimirovich
Originally posted 2018-03-21 04:53:04.
Installation of curtain rods
To install the cornice you will need a certain set of tools. In addition to the fasteners included with the product, you will need:
- ladder;
- perforator;
- tape measure, pencil;
- dowels;
- self-tapping screws;
- building level;
Before assembling a rod-type cornice, you first need to determine its length and, if necessary, trim it. Then they put the curtain mounts on the rod.
Fastening elements are placed on the cornice.
Important! One of the fasteners should be placed between the bracket and the decorative plug so that the curtain does not move towards the center of the rod.
You need to carefully consider the height at which the cornice will be installed. The higher the curtain starts, the more spacious the room seems.
There should be at least 5 cm between the cornice and the window level. If the curtain or curtain will be attached to eyelets, do not forget to take into account the distance between the cornice and the ceiling: the fabric with rings should move freely in this space.
Installation of wall products using string type as an example:
- Mark the place of fastening to the wall, fix the bracket holders.
- Pass the string through the hole located in the mount and secure with screws.
- Screw the bracket to its base fixed in the wall.
- Repeat on the second side.
It is necessary to drill holes for mounting the bracket.
If the string cornice is made according to old models, you will need to open the box and tighten a special washer on the bolt on both sides.
Installation of cornice on the ceiling:
- Drill holes in the profile at intervals of about 50 cm.
- Attach the product to the ceiling, retreating 10-15 cm, outline the location.
- Use a small drill to make a hole in the center.
- Insert a dowel into it.
- Attach the profile with a central screw.
- Align the cornice and give it the required position.
- Make the remaining holes and hammer in the dowels.
Installation of the ceiling cornice takes place in several stages.
Now fasten the finished structure, on which the plugs are already installed.
Recommendations for choosing colors
The correct selection of the shade of the console in combination with the colors of the curtains and the lining of the room is also of great importance.
Basic techniques when choosing colors:
- neutral option - to match the color of the walls or wallpaper;
- painting the baguette and curtains in the same color is perfect for rooms with low ceilings;
- the cornices are painted the same as the ceiling;
- in spacious rooms, the contrast between the ceiling console and other room decorations looks interesting, which adds clear lines;
- The color of the baguette can match the color of the trim, baseboards, floors or interior items.
How to attach a curtain rod bracket
To place the cornice evenly, first of all you need to mark its location with a pencil. Use a building level to avoid mistakes.
Important! For products no more than one and a half meters long, 2 brackets are enough. If the cornice is longer, an additional one is placed in the center.
Instructions:
- Measure 15-25 cm from the window on each side and make lines in these places perpendicular to the ceiling.
- From the center of the upper edge of the window, measure the required distance to the cornice and mark it with a dot.
- Draw segments from the point using a level and ruler. The places where they intersect with the lines on the sides are the points where the brackets need to be placed.
- Place the base of the bracket against the marks and mark where the holes will be made.
- Use a puncher to make holes.
- Insert dowels.
- Secure the fastening part of the bracket to the dowels.
After this, you can mount the cornice itself.
Materials and tools for work
For installation you will need:
- hammer;
- dowels and screws;
- hammer drill or electric drill, drills;
- pencil and tape measure;
- plumb line, level.
Additionally, you will need a stable ladder or stepladder, with which you can comfortably and safely reach the mounting location.
To increase the reliability of the entire structure, craftsmen recommend fixing the dowel with epoxy resin or liquid nails - this way the finished product will be properly secured and will withstand even heavy loads.
How to attach a cornice or curtain rod to drywall
To install a cornice on drywall that does not hold conventional fasteners, you need a special type of dowels - “butterflies”.
When they are screwed, the sides open up and provide a strong grip on the drywall.
You can also use screws for metal.
To attach the cornice to drywall you will need special dowels.
The wall is the most reliable
Scheme for installing a cornice above a window
Assembling forged hangings for curtains is not difficult - but only if the final assembly option has been thought out in advance. If the features of the room, the location of the window, the nuances of design solutions and repair work are not taken into account, serious problems are possible. To avoid them, you need to choose the right bracket for the wrought iron cornice.
The most common version of their installation is wall-mounted. The reason for its popularity is its simplicity. After all, it’s easier to drill holes on the wall than on the ceiling, lay dowels, tighten the brackets and hang the entire structure. Recently, it has become popular to decorate ceilings with decorative materials, plasterboard and plastic.
Hanging metal curtain rods on such surfaces is either impossible (they will not stick) or involves time-consuming preparatory work. It is necessary to install wooden mortgages to which the cornices will be attached. In addition, the wall type of fastening is the most universal. It is compatible with single-row, double-row and triple-row models.
How to make a curtain rod with your own hands from scrap materials
It is easy to make a curtain rod with your own hands from scrap material. The easiest way is pipes made of metal or plastic. For example, water pipes measuring 0.5 or 0.75 inches.
How to make a cornice:
- Select the diameter and length of the pipe, determine the number of brackets.
- If there are 3 fasteners, cut the pipe in half.
- At the ends of the segments, make a thread of 3-4 turns.
- From the same pipe, make pieces of 10-15 cm for each fastening and a thread on one of their ends.
- Buy or make supporting elements for fastenings from a sheet of steel 3-5 mm thick. The pipes are welded to them with the side without threads.
- Sand the seam.
You can make a cornice yourself from a pipe.
After this, the cornice can be assembled, painted and installed. Paint adheres better to galvanized pipes.