All wall finishing work is completed by installing trim on the doors. If they were dismantled on purpose, there are no problems - they are installed in the reverse order. If the repair work was accompanied by the replacement of the door block, then very often the question arises about how to install trim on the door with your own hands.
At first glance, nothing complicated. However, in the process of work, moments arise when knowledge of the nuances cannot be avoided.
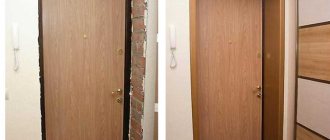
It is unlikely that anyone will agree to live for a long time in an apartment with such doors.
Below we will consider what material and what shape of trims to buy, as well as how to install them correctly - advice from professionals will help you do the work yourself quickly and beautifully.
Kinds
To correctly install platbands on interior doors, you first need to select the appropriate elements. First of all, pay attention to the material of manufacture:
- Products made from natural wood are considered universal. The strips can be painted to match the color of the doors. The wooden elements are fastened with nails without heads. If the walls are well aligned with the door frame, the platbands are placed on an adhesive composition - “liquid nails”.
- Laminated MDF planks resemble natural wood in appearance. Decorative elements are matched to the color of the door. The platbands are secured with adhesive or nails without heads, having previously drilled blind holes.
- PVC cashing is more suitable for plastic doors. The planks are glued or mounted on the mounting profile.
- There are also aluminum and steel cash registers, but they are usually installed on entrance doors.
Most planks are given a standard flat, rounded or curly shape .
Depending on the mounting method, cash can be overhead or telescopic. The first type of elements is fixed directly to the door frame. The second one is equipped with mounting grooves.
Accessories for door frames
New material, which is additional material, appeared not so long ago. But it’s hard to imagine a modern doorway without it. Therefore, you should get to know him better.
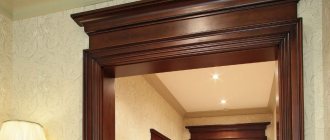
Purpose
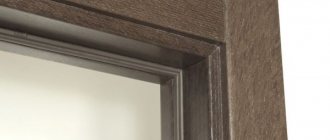
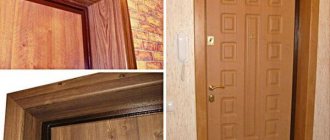
Why do you need an extension for the door block? This element is intended to decorate the opening after installation of the box . The fact is that when producing boxed bars, manufacturers adhere to a standard width size. And it is somewhat less than the depth of the doorway where it will take its place. And to make the frame frame look more natural, the free space is supplemented with special panels, which are called additional panels.
The extensions are designed for lining the slopes of deep doorways
Varieties
Depending on the design project, the following types of additions can be used:
- Wooden;
- MDF;
- PVC;
- Metal.
The most common are products made from MDF, which are most often found both on the shelves of hardware stores and in the apartments of citizens, thus covering the nondescript slope of the doorway. The next most popular are wood products, and only then only the metal type of accessories.
Extensions with MDF platbands
Polyvinyl chloride panels have become no less popular. These products are easy to use and maintain, so they are increasingly used to frame doorways.
In addition to the material of manufacture, slope framing can be divided into three more categories:
- With missing edge;
- With existing edge;
- Telescopic view.
Options for edges
The edges of the first type of trim are not processed, but represent the simplest evenly cut edges. They are closed with platbands installed on top of the ends of this product. The disadvantage of using extensions that do not have cladding is their potential fragility due to the penetration of water vapor into the product.
The edge extension has the appropriate processing. This type is much better protected from moisture penetration. Some inconvenience associated with trim that has processed edges is the need to select the exact size in width. If this is not done, then the edge will have to be cut, which will automatically deprive it of all its advantages.
Telescopic extensions are distinguished by the presence of a machined groove and ridge on the side parts. If you need to close a wider slope, you just need to take another product and connect it to another. Some differences in width can also be easily eliminated by simply moving two parts apart without losing the attractive appearance. Thus, the decorative element frames the doorway, making it complete and beautiful.
How to make extras with your own hands?
If you couldn’t buy a set of extensions along with the door block, then you can always make this element yourself. And in the case of finishing a house with wood, such a solution will be optimal.
To perform the work, you can choose ordinary planed boards with a thickness of no more than 20 mm. The width is selected based on the depth of the doorway . To eliminate the option of warping, which constantly haunts natural wood, you can use an MDF or PVC panel. Such materials are well suited for finishing the entrance door opening both outside and inside.
The width of the extension depends on the depth of the doorway
Often the panels used have a tongue and groove design. To keep them out of the way, cut off the excess with a jigsaw or hand-held circular saw. For soft material, use a chisel, which can easily remove any ridge. The cut side should be processed to give it the appropriate appearance for joining with the platband. The wood is planed with a plane or router, and the PVC panels are simply cut evenly with a stationery knife.
You can put insulation under the homemade addition, for example, mineral wool. This will relieve apartment owners from extraneous sounds coming from the landing. This insulation perfectly blocks noise, so using it to finish a doorway would be the right decision. In addition to the absence of extraneous sounds, the use of mineral wool will make the front door warmer, because there will be no drafts or cold bridges.
The stain preserves the structure of the wood
Methods for installing extensions on the front door
Finishing the doorway of the front door can occur in three ways:
- due to the door frame;
- installed on the wall of the opening itself;
- mounted on a special frame.
In most cases, installation of an additional board involves the use of a special groove selected on a box beam. And the main fastening material here is “liquid” nails. Due to the fact that the extension does not bear a load, adhesive fastening will be quite sufficient.
An alternative to “liquid” nails are self-tapping screws. They are twisted into a decorative element on the front side. But if it is not hidden with an appropriate overlay, then the appearance of such a finish will not be entirely attractive. In rare cases, nails with a decorative head are used for fastening. But this option requires an appropriate interior design of the hallway.
Installation of extensions is carried out using liquid nails or self-tapping screws
Whichever installation method is chosen, the following actions will be performed:
- Two side blanks of the same size are cut;
- Mounted on the side slopes of the opening;
- The top blank is cut out;
- Installed between the side elements.
This algorithm can be performed in the opposite direction, when the trim of the front door opening starts from the top element. In this case, the side panels should take a position between the floor and the top bar. But at any joint, installation is carried out only from the side elements. This is the most correct and convenient option.
To make the slopes as airtight as possible, silicone sealant is placed in the groove on the box beam. Next, an extension is inserted into it, secured in one of the listed ways. This ensures that there is no air movement through the joints between the workpieces and the door block.
What to do if there is no groove
Finishing slopes with extensions can be done not only if there is a special groove in the box. This causes some inconvenience in terms of creating a clear and even outline of the opening. But even in this case, you can achieve the desired result.
To carry out work on installing extensions on a box without a groove, you must:
- measure the depth of the doorway from the edge to the frame beam;
- cut wooden blanks for the frame;
- install the frame using bars, a building level and self-tapping screws;
- secure the extensions to the frame using mounting adhesive, screws or nails.
According to this plan, you can carry out future work and get a smooth and beautifully designed doorway.
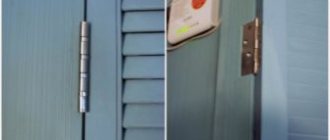
Accessories for metal doors
Recently, the installation of metal entrance doors has become extremely popular. These blocks do not have a special groove for installing extensions, although there is a clear need for them due to the minimum width of the iron box. And this is where drywall comes to the rescue.
Extensions on a metal door are installed using plasterboard
To install extensions in an opening with a metal entrance door, it is necessary to cut strips whose length is equal to the depth of the slopes. The number of parts depends on the height of the box beam. The installation frequency should not exceed 30 cm, which makes it possible to give the finish proper strength. The planks are glued to the wall with glue. If necessary, an additional one is attached to one part so that the level of the walls exactly matches the contour of the door block.
When the original frame is ready, installation of the extensions begins. Any materials that are available to the apartment owner are suitable for the work. Additional strips are attached using assembly adhesive applied to the inner surface of each element. Upon completion of the work, it is necessary to install platbands on the new metal entrance door.
Tools for work
To ensure that the installation of door trims is successful, the tools must be prepared in advance.
- To make accurate markings you will need a pencil, tape measure, plumb line, square and level .
- A miter box will help you cut the workpiece perfectly evenly at an angle of 45 degrees .
- It is better to cut the planks with a miter saw . If you don't have one, you can use a hacksaw . The fine teeth of the blade will not leave chips on the product.
- A hammer is used to drive nails or tap cash elements .
What will be needed to install slopes?
To install MDF slopes you will need the following tools:
Photo 1. Set of tools for installing slopes
- 1 – miter saw;
- 2 – roulette;
- 3 – pencil;
- 4 – angle;
- 5 – knife;
- 6 – hammer;
- 7 – masking tape;
- 8 – fastening elements;
- 9 – screwdriver;
- 10 – polyurethane foam;
- 11 – drill.
How to cut off the platband?
After marking the angle of the cut and the length of the workpiece, the trim is cut with a miter saw. A special feature of the power tool is the adjustable table, which is installed at the desired angle. In order to saw off the door frames correctly and without chipping, the side edges of the workpiece are pressed tightly against the stops on the frame. If a gap occurs, the cut will be uneven.
If you don’t have a power saw, a miter box will help you cut the edge of the casing at 45 degrees. It is better to buy a quality tool. The cheap one made of plastic has deformed thrust elements that distort the size of the angle. A hacksaw for cutting is used with fine teeth that do not leave chips.
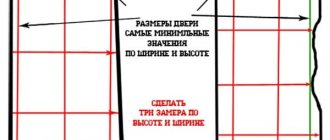
Stage 1. Control measurement of the opening after door installation
We make accurate measurements of the actual dimensions after installing the door - even if we know the exact factory dimensions. It is necessary to measure the width, height of the vertical and length of the horizontal extension.
Door trims are decorative strips that cover the walls of a doorway. They are installed if the opening is wider than the door frame. Most often, MDF panels are used for this.
Photo 2. Measuring the width of the extension
It is necessary to measure at three points vertically on each side and at two points horizontally (from above).
Photo 3. Measuring the length of the horizontal extension
The additional element must necessarily be adjacent to the door frame, so we measure the length along the width of the door.
How to attach platbands to interior doors?
Simple fastening of flat platbands is performed at an angle of 90 degrees. The vertical planks fit tightly at the top with the horizontal one. When installing wooden or MDF elements of complex shapes, the ends are cut at an angle of 45 degrees. There are 4 methods of fixing the planks.
Using finishing nails
Wooden or MDF door casing is easier to nail with nails with flat heads. The fastening is reliable, and if necessary, the planks can be easily dismantled. You can use nails of a different configuration, and so that the heads are not visible, they are removed with side cutters. The length of finishing nails for platbands is about 40 mm. The size can be calculated individually, taking into account the thickness of the cash. Having passed through the bar, the nail must enter at least 20 mm into the body of the door frame.
Attachment points are marked on the workpieces, maintaining the same distance. Typically, a pitch of 500 mm is maintained. Using the markings, drill through holes with a diameter corresponding to the thickness of the nail. After joining to the door frame, the platbands are carefully nailed. For aesthetics, hats are painted over with a wax pencil.
Liquid nails
To attach cash to interior doors without nails, use an adhesive - liquid nails. The advantage of this method is that there is no visible fixation site. The downside is the weak fastening, as well as inconvenience during dismantling. In addition, liquid nails are only applicable if the adjacent walls are perfectly level.
The door frames are installed after sawing and fitting of the blanks. The plank is lubricated on the back side with adhesive and pressed tightly against the wall. To glue platbands for interior doors, it is enough to hold each strip pressed for no more than a minute.
Fastening with self-tapping screws
The method is similar to fastening with finishing nails, only instead of them, wood screws 25 mm long and 6 mm thick are used. Places for holes are marked on the workpiece in increments of 500 mm. A drill of the same diameter or with a margin of 1 mm is used.
It is advisable to recess the hats into the body of the plank. On the front side of the workpiece, the hole is expanded with a drill of a larger diameter to a depth of 1–1.5 mm. Now all that remains is to attach the trim to the interior doors with self-tapping screws. You need to tighten the hardware so that the head fits into the recess. The place of fixation is painted over with a wax pencil.
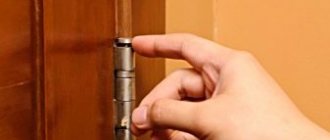
Attachment by beaks
The method does not require the use of screws, nails or adhesive. The cash box is equipped with a beak-shaped lock. The connecting pin is inserted into the recess on the box and pressed until it clicks.
The advantage of this method is ease of installation and invisibility of the mounting location. A negative point is the delamination of MDF trims during dismantling. Over time, spontaneous destruction of the joints may occur, which requires additional treatment of the joints with glue.
Dissolution (cutting) of platbands
Sometimes there are doorways with difficulties in installing platbands; due to some structural features of the opening or door block, one or more platbands do not fit intact, so they have to be reduced in width to the required size - this is called dissolving the platband
. Most often it cannot be avoided due to deficiencies in the room layout. If we talk about typical construction, then in multi-apartment “Khrushchev” buildings such shortcomings are often encountered, although they can also be found in modern premises with a cramped layout. After all, the dissolution of platbands does not arise due to errors in the design of the premises, but as a result of optimizing the layout for the rational use of a limited area.
Among the methods of eliminating dissolutions
platbands can be distinguished by a change in the doorway (expansion, narrowing or displacement) and a decrease in the size of the door block. There are nuances and difficulties with both methods, so sometimes it’s easier to put up with sawn trim. If we talk about budget interior doors, their manufacturers are often limited to the standard sizes of their products, and installing a door that is as much as 10 centimeters smaller in width is not always advisable, and sometimes impossible, if we are talking about a door leaf that is 60 centimeters wide. Among the nuances associated with doorways may be high costs, inconvenience or impossibility of implementation due to load-bearing walls.
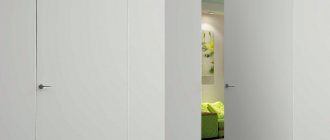
How to install platbands on interior doors?
When installing interior doors with your own hands, glue, nails or self-tapping screws are used to fasten trim made of wood or MDF. However, the evenness of the walls and the shape of the planks are taken into account. There should be no gaps at the joints. If the walls adjacent to the end of the door frame are uneven, then it is better to refuse gluing.
Installation of cashing begins from the side where the interior door opens. This is due to the presence of hinges that prevent the strip from being fixed flush with the box element. You will need to make the same indentation, and on all three sides for symmetry. Where there are no loops, there is no need for mandatory indentation.
If the door is in a corner, installation is carried out using the letter G. If desired, you can saw the element vertically and use a narrow strip.
The platband on one side is installed when the slopes on the other are decorated with tiles or other wall materials.
Docking at an angle of 45
When it is necessary to install trim on the door at an angle of 45 degrees, use a miter box for marking. This joining of elements is usually used for shaped and rounded planks. If there is no miter box, the markings can be made with a protractor.
The installation procedure consists of the following steps:
- The height of the vertical elements is measured from the floor. The planks from below are placed on the floor covering, which is why the joints of the baseboards and door frames are on the side. When installing cash on the door from the hinge side, take into account the width of the indentation. The indicators are measured on the workpiece and a mark is placed. This will be the bottom point of the 45 degree angle.
- Having inserted a bar into the miter box, mark a cutting line at an angle from the set point. The excess part is sawed off.
- First, the blanks are baited in two places so that they can bend from above. The heads of the nails are removed with pliers and hammered into the door frame: one just above the floor, the other at a distance of 1 m.
- The length of nails without heads should not be greater than the thickness of the strips. It is optimal to make the protrusion of the pins 5 mm. The platbands are attached to the door frame. At the location of the nail, a wooden beam wrapped in fabric is applied to the workpiece, and vertical strips are placed on the pins with light blows of a hammer.
- To properly make platbands for the entire door, the corner must be given an even shape. The upper unfixed parts of the cash are folded back, and a horizontal element is placed under them. At both ends of the workpiece, mark lines at an angle of 45 degrees with a pencil, after which the excess part is cut off.
Docking at an angle of 90
The platbands are fastened at 90 degrees with horizontal or vertical seams. The choice depends on the preference of the owner. When installing a door cashing with your own hands at a right angle, only flat-shaped blanks are used. The cut areas are treated with varnish or acrylic-based paint.
To install platbands on interior doors with imitation lintels, the upper element is extended. The joining is obtained at an angle of 90 degrees with horizontal seams. The top bar extends beyond the vertical.
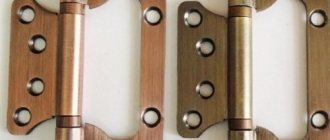
Telescopic trims
Telescopic trims are attached to interior doors without nails. Decorative elements are equipped with a special lock consisting of a slot and groove. Fixation occurs at the end of the box. The main requirement for proper installation of platbands is the presence of a protrusion. It forms when the door frame is narrower than the thickness of the interior partition. The adjacent walls must be level, otherwise you will get an unsightly gap.
Installation instructions for plastic trims
Glue is used very rarely, the connection is unreliable. Basically, plastic trims are installed on interior doors using a profile. This installation method consists of the following steps:
- A special profile is cut to fit the dimensions of the door frame. The blanks can be made 5 mm shorter. This will not play a significant role; they will still hide under the cash.
- 4 long and 2 short elements are cut off on two sides of the interior door. The connecting ends are sawed off at an angle of 45°.
- Fix the mounting profile with self-tapping screws to the door frame. This option will not work with cheap Chinese doors. The box is made of thin metal; it is impossible to tighten the screws firmly. In this case, the mounting profile is fixed to the wall, but it must be strong, preferably without plaster.
- They begin to screw the profile with self-tapping screws from the middle, moving in both ends. Using a plumb line or level, correct any distortions.
- After installing the mounting profile, measure the height of the side cashing elements and saw off the ends at an angle of 45 degrees. The process is identical as for planks made of wood or MDF. The workpieces are inserted into the groove of the vertical mounting profiles, where they can move.
- Connectors - corner fittings - are placed in the cut of the platbands. The top bar is measured and sawed off at both ends at an angle of 45 degrees. The workpiece is joined with connectors to vertical trims, snapping into the mounting profile. Corner fittings completely hide the joint, even if there is a gap.
If the plastic cash is placed on a wall lined with clapboard, then a wooden strip is fixed around the perimeter of the doorway, and the profile is already attached to it.
Installation is possible using special nipples and screws.
What is a door casing?
In the construction industry, this concept refers to a decorative strip that is fixed on top of the door frame next to the door leaf. Platbands can be made of different materials, including modern plastic (PVC). There are several rules for choosing this interior detail:
- the material of the strip must match that from which the door leaf is made;
- it is advisable to select the color as accurately as possible if the casing is purchased separately;
- The design style of the decorative element must correspond to the overall style of the interior.
As a rule, trade organizations offer a whole line of products, the material and color of which correspond to commercially available doors. When purchasing a new set, it will not be difficult to choose what you need right on the spot.
The most common platbands are made of MDF. The material has an attractive appearance, can imitate different types of wood, and include additional decorative elements. The cheapest option for platband is pressed paper or plastic. Thanks to modern methods of surface finishing, such products also look quite aesthetically pleasing. The highest quality and most expensive are solid wood frames. It is advisable to combine them only with solid doors made of exactly the same material.
Based on the type of design, the following types of platbands are distinguished:
- straight - consisting of planks with a smooth surface without unnecessary details;
- rounded - the profile of the outer side of the product has a convex shape or smoothly cut edges;
- figured - the profile line is more complex; varieties of such platbands include carved products made from solid wood;
- typesetting can consist of parts of different shapes - a set.
One of the options for inlaid platbands can be considered products with a capital: a decorative element that repeats the shape of the upper parts of the columns. Such details would be appropriate only in classical-style interiors (Rococo, Victorian, Baroque, etc.). They will not suit modern minimalism or high-tech at all; they will look ridiculous in a loft-style studio.
Elimination of defects
An unpleasant moment is the visibility of the nail head or screw. They are slightly recessed into the body of the cash, and sealed on top with sealant of the desired color. You can use a wax corrector.
On uneven walls, due to the curvature of wooden planks, joints diverge. During installation, the joining elements are additionally connected with a finishing nail.
Wide strips from 100 to 120 mm help to hide large defects around the door frame.
Features of installing extensions
In order to install high-quality extensions, you first need to accurately calculate the dimensions of the door structure. Measurements are taken from the box to the edge of the wall, top, bottom and middle: the width of the additional parts will correspond to the maximum value.
If the platbands are telescopic, then you will need such a number of strips that their total width is the required value. The elements must be made of the material that makes up the remaining fragments of the door system and match in color.
Installation work is carried out in the following sequence:
- the product is cut in accordance with measurements;
- the door frame is cleaned;
- the upper additional part is being installed;
- polyurethane foam is blown into the gaps;
- side additional elements are installed.
Self-tapping screws are used to secure the finish. Mounting holes with visible screw heads are decorated with plugs to match the additions.
How to join the plinth with the platband?
There is no need to cut the door trim; it should reach the floor. Otherwise it won't look very nice.
The plinth itself is adjusted, the method depends on the material.
- The plastic ones have decorative plugs, with the help of which you can neatly and beautifully join the end of the plinth and the door casing.
- A cut is made on the wooden one at 45 degrees to align the adjacent side of the plinth with the thickness of the door casing.
Methods for finishing slopes
You can trim slopes in different ways:
- Cement and carefully putty;
- Install slopes from a sandwich panel. This is an inexpensive type of finishing. But sandwich panels are fragile and short-lived.
- Install MDF slopes. This is a more expensive and at the same time reliable method of finishing. MDF slopes are more durable. In addition, they can be matched to the color of the door. Torex produces slopes that fully match the selected door model in color and texture.
You can perform any of these options either independently or with the help of professionals. You can order the installation of MDF slopes from a certified Torex team. In this case, we guarantee high quality of work performed. Since installing MDF slopes is the most complex and time-consuming, you need to know a number of nuances. If you decide to do this yourself, use our instructions.
Dismantling
Removal of platbands is usually required when cash is replaced. There is no need to worry about their safety, but the work is done carefully. Taking an ax with a sharp blade and a hammer in their hands, they begin to dismantle:
- To remove the trim carefully, the interior door is placed in an open position. Positioned in the doorway, the tip of the ax is inserted in the upper corner between the bar and the frame.
- The hammer is used to hit the butt of the ax until the blade plunges under the cash.
- By pressing the handle on the ax, the bar is separated from the box. The further procedure consists of similar actions. They use an ax in a circle until the dismantling of the platbands is completed completely.
The procedure must be carried out carefully so that no dents are left on the door frame. Instead of an axe, homemade sharpened strips of durable metal or other similar devices are suitable.
General rules for installing doors
A door block is a prefabricated structure consisting of a frame, a leaf, installation and connecting units, and fittings.
The box is mounted in the opening and consists of vertical profiles and a crossbar. The sash is installed on one of the profiles using hinges. The profiles are made of durable wood. Sometimes the box is supplemented with a threshold and seal for sound and thermal insulation. In installer slang, a door frame is called a “ludka”.
A movable panel made of wood, veneered with MDF, PVC or metal, closes and opens the opening. Lightweight frames with honeycomb filling or reinforced frames made entirely of wood are sold.
Component elements include platbands and extensions. Framing strips perform a decorative function and cover the joints of the canvas and the box. Extensions cover slopes and joints with walls. Elements come in a special format: for decorating arches and non-standard doorways.
The category of fittings includes all possible latches, handles, hinges, and crossbars. This group includes door closers, opening angle limiters, seals
.
To install a door system yourself, you need tools and basic skills. The quality of installation is affected by the accuracy of measurements: from minimal misalignment of parts, system defects will appear in the future: cracks will form or jamming of the canvas.
The dimensions of the frame must be smaller than the size of the opening, otherwise it will need to be expanded. Professionals consider the optimal size of gaps to the wall to be 10-40 mm.
Door blocks are presented on the construction market in disassembled or assembled format. In the first case, the installer's work will be more complex and time-consuming, since the box will need to be assembled.
The general procedure for attaching an interior door frame looks like this:
- Installation of a disassembled box.
- Equipping all elements of the door block with the necessary fittings, fastening the door leaf to hinges.
- Installing the frame: the door frame is fixed in the opening using hangers or anchors, the gaps are filled with foam
- The sash is hung on the fixed “bowl” and adjustments are made.
- Platbands and extensions are installed.
Platbands are a mandatory decorative element of the door structure to design the opening around the entire perimeter. Extensions are purchased if the opening in depth exceeds the dimensions of the frame. The protruding surface of the wall is hidden under decorative strips.
Stage 3. Trimming the extensions to the required sizes
Photo 9. Sawing blanks
Using a miter saw, we cut blanks for additional elements exactly along the marks.
Photo 10. Sawing the second workpiece
We saw off the first and then the second horizontal parts of the extension.
We repeat the procedure for the vertical parts.
Stage 4. Assembling the accessory box
Before installation, we assemble the extensions into a solid, rigid box.
Photo 11. Drilling holes for self-tapping screws
Using a drill, we drill holes for self-tapping screws - for fastening from the inside. This is a mandatory step so that when screwing in the screw does not split the MDF panel.
Photo 12. Drilling holes for self-tapping screws
We make several holes at a distance of 10–15 cm from each other.
Stage 2. Setting aside and marking the required dimensions of the extensions
Photo 4. Preliminary markings
After we have measured the required dimensions of the additions, we set them aside on the blanks of the additional elements. We make preliminary markings directly on the panel.
Photo 5. Gluing future cutting areas with masking tape
Using masking tape, mark future cutting lines.
On one blank for additional elements, you can put two parts - the threshold and the upper part of the additional elements.
In the same way, we set aside the dimensions of the second part, make preliminary markings on the workpiece and glue it with masking tape.
Photo 6. Re-mark
We re-mark the length of the extension directly on the masking tape.
If you do not glue the edge of the additional element with masking tape, chips may appear on it during sawing.
Photo 7. Checking dimensions
Once again we check the correctness of the markings.
Photo 8. Postponing the cutting angle
Use a miter angle to mark a cutting line perpendicular to the edge of the panel.