Professional builders know that installing interior doors requires more careful compliance with all the requirements of the instructions for their installation than when installing an entrance door, where various mistakes can be hidden under the slopes. You won't be able to pull off this trick on interior doors. The slightest errors in calculations, both when taking the parameters of the opening and block, and when cutting down risers and crossbars, inevitably lead to a negative result, which, in most cases, cannot be corrected.
To prevent such a situation, we will analyze in detail how to assemble the door frame of an interior door at home, and then install it in the doorway. There is nothing complicated here. All you need is patience and attentiveness.
Preparatory work
Preparatory work for replacing interior door frames consists of several stages:
- the doorway is measured;
- the door block is selected;
- materials and tools are purchased;
- the old box is dismantled;
- a new door frame is being assembled.
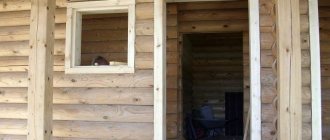
Taking measurements
To take measurements, you should have a tape measure, a sheet of clean paper and a pencil (pen) at hand. Measured:
- opening height - the distance between the floor and the ceiling (position 1 in the figure);
- width (2) - the distance between the side elements of the opening;
- wall thickness (3);
It is also noted in which direction the doors will open. The height is measured along both side slopes. The smallest value is taken. The result obtained is also rounded down to the nearest centimeter. The width is measured in several places (see diagram) - only in panel houses the width of the opening is the same along the entire height. As in the case of height, the size of the narrowest part of the opening (indicated by a green line in the figure) is taken as a basis.
Box selection
When ordering a door block, you need to remember that there is a direct relationship between the width of the doorway and the width of the door leaf - this is the main indicator in door sizes. For example, in an opening 93 cm wide, it is even theoretically impossible to insert a door with a leaf of 90 cm. For doors with a leaf of 70 cm, the opening will be too wide. The ideal option is an 80-centimeter canvas.
We will summarize the dependence of the door leaf on the size of the doorway in a table.
| Doorway width, mm | Door leaf width, mm |
| 670 — 700 | 600 |
| 770 — 800 | 700 |
| 870 — 900 | 800 |
| 970 — 1000 | 900 |
From the given figures it is clear that with the lower value of the opening width (67 cm, 77 cm, etc.), it will be difficult to push the door frame into the doorway - there is only 10 mm left (60 cm panel + 6 cm, 3 cm each each, racks).
It is most convenient to work when there is a gap of 3 cm on each side between the wall and the box.
For information: the frame and the door leaf do not have to be made of the same material. For the box, it is preferable to buy timber made of natural wood, and MDF canvas covered with eco-veneer.
The working process
We will divide all the work into three parts: collecting the necessary materials and equipment, setting up the box and fastening the structure.
Materials and tools
This is what a set of everything you need looks like
All information on the components we need is presented in the table.
| Name | Description |
| Doors and frame | Everything is clear here: it’s impossible to install doors if they don’t exist. I don’t recommend assembling the box yourself without skills and special tools, so immediately order the assembly of the structure and the insertion of hinges and handles |
| Polyurethane foam and a gun for it | We will mount the structure using polyurethane foam; it is better if it is a professional option. It is much more convenient to apply the composition from a pistol, but if you need to install 1-2 doors, then you can get by with a household version with a straw |
| Jigsaw and hacksaw | If you need to cut something during the process, you can use a hacksaw or jigsaw |
| Measuring devices | This includes a pencil, a square and a building level; most often we will use the latter device |
| Screwdriver | It can also be used for various jobs, for us it was mainly used for installing handles and screws |
| Flushing | In order not to spoil the gun and, if necessary, quickly wipe off the foam, we will need a special composition |
| Wedges and plates | Used to position the door and frame in the desired position and fix the elements before fastening them |
Required materials and tools
To replace the frame in an interior door you will need:
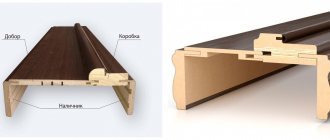
- door frame made of wood, MDF (both options are sold assembled or as a set of elements) or profiled metal (can only be purchased assembled);
- platbands (wooden, MDF, plastic);
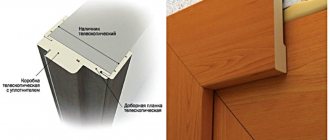
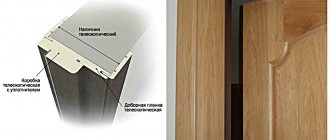
Attention: the door frame can be telescopic, i.e. with a groove for fastening platbands. In this case, the platbands should also be telescopic - with a ridge.
- wood screws when installing the box on a plasterboard partition;
- self-tapping dowel for a brick or concrete wall;
- anchor bolts for a metal box;
- polyurethane foam for attaching the box to the walls;
- special nails for fastening platbands - colored, with a small head;
- vertical and horizontal bars for spacers;
- spacer wedges;
- an electric wood cross-cutting machine with a round rotating mechanism for cutting at angles of 45o and 90o (can be replaced by a hand saw for wood with a fine tooth and a special device for cutting at an angle - a miter box);
Electric cross-cutting machine.
Miter box.
- an electric drill (screwdriver) with a set of wood drills (for a plasterboard partition) or with a Pobedit tip for a brick or concrete wall;
- chisel for forming a recess for hinges;
- Phillips screwdriver or screwdriver with a set of bits;
- roulette;
- axe;
- level;
- plumb line;
- construction pencil;
- hammer;
- construction knife;
- crowbar (crowbar);
- a grinder for dismantling a metal door frame or a hacksaw for metal.
The given list of tools is universal and allows you to install a door frame made of any material.
Removing the old door frame
Any interior door consists of vertical frame posts, an upper cross beam (crossbar), a threshold (not always) and a door leaf. Dismantling the frame always begins with removing the door leaf from the hinges. To do this, a crowbar is placed under the door, which is open at 90o.
A solid object is placed under it to create leverage. The door leaf is lifted and removed from its hinges. It is better to do the work together so that the door does not fall. If the blade does not lift, the hinges are lubricated with anti-corrosion lubricant.
Further actions depend on whether the box is kept or thrown away.
Fast, destructive way
If the door structure will not be used in the future, all dismantling work is carried out quickly:
- The platbands are removed with an ax - the tip of the ax is driven with a hammer between the box and the platband until a gap appears. After this, the ax is moved closer to the fastener and rotated until the platband moves away from the box completely. Instead of an ax, you can use a nail puller;
- each vertical post is cut in the middle, after which it is turned out of the doorway with a crowbar;
- the threshold is also cut and removed with a crowbar;
- the fasteners are cut flush with the wall using a grinder or a hacksaw.
Gentle way
The easiest way to preserve the door frame with your own hands is to dismantle it. Step by step it looks like this:
- platbands are removed;
- the hinges and the latch bar are unscrewed - there is a hidden fastener underneath them;
- Use a screwdriver at low speed to unscrew the screws (the nails are removed with a nail puller). If they do not unscrew, then cut them off with a grinder or a hacksaw;
- The polyurethane foam is cut out with a construction knife;
- the door frame is carefully removed from the opening and disassembled.
When dismantling the doors, you must remember that a wall damaged during disassembly of the frame will cause problems several times greater than a few minutes spent on careful work.
MDF door frame - how to install it yourself
Content
Updating the front door with MDF panels or installing interior doors from this material with your own hands requires a very careful and meticulous approach both when cladding the panels and when assembling the entire door structure. Before starting work, you must carefully study all stages. In the article we will describe the advantages and disadvantages of an MDF door frame, and also tell you how to properly assemble an MDF door frame and install the structure yourself.
Regarding the process of upholstery and installation of MDF panels on entrance doors, we note that the practicality and beautiful appearance of such finishing allow us to compare this material with luxury finishing products. Thanks to the large selection of products, the door panel can be selected to harmoniously match any interior.
Here is a list of the important advantages of MDF panels that will help you understand the feasibility of updating an old metal entrance door with this material:
- presentable appearance
- excellent sound and thermal insulation properties
- high resistance of the material to loads and damage
- ease of installation and the ability to install it yourself
- a large selection of MDF panels on the building materials market
- fast work process
- possibility of finishing MDF on both sides
Meanwhile, updating the front door with MDF panels requires a professional approach, and therefore, at the link https://www.prostozamok.ru/ we suggest that you familiarize yourself with the installation services of panels and other accessories by the company’s specialists.
Box assembly instructions
Manufacturers of interior doors offer two options for their products: assembled and in the form of a set of elements. Many people prefer to buy a ready-made door block. However, assembling a door frame yourself is not such a difficult task.
You can assemble the box using 3 technologies:
- into a tenon - the manufacturer has cut out the tenons and groove in advance. Only carpenters with experience can independently prepare the racks and crossbars for assembly into a tenon;
- at an angle of 90o - the simplest option;
- at an angle of 45o - a more complex method. But the difficulties are compensated by the beautiful appearance of the joint between the rack and the crossbar.
Tenon assembly
Assembling the frame on a tenon is rare - door manufacturers do not want to do unnecessary technological operations that increase the cost of the product. But, nevertheless, you can find them on sale. Assembling such a box is simple: on the floor, the crossbar is inserted with a tenon into a groove in the racks, after which the entire structure in each corner is fastened with a long wood screw, tightening and strengthening the box. It is better to drill a hole for the hardware, but of a smaller diameter.
At an angle of 90o
Assembling the frame at a right angle is the easiest and fastest way to install the load-bearing part of the door block. There are only three operations:
- the posts and crossbar are cut at an angle of 90o to the required size;
Attention: when measuring the racks and crossbar, it is necessary to take into account an important point: the crossbar will be attached to the racks or between the racks and will make allowance for the thickness of the box elements.
- using a chisel and saw, a part of the vestibule is selected (see photo);
- the box is assembled on the floor into one whole. The posts and crossbar are fastened together with self-tapping screws - 2 (in wide ones 3) at each end (see photo).
At an angle of 45o
The connection of the racks with the cross member at an angle of 45o, provided that the ends are cut correctly, looks very beautiful. The technology of work is simple:
- the elements of the box are laid out on the floor;
- the racks and crossbar are measured - no correction is made here for the thickness of the elements, as when assembling at right angles;
- the ends at the top of the box are cut at an angle of 45o. For work, be sure to use a miter box or a circular saw with a rotating mechanism;
- the structure is assembled into one whole;
- the ends are attached with self-tapping screws - two for each.
Instructions for installation in the opening
Installing an interior door frame yourself does not create any big problems. Detailed instructions are available even for a beginner in the construction business. The step-by-step installation process is as follows.
Step 1. At a distance of 20 cm from the top and bottom of the supporting post, loops are placed and outlined with a pencil. Use a chisel and hammer to select a groove for them. Sometimes the same operation is carried out for the lining under the tongue of the door handle on the opposite pillar, for additional fastening of the frame.
Step 2. The door frame is installed in the opening and secured on the sides with several wedges. The main thing here is to prevent the vertical posts from touching the wall. Otherwise, it will be difficult and sometimes impossible to align the box vertically and horizontally. If the wall is uneven, then you need to navigate by the part that protrudes inside the doorway.
Attention: the threshold is installed only in the doors of the bathroom and toilet. In a box without a threshold, a spacer is placed at the bottom so that when foaming the gap between the wall and the studs, they do not go inside the door. Removes before hanging the door leaf.
Step 3. At this stage, it is important to position the box correctly so that the vertical posts have a perpendicular angle (90o) to the floor along the entire circumference. A plumb line, a level (both tools can successfully replace a laser level) and wedges will help here.
When driving wedges, you need to constantly monitor two things:
- so that the box does not change its position in space or move;
- so that the vertical posts do not bend inward due to high load.
If the box is deformed, the problem is solved with the help of spacers. If this operation does not help, the wedges are gradually knocked out in the opposite direction, removing the load from the beam of the racks.
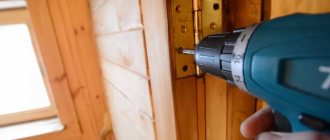
Step 4. In the selected grooves for the hinges, holes with a diameter of 4 mm are drilled through the box. Wood screws are inserted into them and screwed into a block in the wall. There is no need to wrap them all the way yet.
If the wall is brick or concrete, then a hole for the dowel is drilled through the door frame, after which a self-tapping screw is also screwed in.
Attention: many apartment owners, when replacing a frame in an interior wall made of foam or aerated concrete, screw in self-tapping screws. The accumulated experience suggests that here, too, the best option is self-tapping dowels.
Step 5. Wooden blocks or wedges are inserted near the screwed-in hardware (needed in order, firstly, to give stability to the entire structure, and secondly, to prevent the stand from bending in the opposite direction when screwing the screws in completely) so that the structure stands level. After this, the position of the box in space is checked. If a shift occurs, it is corrected. After this, the screws are screwed in until they stop.
The position of the box is checked again. Here it is better to play it safe than to discover a distortion at the final stage - in this case, you will have to redo all the work.
Step 6. The door frame is attached to the wall with foam. First, the joint on the hinge side is foamed. Work is carried out from top to bottom. The foam is applied evenly. On the latch side, the joint is foamed with a small snake to prevent deformation of the rack.
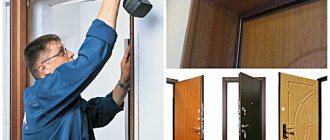
Step 7. At the final stage, you need to secure the door leaf to the frame. It takes two people to hang it: one screws the hinges to the frame, the other holds the sash. There are a few little tricks here that will make the job easier:
- the hinges are first screwed onto the box;
- It is better to put a wedge under the door so as not to keep it hanging;
- The top loop is attached first;
- When attaching the lower hinge, the upper and then the lower screws are screwed in first. The rest of the fasteners are tightened after the operation of the door leaf is checked;
- along the entire perimeter the distance between the frame and the sash should be 3 mm. If it is necessary to achieve tightness, then glue the seal.
Step 8. The door is closed, after which its position is checked again. If everything is done correctly, the box is attached to the wall in the latch area. The self-tapping screw is screwed in under the bar, but not all the way. A wedge is driven in around it, after which the fastener is screwed in until it stops.
The structure is finally foaming. After the foam has dried, its excess is cut off with a construction knife, an extension is installed if the wall is wide, and platbands are attached.
Foamed gaps.
We looked at how to install a wooden door frame. A door made of MDF is attached in the same way.
There are some differences when installing a metal box made of metal profiles:
- the box is installed in the opening and fixed with wedges;
- its geometry is checked;
- Through the box in the wall on the side of the hinges, two holes about 15 cm long are drilled for anchor bolts. The drill is taken of the same diameter as the anchor;
- Using a hammer with a metal insert, the anchor bolts are driven into the hole. Hit the insert with a hammer until there is a characteristic click, indicating that the anchor is seated on the outer wall of the box;
- The bolt is tightened with a spanner wrench. At the same time, the verticality of the box is constantly checked. If necessary, the anchor is released;
- a similar procedure for installing an anchor, but only one, is carried out from the handle side;
- the door leaf is installed.
The process is very similar to installing a metal entrance door, which you can read about in the work “How to install a metal entrance door yourself?”
In addition, the box can be installed on metal hangers, which are used for lathing under plasterboard and special installation systems, the installation principle of which can be seen in the photo.
Special mounting system.
The procedure for installing the box on the hangers:
- from the outside of the box, three hangers are screwed to the risers using self-tapping screws (two per hanger);
Mounting on hangers.
- the box is installed in the opening and fixed with wedges;
- using a laser level (plumb and level) and wooden spacers, the vertical and horizontal of the box are displayed;
- the ends of the plumb lines are attached to the wall;
- the gap between the wall and the box is foamed about halfway. After the mounting foam has dried, the joint between the door block and the wall is completely filled with foam.
This type of fastening has many disadvantages, and therefore craftsmen who value their reputation do not use this type of fastening in their work.
What should the room look like?
For the installation of interior doors to be successful, it is necessary to carry out preliminary preparation of the room. To do this, perform the following operations:
"Pie" of MDF panels.
- leveling walls;
- puttying;
- applying plaster.
After completing wet work, the room is thoroughly dried. Drying must be done. Otherwise, the door may “lead”. The future thickness of the main floor must be known exactly. Do-it-yourself installation of interior doors will be done taking into account the dimensions of the threshold and its height. If only the doors are being replaced, then the work can be done immediately, since these conditions will not have any effect on the installation of the door. For the most part, designs are divided according to the principle of operation:
The most commonly used doors are swing doors. They are very easy to install, but some of the usable space is lost. Today there are several types of sliding doors:
MDF doors can be either single-leaf or double-leaf.
- single-leaf;
- bivalve;
- right-sided;
- left-sided;
- directed along the wall;
- walls directed inward.
These models save space as much as possible. The disadvantage is the need to install a door frame; the doors have poor sound insulation. The presence of several leaves is typical for a folding door that moves along guides. Such doors are divided into several types:
Accordions can replace the screen. The book is distinguished from the accordion by two sections, higher strength. A characteristic disadvantage is the rapid breakdown of fastening fittings under heavy loads. There are a lot of different offers of interior doors on the modern construction market. Each model has individual technical characteristics and differs in its shape and dimensions. The main materials from which interior doors are made are:
The hinges must be cut to a depth in the same plane with the end surface of the leaf and door frame.
- wood;
- plastic;
- metal;
- glass;
- MDF panels;
- various combinations of materials.
When choosing a model, it is advisable to take into account the interior of the room and the functionality of the door. To make the right choice, you must first measure the dimensions of the doorway. Based on this data, you can choose the right door, but you need to know a few nuances. Installation of interior doors is carried out so that a gap is maintained between the door block and the base of the opening. Usually it is 10 mm. To prevent the door from jamming, especially when there is a change in humidity, you need to create an additional gap between the door leaf and the parts of the block. The gap should be no more than 5 mm. The future door should not interfere with the finishing work of the flooring. When choosing an interior door, you must make sure of its quality. Must not be:
A few tips for novice carpenters
People say that “the first pancake is lumpy.” Therefore, those who have done the work of installing the box themselves for the first time should not be upset by the mistakes made, which in most cases can be easily corrected.
- An unsightly joint between the laminate and the door threshold can be hidden with a plinth or metal trim.
- If the doorway turns out to be smaller, it is easier to trim the posts and crossbars of the frame, but on the condition that you can adjust the size of the door leaf. Otherwise, you will have to widen the doorway.
- If the width of the casing is not enough for the gap between the frame and the wall, the latter is plastered and then finished with the same material that was used before the door was installed. Therefore, in new buildings, doors are installed first, and then the walls are finished.
- When installing a box made of wood or MDF into walls made of concrete or brick, first drill a hole in the rack with a drill or screwdriver, and then drill the wall with a hammer drill.
- Special mounting systems simplify the process of installing the box - there is no need to use wedges. Detailed instructions for their use are included in the packaging.
- In new houses, the door cannot be attached directly to the wall due to possible shrinkage. Here, first a wooden block is attached to the opening, and a door block is attached to it.
In conclusion, installing a door frame in an opening is not such a difficult job that can be done by yourself in just a few hours. But the effect of this is significant - the family budget will save approximately 3,000 rubles on each door (the average price for installing a door frame by professional builders is indicated).