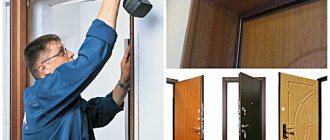
If you have no experience in installing door hardware, but really want to do everything beautifully and neatly, then you need telescopic extensions for interior doors. Next, we will step by step analyze what it is, what such fittings are made of and what sizes of telescopic extensions exist for interior doors and entrance doors, and we will clearly show practitioners how to install the extensions with their own hands. And also how the installation of the door frame with the extension proceeds.
Telescopic extensions for interior doors are considered the best solution for a novice master.
What is dobor
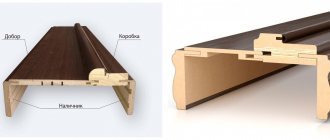
When installing interior doors, a situation arises when the frame is smaller in width than the thickness of the wall. In such cases, a special board is used, which is attached to the door frame, closing the remaining space. This board is called the addition to the interior door. The names “additional board” and “additional plank” are also found. You can then attach a platband to it, which will close the gap between the extension and the wall.
Extension - a board for expanding the door frame to the thickness of the wall
That is, the door frame is an additional part of the door frame. It is a board of certain sizes, which is joined to the door frame. They place it on one side - opposite to the one into which the door opens. You can also call this board an expander - it reflects its real purpose.
If the wall thickness is more than 140 mm, you have to install a door frame extender - an additional board
There may be some nuances regarding the connection between the fittings. Often the shape of the door frame is specific - with a special relief (protrusions, depressions, roundings). Then you will have to look for a selection specifically from this company, otherwise connecting them will be problematic.
Eliminating gaps after installation
Rice.
6. Closing gaps The immobility of the extensions can be ensured by fixing them to the frame and walls with masking tape. Spacers are placed between the two elements, and if they are missing, the gap is filled with foam. You should take a balloon and introduce foam in small portions (so that the structure does not move). After it dries, the excess is cut off with a knife at the level of the wall.
Door extensions allow you to aesthetically design the opening. With minimal skills in handling glue, nails, saws and foam, such work can be done independently.
Materials and sizes
Each manufacturer produces a certain set of additional boards, in which the length is fixed - 230-250 cm, the thickness/width varies. For example, there are the following options (thickness, width, length):
- 10*50*2350 mm;
- 10*100*2350 mm;
- 15*150*2350 mm.
Shape, thickness, width may vary
Thickness and width - each factory has its own. Can be 60 mm, 65 mm or 75 mm. In general, any set. What if none of them suits your case? Take a larger width than required, then saw off the excess. What if your opening is wider than all available options? Order the size you need (many manufacturers make to order) or splice two smaller sizes. Another option is to use telescopic platbands. They come with a corner bend, which can cover your width gap.
If the doors are made of solid oak, it makes sense to install the same addition
What materials are interior door trims made from? From the same as platbands:
- wood;
- MDF;
- Chipboard.
MDF and chipboard can be covered with veneer and laminated. Wooden ones can be treated or untreated. Select the material and color for the door frame. And this is another reason to buy from the same manufacturer - even if the color/texture name is the same, there is no guarantee that they will actually be the same.
Why do door panels swell?
A special feature of additional panels is their ability to bend, which is explained by their insignificant thickness. The planks may swell upon contact with wet construction mixtures, so they are not recommended for use during installation. Deformation and loss of flatness occur during polymerization of the polyurethane foam. This is why spacers are installed in several places or masking tape is applied before applying the foam.
Accessories have many uses. They allow you to refine not only the entrance doors, but also the interior doors, the entrance area in the entrance hall or an auxiliary room.
Types of additions
There are two types of additional board:
- With straight edges. An ordinary board that is attached end-to-end to the box. It can be: with a decorative edge;
- without decorative edge.
Types of extensions for interior doors: telescopic on the left, regular on the right
The addition to an interior door with straight edges is the most common board. In this case, it needs to be selected only by color and size. The extension is pressed against the box and secured with screws installed diagonally. One of the ends of the additional strip can be processed. This is necessary if the casing can be displaced.
Installation of an extension with smooth edges (not telescopic)
It is not very convenient to attach this type of extension. You have to think about how not to split the plank and how to close the screw heads. However, you don’t have to select the shape of the grooves/protrusions, which is far from simple and ties you to only one manufacturer.
If there are protrusions, grooves, roundings, you need an extension for the interior door from the same company as the frame
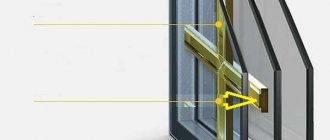
The telescopic door panel has pre-formed grooves. From the point of view of joining, this is a very convenient option: drive the protrusion into the groove, tap it until it matches completely, and the whole installation is complete. But only if the match is perfect. How else is telescopic extension convenient? You can install a telescopic casing in it (if it fits).
Installation process
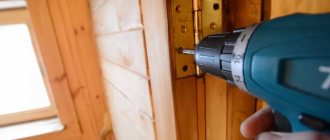
To install the extensions, you will need the following tools: a hand-held circular saw, a milling machine, and a clamp. The latter should have a soft surface. In addition, slats, wedges, and plywood are needed (can be replaced with plasterboard).
Marking
Before installing additional strips, you first need to slightly knock off the main surfaces. To make the markings as accurate as possible, experts advise making marks on the floor.
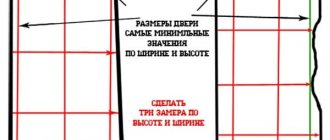
Next you need to act according to the Pythagorean theorem. First measure the width of the opening at the bottom. Half the value required. It will be equal to 3 standard length sizes. For example, if the bottom width is 60 cm, then half of it is 30 cm, and the main length will be only 10 cm.
Walls with an existing slope
If the indicator is less than 5 mm, then plaster is used. It needs to be carefully distributed under the platband. If the distance is much greater, then wedges must be used.
Working with foam
The foam expands and hardens, which can sometimes cause the corners to become crooked. To avoid this, it is recommended:
- leave the installed wedges until the foam dries completely (until it hardens);
- additionally install strips to support the extensions.
It is recommended to use foam to treat the gaps on all sides of the door opening. Act evenly, performing everything in several stages.
Installation of accessories at the same time as the box
The instructions for installing a door frame with additional strips are as follows:
Install the door jamb on leveled surfaces. Check all corners. Add quarters using a router. Fix pieces of plywood around the perimeter from the outside. They should protrude the same size as the width of the additional trim. They are temporarily secured with nails. Cut the additional strips so that everything fits in size. The top bar must be adjusted so that the dimensions are the same as the top quarter. The side strips should match the sides of the door frame. The edges of the resulting quarters should be coated with glue. You can also use liquid nails. In their places you need to install additional strips. All you have to do is wait until the surfaces dry and set. Temporary strips that were installed before should be removed
This action must be performed very carefully. After this, the box must be installed in place. Check if the sides of the door frame are aligned
It is recommended to additionally use a plumb line. If necessary, use wedges to level everything. Fill all gaps with foam.
At the end, all that remains is to install the facing materials and parts. A special construction adhesive is suitable for fixation.
Door with straight slopes
To facilitate the process of installing additional strips, it is recommended to prepare approximately 20 plywood wedges in advance. Their thickness should be about 0.4 cm. After this, you can begin installing additional door strips.
First, remove the plaster on the surfaces and check that there are quarters. If they are present, then you need to select additional boards. All further actions are exactly the opposite of those described above. In other words, the top part should be the same as the top, and the sides need quarters.
Spacers should be installed along the width. Check periodically to ensure everything is level. When everything has hardened and fixed, then all that remains is to fill the gaps with foam and lay the baseboard.
How to install extensions on an interior door
In this paragraph we will talk about ordinary planks - with straight ends. Sold in lengths of 2100-2300 mm. Three strips are needed for one door: One on the right and left, and a piece from the third will go to the upper part. If you install several doors at the same time and they are the same color, one strip will go to the two “tops”.
How to attach fittings to an interior door
The width and length of the planks are usually larger than necessary, so they will have to be trimmed. What instrument? With what you have. A jujube that cuts DMF, chipboard or wood is suitable. To decorate the corners, you may need a miter box (if you are going to join the box (and extensions) at 45°. It is also convenient to use in order not to “fill up” the cut and make it strictly perpendicular.
We take measurements and make blanks
Before installing the extensions on the interior door, you need to find out the exact dimensions of the expansion strips. To do this, install a door frame in the doorway and secure it. Draw an opening on the plan; it will be easier to write the dimensions. Next, take a tape measure and a level, measure the size of the extensions that you need.
- The width of the extension is determined as follows: insert the measuring tape of the tape measure into the groove until it stops. We apply a level to the wall and determine the required width at the intersection with the tape measure. We take measurements at six points: two on each side. If the wall has unequal thickness, we take the width of the extension according to the largest number.
We measure accurately - Length of additional strip. Again, take a tape measure and measure along the opening - from the floor (threshold, if anyone has one) to the beginning of the groove in the frame of the installed door. We measure on the right and left, because again there may be a difference. We measure the upper part from the beginning of the box to its end (not from the groove).
Now we cut out the sizes we need from standard planks. Make marks with a pencil - on light strips a simple pencil is clearly visible, on dark ones you can use a white one. We try on the cut strips in the opening; if necessary, we trim them a little.
We collect
Before placing the extensions on the interior door, they must be connected to each other. We lay out the cut out additional strips on the floor in the form of the letter “P”. If they have a processed edge, lay them out so that the edge is on one side. The planks will need to be connected to each other. If they are made from MDF or chipboard, you will need to pre-drill holes in the top rail.
Preparing for assembly
To do this, it is better to take a square (ideally a carpenter’s square, but an ordinary school one will do). We draw a line on the plank that marks the middle of the thickness of the plank. If the thickness of the additional board is 10 mm, the line runs at a distance of 5 mm from the edge. If the plank is 15 mm thick - at a distance of 7.5 mm. We put two points on this line and then drill holes. Diameter - 1 mm less than the diameter of the screws.
We complete the assembly of the door frame
Next, the holes must be transferred to long strips. To do this, we join them and align the edges. Using a drill, we transfer the marks to the end of the plank, then deepen it to the required length (along the length of the self-tapping screw). Having made the holes, we join the planks and tighten the fasteners. The extension to the interior door is half assembled. But don't rush to attach the second bar. You need to try on what has already been assembled “in place.”
Fitting and trimming
We put the assembled L-shaped part in place, driving the strips into the groove in the door frame. The upper jumper turned out to be larger (this is how we measured it). Take a pencil and put a mark where the groove begins. Try to be precise as this is important. You don't have to cut off the excess. We simply draw a line along the mark and make marks on it, then drill holes. After assembly, the letter “P” is obtained. We have assembled the extension for the interior door, now we need to install and secure it.
Installation in a door frame
Now the addition can be installed. Check the opening first. If the doors were placed on foam, it may block the groove. We cut off the excess so that the planks fit freely. Insert the U-shaped structure into the groove, tapping the end with your palm. We start from the top, then to the sides.
We put it in place, having first removed the excess polyurethane foam.
We take masking tape and use it to fix the planks to the walls. If in some places the extension on the interior door does not fit tightly to the frame (there is a gap), we remove this gap with the help of pads. You can use mounting wedges for this. If you don't have them, make them from foam plastic. You just need to set the bar level; dense foam plastic is enough for this purpose.
Fastening the additional box
You also need to level the extension to the interior door. You shouldn’t rely on your eye; use a level. Using a level and wedges, we remove all protrusions and blockages. During the process, we fix the aligned areas with masking tape. The distance between the tacks is 40-50 cm. One at the top and bottom (stepping back about 10 cm), and then at equal intervals.
How to attach the extensions: during the installation process
Next, using polyurethane foam with low expansion , we fill the space between the wall and the additional strip with it. Before use, read the instructions on the cylinder. It may be better to moisten the surfaces. In any case, the polyurethane foam must be laid in stages, otherwise it may bend the extension strips. Everything will have to be torn off, cleaned and foamed again.
So, first we apply foam deep into the gap. Not much, one strip. At the same time, we make strips across the entire width near the “tacks” (an example of applying foam to the door trim is in the photo above on the right). The foam in the area of the tacks will give the bar stability, the strip in the far part - near the joint - will press the extension to the groove, but will not bend the bar.
We leave the foam on the side strips to polymerize while we fill the gap from above. If it is as big as in the photo, there is no point in transferring a lot of foam. It’s easier to cut out a “bookmark” from foam plastic and place a wooden block of a suitable size. It is slightly smaller in size than the free space. There should be a gap of at least 1 cm on all sides. But too large gaps are not needed.
How to install extensions on an interior door: filling the top gap
Next we proceed like this:
- We place small pieces of polystyrene foam 1 cm or so thick under the embedded part.
- Using a snake, apply a layer of foam to the back wall (if there is one).
- We install a foundation block and fill the gaps around the perimeter with foam. Again, not too much so that the foam extension bar does not bend downwards.
- If necessary, install a “front” bar (bottom left in the photo above). If the width of the block is sufficient, we skip this step.
- We level the position of the additional strip using a building level and secure it with masking tape.
After the first layer of foam has hardened (the time is indicated on the can), we fill the remaining space. If the extension to the interior door has a significant width, it is possible (and better) to apply foam in two stages. But each time you need to wait for the polymerization time. After that, all that remains is to install the platbands.
Preparing the work area
Before the installation of extensions and telescopic platbands on the openings begins, it is recommended to prepare for the work.
Assembling the box for installation
This process is necessary, first of all, for the home craftsman who undertakes to do everything with his own hands. So does the design itself, so that it subsequently shines with a visually perfect finish. Conventionally, the list of preparatory actions can be divided into several logical stages that should not be missed:
- Installation of the door frame. It is worth noting that the installation of the door frame is an important component in the installation work of the door structure as a whole. It is the box that will bear the mass of the constantly active sash. And since telescopic platbands carry, first of all, a decorative functional load (to hide installation and wall defects), then installing them yourself should be done after installation work.
- Cleaning the filling material (foam).
Cut off excess polyurethane foamThe foam needs time to completely dry and harden (about a day with a large amount). After drying, the remaining residues must be carefully cut around the perimeter with a sharp construction or stationery knife. The cutting level of the foam should coincide with the core and the wall.
- Increasing the strength of the opening. It is possible to increase the strength of the opening with the help of plaster used to grout the surface of the foam. This will lock the box and wall together into a single unit. In addition, during installation work on installing the box, some unevenness at the end of the wall may occur: concrete chips, other gaps.
- Finishing works of the wall surface.
Wall defects after installing the door frameAs previously noted, the strips should frame the door in a decorative manner, which means complete installation of the door structure. The same applies to wall finishing work. Moldings cover the joint between the wall and the loft. It is recommended to finish all painting of the walls, wallpapering, etc., before putting the telescopic trims in place.
- Cleaning work. The final stage of preparatory work for installing the frame involves cleaning the mounting surface. Dust deposits and other debris must be removed from the plane of the adjacent wall and block. If during installation glue will be used to fit the telescopic casing into the groove, then it is advisable to additionally degrease the surface along the entire perimeter.
How to attach the extension to the door frame if it is thicker than the selected quarter
Often the extra is thicker than the quarter selected in the box. What to do then? How to make sure that the extension rests without cracks and holds tightly? There is a simple way - drill holes diagonally, screw in self-tapping screws, then close the holes with matching plugs. Here everything is more or less clear, but not very beautiful - the stubs are still visible.
There is another way. Need drywall hangers. Only they should be the strongest and thickest. We separate the perforated parts of the tape from the hangers. Each one makes two pieces. You will also need small screws (fleas). We screw the perforated tapes onto the door frame around the perimeter - at the corners at a distance of 10-15 cm, also at the bottom, and in height at a distance of 40-50 cm.
How to secure the addition
We screw in the screws at a distance of 1.5-2 cm from the edge of the box (middle photo). One self-tapping screw per piece of metal tape is enough. When you install the door frame, the tape will stick out. These strips are thin, so there will be no problems with even the smallest gap. If the extension to the interior door is the same width, simply insert it. Due to their elasticity, the plates press it tightly.
How to install extensions if they are thicker than a quarter
If the extension is wider, first we bend them to the front part, then return them back. Due to the fact that they are not fixed at the edge, they bend and become like an arc.
This is how it can work out - without the slightest gap
Now we insert additional strips, placing them between the plates and the groove. They will press the bar tightly. The cracks will not be visible even upon closer inspection.
Some useful tips
- Installing extensions on polyurethane foam is the simplest and cheapest way, while the strength of the installation does not suffer at all from the absence of nails or screws. More complex installation options were necessary before spray foam was so common. Installation, which requires drilling holes and using fasteners, is not a cheap process. In addition to the extra installation costs, there is a risk of damaging the strip during drilling, in which case you will have to purchase additional material.
- If a small gap has formed at the junction of the vertical and horizontal planks, you should not try to fasten the trim elements with nails: this can cause the plank to split. When the polyurethane foam expands, this gap will disappear on its own. To be sure of the quality of the work done, you can drive a wedge between the plank and the opening.
- It is not necessary to install the extensions completely assembled. The U-shaped structure does not have a rigid base and will warp. All defects will still have to be eliminated on site, and the installation process will take much more time and effort.
If you need outdoor floodlights, then on the page https://ledin.kz/ru/catalog/prozektora today every modern consumer has the opportunity to get acquainted with one of the most practical, reliable and attractive solutions.
What size should the platband be?
Due to the fact that interior doors in most cases have standard sizes, you need to be guided by GOST. If the door leaf is 200 cm by 8 cm, then the width of the frame may vary. In the case of 6 cm by 10 cm, you should prefer a plate 7 cm wide. However, these figures are not the ultimate truth. It is necessary to take measurements so that unnecessary problems do not arise later. For example, it is possible that doors may be of non-standard sizes. Then the usual platband will not only look ridiculous, but will also significantly reduce the usable surface.
Video
The video will tell you how to correctly measure trims and trim for interior doors.
We looked at the features of door extensions. As you can see, such a simple detail can decorate a door with high quality, make the entrance to the home and the space between rooms more presentable and neat. With the help of our tips, you can easily navigate the sizes and types of these parts, and you can even, with a little effort and diligence, install them yourself. If the width of the trim is smaller than you need, there is an article that describes how to finish door slopes after installing the front door.
How to choose sizes
Is it worth choosing the size especially carefully if any material can then be adjusted and trimmed? An important nuance: the wider and longer the structure, the more expensive its cost. For telescopic extensions, the width of the decorative strip starts from 60 and reaches 80 mm. And the width of the shelf that is inserted into the grooves is usually 40-50 mm. Standard length of the set: 2 trims of 2.2 m each and one of 1.2 m. An additional additional strip can have a width from 80 to 100 mm. The length of the slats is standard and corresponds to the main casing.
The main installation steps can be seen in the video.
Features of telescopic platbands
The box and the platband are interconnected and complementary concepts. Therefore, the successful installation procedure depends on how the “soil” was prepared. Some nuances have been outlined above. But how to work correctly with a specific type of plank? There are several of them:
- flat;
- rounded;
- curly;
- standard;
- telescopic.
The last platbands are especially interesting for their structure. This is a panel that is bent in the shape of an “G”. Even a beginner can easily attach it to the box. The outer part cannot be damaged by nails. It just needs to be attached to the wall. This approach does not require money to purchase additional accessories, and also saves time. However, nails will still come in handy. This is the most reliable and safe method of fastening, which can be disguised in the future. For example, by painting the pins with a special wax pencil, which is freely available in all building materials stores. If this option is not suitable, you can get by with glue or joining. The latter method comes in two types: at an angle of 45 and 90 degrees. Different telescopic units require different approaches.
Manufacturers and prices
Let's find out which of the modern manufacturers offers customers the best selection of door accessories at the best price.
Mario Rioli
The company from Tula works using Italian technologies. Therefore, it mainly offers products according to European standards, that is, 210 cm in length. So, an addition from this company of the indicated length, 10 mm thick and 5 cm wide will cost the buyer 330 rubles. And if the width is 10 cm - 640 rubles.
Matadoor
The Yaroslavl brand also works according to “European standards”. The company can offer customers, among other things, telescopic extensions. A product 210 cm long, 10 mm thick and 10 or 15 cm wide will cost 440 rubles.
If the width increases to 40 cm, the cost rises to 1100 rubles. A telescopic version with a width of 15 cm will cost the buyer 500 rubles.
Uberture
A manufacturing company from Reutov offers accessories at a low price with good quality. Thus, a product of Euro-length, standard thickness 10 mm and width 10 cm will cost only 270 rubles. If the width is 15 cm, then 380 rubles. In addition, this brand offers customers a non-standard width of 20 cm at a price of 500 rubles.
Astral Design
The company from Korolev near Moscow can boast of really good quality products. That's why prices here are higher than others. So, a Euro-length product with a thickness of 10 mm and a width of 10 cm costs 600 rubles. A width of 15 cm will cost the buyer 700 rubles, and 20 cm - 800 rubles.
Installation with screws
Ordinary extensions are installed mainly using screws. It is better that the wall is level, otherwise some difficulties may arise, such as distortions. Installation
conventional door
extensions
consists of the following steps:
- Work begins from the top element. Determine the missing width, saw off the excess;
- Attach the strip to the wall, if all dimensions match, you can screw it;
- After which you can proceed to the side parts of the structure. Adjust them to size. Please note that these may differ for each party;
- Drill holes for screws;
- Place the strip in place and screw it to the wall. It’s great if the doorway is framed with wood slats;
- Seal all connections and attach trims. Mask the places where the extensions are attached with screws using furniture plugs matched to the tone of the material.
Pay attention to the structural elements of the door frame
Extensions can be attached to a flat wall with the least damage to their surface - using watery nails.
To do this, the wall must be cleaned of dust, the surface degreased, glue applied pointwise, then the planks pressed down and tapped.
What materials are needed for installing extensions?
It is quite possible to close the slopes of doorways yourself, without resorting to the services of professionals, since this procedure requires minimal effort. The main thing is to apply precise markings and install the element into the opening as carefully as possible, without disturbing the overall geometry of the structure. However, the master always needs a certain set of tools, which can be found in the nearest hardware store:
- Polyurethane foam for filling voids between the surface of the opening and the additional element.
- Liquid nails are a special glue that allows you to fix an element to the wall without mechanical fasteners. In some cases, experts advise using self-tapping screws with decorative heads for better fixation.
- It is necessary to have masking tape, since after installing the liquid foam you need to give it time to set and harden. At the same time, foam has the ability to expand, which can lead to disruption of the geometry of the opening. It is for this purpose that it is better to fix the installed planks to the main wall using masking tape.
- A hacksaw with a fine tooth or an electric jigsaw is a tool necessary if, during the work, the element needs to be adjusted to accurately fit it into the installation location.
- If only minimal trimming of the board is necessary, the saw can be replaced with a plane.
Rice. 4. Processing the frame with a plane
- If you need to make a telescopic extension yourself, you will need a milling machine with precise positioning of the cutting element - only in this way can you form an ideal groove for the ridge of the casing without damaging the element.
- Measuring and positioning tools - angle, plumb line, tape measure and building level - to ensure the ideal position of the structure.
- The last thing a craftsman might need is an ordinary soft hammer with a rubber tip to be able to adjust the position of the extension after it has been installed.
Thus, having all these tools available, you can begin the main work on framing the opening.
Telescopic box assembly process
In order to install the telescopic box you do not need to make any special efforts. Step-by-step algorithm of actions regarding the assembly process:
Reference! The additional strip and telescopic box are assembled separately from each other, and then connected.
- first of all, the box itself is mounted in the opening;
- the canvas is hung on the frame. At the same stage, the presence of gaps is checked;
- the door is being installed;
- They are connected using inflatable foam.
Reference! After the foam has completely dried, its excess must be cut off with a stationery knife.