During the construction of a bathhouse, it is necessary to take into account many factors, because the further functioning of the room, its reliability and durability will depend on them. The installation of a door in a bathhouse is of no small importance, because it is this that ensures a reduction in heat loss and creates maximum comfort while in the steam room.
Where is the best place to install arches?
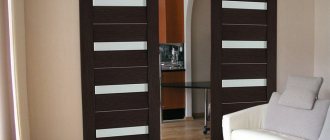
The arch makes the room brighter. This is due to the lack of doors, which even in the open position take up space. If the rooms between which there is a passage are dark, the arch is made with lighting from spotlights or LED strip.
The passage in a designer style is designed by:
- Between the corridor and the living room. The arch has standard doorway dimensions or is wide - decorated in a style that emphasizes the interior of the room.
- Between the hallway or living room and the kitchen. The structure is mounted with lighting, which acts as additional lighting in the evening.
- Arch in a studio apartment. The room where all the functional spaces are located is separated from the kitchen by a bar counter and an arched passage.
- Private country house. Here arched passages are placed not only from the living room to the kitchen, but also between rooms.
- Decorative arch. Installed to highlight the design. This is a niche designed in an arched shape, a small delimitation of space into zones in one room. They also install semi-arches, which, on one side, have a vertical column, and at the top are connected to the ceiling into a single sheet.
Attention! Arched openings are not made between the living room and the recreation room, as well as into the children's room.
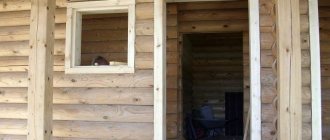
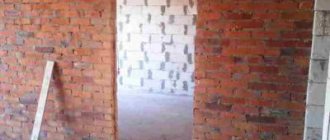
The nuances of installing doors in a bathhouse made of logs or timber
The walls in a bathhouse made of logs need additional strengthening when openings for windows or doors are cut into them. For this purpose, the installation of doors in a bathhouse made of timber or a log house is preceded by the creation of a frame , to which either the door frame will be attached, or, if a quarter is cut out on the frame, then it will be the finished door frame.
There are two ways to make a socket, both based on tongue-and-groove joints . However, in the first case, the groove is made in the logs or timber, and the ridge is made on the insert strip, and in the second case, on the contrary, the ridge is cut on the logs, and the groove on the plank. Such a connection is necessary in order to give the log the ability to slide (shrinkage lasts for years).
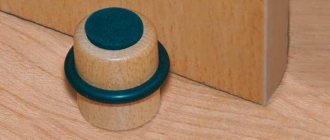
ATTENTION! Be sure to leave an empty space above the door, which is given to the log to shrink.
We highly recommend watching the following video, where all the principles and variations of the frames are shown on simple blocks (which applies to both windows and doors):
Types of arches
The arched opening is designed taking into account the interior of the room, and is also guided by the height and width of the doorway. There are many stylistic solutions, such as modern, that highlight the types of arched openings. They come in different finishes and sizes.
When choosing an arched structure, you need to take into account the height of the ceiling, the width of the opening, and the construction of the room. Sometimes, removing the doorway weakens the emphasis on the ceiling, so you need to install an additional column.
Arch made of PVC and MDF
The main types of arches made of MDF and fiberboard are:
- veneered arches;
- laminated arches - panel.
The MDF board used as a base is easy to process - it allows you to assemble arches with various types of milled patterns.
PVC arches are used because they can be made according to a given template in any shade. The advantage is affordable prices. The door arch is installed using liquid nails or polyurethane foam.
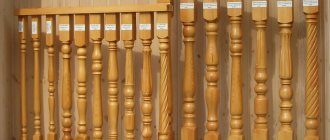
Wooden arch
The characteristics of wood make it possible to create carved ornaments on it. Such arches reflect the wealth and status of the owners of the house. LEDs can be installed in wooden structures.
Brick arch
Installing interior brick arches is a complex process that requires special skills. The structure is made during construction. During major renovations, this installation method is not used due to the complexity and time required. To install the structure, craftsmen use their skills and certain tools.
Plasterboard arch
To create an arched structure from gypsum plasterboard, you need sheets with a thickness of 9.5 or 6.5 mm. Before fastening the curved, cut sheets, a frame lathing made of metal profiles is installed. Drywall used is moisture-resistant - green, regular - gray.
Determining the dimensions of the structure
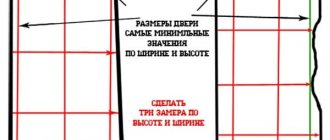
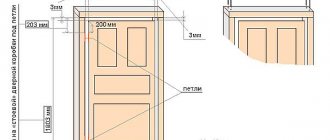
The diagram shows the main dimensions that should not be changed
Openings in self-built baths, as a rule, differ from standard ones. Therefore, before making a door and frame for it, it is worth carrying out basic calculations:
- Using a tape measure, measure the width and height of the opening according to the level to avoid errors due to skew.
- Subtract 6 cm from the resulting width and 3 cm from the height. This way you will get the external parameters of the box without taking into account the threshold. It is better to determine its thickness when the door is ready in order to level out possible errors.
- From the width of the box, subtract the thickness of the timber that you plan to use (the most popular is 110x60 mm) and another 6 mm (the required gap on both sides). This will be the final width of the finished door.
- To determine the height of the door, subtract the thickness of the beam and another 18 mm from the height of the frame (3 mm gap at the top and 15 mm ventilation gap at the bottom).
If the result obtained differs from standard models by only 1–2 cm, you can make a standard door and simply use thicker bars to secure the frame in the opening.
How to install an arch in a doorway?
Arches made of different materials have their own installation methods. Structures made of natural wood require certain skills in working with wood, while plasterboard structures require accuracy, evenness, and step-by-step work. Arched openings are assembled from MDF quickly, independently, without the involvement of craftsmen.
Installation with hidden fasteners
This method is used to install an MDF arch. There is a certain sequence for this:
- the finished arch set is disassembled into parts, connected in the correct order and glued together;
- first, make the first side, then the second;
- the finished MDF arch is inserted into the doorway and raised slightly;
- after leveling, the structure is fixed with a clamp;
- the end parts are coated with glue;
- the remaining parts are also coated with glue and installed on the sides of the opening.
Attention! If the width is non-standard, then the kit includes decorative inserts. For widths greater than 1 meter, arch extenders are used.
Manufacturers produce ready-made sets of arches, installed both by the company’s craftsmen and independently. To fix the elements of the kit, “liquid nails” or PVA are used.
Installing a prefabricated arch in the usual way
The installation of a finished interior arch is carried out by measuring the width, thickness, and height of the opening. For non-standard dimensions, when assembling the top of the structure, inserts are made in the middle. They are mounted with protruding “chops” into prepared holes. After selecting the desired size, the half with the decorative insert is left separately from the other half - then vertical inserts are attached to them.
The two parts of the arch are applied to the opening, connecting them in the middle at the top. The finished parts of the arch on one and the other side of the opening are secured with plastic plugs. The middle of the structure (in thickness) is installed according to the dimensions, also secured with plugs.
Ways to design an interior passage
The simplest and cheapest option for finishing an open doorway is to cover the ends with wallpaper and hang a transparent curtain. The method is applicable in home renovation conditions, when wallpaper is re-pasted in two adjacent rooms, otherwise the difference will be noticeable.
How you can finish the opening in other ways:
- install decorative panels made of MDF or plastic, made in the form of platbands;
- instead of wallpaper, make a mosaic of artificial stone or clinker tiles at the ends, imitating brickwork;
- use ready-made gypsum stucco elements or imitation polyurethane;
- sew up the ends with classic wooden platbands and extensions.
Framing the arch with ready-made sets of platbands
Recommendation. The cladding option should be selected at the stage of forming the door clearance. If you buy a ready-made set of platbands made of polyurethane or MDF in advance, then the bending radius of the arch can be adjusted to the upper part.
We have listed the most common cladding options. There are other methods - painting with a water-based composition, applying liquid wallpaper, and so on.
Lining the arch with plastic corners
This is a simple and affordable way to improve an arched portal at minimal cost. The materials you will need are flexible corners made of plastic or MDF and high-quality glue (liquid nails will do). Before installing the facing elements, the walls must be puttied and covered with wallpaper.
Advice. Choose plastic cladding that matches the color of the laminate and baseboards. Ideally, the finishing of the opening should look like a continuation of the floor edging.
The design of a doorway without a door with corners is carried out using the following technology:
- Cut the material to height and degrease the internal surfaces.
- Apply liquid nails or glue to the corners, wait 1-5 minutes (the exact time is indicated in the instructions).
- Bend and press the piece tightly against the corner of the wall. Temporary fixation of the ends of the element using small nails or masking tape is allowed.
Reference. Arched corners need to be bent along a wider shelf.
Finishing a standard rectangular portal is even easier - you don’t need to bend the material, just trim the ends correctly so that they fit nicely at the corners. More useful information about the use of corners can be found in the video:
Clinker tile finishing
The color of artificial stone or clinker tiles is selected according to the color of the walls. To purchase the required amount of material, it is recommended to mark the future drawing on the wall with a simple pencil. For finishing, a construction adhesive mixture such as Ceresit CM11 or liquid nails is used.
Options for facing artificial stone tiles
Substrate preparation includes leveling and applying a deep-penetrating primer. How to decorate an opening yourself with clinker tiles:
- Prepare the adhesive according to the instructions on the package.
- Carefully apply a continuous thin layer of adhesive to the back of the tile and press it against the wall in the designated location, as shown in the photo below. Check the horizontality of the facing element with a building level.
- Remove the squeezed out excess solution with a spatula.
- Using calibration slats from any available material, glue the following tiles at the same distance from each other, forming an overall pattern.
After the adhesive mixture has hardened, remove the slats and carefully clean the edges of the tiles. The final stage is grouting the joints with a composition that is in harmony with the interior of the room.
Installation of polyurethane stucco molding
Real gypsum stucco is distinguished by its considerable price, decent weight and fragility. Polyurethane imitation of columns, pilasters and overhead patterns looks no worse, but costs much less. In addition, plastic lends itself well to painting in any desired color.
Visually, polyurethane stucco is no different from plaster
The technology for installing polyurethane moldings is similar to finishing with plastic corners. Each element is cut and adjusted into place, then glued to the walls on both sides of the opening. To join the shaped parts to each other, a special glue for plastic is used.
Note. In addition to the usual stucco molding, there are flexible plastic elements on sale that resemble thick rubber. How such cladding is used on curved and round surfaces, see the video below.
When the glue has dried, the cracks and joints must be puttied and carefully treated with sandpaper. The last stage is painting in the required color (preferably with an aerosol can or spray gun).
Use of wooden platbands
Wood is a material traditionally used for finishing any openings. In the case of an arch, you will have to find a top element on sale or order production in a carpentry workshop.
Before installation, wooden panels should be treated with sandpaper and coated with 2-3 layers of protective varnish. The latter is selected according to the required color - you can use stain and transparent varnish or a composition with the addition of the desired dye.
Wooden cladding requires maintenance and periodic renewal
The platbands are fastened in the classic way - with screws or nails. It is important to recess the fastener heads so that they are not conspicuous. At the top, the attachment points are carefully covered with putty and painted.
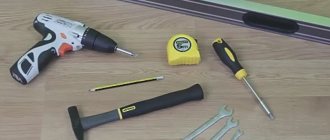
Necessary tools and materials for installation
To create an arched passage you need not only material, but also a tool:
- metal scissors;
- construction knife, set of blades;
- screwdriver;
- jigsaw;
- level, plumb line, tape measure, pencil.
The materials are:
- plasterboard (9.5 mm) or arched KNAUF;
- MDF;
- PVC plates, polystyrene foam.
The most common type for creating a passage is gypsum board. For it you need to assemble a metal base from profiles.
What will you need for finishing?
To finish a doorway, you need to have on hand a small repair kit consisting of the following tools:
- roulette;
- hammer;
- construction square;
- masking tape;
- tape for framing the edges of the plank;
- foam for installation;
- electric saw or jigsaw;
- saw with miter box;
- fasteners in the form of liquid or regular nails and self-tapping screws;
- ready-made or homemade boards.
If the plans are only to close the slopes without replacing the door leaf, the following materials will be useful for the manufacture of extensions:
- wood boards;
- pieces of wood fiber sheets (MDF);
- several long chipboard strips;
- plastic elements.
When cladding with natural wood, it is recommended to pre-treat the surface with a special impregnation. The antiseptic composition retains the properties of the material over many years of use.
Attention! In terms of external characteristics, resistance to moisture and temperature fluctuations, wood or MDF panels are more suitable for finishing external entrance openings. Indoor use of particle boards is allowed.
When installing plastic inserts, it is better to use panels with a metal base.
Standard Installation Instructions
Despite the large selection of materials, independent production consists of general rules and step-by-step design. By following the stages of work, you can avoid mistakes that will lead to a short service life of the structure.
Preparing the vault
To prepare, you need profiles and levels. The profiles are fixed to the base with dowels. First, a frame is mounted on both sides of the opening, describing the top of the future structure.
After this stage, a metal profile bent into a regular arc is attached at the required distance - its sides are cut. Stiffening ribs are fixed between the bent profiles at a distance of 20-25 cm.
Attention! All fixed elements are checked with a level, and the strength and rigidity of the frame is also taken into account.
Arch arch installation
The arcs of the arch are made according to a pre-prepared template. It can be made on plywood or paper. An arc cut from the material is attached on both sides to the frame base with self-tapping screws.
For evenness, craftsmen use another method, in addition to the template. A curved profile is attached to the prepared cut material from the back side.
Preparing the side parts
The side part is equal to the distance between the arcs. Depending on the material used, it is bent. For gypsum plasterboard there are 2 methods of bending the sheet - dry and wet. The finished curved panel is placed between the arches in the opening. The part has dimensions equal to the arch of the structure.
Mounting the interior arch post
A plasterboard structure requires a metal frame onto which the rack elements are attached. Other materials are attached to a frame base or glue.
To make an element, the required distance is from the edge of the arc to the bottom. The resulting length is measured on the material and cut. You will need 2 front parts and a strip between them.
All fixed elements must be checked with a level not only vertically, but also the evenness between the left and right parts.
The final moment of installation
The last step is to cover the joints with decorative molding. If the structure is made of gypsum plasterboard, all joints are reinforced, and the fastening points are covered with joint putty. It is necessary to cover the structure with a primer and finishing putty. After drying and rubbing, they decorate (paste, paint).
The arched design is easy to assemble if you purchase it as a complete set. However, it has a number of nuances when installed independently. The evenness of the arch is beauty and sophistication.
Preparing for work
The first thing you need to do is measure the parameters of the canvas. Also, it is worth considering such a moment as the material.
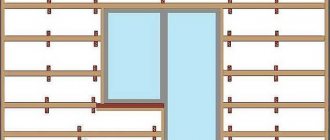
Diagram with dimensions for installing a bath door
When making a door for a bathhouse, the issue of material is especially important, because not all raw materials will withstand the sudden changes in temperature and humidity levels that usually occur in a steam room. Therefore, before making a door to a bathhouse with your own hands, you should think about ensuring that the material is both moisture-resistant and temperature-retaining.
Drawing with dimensions of a door for a bathhouse
Experts recommend giving preference to canvases with a height not exceeding 170 centimeters. It is a door of this height that will be able to maintain the desired temperature in the room and maintain the required microclimate. Also, when preparing, you should take into account the fact that there should be two structures in the bathhouse. One of them is the main one for entering the dressing room space, and the second is internal, which is located at the entrance to the steam room itself.
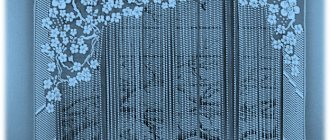
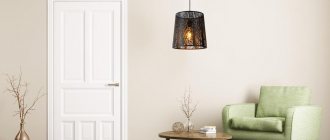
Steam room door design option
An important nuance is that the door to the steam room requires good thermal insulation. To do this, it is not necessary to install bulky and oversized doors. It is quite possible to achieve the above function with the help of insulation even in a standard door.
Finishing
When the arched frame is ready and sheathed, you can begin finishing work. To do this, you need to cover the edges and joints of the materials with specialized paper tape or fiberglass mesh. You will also need to apply putty in at least 3 layers and sand the structure. Once you are convinced of the reliability of the formed structure, you can proceed by following some of the recommendations given below.
To do all the finishing work, you need to purchase acrylic putty, which is intended for interior work. But, please note, it is better to use a special mass for drywall. Before use, the putty mass is thoroughly stirred until smooth.
How to apply putty correctly
When starting work, put on gloves and other personal protective equipment! The putty is applied in linear movements with a rectangular spatula. In addition to filling all the unevenness and joints of materials with putty, it must also be applied to the heads of the screws so that their edging does not show through. Similar actions are carried out until the surface becomes ideal.
After puttying, you can begin gluing the joint and edges to remove all sorts of irregularities and give the material strength. To do this, you can take a fiberglass mesh or paper tape, it all depends on your preferences (both options are good). Cut a piece of mesh and place it at the joint (in the very center), pressing it with your fingers into the putty that has not yet dried. Check that the tape is securely fastened and that there are no wrinkles.
Fixing the mesh
After all the joints have been treated with mesh, you can cover the curved parts of the arch with it. The work needs to be done according to a similar scheme. When the mesh forms folds during the processing of arcuate sections, they can be smoothed out by cutting the fabric with a sharp knife.
After drying, the putty will become snow-white. This will be a signal that you need to take sandpaper and go smooth the surfaces. But, work carefully, do not remove too much putty, so as not to expose the mesh. For this work, use a respirator, because during surface grinding there will be a lot of dust, which is very harmful to human lungs.
When all 3 layers of putty have been applied and the surface has been cleaned, you need to wait about 12 hours for the structure to dry completely. Sand again with fine-grit sandpaper to achieve a perfect surface. That's all, you can decorate the surface.