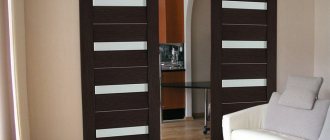
Interior doors are an important element in every apartment or private residential building. The design allows unhindered penetration into adjacent rooms, and also contributes to the soundproofing of different occupied spaces. Installing these products without a threshold is a complex technological process, for which you should turn to professionals. If this is not possible, the work can be done with your own hands, provided that all points of the technological map are followed.
How to properly install an interior door without a threshold
In order to correctly install an interior door without using a threshold, experts and professional craftsmen advise adhering to a number of important rules and nuances that make this procedure easier:
- Installation of the box and canvas is carried out only after all finishing of the premises has been completed.
Do-it-yourself door installation
- Before installing a new door, the old frame must be dismantled so as not to spoil its surface if the owner of the premises intends to reuse the product.
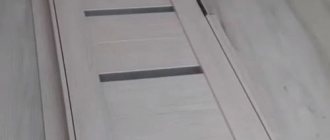
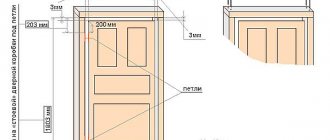
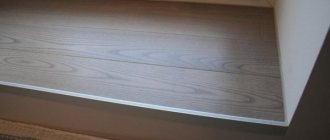
- When installing a door without a threshold, a technological gap of up to 3 mm should be provided between the finished floor and the lower edge of the door leaf.
The gap between the door leaf and the floor covering
Thus, a door without a threshold plays the role of fresh air ventilation, ensuring fresh air enters the room and increasing the air exchange rate.
Installation clearances when installing the door
In addition to the technological gap between the leaf and the floor, when installing the door you will also need installation gaps, which are necessary for installing polyurethane foam.
The size of these gaps ranges from 20 to 30 mm. When designing an opening, it is not at all necessary to refine it to an ideal plane, since the sealing self-expanding composition smoothes out all irregularities.
The best surface for an opening prepared for the installation of a door frame is masonry made of building bricks. At the same time, a plastered surface or planed wooden blocks are suitable for correct and reliable installation.
Finalization of the opening
Eliminating a large gap
The defect can be eliminated using one of the following methods (optional):
Materials that will help to insulate a gap that is too large in a standard design (more than 6 mm) are selected taking into account aesthetics and insulation characteristics. The choice depends on the presence of drafts, sound insulation, and flapping. Some of the most popular materials are sealing tape and silicone. There are cases when they use felt and any dense fabric, thin slats to cover the cracks.
Sealing tapes are made of rubber and plastic. They are inexpensive and easy to install. It is recommended to use self-adhesive materials. Over time, such a tape needs to be changed, since the material is compressed and blocks the gap worse. To install the tape, the surface of the web is degreased. The tape is measured with a margin of 10 mm, the protective film is removed and a strip is glued from the top corner. The sealant is firmly pressed to the surface and carefully trimmed in the corners. When working with tape without an adhesive backing, you will have to use nails to secure the seal around the perimeter of the box. The distance between nails is up to 10 cm.
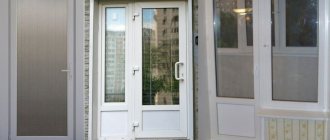
What work needs to be done before installing the door?
For successful installation of an interior door, it is necessary to carry out work to prepare the opening, as well as finishing the premises in the following volume:
- The walls of adjacent rooms are finished with finishing materials, according to the design project.
Door opening direction
- A finishing coating is installed on the floor, brought to the design level.
- You must immediately purchase or rent a hammer drill, a jigsaw or circular saw, a screwdriver, and also stock up on hand tools.
Set of power tools for home use
- The assembly of the box from linear elements is carried out after measurements exclusively on a flat horizontal surface, for which it is necessary to clear the workpiece area on the floor.
- The entire installation pattern of the product will depend on the direction of opening - the location of the box ledges, hinges, handles and locks.
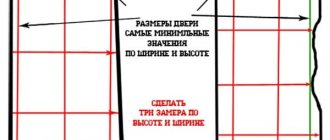
- Before installation, carefully measure the opening in 3 dimensions. As a rule, the standard landing area for a door frame is measured at least 3 times along the width of the opening, and 5 times along the height, and also from 6 to 10 times - the thickness of the wall along the entire perimeter of the structure.
Measuring the opening before installing the door structure
Immediately after the measurement, before starting to assemble the frame, you should draw a sketch of the future door with real dimensions at each point, then take the smallest size as the optimal size and check the possibility of installing the door leaf in the frame against it.
Requirements for the manufacture of doors according to GOST
Despite the wide variety of design solutions, the production of doors for rooms should not contradict the clear conditions dictated by state standards. There is a whole list of regulatory documents that define the rules for the manufacture of this type of product.
- GOST 6629–88 contains a comprehensive list of all specifications and standards that relate to doors made of wood.
- GOST 475–78 establishes general requirements for all types of wooden products.
- GOST 24698–81 defines the types, sizes and design options of interior doors.
- GOST 30970–2002 describes the characteristics of PVC products.
- Certificate of Conformity No. 6629-88 contains information on connection options and standard sizes.
- Standard STB 2433-2015 “Door blocks. General technical conditions" includes classification, parameters of different types of doors, requirements for them.
- GOST 538–88 provides information on the requirements for door frames, hinges and fasteners.
What tools and consumables will be needed to install an interior door without a threshold?
Before you begin installation, after taking measurements and purchasing the required set of door structures, you need to stock up on the following set of electric and manual tools:
- Marking tool - tape measure, ruler, steel carpenter's angle, laser or bubble level, as well as a pencil with a soft lead for drawing cutting lines or installing fittings.
- The best solution for cutting materials is to use a semi-automatic cross-cutting machine with a rotating bed and a lowering working body.
Cross-cutting machine
- If it is not possible to purchase or rent complex semi-professional equipment, you can use a jigsaw or a hand-held circular saw.
- If you don’t have any power tools at hand, it’s enough to use a hacksaw with a fine tooth and a miter box to make cuts precisely at an angle of 90 or 45 degrees.
Hacksaw with miter box
- To make holes in the end of the wall, you will need a hammer drill.
- To drill guide holes for self-tapping screws in the place where the lock or hinge hangers are installed, you need to purchase a drill with a thin wood drill bit.
Drill with thin drill bit
- To insert a deadbolt lock, you need to use a well-sharpened chisel with a hammer or a wooden mallet.
- If possible, an ideal selection of material for the lock device is obtained by using an electric portable milling cutter.
Portable router
- Polyurethane foam with a gun that fits onto its head to fill gaps.
- Silicone sealant, liquid nails, also with a mounting gun of a different design.
Silicone sealant in a gun
- To fasten the box or trim with self-tapping screws, you will need a screwdriver or a high-quality slotted or Phillips screwdriver with a rubberized handle.
Screwdriver
- A set of hardware, depending on the type of fastening of each element - nails, screws, self-tapping screws.
In addition, to position and fix the blade in the desired position during processing, you should stock up on 2–3 clamps or a vice with elastic gaskets in advance, so as not to deform the soft wood.
Materials for insulating cracks
Many different materials are used to insulate the gap. But before you start insulating, you need to decide how much smaller the gap should be.
When choosing a material for insulation, it is important to pay attention not only to aesthetics, but also to take into account the insulating qualities. After all, this determines the reduction of sound transmission, drafts and, in addition, eliminates door slamming.
The most popular materials for insulation are silicone paste and sealing tape. But they also use stuffing strips of felt (or any other dense fabric) or thin slats in places where there are cracks. The choice of material depends on the location of the door installed and the size of the gap.
How to assemble a box correctly
In practice, several basic methods for assembling an interior door frame are used, depending on the type of pairing of mutually orthogonal linear elements:
- Maintaining a 90 degree angle when installing the frame. In such cases, adjacent beams are fixed along the contact surface with powerful self-tapping screws, after making preliminary through holes. Fixation should be carried out on hardware with a length of 100 mm or more, and a diameter of at least 6 - 8 mm.
Box assembly
- With preliminary cutting at an angle of 45 degrees, which will require a cross-cutting machine with a rotating base. In such cases, the elements are also fixed to the floor with powerful self-tapping screws, strictly in the central part of the perpendicular element, in order to avoid cracking.
- Groove-tenon connection. The technique is actively used in the pre-processing of wooden products in factory conditions. At the end of each element, cuts are arranged in such a way that when joining, the workpieces are securely connected “into a lock.” This technology allows for hidden fastenings, as well as gluing together box parts.
Due to the complexity of processing, the tongue-and-groove technology is practically not used at home.
Groove-tenon connection
When assembling a box at an angle of 45 degrees, experts recommend starting cutting from the inclined side of the product, as this will allow you to refine the edge, and then cut the opposite end to the required length. The elements should be fastened at right angles with two or three self-tapping screws to form a rigid interface unit, without the possibility of rotating the elements relative to each other.
How to install extensions and platbands
When the most important part of the work is completed and the box with the canvas is installed in the doorway. It is necessary to install the extensions and platbands. To do this you need to perform a few simple operations:
- Taking measurements of the remaining wall thickness from the door frame to its edge.
- Applying markings on the back sides of the platbands - the marks are connected by a solid line.
- Cutting linear elements using a jigsaw or circular saw.
- Cleaning and polishing cutting areas using coarse and soft abrasives.
Grinding the cutting area
- Fixing the extensions to the end of the opening using mechanical fasteners, liquid nails or polyurethane foam.
- Spacer the elements with timber inside to prevent them from being squeezed out of the plane of the frame.
- Waiting for the adhesive composition to polymerize, cutting off the foam, sealing the joint with silicone.
Fastening extensions with liquid nails
- The trims are also marked and cut at an angle of 45 degrees on a cross-cutting machine or miter box, after which they are fixed along the perimeter of the wall and door frame.
- When attaching platbands, it should be taken into account that their edge must strictly reach the structure of the finished floor. If the owner of the premises decides to install framing elements up to the plinth, it is necessary that each detail accurately replicates the shape and shade of the casing.
When all the work is completed, the master once again checks that the door opens correctly, that the gaps are unchanged, and that the frame is firmly fixed - it should not move in the opening when the door is torn 90 degrees.
Checking the correct installation of the door structure
If no modifications are required, door handles and decorative elements are hung on the canvas.
If self-tapping screw heads are visible on the surface of the elements, they should be masked with plastic plugs using a rubber mallet so as not to damage the finishing material.
Finished interior door upon completion of installation work
Fitting a non-standard opening
If the established parameters indicated in SNiP do not correspond to the existing dimensions of the doorway, it is necessary to adjust it to the appropriate dimensions. These measures must be carried out until finishing work on the walls is completed. It is worth remembering that the maximum overlap of the gap using platbands is 3 cm.
Reducing the width of the opening must be done evenly on both sides. However, narrowing can be done no more than 3 cm from each side. To build walls of an acceptable size, it is necessary to use a wider door block.
Briefly about the main thing
To install interior doors without a threshold with your own hands upon completion of the final finishing of the living space, a home craftsman will need detailed adherence to the technological map and a set of tools. All production operations are divided into preparing the opening, assembling the box, installing fittings, hanging the canvas and installing framing elements - extensions and trim. After installation, you should check the correctness of the installation - when opening, the gap between the leaf and the floor should remain constant, and the door at rest should not be driven under the influence of gravitational forces.