The history of sliding systems dates back to the Middle Ages, and now they can be found in new apartments, renovated apartments of old houses and large private properties outside metropolitan areas. Sliding doors attract with their beautiful and modern appearance. These designs are designed primarily to improve ergonomics and save space. Sliding systems are a great option for small apartments and, in general, for those who don’t like swing doors. Depending on the installation method and materials used, you can save a lot of money. There are many options and placement configurations, which allows you to use sliding mechanisms in all rooms. Sliding doors go well with modern design trends and some historical and national styles in the interior.
Advantages and disadvantages of sliding doors in the interior
In addition to cabinets, sliding elements are widely used in interior doors. Sliding systems allow you to save immediate space for various needs. Sliding doors look stylish, and they have long been popular among a number of peoples in East Asia. Sliding doors are easy to use and improve the ergonomics of the room. They also have several disadvantages, due to which this type of design is inferior to more familiar ones. Retractable systems isolate sounds, odors and light less well - they pass through such mechanisms more easily. This is due to the larger size of the gaps between the canvas and the box. The second disadvantage is the high price. There are also operational disadvantages. If you pull the sliding door too hard towards or away from you, it may fall. Other performance properties may also deteriorate: the blade may move jerkily and may jam. However, the experience of many manufacturers and the large selection on the market allow us to take into account all the nuances.
Sliding door systems are equally suitable for both residential premises and offices.
Standard and non-standard door leaf sizes
Standard
As for the size of canvases, each state has its own standards. In Russia, the height is usually two meters (the rough opening height is 210 cm), and the width of single-leaf products is from 0.6 to 0.9 m .
Manufacturers produce sliding structures in the same size range. Therefore, choosing the right product option for a standard opening will not be difficult.
Non-standard
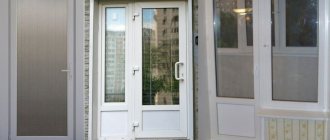
Considering that non-standard options are made to individual orders, they will not be cheap. When manufacturing products, materials such as glass and mirror are often chosen.
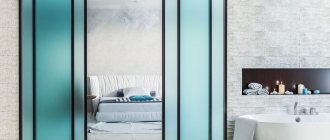
Glass devices give the interior lightness and weightlessness, while mirror ones make the room visually larger. Equally popular are blind products made from various wood species.
An option for a non-standard sliding design is a glass door
If you want to order products whose width is larger or smaller than generally accepted standards, make sure that you have enough space for the doors to open completely. To do this, measure the width of the vertical surface. It should be larger or equal to the width of the canvas.
Non-standard height products can also be made to order. These are, for example, models with arches or transoms.
Sliding door equipment
The kit usually contains the door leaf itself (or several doors), a door frame, platbands, and all the necessary mechanisms and parts (including guides). The roller system and guide rails are the basis for controlling the door leaf. They function thanks to fastenings using self-tapping screws, brackets, etc. The lock requires a side beam. At the end of the work, the beams are masked using false panels. All sliding models are sold with a large number of fittings. It also includes some auxiliary elements. These include guide protection, roller sets, synchronous mechanism sets, door stops, biometric locks, cylinder covers and screws, door hinges, latches and cylinder mechanisms. For convenient operation of the sliding door, it is desirable to have a cassette box.
Canvas
There may be several paintings. For small openings, you should choose a door with one leaf. However, the most convenient option is double doors. Cascade mechanisms and accordions can be equipped with a large number of blades. The total price largely depends on the material used to make the sashes. Elements attached to them should not extend beyond the edges of the canvases. This also applies to handles, which are mounted to form recesses in door frames. There are also devices attached to the end of the leaves and used to control the door leaf. Experts recommend installing a cassette for blade stability and easy control. However, this option will be much more expensive. For the production of one leaf for a doorway of a non-standard configuration, you will need to pay an additional 20%.
Box
The most expensive boxes are made from solid wood. However, there are alternative options. You can also choose a canvas from solid wood, and a box from other raw materials. One alternative is spliced timber. The material is as durable as possible and without defective areas. MDF and HDF are high and medium density boards. Any parts of boxes and canvases are made from them. These materials are characterized by a wide range of sizes. The box can be made from layered composites, which consist of several types of raw materials. However, no matter what material the box beam is made from, the main parameter is the width, which is tied to the thickness of the partition or wall and provides load-bearing capacity. The standard indicator for interior sliding doors is 35×75 or 30×70 mm. The minimum width of the door frame is equal to the smallest partition thickness - 65 mm. The cross-section of a standard door frame beam resembles the letter “L”.
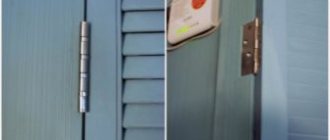
Set of guides and mechanism systems
The main components in ensuring motor function are guides. Depending on the installation method, they can be upper or lower. The guides “force” the door to move along a clear path. They are equipped with “closers” to prevent damage from sudden movement of the sash and for soft closing. The main purpose of the top rail is to hold the doors. The part usually has 2 grooves, regardless of the number of sashes in the system. The lower guide is attached to the furniture board or floor. It is also almost always double. The main load falls on the lower guide. The height of the part is 5-7 mm. An irreplaceable component of the system is the roller mechanism. It contains ball or needle bearings for the quietest and smoothest movement of the doors. To fix the valves in a certain position, a stopper (positioner) is used.
Accessories
In the case of sliding systems, it is necessary to use a different method for installing handles. They are mounted inside. These elements are made from stainless steel with a decorative coating or from an alloy of aluminum and zinc. Doors can be equipped with profile handles. They are symmetrical and asymmetrical. The first type is used mainly in interior doors, the second - in wardrobes. This part is attached to the frame to use the latter as a handle. The doors are equipped with upper and lower frames. They have a horizontal configuration. They are used to accommodate wheels; the lower one is always more massive than the upper one. It is also advisable to use a sealant (schlegel) to soften the impact of the sashes on the walls. It is attached to the end part of the vertical profile. A decorative element such as an overlay is often used. It is glued to a glass sheet or board to divide the surface into parts.
Cassette
Most cassette boxes consist of a metal frame, a guide rail with mobile wheels, a limiting and fixing device. Such an element can also be synchronizing mechanisms (with 3 or more canvases). The guide parts of the cassette are located mainly parallel to the wall or inside it. They do not create obstacles to movement and leave the passage open. Modern synchronizing devices ensure rapid opening of multi-leaf doors with simultaneous movement of all leaves. In this case, minimal impact on any of the valves is required. The cassette box may consist of a removable rail, a reference mark, spars, a grid, mortgages for fastening to the floor, and the same elements for reliable fixation on the wall. This set may also include an adapted socket box.
Recommendations from experts
When installing sliding door blocks yourself, it is recommended to pay special attention to the parameters of the door leaf. Its width should completely cover the interior opening.
The moving mechanism for such doors often has to be slightly shortened with a grinder. Therefore, it is recommended to remove burrs in the cutting area so that they do not create inconvenience during the installation of the product.
To correctly install the floor stop, the door leaf is completely closed. Next, a thrust element is inserted into a pre-prepared groove at the base of the floor (half of the part remains above the floor surface) and two fasteners are installed. Then the canvas opens all the way, the remaining two fasteners are installed. The best way to understand how to install interior sliding door models with your own hands is to use a video that shows the entire process in detail:
Popular sliding door models
Sliding doors are often used in closets. They are single- and double-leafed and move in the same or different directions. Cassette doors (pencil case) are the most popular model. The system contains narrow niches for the movement of the valves. The cascade version usually has 2, 3 or 4 doors. They are collected on the left or right side of the doorway. The movement of each of the valves occurs along its own guide. Internal doors are made with double leaves. Their parts are moving towards. The book configuration is also popular. In general, doors of different sizes are better than doors of the same size, and the reason is that it makes doors easier to close and open. For narrow openings, this option may be the only possible one. An accordion door can consist of a large number of leaves. This is the most presentable option among folding doors.
Installation of sliding doors
The installation of interior sliding or sliding doors is impossible without special mechanisms. It is not difficult to purchase them - they are widely represented in online stores, specialized services, and construction supermarkets. A specialist installer can easily modify the canvas and assemble the structure right on the spot. But only if, when choosing the dimensions of the canvas, you did not make a mistake with the necessary details and correctly calculated the method and location of the guide track fastenings. If you doubt anything, it is better to entrust it again to specialists.
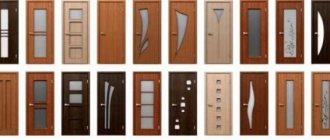
Materials and styles
Materials for making doors:
- plastic;
- metal;
- MDF;
- tree;
- aluminum;
- tempered glass (transparent, mirror, frosted).
MDF, natural wood and tempered glass are widely used. Often two types of raw materials are combined. Wooden models are durable. Glass ones are useful in hot and humid rooms. Systems made from MDF are relatively cheap, but the quality is not inferior to others. Combinations of materials expand design possibilities. Among the main execution styles are high-tech, modern and Japanese. The first one can also be called “modern”. High-tech is expressed in the dominance of straight lines, minimalism, and the absence of fusing or baguettes on the door. Colors don't have to be natural. Doors in the Art Nouveau style often have asymmetry, for example between the right and left leaves. The main material is definitely wood. There must be some kind of texture. Japanese style is characterized by a modest color scheme (black, white, gray), the absence of curved lines, and a large amount of glass.
Self-installation
The algorithm should look like this:
- Preparation of tools and materials;
- Preparation of the opening;
- Installation of timber;
- Finishing the opening;
- Installation of the upper and lower guides;
- Door assembly;
- Installation of fittings.
Installing sliding interior doors is a lengthy process that requires precise calculations and high concentration. Installation of a sliding system begins with measurements. At the same time, the recommended operating reserve is maintained. Then comes the difficult stage - creating the door frame. Before this, the appearance of the opening is put in order. When the box is made and decorated, it’s time for the guide rails. Maximum accuracy is required, so you need to use a building level in the process. First, markings are made, and then everything is fixed. It is necessary that both strips have the same length. The next step is to receive the sashes and install them. Before installation, a profile is attached to the doors. Next, a roller device is attached to the canvas and the installation of the main fittings, including handles and locks, begins.
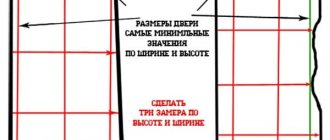
Required Tools
You will need a tape measure to measure the doorway. If there is only one canvas, then it should be 6 cm wider than the opening and the same amount higher. In addition, you will need to acquire fittings and fasteners. These are screws, handles, rollers and guides. All these accessories can be purchased at building materials stores. You will also need a beam with a cross section of 5x5 cm. The length of the beam should be equal to twice the width of the canvas. The door frame, extensions and platbands are necessary to form the external part of the system. You must have anchors with you to mount the bar to the wall. It is necessary to acquire an additional number of screws and finishing nails. Other devices and tools that will be required when installing the door are a chisel or milling machine, a pencil, a screwdriver, a plumb line and a building level.
Installation of timber
To prepare the opening for installation of the box, you need to carry out a finishing touch. The side walls should not deviate by more than 5 mm. If they are plasterboard, then the beam is attached along the entire length of the guide rail. The protrusion of the short part should be 80 mm beyond the edge of the doorway. Next, markings for the top bar are applied to the wall. The canvas leans tightly against the doorway. The boundary of the beam placement is drawn on the wall, and at the same time the width of the rail and a margin of 5 mm are taken into account. Then the sash is removed and a horizontal stripe is drawn along the mark. If the canvas opens to the right, then the beam is placed so that the middle part is above the right half of the box. Next, holes are drilled (in the wall and timber). The elements are securely fastened with anchors. In general, door frame assembly can be done in two ways:
- First, the side parts are obtained, and the cross beam is placed in the grooves between them.
- First of all, the transverse element (shorter) is cut out, and then it is placed on top of the end parts of the racks.
The second method is easier, since there will be no need to cut grooves and tongues at the ends of various parts.
To make the door frame parts correctly, you must first draw a sketch, and for this you may need the help of a craftsman.
Guide installation
This stage of work is the most responsible and important. Before installing the frame for sliding doors, you need to draw a marking in advance based on which the slats will be placed. It is necessary to maintain exact parallelism between the ceiling and floor slats. For work you will need a building level. With its help, precise lines are drawn along the entire doorway. The next step is the actual installation of the guide rails. They are attached to the floor and ceiling, adhering to the markings. To make the structure as strong as possible, you need to use guide elements of the same length. It is also recommended to maintain this proportion in order to give a more aesthetic appearance. The bottom and top strips must be cut to the nearest millimeter. It is worth taking care of the frame, carefully securing it with self-tapping screws for greater reliability.
Door assembly
After the system of guide elements is secured, it is time to make the doors. It must be borne in mind that in small apartments this process is accompanied by some inconveniences. In all cases, the doors are cut with an excess of 5 cm above the size of the doorway. This is necessary for overlaying panels. After choosing the dimensions of the product, they begin to cut the chipboard sheets. Before cutting, lines are drawn on the panels. Then the doors are cut out using a jigsaw/saw. If chips form on the edges, the defect will have to be hidden with aluminum profiles. The next step is edging the doors. Some profiles are connected to the doors with self-tapping screws, while others are glued into a cut groove. For those who do not have much experience working with a milling machine, it is better to choose the first option. The screws are hidden with caps matching the color of the board. When installing the rollers, you will have to use a milling machine. The rollers are applied to the bottom panel at a distance of 10 cm from the edge. Contours are drawn and then a groove is cut along them. Next, the roller is placed in the void and secured with a self-tapping screw.
Installation of fittings
It occurs in several stages:
- Installation of the canvas.
- Installation of lock and handles.
- Masking beams.
This is the final stage of assembling the sliding system. To move the blade along the desired path, holes are drilled in the end part along the edges. Next, the roller mechanisms are mounted. To install the doors, they are lifted and inserted into the guide. The groove in the bottom of the leaf will coincide with the lower guide rail, and the door will be suspended above the floor. To work with fittings when installing the canvas, you will need a wrench. Then the lock and handle are installed. The latter cuts into the sash and is fixed with a snap. The lock requires a side beam into which the L-shaped bolt will fit. Locks for sliding systems are equipped with hooks rather than regular latches. At the very end, the canvas is finished to hide the beams. In this case, false panels are used. If desired, the door is finished with additional control elements.
Finishing the opening
It is better to start designing the opening itself before installing the door leaf. After fixing the guide elements, this work will be much more difficult. First, the old finish is removed. To remove the old door frame, you may need a crowbar and an angle grinder. Then the perimeter of the doorway is leveled. In this case, you can use drywall or plaster. After puttying, the surface is painted or finished with MDF overlays. Installation of MDF panels is similar in principle to fastening a door frame. The top bar and side parts are first assembled separately on the floor, and then secured in the opening and filled with polyurethane foam. The location of the parts and the distances between them are supported by spacers and wedges. Other interesting finishing options are clinker tiles and trim of suitable width.
Necessary tools for independent installation work
Installing a sliding interior door in an apartment or country house with your own hands requires a set of special tools, which includes:
- Hammer;
- Screwdriver;
- Drill;
- Hammer;
- Screwdriver set;
- Construction tape and level (plumb line);
- A simple pencil.
Additionally, it is recommended to prepare several wooden wedges for pre-fixing the doors in the interior opening. And to secure the guide rails you will need wooden blocks with a square section of 4-5 cm.
Features of installing doors with a cassette system
This is a technically complex process, so you may need the help of an experienced technician. The first step is to prepare the opening. You will need to break part of the wall. This manipulation must be carried out carefully; using a control and measuring device. You need to measure the length and width of the cassette. Based on them, a drawing of a new opening is drawn. It is necessary to remember the technological gap - a few cm between the cassette and the opening on both sides. Then the cassette is mounted. In order for the entire system to operate silently, levels must be observed. If the cassette is well leveled, the service life will be longer. It should be fixed with corners and other fasteners. Often, in addition to such fixation, foam is also used. The next step is to cover the cassette with plasterboard. At this stage, it is important to choose the right method for installing plaster. If the thickness of the wall is too small, it is sewn onto the cassette device.
When installing doors with a cassette device, it is recommended to use self-tapping screws measuring 16x3.5 mm.
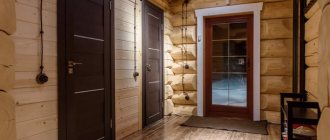
Sliding doors in the interior of rooms
For large rooms like the living room, you should buy sliding systems in a discreet, functional style. It is preferable to have more than two doors. However, in studio apartments the opposite is true - the more there are, the better. In the kitchen, single-leaf doors with a large amount of transparent material are relevant. Sliding sliding doors are the best option for bedrooms. The same system can be used to separate the wardrobe inside the bedroom. Monochromatic systems, as well as doors with a pattern, harmonize well with the room. In the bathroom, a thick single-leaf door with a moisture-resistant coating is most often installed. Translucent options are also popular. Light double-leaf systems are suitable for children's rooms. Preference is given to doors with large patterns and rich colors. Constructions in children's rooms are additionally equipped with blockers.
Interesting ways to use sliding systems
Sliding door blocks are installed today in rooms of different types: in the nursery, bedroom, study. Installing doors on rollers or rails allows you to implement various interior solutions. For example, you can use a similar system as a wardrobe, separating part of the room. This is an ideal option for both large and small spaces. Allows you to significantly save money on the purchase of a full-fledged wardrobe. Also, the door structure can serve as a functional partition between the bedroom, study and loggia.
Recommendations on how to choose a sliding door
There are a number of rules and criteria for choosing the ideal door. The canvas should be 10 cm wider than the doorway. Do not forget about the installation location of the sliding system. If there is a baseboard there, you will need to remove it. The height of the door leaf is consistent with the same opening, but taking into account the fact that rollers will be used. Doors with glazing beads or protrusions on the panels should be avoided, otherwise the gap between the wall and the panel will be larger than necessary, or the opening/closing process itself will be problematic. It is also necessary to take into account the location of the system and interior features. It is desirable that all sliding doors are in harmony with each other. Particular attention is paid to the selection of material. It can be wood, glass, plastic and metal. The best option is a combination of natural wood and impact-resistant glass.
What is needed for high-quality installation
Before you begin installation, you should prepare everything you need. Then the work will go faster and you will be able to avoid fuss, during which serious mistakes can be made.
To install a sliding door, you will need:
- wooden beam;
- open-end wrenches;
- screwdrivers;
- building level;
- screws;
- milling cutter;
- drill;
- self-tapping screws;
- saw.
Naturally, you need a door set consisting of a leaf, rollers, guides, handle, trim and latch.