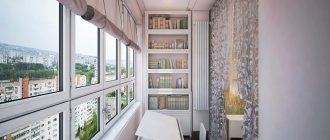
To expand the functionality of the balcony and turn it into a cozy room, it is glazed. This raises the question of how to ensure waterproofing, insulate surfaces and make them more aesthetically pleasing. Experienced craftsmen recommend cladding with plastic panels. They are durable, elastic, waterproof and wear-resistant. Let's look at how to install panels on the ceiling, and then perform hydro- and thermal insulation without the help of specialists.
Pros and cons of plastic panels on the balcony
In addition to the budget cost and the ability to resist moisture, PVC lining has the following positive properties:
- attractive appearance, large selection of colors;
- ease of installation and maintenance;
- hygiene;
- long service life;
- possibility of fragmentary repairs;
- ability to retain heat;
- lightness, strength, resistance to mechanical loads;
- environmental friendliness;
- Possibility of frameless installation.
This product also has some shortcomings that are taken into account when repairing a balcony. The seams between the elements remain visible, and there is no way to fix this. The plastic is thick and is attached to the frame, so after installation the height of the balcony will decrease slightly.
If polyvinyl chloride panels are heated to +80 °C, they deform; at higher temperatures, they melt. In case of fire, they quickly ignite and release toxic substances. In cold weather, the material becomes brittle and cracks. Colored slabs exposed to direct or reflected sunlight become faded over time.
There are products with a protective coating, but they are more expensive.
PVC boards cannot be cleaned with powder containing abrasive particles or rubbed with metal or other hard brushes. This type of cleaning results in scratches. From accidental impacts, the plastic becomes deformed and cracks, and dents appear on it. However, with careful handling, the service life of a ceiling made of PVC panels on a balcony will be 12-15 years.
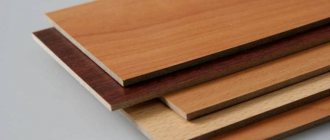
Wooden lining
A natural wood material that provides not only aesthetic beauty, but also moisture and environmental friendliness. When installing such material on the ceiling, you can use it as with an already treated surface, or after installing the lining, apply a special protective layer over the surface, which will help prevent the surface from the formation of mold and fungi.
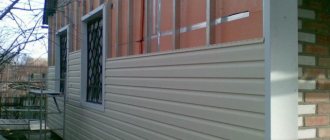
Balcony finishing with wooden paneling
Installation of wooden lining can be carried out either on a wooden or on a metal frame. It is also possible to install a ceiling in several levels, giving the surface a special pretentiousness and beauty.
What types of PVC panels are best to use for ceiling cladding?
For covering a balcony ceiling in a Khrushchev-era building with your own hands, not any slabs are suitable, but only those that are designed specifically for ceiling surfaces. Execution options:
- Stacked planks with a smooth surface. They are fastened together using a locking connection, and attached to the ceiling with staples or screws.
- Under the tiles. Products are produced with imitation of decorative stone, wood and other materials. The photo shows what types of designs there are. Fastening - using liquid nails.
- Leafy. Standard sizes in mm: 3000×250×8, 2700×500×8, 3000×500×8, 2700×250×8, 1035×500×4. Installation - with self-tapping screws.
- "Mosaic". The difference from the previous version is in size. Standard product parameters are 955×480×4 mm. Fastening - with self-tapping screws or liquid nails.
The surface of polyvinyl chloride boards can be matte or glossy. The first option is suitable for a balcony: when the backlight is turned on, such panels do not produce glare. When choosing, take into account thickness and width. Products that are too thin become deformed during use, and in cold weather condensation and ice form on them.
Important! To install a ceiling on a loggia made of PVC panels that are white or another light color, use fasteners of a suitable shade, otherwise they will stand out.
If the balcony is not insulated, the width also matters: narrow slabs withstand temperature changes better. Sheet materials are not suitable for balconies where the ceiling has a complex configuration or defects, as they do not eliminate defects.
Why is plastic good?
Polyvinyl chloride is the main raw material for the production of plastic panels. It is not used in its pure form, but with the addition of ground chalk, titanium dioxide, stabilizers, bleaches or pigments.
The range of products is very large. The panels are produced in different colors, with a smooth or textured pattern, imitation of natural materials, with shiny metallized inserts. The surface can be matte, glossy or rough.
Finishing from plastic panels is inexpensive, visually attractive and easy to install. In addition to a wide variety of plastic panels:
- durable;
- lungs;
- are not afraid of moisture and temperature changes;
- washes well.
Standard panel widths are 250, 375 and 500 mm, thickness 5-9 mm. The products have a cellular structure. Inside there are air cavities separated by stiffening ribs. When impacted or subjected to strong compression, the surface may be pressed through, so the material must be handled carefully.
Installation procedure
Let's look at how to cover the ceiling of a remote balcony with cold glazing with plastic panels. The elements will be fastened across. The finishing method assumes that in the future there will be a hanging dryer on the balcony. Tools and materials you will need:
- pencil (you can use dye thread instead);
- building level;
- wooden bars.
Frame structure
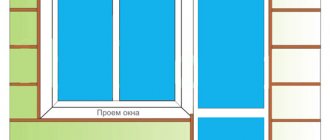
Before installation, markings are made. The top edge of the balcony frame is taken as the reference point. The level is transferred from it to the opposite side. Two bars are mounted across the length of the balcony - the dryer will be attached to them, and a place for it is chosen as far as possible from the entrance.
Step back 20 cm from the window sill and draw a line perpendicular to the wall. Measure the distance from the front frame to the rear plane of the balcony, add 1 cm and saw off 2 pieces of timber of that length. These are embedded elements. The first one is mounted along the line that was drawn earlier. The second bar is attached in parallel, so that the distance between the centers of it and the other element is equal to the length of the dryer.
Next, install the remaining embedded parts. They are also sawed off with a hacksaw from a long beam.
On a note! During the fastening process, monitor the level: all elements are leveled so that they are in the same plane.
It is better to assemble the frame from wooden blocks rather than from metal profiles. The metal rusts over time, causing stains to appear on the panels. The suitable timber size is 20x45 mm. The slats are strengthened along the balcony: one is mounted close to the wall, the second - in the center of the ceiling.
Installation of the starting strip
The starting plastic strip is a profile in the shape of the letter “p”. This element is stapled around the perimeter to a wooden frame, and the ends of the panels are inserted into the groove. In the front part of the balcony, as well as on the sides, the strip is fastened using metal screws, observing a step of 13-14 cm. If the profile is short, the fastening is done end-to-end, trying to avoid the gap being visible. The connection in the corners is made with an overlap.
Fastening panels
When the starting strip is reinforced along the entire perimeter, measure the distance from the front frame to the back wall. Cut strips 1 cm shorter from the panels to leave small gaps. They are needed because as the temperature rises, PVC panels become slightly longer.
The ceiling cladding on the balcony is made of PVC panels from the entrance side. The protrusion of each subsequent panel is inserted into the groove of the previous one. The location of the bars for attaching the dryer is marked in advance on the back wall and window.
The slabs are secured to the central element of the frame with staples using a construction stapler. Difficulty may arise when installing the last element. It must be measured and cut especially carefully so that the dimensions match exactly. When installing this panel, use a wide spatula with blunt edges. First, it is brought all the way into the starting strip, with the edge going into the groove by 8-10 mm, then it is moved to the opposite side.
Consequences of using unsuitable materials when finishing balconies
Not so long ago, just a few decades ago, balconies were also closed, but they often looked like hanging “chicken coops”.
The materials mainly used were:
- Wooden lining;
- Aluminum sheets;
- Corrugated iron sheets.
This method of finishing was forced due to the lack of light and beautiful materials with good heat and sound insulation, but it was incomparably easier to “get” the now scarce aluminum sheet.
The appearance of such a balcony was depressing, and not everyone decided to update it from the outside, for fear of heights. So such a structure hung in an unpresentable form. A loggia, unlike a balcony, due to the lack of open end sides, looks much more advantageous, which is why it was easier to finish them before and now, although they are larger in size.
But those days are gone; in open sales, if you start looking for finishing materials, you can find anything to suit all tastes and budgets.
Hydro- and thermal insulation of the ceiling on the loggia
Waterproofing and thermal insulation are carried out before covering the ceiling on the balcony with plastic panels. To properly protect the structure from moisture, all problem joints are filled with sealant. If there are cracks, they are also sealed.
The open neighbor's balcony, which is located above, is inspected with the consent of the residents. Found problem areas are put in order. If this is not done, water will drain from the neighbor’s balcony and after a while will begin to seep through the sealant.
If there is an unheated balcony on top, you cannot do without thermal insulation. It is done step by step in the following sequence:
- A waterproofing membrane is attached to the ceiling.
- Mount the frame as described above.
- Fill the space between the bars with insulation.
- The material is fixed with transverse slats or threads, tying them to nails driven into the bars.
- Strengthen the vapor barrier membrane by turning its rough side outward.
Polyurethane foam boards, polystyrene foam or mineral wool are used as insulation. Voids and corners are sealed with polyurethane foam. Finally, the edges are finished with ceiling plinth.
If you follow all the recommendations, installing plastic panels will not cause any difficulties. If you do everything carefully, the balcony ceiling will be smooth, airtight and beautiful.
Read more: What is the best way to decorate the ceiling on a balcony?
Preparatory work
Before finishing the ceiling of a balcony or loggia, it is necessary to clean the surface of the ceiling slab from the old coating, seal the joints between the window frame and the ceiling, eliminate cracks, carry out waterproofing and insulation.
Removing old finishes
Sealing the joints of the window frame and ceiling
If the balcony is on the top floor, then waterproofing is done from the outside and inside, while external waterproofing must be entrusted to professionals.
Photos of balcony ceilings made of PVC panels
How to make a lathing from a galvanized profile
This option is somewhat simpler, since you have to work with a flat profile, from which you can quickly assemble a high-quality structure. All you need is a profile CD-60, UD-27, galvanized U-shaped brackets and fasteners.
Sequencing:
- After marking the ceiling level, we attach the UD guide profile to the walls on both sides (fastening is done using self-tapping screws on a dowel or directly into the wall, if its surface allows);
- We insert a transverse CD profile into the grooves of the guide profile and fasten it to the ceiling using hangers with self-tapping screws.
We attach the UD profile to the CD profile with a self-tapping screw
Fastening and adjusting the plane (leveling) are carried out in the same way as when assembling slatted sheathing.
Checking the plane of the ceiling using the ruleThe distance between the centers of the transverse elements should not exceed 50 cm, between the brackets - 70.
Attach plastic panels to a galvanized structure using a press washer with a drill or glue (liquid nails).
Criterias of choice
Selecting plastic panels is a rather complex process, during which you must be guided by certain rules and criteria. There are a few important things to consider before making your final decision.
Cost and quality
The affordable cost of the material is one of the key values when choosing. However, it must be taken into account that high-quality products cannot be sold at a reduced price. The cost of plastic products can be influenced by various factors, but the most important thing is that in order to save money, you should not purchase the cheapest products. A smart decision would be to purchase certified material from a trusted manufacturer.
Elasticity and stiffeners
The strength of plastic can be determined not only by the thickness of its walls, but also by the number of stiffeners located on the inside of the product: the more there are, the more reliable and durable the material.
You can try pressing lightly with your thumb on the front side of the panel. If a dent immediately forms, then you should refuse the purchase, since this material is unlikely to last long. High-quality plastic products must be sufficiently hard and elastic, their durability and service life depend on this.
Front side and color
When choosing, special attention is paid to the appearance of the front side. If, when examining the product from a slight angle, clearly visible stiffening ribs are noticeable, this indicates that the panels are most likely not of very high quality
Good material should be evenly colored without sharp color transitions. If the plastic has a clearly visible grayish tint or blurry dark spots, this indicates that the product is made from low-quality recycled materials.
Dimensions
When choosing PVC panels, you must take into account the size of the product you are purchasing. Depending on the variety, the dimensions of plastic products in width can vary from 10 cm to 2.3 m
The length ranges from 1.5 to 6 m. To decorate a standard loggia, you need to purchase models with a width of about 25 cm.
Tools
- electric jigsaw. This tool will be needed in the manufacture of the frame, as well as for cutting the plastic panels themselves, especially for cross cutting;
- hacksaw. It is more expedient to perform longitudinal cutting of the elements of the future ceiling using a hacksaw rather than a jigsaw;
- electric drill;
- screwdriver;
- self-tapping screws/dowels (50–120 mm) - the fastening must penetrate into the ceiling by at least 30 mm;
- construction stapler with the necessary set of staples;
- construction level;
- hammer;
- knife. A knife with replaceable blades, used for cutting cardboard, is suitable.
Now you can move on to active action and resolutely begin installing the frame.