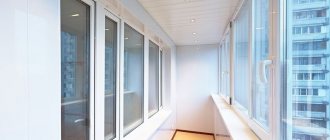
Modern thermal insulation based on polystyrene foam is today considered the best in terms of a number of indicators, including thermal conductivity and resistance to water vapor. But such insulation with extruded polystyrene foam must be protected from the ultraviolet radiation of the sun and freezing condensate. You can plaster the surface or try to install siding on polystyrene foam; there are differences in the method of protection, and quite significant ones.
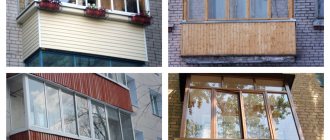
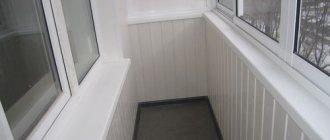
The classic version of foam insulation with vinyl siding on a galvanized frame
Is it possible to insulate with penoplex under siding?
Before making a decision, you need to understand the capabilities of extruded polystyrene foam. Siding can be laid on polystyrene foam only if the thermal insulation layer can withstand the additional load. With the traditional approach, the installation of siding panels is carried out according to three schemes:
- On a wooden frame with a vapor barrier laid under the grating, on top of which a horizontal sheathing is sewn;
- On a metal frame. A vapor barrier is installed directly on the wall, thermal insulation is laid on top, and all this is covered with waterproofing. Next comes the installation of metal supporting structures on the insulation, and then it is possible to lay siding panels;
- On cast, perfectly smooth walls, installation of siding can be carried out after laying a vapor barrier or waterproofing and insulation. Next comes the installation of the slats, and only on them can the siding be attached.
The first installation case is the most common, the second is used if installation is planned on very curved walls, sometimes even with a negative slope. The third is the rarest, since perfect walls are rare.
Cladding with siding panels is classified as a passive type, which means that the material, after installation on the wall, does not form a sufficiently rigid coating with a smooth and flat surface. Therefore, in all of the above cases, the siding was laid on a supporting frame, which ensured reliable retention of the weight of the cladding and compensation of the load from gusts of wind and the mass of frozen snow. Moreover, a ventilation gap is left between the insulation layer and the siding panels, thanks to which condensation can be removed.
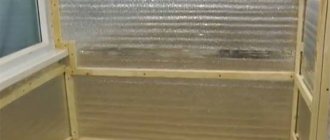
Vapor barrier, frame construction
Siding will subsequently be installed on the sheathing. The panels leave a gap for air ventilation and insulation. The entire facade is covered with a film with vapor barrier properties. The flooring starts from the top. Fixation is carried out every 30 cm. A slight sagging is only a plus. Adjacent strips should only overlap. Then they are glued with a special tape.
Each place is additionally sealed. At this stage, pay all attention to the corners. The convergence of the walls should not be shown in any way.
Rough side to the façade surface. In this case, unnecessary movement is eliminated.
Is it worth making foam insulation under siding?
It is in the presence of a ventilation gap that most of the installation problems lie. The finishing of facades and walls with decorative siding panels was developed for the installation of thermal insulation made of dense mineral wool on brick or wooden walls. In this case, you have to resort to installing a load-bearing frame and be sure to equip a ventilation gap that rises up before lining the roof overhangs with soffits. If you attach the siding to polystyrene foam, then there is no particular need for such ventilation. Extruded polystyrene foam practically does not allow water vapor to pass through. The ability of penoplex to absorb moisture is close to zero.
Often adherents of the old mineral wool-based insulation technology scare developers with possible serious problems:
- For example, if you attach siding to penoplex directly using adhesives, or mechanically using standard fasteners, then water vapor will accumulate in the gaps at the joints of the panels. As a result, cold bridges appear, and in winter this situation can lead to breakage of fastenings;
- Insulating the facade with penoplex under siding is unacceptable due to the high flammability of EPS. When the thermal insulation ignites in the ventilation gap, a strong draft arises, like in a chimney, and the flame front spreads in a matter of minutes.
In addition, it is believed that even with high-quality installation, wooden slats in the absence of ventilation are susceptible to swelling with water condensation, and, as a result, deformation of the sheathing and even rotting of the wood.
Not everything is as scary as it might seem at first glance. Siding installation is just a type of decorative finish. Whether the walls of the house are lined with siding panels or not, this will not affect the insulation characteristics and its durability. Of course, wooden blocks and sheathing must be treated with impregnations and varnishes, otherwise the wood will be destroyed even in the presence of a ventilation duct.
Penoplex burns well, but the flame front spreads only over the surface of the material, so an additional protective coating made of non-flammable material will easily solve the fire hazard problem. Known cases of fires involve the burning of ordinary foam under plastic siding. The installation was carried out with a ventilation gap, but without additional protection with a fire retardant coating.
Important! For those who doubt it, we can recall houses made of safe SIP panels and such material as metal siding with a thick layer of foam glued on the back side.
Such panels are widely used in European Union countries. Installation is carried out using pins and glue, with or without lathing.
Final stages
After all the preparatory work has been completed, you can begin installing the gypsum board sheets. Drywall must be screwed using special self-tapping screws. It is best to attach the sheets in large pieces, without cutting them unless absolutely necessary. The installation itself depends on the surface on which the plasterboard is attached, whether there is a need to create a multi-level surface (this is usually used for ceilings, but often plasterboard is used to create various wall niches).
After the gypsum board sheets are completely strengthened, all joints and fastening points should be puttied, and finishing work should begin.
An increasing part of a wide variety of buildings today are being built using lightweight aerated concrete, which has numerous advantages. Its special cellular structure makes the material not only very durable and light, but also allows for relatively simple processing. This also includes the ease of attaching a wide variety of elements to the blocks, from the installation of roof parts to interior finishing work.
Wall insulation is one of the most important stages of building construction. Thanks to good thermal insulation, the inhabitants of the house will feel comfortable, even in the most severe frosts.
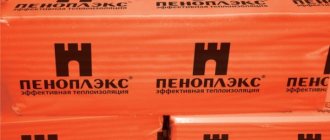
When choosing a material for covering walls, floors and even the foundation, we recommend paying attention to penoplex.
It has a number of advantages that will help you save your budget. We invite you to familiarize yourself with the main advantages of the material and installation methods.
If for some reason it does not suit you, you can choose insulation from these materials:
How to attach insulation to walls
It remains to decide how to install the panels on the EPS surface. Finishing penoplex siding involves the use of mechanical fasteners. The cladding on the walls, especially if it is aluminum or galvanized sheet, experiences quite a serious load, so you should not skimp on fasteners.
Installation of siding only on the frame and only with mechanical fasteners
Experts categorically do not recommend installing siding over polystyrene foam using glue, although this is quite possible. Conventional tile adhesive mixtures will not hold the cladding, and special adhesives based on polyurethane or silicone are very expensive.
Direct installation of penoplex insulation panels under siding on the wall is carried out in a complex manner - glue and mechanical umbrella or fungal fasteners.
As glue you can use:
- Tile adhesive mixtures on a cement-sand basis. The glue is not afraid of moisture, so with its help it is quite possible to insulate the base of a building with penoplex and then cover it with siding;
- Polyurethane foam with a reduced degree of expansion. It is considered a universal option specifically for laying EPS.
Polyurethane foam is also used for blowing in joints and mounting holes when installing under a fungus. Tile adhesive is very viscous, so you have to make significant efforts to align the glued insulation boards in one common plane.
Polyurethane foam is much softer than glue, but due to strong expansion, the foam can tear off from the base. Therefore, after laying the insulation, it is better to immediately drill and hammer in the fungi before the slab is lifted. Absolutely dry penoplex is poorly wetted by foam, so during installation the surface must be lightly sanded with sandpaper or wiped with a damp cloth.
Option 1. Universal glue
Universal adhesives that grip different surfaces equally well include:
- Kleyberite-636;
- Moment Crystal;
- Emfikol-34012
Despite the fact that these adhesives are suitable in our case, professionals recommend using special adhesives for plastic, or liquid nails. We will talk about them further.
What tools and materials will be needed
To insulate the walls of a house, depending on the installation technology, you will need to stock up on the following materials:
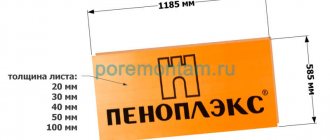
- Extruded polystyrene foam with tongue-and-groove locks, if you plan to base siding on polystyrene foam, then the thickness of the material should be in the range of 25-50 mm, no more;
- Galvanized wall profile, the cross-section of the material is selected depending on the height of the facade and walls. For installation on a plinth, you can use a regular profile for plasterboard;
- Cylinders with polyurethane foam;
- Mounting mushrooms with locking pins;
- Self-tapping screws for metal;
- Long pin - self-tapping screw with a plastic plug;
- Brackets for mounting the frame on the wall.
Tools you will need are a screwdriver with bits and a set of drills, scissors for cutting a wall profile, a knife for cutting foam boards, a construction hydraulic and bubble level, and a tape measure. Also, according to the technology of insulating the base with penoplex from the outside under the siding, you will need to have in stock several siding panels with corner and starting J-straps.
Important! The problem is that the height of the base is always non-standard. When covering yourself with siding with penoplex insulation, you need to know in advance the points and levels where you will need to install brackets for fastening decorative panels. Horizontal cross members from the profile will run along them. The wall mounts should be positioned slightly higher.
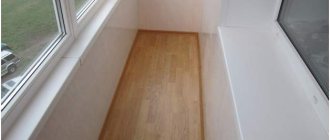
Installation of siding on a penoplex insulated base; on the walls of a wooden house, panels are laid over hidden lathing
Why foam?
There are a considerable number of different insulation materials that have certain advantages. They are selected according to various parameters - cost, origin, level of vapor permeability, but the degree of thermal conductivity remains the most important.
- The colder the climate, the thicker the thermal insulation layer should be or the higher the thermal insulation value should be. An 8 cm thick slab of foamed polymer replaces a 10 cm thick layer of mineral wool, a 27 cm thick layer of wood, and a 76 cm thick brick wall. It is clear that foam plastics are much better in this regard. The photo shows slabs with different densities.
- The material is easy to cut and join. The technology for laying outside with your own hands is extremely simple.
- Foamed plastic is very light, insulation does not create a load on foundations and walls.
- It does not absorb moisture at all, and, accordingly, does not rot, does not become moldy and does not lose its performance qualities.
The disadvantages include low vapor permeability. However, if plastic or metal siding is used for cladding, and the house has metal-plastic windows, this no longer matters: you will still have to install exhaust ventilation, according to expert reviews.
Installation technology
Foam plastic of the PSB-S-25 brand is chosen as insulation - it is used everywhere. PSB-S-35 has a high density and is used for thermal insulation of foundations or buildings during harsh winters.
The size of the sheet is determined by needs. In regions with a temperate climate, as a rule, slabs with a thickness of 8–10 cm are used, and in cold climates the thickness can reach 15 cm.
- Do-it-yourself insulation of a house with polystyrene foam under the siding begins after installing a sheathing made of a galvanized metal profile - if the climate is humid, or wood, if the climate is dry.
- Facade adhesive is applied to the slab. If the surface is smooth, then the glue is applied evenly over the entire sheet; if it is uneven, then to the areas where the insulation comes into contact with the surface. You can see an example in the photo.
- The sheet is glued in a horizontal position, first the lower section, and then the upper.
- The slabs must be joined tightly, without gaps. If they do appear, they are sealed with polyurethane foam, sealant, and, for larger sizes, with pieces of insulation.
- If necessary, fastening with glue is duplicated with disc screws. This operation is recommended to be carried out when insulating door and window openings.
The video explains in more detail how to insulate a house from the outside with polystyrene foam under the siding.
Preparing the walls
First of all, the surface is subject to revision in order to repair defects, prime and, possibly, treat the walls with fire-retardant impregnation and an agent against pathogenic microflora. To install penoplex on wooden walls, you will need to sew a sheathing of slats. It is impossible to stick EPS onto concrete or brick; insulation of a wooden house with penoplex from the outside under the siding must have vents for removing condensate. In addition, the slats must have a sliding fastening, otherwise the fasteners may break due to shrinkage processes, fluctuations in temperature or humidity of the wood.
The second step is to measure the geometry of the walls; this is necessary to determine the size of the bracket overhang in each specific case. Next, you need to make fasteners for the vertical profile, but do not cut them to size, only mark them. Trimming to size is carried out immediately before installing the penoplex on the wall.
What thickness of penoplex to choose for insulating walls outside
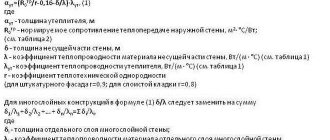
There is a generally accepted method for determining the power of thermal insulation for specific climatic conditions. First, you need to find out the indicator called “degree-day”; it is determined from climate maps and tables in SNiP. For each region, according to the observations of meteorologists, the average temperature and the “degree-day” index have long been established.
Knowing these two indicators, the required heat transfer resistance can be determined from the graphs. By multiplying the thermal conductivity coefficient of penoplex by the heat transfer resistance, we find out the thickness of the insulation layer on the wall.
In practice, it is impossible to make foam insulation of arbitrary thickness, so standard EPS boards are used. For southern latitudes you can use 50 mm penoplex, for middle latitudes - 75 mm, for the North you will need 100-150 mm slabs.
Attaching brackets for sheathing under siding
There is one more nuance associated with the installation of EPS insulation. Correctly sheathing penoplex siding is possible only if you select the right frame or sheathing for laying decorative panels. After installation is completed, the insulation boards will completely hide the plane of the wall, only fungal caps will remain on the surface. What to attach the frame to?
To assemble the frame you can use:
- Metal strip hangers sewn onto a stone or wooden wall through insulation;
- Try to secure the brackets to the mushroom caps;
- Install additional supports in the form of coniferous wood bars;
- Use plastic adapters.
As a last resort, installation of the frame can simply be done with a self-tapping screw on a plastic plug of increased length, within 10-15 cm.
Half the length of the plug is allocated for immersion into the wall, half for passing through the thickness of the foam. In any case, the installation of the supporting frame for the installation of siding panels should be carried out to the main wall, and not to the insulation material.
Perforated tape hangers pierce the foam board
Protective covering
In order for the insulation surface to look beautiful and be durable, it must be protected. The simplest and cheapest way to protect insulation is plastering, which is carried out in stages.
- Selection of plaster mortar.
- Selection of reinforcing mesh for plaster mortar.
- Fastening the reinforcing mesh using a certain technology.
- Laying the mortar, leveling the surface, grouting with a plastic float.
- Primer the surface for the finishing coat.
- Finish plaster. After drying, painting is done or a transparent protective layer is applied.
Video instruction:
In general, attaching penoplex to concrete and brick walls, as well as insulating the foundation of a building, is not difficult. It is enough to follow the installation technology and carry out the work carefully to ensure that the insulation is attractive and durable.
Features of different types of profile mounting
The simplest option for installing a load-bearing frame involves using long self-tapping screws with a plug driven into the wall 5-7 cm as support. This method can only be used for absolutely smooth and flat walls and in the absence of separate finishing of the basement of the building. That is, the metal wall profile must be installed vertically on top of the penoplex, from the top to the foundation. The method is suitable for small one-story brick rooms. The advantage of this method of installing a frame for siding is the minimum pressure of the plug with a self-tapping screw on the foam board. A significant disadvantage of the installation technique is the inability to regulate the extension of fasteners in the horizontal direction.
To insulate a frame house with polystyrene foam from the outside under the siding, strip hangers are most often used, sewn directly onto the wall with ordinary wood screws. Since the weight of vertical profiles turns out to be quite large, it is best to choose suspensions with stiffeners. To remove the petals, a square-shaped hole is cut out of the foam, after which the cork is glued back onto the mounting foam. Thanks to the perforations on the bent parts, you can easily adjust the vertical position of the profile and secure it to the tape with metal screws.
For buildings with weak walls, it is best to use specialized fasteners. For example, to insulate a house made of aerated concrete with penoplex for siding, you will need to make or buy specialized brackets with a heel length of at least 10 cm.
For your information! It is often necessary to insulate a small frame room, such as an enclosed veranda or terrace, built from lumber or plywood. In this case, wooden blocks can be used as brackets; they are fastened with self-tapping screws along the installation lines of the metal profile.
Rules for installing drywall
When performing finishing work, quite often plasterboard is attached to the surface of an aerated concrete wall, which allows you to perfectly level the surface before finishing individual works, for example, before gluing wallpaper, painting walls, applying decorative plaster and much more. To properly attach drywall, in addition to sheets of material of the selected type, you need to prepare the following elements:
Tools: electric drill with hammer drill function, screwdriver, hacksaw, construction knife, metal scissors, plumb line, level, tape measure, tapping thread, pencil.
- self-tapping screws for drywall;
- insulation (mineral wool is best suited for this, as it has the necessary properties; it is easy to install);
- a special metal profile for fastening drywall (with its help, a reliable, durable frame is created);
- building level;
- ruler and simple pencil;
- breaker cord;
- screwdriver
Drywall is attached to the surface of aerated concrete as follows:
After the frame is mounted, the insulation - mineral wool - is tightly laid.
- GKL sheets are attached to aerated concrete only with self-tapping screws (the adhesive method is not used here). In this case, the space between the wall itself and the gypsum board sheet should be no less than 3-5 cm. Experts recommend filling this space with mineral wool. Such insulation will not only help retain heat, but also create an excellent soundproofing layer. The metal profile is attached directly to the surface of the foam concrete, for which a series of preparatory work must first be carried out. The surface of the wall must be marked using a building level, marking the places where the profile will pass. After this, it is recommended to cut the drywall according to the existing contours.
- For the frame under the gypsum plasterboard sheets, a guide profile is first attached, after which, using a building level, you can begin fastening the guide profile. Thus, a metal rectangular frame is obtained on the surface of aerated concrete. It is to the surface of such a profile that the sheathing sheets will be attached. The profile is mounted to the surface using self-tapping screws, which are screwed into the wall or ceiling blocks.
- After the frame is mounted, it is necessary to consider whether any communications will pass under the surface of the sheets. Electrical cables must run in a special corrugated pipe. The places where elements such as switches, sockets, and other electrical accessories will be located are immediately determined.
- The insulation is chosen in the form of mineral wool; it is best to take slabs that are more convenient to install. The insulation must be installed tightly, without leaving gaps or cavities; the quality of heat and sound insulation will depend on this.
- When attaching the profile to the wall, it is necessary to take into account that in addition to self-tapping screws, it is necessary to use additional metal strips - perforated strips, one edge of which rests on the aerated concrete, the other on the profile.
How to insulate a house with penoplex outside under siding
In this case, the thermal insulation of the room is always carried out according to the scheme with a ventilated facade, regardless of the height of the building, material and thickness of the main walls. If the house plans to install penoplex with siding cladding both on the base and on the walls, then it is best to first perform insulation with decorative cladding of the base, and only then move on to the remaining surface.
This scheme is used due to the design features of the plinth of the walls, since the plinth almost always protrudes above the plane of the main wall surface by at least 10-15 cm.
Installation of penoplex on the base
We stretch marking cords along the corners of the box. As a rule, three painting threads are used, one cord is placed along the upper level of the plinth, the rest are placed along the lines for installing homemade brackets from suspensions in the middle and on the line for laying the J-bar. The strip suspension is mounted on the walls so that the attachment points do not coincide with the inter-plate gaps on the thermal insulation locks.
Perforated tape hangers pierce the foam board
The installation of penoplex slabs is carried out vertically, we try on and cut out the windows for the installed strip hangers. Next, we apply mounting foam to the tongue-and-groove locks, as well as one strip along the top and bottom edges. For weak walls or thicker penoplex, the thermal insulation will need to be additionally fixed with fungi.
Thermal insulation of walls
If there is no transition step between the base and the main part of the wall, then it will be possible to continue installing the penoplex according to the same scheme. You will only need to additionally hang vertical plumbs with a load or tighten the cords so as not to go beyond the profile installation boundary.
The appearance of a wave or a slight slope on the surface of the thermal insulation is not of particular importance, the main thing is that there is at least a small air gap between the siding and the penoplex.
For penoplex on the walls, tile adhesive and fungi must be used; installation points for hanging brackets must be blown in with foam to strengthen the tapes and remove cracks.
How to attach siding to penoplex
The next step will be to assemble a frame for installing the siding panels. If there is a protruding plinth on the wall, then the installation of the supporting frame structure must begin with laying the top mounting strip. It must be correctly oriented horizontally in accordance with the line of the windows or roof, otherwise the siding on the base will look uneven.
If there is no dedicated base tape, then we install the supporting frame immediately over the entire surface of the wall. We attach the vertical steel profiles to the hangers, starting from the corners, precisely align them along the stretched marking cords and fix them with self-tapping screws.
When installing vertical and horizontal profiles, it is necessary to take into account the installation size of the siding
Next you need to install the cross members. If the installation of vertical posts was carried out in increments of 60 cm, then for the transverse profile the distance is selected according to the height of the siding panel, otherwise it simply cannot be fixed.
Siding installation begins with the installation of the starting J-strap and corner guides. We attach three panels at a time, this makes it both more convenient and faster.
How to attach penoplex siding to a wall without sheathing
For small wooden panel or frame buildings, it is quite possible to install insulation and decorative panels without a supporting frame. Instead of tape holders or purchased brackets, we attach 70x70 mm pieces of timber to the wall. It is clear that you will first need to mark horizontal lines on the wall along which the top edge of the siding will go, so as not to miss screwing in the screws.
We glue Penoplex onto the wall with mounting foam, blow out the joints between the slabs, the top and bottom edges under the roof, under the windows and along the foundation. Installation of penoplex turns out to be more labor-intensive, since in each slab you have to cut out a window for a screwed-on block, stick the slab on and blow it with foam.
In this case, the end of the block should protrude 20-25 mm above the plane of the penoplex. All that remains is to lay the siding panels and screw them directly to the wooden “brackets”.
Step-by-step instruction
Preparing the base
Before starting work, it is necessary to clean the concrete wall from dirt, fungus, and grease stains; if possible, rinse it well with water.
After this, the condition of the surface is assessed, all cracks and cracks are sealed, and unevenness is eliminated.
Waterproofing
At the next stage, waterproofing work is carried out using a deep penetration primer or bitumen mastic.
You can begin installing penoplex only after they have completely dried.
Penoplex fastening
The sheets are attached to the wall with glue, and they are laid tightly next to each other and offset from the previous row. All seams must be properly sealed with putty, tape or foam.
After the glue has set, the sheets must be additionally fixed using
fasteners for penoplex (
dowel-fungi), they provide reliable fastening and a tight fit of the insulation, a hole is drilled in the wall through the insulation, and a dowel - fungus - is inserted into it.
Laying the sheets starts from the bottom up; in order to lay them evenly, it is necessary to secure the mounting angle. To improve the adhesion of polystyrene foam and the concrete surface, it is recommended to clean it; this can be done with a metal brush or coarse sandpaper.
After the glue has hardened, it is necessary to protect the insulation from external negative influences, so a fiberglass mesh is attached to it using the same solution on which the sheets were installed, usually ceresite, but maybe another .
It is necessary to give time for the solution used to fix the mesh to dry and a protective layer of plaster can be applied. If the work is carried out inside the building, then you can immediately attach the drywall, and only then plaster it.
To perform the above work you will need the following tools and materials:
- penoplex;
- glue;
- antiseptic;
- deep penetration primer;
- plaster;
- measuring instruments;
- knife;
- spatulas;
- fasteners for penoplex (dowel-fungi);
- reinforcing mesh.
Recommendations
One of the problems that one often encounters when installing siding is the insufficiently high rigidity of the supporting frame. It is clear that penoplex does not make it possible to use full-fledged fastening, and perforated tapes and long self-tapping screws do not provide rigid fixation of the sheathing and frame.
The problem can be solved by using plastic inserts, as in the photo.
The insert has four needle supports that easily penetrate the foam layer and are attached using a long self-tapping screw or pin
In this case, installation of the frame under the siding can be done directly on the holes in the plastic insert. As a result, the support is rigid enough to hold both insulation and decorative cladding.
Finishing
Insulation may deteriorate after constant mechanical exposure. To prevent this from happening, the surface of the penoplex must be strengthened. This is done using a special reinforcing mesh. You need to choose one that is suitable for a specific type of glue. The smaller the cells, the higher the strength of the mesh for penoplex. The surface of the penoplex sheets is made rough using coarse sandpaper or a sharp object. Using a notched spatula, a special adhesive composition is applied to the penoplex. It is better to do this in strips of one meter from top to bottom. After this, the mesh is applied and pressed into the glue using a flat spatula.
To decorate the corners, you can glue a special corner metal profile. Instead, a mesh is perfect if you bend it properly. After the glue on the penoplex dries, it must be cleaned using fine sandpaper. Next, a leveling layer of glue is applied. Its layer should be no more than 3 mm. After it dries, cleaning is also done. After stripping, it is necessary to strengthen the top layer; this is done with one or more layers of primer. Then you can perform any type of external finishing, for example, bark beetle.