High-quality thermal insulation must be provided for the walls, floor and ceiling of the loggia.
We hasten to disappoint those who believe that energy-efficient double-glazed windows and an additional battery are enough to insulate a balcony/loggia. A loggia, and especially a glazed balcony in any residential building, is not designed for comfortable conditions for a person in cold weather. It is cold there in late autumn, winter and early spring.
All these troubles are eliminated by heating together with effective insulation, which will ensure normal room temperature in the balcony/loggia and the adjacent room or kitchen at any time of the year. The optimal choice of insulation would be high-quality and efficient thermal insulation boards of the PENOPLEX COMFORT® brand made of extruded polystyrene foam.
Advantages of PENOPLEX COMFORT® slabs when insulating a loggia:
Low thermal conductivity coefficient up to 0.034 W/m•K - provides high-quality thermal protection even with small thickness. Zero water absorption - will not allow dampness, the development of fungus and mold.
Insulating a balcony/loggia from the inside with high-quality PENOPLEX COMFORT® can be done by any person who is not afraid of work. We should not be afraid of the unpleasant consequences that sometimes overcome us in contact with certain building materials. PENOPLEX® boards are environmentally friendly and safe for health. They are made from general-purpose polystyrene, which is also widely used for the production of food and medical packaging, children's toys, and refrigerator parts.
PENOPLEX® does not contain small fibers, dust, phenol-formaldehyde resins, soot, or slag. Therefore, working with PENOPLEX® does not require respiratory and skin protection. Freons are not used in its production.
The safety of using PENOPLEX® thermal insulation in an apartment is confirmed by the conclusion of a sanitary and epidemiological examination.
Many people can even cope with insulating a balcony/loggia with their own hands because PENOPLEX® is easy to install. The slabs have optimal geometry - there are L-shaped edges on all sides, which makes them easy to join.
What does thickness depend on?
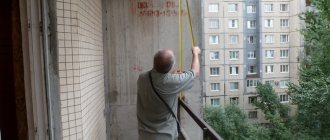
Calculation of the thickness of insulation for walls should begin with determining the main indicators of construction technology. Such indicators include the thickness of existing walls and the material from which they are made, the material of the heat insulator, as well as the climatic conditions of your region, the design and wear of the building walls, the internal dimensions of the room and other current indicators.
Let's take a closer look at the calculation elements for a wall heat insulator.
The thickness of the walls, as well as the materials from which they are built, are indicated in the technical passport of your housing, which can be viewed at the housing office or at the management company. These indicators are important because each climate zone has its own standards for construction and subsequent thermal resistance.
The insulation material is important because the subsequent reduction in heat loss in your apartment depends on it. Each material has its own thermal conductivity coefficient, as a result of which the minimum permissible insulation thickness will also differ.
Wear and construction of the walls also affect the insulation process, since depending on the side (external or internal), the insulation process may need to be coordinated with utility services, who will tell you how badly the wall is damaged. If the building has not undergone cosmetic repairs for a long time, then in addition to a thicker layer of insulation, during the installation process, puttying joints, cracks and strengthening the floors will take a large amount of time.
It should be noted that the thickness of the insulation for external walls is not calculated with such scrupulousness as for internal ones. The reason for this neglect is the inability to predict the weather. If inside the apartment you can determine the temperature level in winter based on annual indicators during the heating season, then outside the weather conditions are impossible to predict. Therefore, for external insulation, a thickness exceeding the minimum by at least 1.5 times is taken. This way, you won’t spend money on unnecessary materials and will insulate your walls.
How to insulate a balcony/loggia using PENOPLEX COMFORT® with your own hands
To insulate a balcony/loggia with your own hands, you will need the following materials:
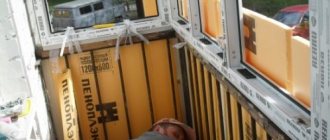
- Thermal insulation PENOPLEX COMFORT®. The required thickness for a combined loggia in the central regions of Russia is 100 mm. The thickness can be calculated using our calculator.
- Moisture-resistant plasterboard (GKL) or gypsum fiber (GVL) sheets.
- To install a screed on PENOPLEX® slabs, a cement-sand mixture with reinforcing mesh is required for a “wet” coating; or slab materials with a “dry” coating - two layers of slab materials, such as gypsum fiber board, fiber board, OSB or plywood overlapping joints.
- To create a vapor barrier layer, foil-coated polyethylene film is often used.
- Polyurethane adhesive PENOPLEX®FASTFIX®.
- Self-tapping screws for fastening gypsum plasterboard and gypsum board sheets to the guides.
Calculate the thickness of the insulation
Thermal insulation of the outer wall reduces heat loss by two or more times. For a country, most of whose territory belongs to a continental and sharply continental climate with a long period of low negative temperatures, like Russia, thermal insulation of enclosing structures provides a huge economic effect.
Whether the thickness of the heat insulator for external walls is correctly calculated determines the durability of the structure and the microclimate in the room: if the thickness of the heat insulator is insufficient, the dew point is located inside the wall material or on its inner surface, which causes the formation of condensation, high humidity, and then the formation of mold and fungal infection.
The method for calculating the thickness of insulation is prescribed in the Code of Rules “SP 50. 13330. 2012 SNiP 23–02–2003. Thermal protection of buildings."
Factors influencing the calculation:
- Characteristics of the wall material - thickness, design, thermal conductivity, density.
- Climatic characteristics of the building area - the air temperature of the coldest five-day period.
- Characteristics of materials of additional layers (cladding or plaster of the inner surface of the wall).
The insulation layer that meets regulatory requirements is calculated using the formula:
In the “ventilated facade” insulation system, the thermal resistance of the curtain wall material and the ventilated gap is not taken into account in the calculation.
Insulation scheme for a balcony/loggia
- Glazing of a balcony/loggia
- Balcony/loggia wall
- Thermal insulation PENOPLEX COMFORT®
- Vapor barrier
- Lathing
- Finishing the walls (plastic panels or moisture-resistant plasterboard)
- Fastening element
- Screed for finishing the floor
- Finishing the floor
- Floor of the balcony/loggia.
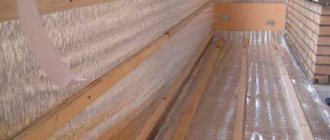
Sequence of insulating a loggia using PENOPLEX COMFORT®
- Window units are being installed. The optimal means of sealing seams is PENOPLEX®FASTFIX® polyurethane foam.
- PENOPLEX COMFORT® boards are attached with polyurethane adhesive PENOPLEX®FASTFIX®, which is also used to process joints between structures./p>
- The vapor barrier is attached - foil-coated polyethylene film - using double-sided tape. The vapor barrier is installed end-to-end, and the joint between the panels and the structures is glued with metal tape. /p>
- We install the balcony floor./p>
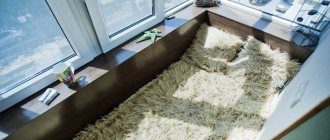
In the photo - insulation of the loggia with PENOPLEX ® in the apartment of actress Marina Dyuzheva
Which penoplex to choose
Penoplex slabs are produced in different thicknesses, densities and thermal conductivities. Each type of material has its own marking and is used for its intended purpose. The softest type of penoplex brand 31C. It is designed to insulate surfaces that will not be subject to strong mechanical stress. It is recommended to be used for installation on ceilings and walls.
It is better to put penoplex grade 35 on the floor, since it is endowed with increased density and does not deform under the weight of furniture; you can walk on it freely without leaving dents. You can pour a cement screed on it or install a “warm floor” system.
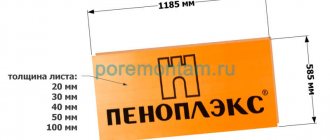
The thickness of the slabs varies from 20 to 100 mm. The 20 mm thick material has smooth edges, while thicker sheets are available with protrusions on the edges.
Through these protrusions, the sheets are tightly connected to each other, so that cold bridges do not form. This connection system eliminates the need for additional sealing of seams and does not require gluing of joints.
Penoplex sheets 50 mm thick are suitable for insulating walls and ceilings. It makes no sense to buy thicker material, since it will “steal” the useful area of the balcony, while the efficiency of insulation will not increase much. On the floor, the thickness of the sheets is selected based on how many centimeters it can be raised. In any case, it is necessary to carry out calculations so that, taking into account the screed and flooring, the floor height does not rise above the threshold.
The following bases can be laid on PENOPLEX® thermal insulation:
— Cement-sand screed (thickness 4 cm). It is necessary to leave a temperature gap of 1 cm between the vertical wall and the screed. To do this, before pouring the screed, it is enough to install a 1 cm thick strip of foamed PE around the perimeter. After the screed has hardened, the finishing finishing layer is laid.
- DSP screed with electric heating - based on the technology of installing a heated floor system.
- Solid flooring made of gypsum fiber sheets (gypsum fiber sheets) - installed in two layers with the obligatory overlap of joints.
- The sheathing on the walls, ceiling and parapet is made of dry wooden slats (treated with antiseptic) and is aligned at vertical and horizontal levels. Attaches directly to concrete using dowels and self-tapping screws. The slats can be 40x20 mm in size.
- The finishing trim is attached to the sheathing. Usually these are plastic panels 25 cm wide or moisture-resistant plasterboard. When using drywall, additional finishing work is required, namely: priming, puttying, corner processing, leveling, wallpapering or painting.
- Electric heaters, lighting, etc. can be installed on the loggia. Electrical wiring is installed before the interior finishing in non-combustible boxes.
Correct installation of insulation in stages
1. The room should be cleared of unnecessary items before starting the insulation process.
2. The enclosing surfaces are leveled - they should be free of screws and cracks.
3. Using fasteners (dowels), the slabs are fixed (the sheets are cut with a knife if necessary).
A disc-shaped dowel used for mounting sheets on walls (“umbrella” or “mushroom”).
The sheets can also be secured using a special mounting adhesive if the surface is pre-leveled.
5. In order to smooth the joints, you can use tape. The result will be a smooth surface;
6. The high moisture resistance of the material allows for the absence of special vapor barrier. However, if you decide to organize an additional layer, it can be made of polyethylene film covered with foil (penofol). Thus, the balcony room will be protected to the maximum from moisture. The foam layer should be oriented with the foil facing outward.
Polyethylene foam with metal tape operates on the principle of a thermos, additionally insulating the room;
Metallic tape for joining polyethylene foam film.
7. Another way to provide vapor barrier is to cover the surface with special plaster and plasterboard;
Creating a warm floor structure
After covering the balcony with penoplex, it is necessary to complete the insulation of the floor.
There are three finishing options:
1. Light flooring option. A base is created from timber in two tiers, the elements of the two layers are fixed perpendicular to each other. Insulation is placed in the structure, then the cells are sewn up with sheets of plywood or boards. The resulting coating can serve as the basis for the final layer.
2. Screed made of concrete or sand-cement (thickness 40 mm). The leveled floor is tiled. A prerequisite for installation: creating a 10 mm gap with polyurethane foam around the perimeter of the floor (between the walls and the screed). The weight of the structure is significant; preliminary load calculations are necessary.
3. Installation of heated floors. Installation instructions are included with the specific system.
Installation of heated floors on top of insulation.
Balcony insulation with polystyrene foam.