Electrician in the house
Encyclopedia about electricity from A to Z
Masters catalog
Find the best master or company in your city
We connect the switch from the outlet
Connecting a switch from an outlet is not a very complicated procedure, but it often helps solve a lot of problems. First of all, this concerns issues of additional connection of lighting systems.
Indeed, thanks to this connection, we can significantly save not only on wires, but also on the amount of additional work, such as gating walls. Therefore, if you are faced with the problem of connecting additional lighting and do not want to renovate the room in a new way, this option will be the ideal solution.
- Preparatory work Selecting a wire
- Switch selection
- Connecting the phase and neutral wires from the outlet
Preparatory work
Before proceeding directly to the connection process, you should complete a number of preparatory work and decide on the location of the future switch. Preparatory work includes work related to the selection of the wire, the switch itself and the circuit that it will power.
Wire selection
Before connecting a switch from an outlet, we should correctly select the wire with which the connection will be made. After all, choosing the right wire will significantly reduce the likelihood of a fire or other breakdowns.
So:
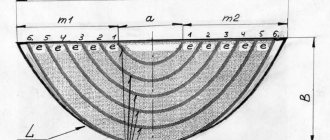
- To select a wire, we need to know the rated power of the electrical appliances being switched, from which it is then not difficult to derive the rated current. This is done according to the formula, where I is the rated current, P is the rated power, and U is the rated voltage, which for a single-phase network is 220V.
- Having calculated the rated current, we can use table 1.3.4 PUE for copper conductors or table. 1.3.5 for aluminum wires, to select their nominal cross-section (see Calculating the wire cross-section by power).
Summary table for selecting conductor cross-section by rated current
Note! In most cases, when you connect a switch from an outlet, it switches one or two light bulbs. Because of this, the rated current is small and according to the table. 1.3.4 and 1.3.5, you can use a small cross-section wire. But according to the table. 7.1.1 PUE, the cross-section of this wire in any case cannot be less than 1 mm2 for copper wire or 2.5 mm2 for aluminum.
- Another aspect to consider when choosing a wire is the way it is laid. Indeed, if it is laid indoors in an open way on insulators, according to Table 2.1.1 of the Electrical Installation Regulations, its minimum cross-section should be 1.5 and 4 mm2, respectively, for copper and aluminum wire.
- If the wire will be used for external laying in an open manner on rollers or insulators, then its cross-section in general should be no less than 2.5 and 4 mm2, respectively, for copper and aluminum wire.
Switch selection
Before you power the switch from the outlet, it is important to choose the right switch itself. This aspect is often neglected, which is why switches often fail. This aspect is especially important if the switch will switch large loads.
- First of all, we select the switch according to the rated current. When choosing a wire, we have already calculated the rated current of our network, therefore, using the same numbers, we select the rated current of the switch. Currently there are 6, 10 and 16A models on the market. More powerful switches can be found, but they are rare.
- The next important selection factor is the method of mounting the switch. For hidden wiring, a recessed version of the switch is used, and for open wiring, respectively, with an outer box. Here the choice depends entirely on the method of laying your electrical wiring. The only exceptions are bathrooms and showers, in which paragraph 12.22 of VSN 59 - 88 recommends using only hidden wiring. But given that it is prohibited to place switches in these rooms, the method of installing the switch can be any at your discretion.
The photo shows different types of switches
- Our instructions also advise taking into account the installation location of the switch. For outdoor installation, switches with IP no lower than 44 should be used. Of course, it is better to use switches with a higher degree of dust and moisture protection, but the price of such models increases in proportion to the level of protection.
Installation features
It will not be difficult to install a combined unit without the involvement of a professional electrician, since connecting modern models requires a minimum of wires.
The installation process will have only a few features that need to be taken into account:
- You need to prepare the necessary tools in advance ; you won’t need many of them: an electric drill with a drill core; several screwdrivers of different sizes; pliers and wire cutters.
- To ensure safety during work , make sure that the handles of all tools are insulated.
- Some modern varieties are designed for external installation, that is, when installing them, you can completely avoid drilling holes in the wall surface.
- You can choose a variety with an increased level of protection from environmental conditions ; such models can be installed not only indoors, but also outdoors. Such devices also have an additional element in the design in the form of a special lid that helps prevent liquid from getting inside the device.
- All modern types of blocks are suitable for installation in walls made of any material and regardless of the type of finish.
We connect the switch from the outlet
There are two options for how to power the switch from an outlet. These methods are not fundamentally different, and by and large the choice of each of them is made based on the location of the lamps themselves.
If the lamp is located next to a switch or socket, then it is advisable to connect the “zero” directly from the latter. If the lamp is far enough away, then in order to save wires and be more aesthetically pleasing, it is better to connect the neutral wire in a junction box.
Connecting the phase and neutral wires from the outlet
The easiest way to make a switch from an outlet is to power both the phase and neutral wires directly from the contacts of the latter. This method will be very convenient when the lamp is located in close proximity to the switch.
So:
- To do this yourself, you first need to mount the lamp and switch. Only after this should you proceed directly to the connection.
- At the first stage, remove the voltage from the outlet. This can be done using a group circuit breaker for a specific group. If you do not provide for division into groups, then you will have to relieve the tension from the entire apartment.
- At the next stage, we open the outlet to which we will connect and check that there is no voltage.
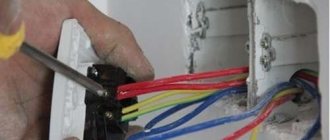
- If the wiring in your apartment or house is made in accordance with clause 1.1.29 of the PUE, then the blue wire is the neutral wire, the yellow-green wire is the protective wire, and the third wire is the phase wire. If you have not completed the color designation, then briefly apply voltage to identify the wires.
- Now we connect a wire to the phase contact of the socket, which we attach with the other end to the input of the switch. We connect a wire to the switch terminal that is connected directly to the lamp.
Connection diagram for phase and neutral wires from the socket
Note! If a two- or three-key switch is used, then the wires from the switch terminals are connected to the corresponding lamps. The rest of the connection diagram is identical.
- We attach a wire to the zero contact of the socket, the other end of which is attached to the terminal of the lamp. We also connect the protective wire to the corresponding contact of the lamp.
- This completes our connection. Now we can lay the wires, insulate the live parts and apply voltage to test our circuit.
Connecting only the phase wire from the outlet
Since only the phase wire opens in the switch, sometimes it is much easier to take only the phase wire from the outlet. It is easier to connect the neutral wire directly in the distribution box closest to the lamp.
Thanks to this, you will not only save wires, but also greatly facilitate the task of laying wires.
- Before connecting the switch from the socket, as in the first option, you should remove the voltage from the socket. In addition, we should remove the voltage from all wires passing through the junction box in which the neutral wire will be connected.
- Now we open the socket and check that there is no voltage. We attach a wire to the phase terminal of the socket, which is also connected to the input of the switch. And we connect the wire from the switch output directly to the lamp.
- Now we open the junction box. Determine the neutral wire. Perhaps it will even be a whole busbar with neutral wires. We connect a wire to it, which we then connect to the lamp. In the same way, we connect the protective wire to the corresponding contacts in the lamp and in the distribution box.
- After laying and insulating the wires, you can apply voltage and test the performance of our circuit.
Diagram for connecting a switch from an outlet using only a phase wire
Note! Due to the fact that for normal operation of the switch only one phase wire is needed, the question: how to remove the socket from the switch has a clear answer - no way. Unfortunately, you cannot connect an outlet from the switch. It is only possible to connect the phase wire, and the neutral wire from the distribution box. But this option is not the most optimal. After all, often the current on the socket is much higher than on the lighting network, and the small cross-section wire of the lighting network will simply burn out when connecting the socket to it.
An example of drawing up an electrical wiring diagram in a private house
The future electrical wiring diagram is drawn up based on the plan of a private house. It consists of two parts, electrical and installation. The main elements are outlined schematically, “for yourself.”
- Electrical diagram
. The electrical wiring diagram in a private house shows how energy consumers are included in the circuit and their number.
An example of an electrical wiring diagram in a country house
- Wiring diagram
. Determines the installation locations of devices. This data will help you calculate the number of cables and additional consumables needed.
Installation version of the wiring diagram
The main elements of the network include wires, sockets, switches, meters, fuses and relays, distribution boxes, in addition:
- external power cable entry point;
- RCD;
- connection points for high power household appliances;
- ceiling and wall lighting fixtures.
The beginning of the electrical supply to a home is the electrical panel. A power wire is supplied to it from the outside (usually via an overhead line), supplying single-phase or three-phase current.
How to choose a suitable block?
The wide range of models and modifications of such devices presented on the modern market often significantly complicates the selection process.
In order to buy a suitable unit and not regret your choice in the future, you must take into account the following important criteria:
- The required number of sockets and switch buttons that must be included in the design of the unit. Today, there are a large number of different options and it is best to immediately make an accurate calculation of consumers so that in the future you do not have to use extension cords.
- Installation method , which differs for external and internal devices. The first option is recommended for rooms with open wiring, since visually such a unit will look more noticeable and bulky.
- Design of the device , which will allow it to fit harmoniously into the overall interior design of the room.
Step by step instructions
All modern lamps have three wires - phase, neutral and ground. If the apartment has appropriate wiring, there will be no connection difficulties. If there is only a working phase and zero, when it is not possible to change the wiring, you will have to act differently. You can install the lamp by connecting a phase and a zero through one phase interrupted by a switch, while observing the markings.
Choosing a location for connecting a wall lamp
Usually sconces are placed in the bedroom at the head of the bed. For a small one, one electrical appliance is enough. If the bed is of an impressive size, it is optimal to mount one lamp on each side. In the nursery, sconces are usually placed so that the bright light does not disturb the baby. A good solution is to hang a lamp above the chair so that you can read a book to your child before bed. For older children, place a lamp above the bed.
Sconces can serve as the main light source in a bathroom or hallway. In such rooms they are mounted symmetrically on both walls or the area around the mirror is illuminated. For the bathroom you will need a waterproof lamp.
Before installation, you should measure the distance from the floor and between the lamps, which is especially important when installing two or more sconces. If you hang it by eye, you will end up with unnecessary holes in the wall or the lamps will hang crookedly.
Preparation for installation work
Before carrying out the work yourself, immediately prepare the necessary tools and devices. You will definitely need an electric drill with a drill, which is selected depending on the material of the walls. For concrete ones, do not use wood drills and vice versa.
General rules for connecting to the electrical network
Following the installation of electrical wiring, automatic devices, RCDs and electrical appliances are installed. To commission the electrical equipment of a private house, a specialist from the energy supervision authority is invited, authorized to conduct acceptance tests.
After checking the safety of the electrical installation, a “Connection Certificate” is issued, allowing further use of the equipment. Based on this document, the energy supply organization enters into an agreement with the owner of the house and connects the home to the support.
We mount installation elements
For maximum clarity and clarity, we will analyze the full circuit installation cycle from start to finish. Thanks to this, we will give the most detailed answer to the question of how to connect an outlet with a switch. As an example, let’s take a diagram of hidden electrical wiring, something that is usually located under a layer of plaster.
We install the distribution box.
Next we need two sockets. Detailed instructions for installing a socket box (mounting cup) are described here.
We will install a switch in one, and a socket in the other.
Now let's mount the DIN rail, in our case it will act as part of the power cabinet; a circuit breaker will be installed on it, which will protect the electrical circuit from short circuits and overloads, which have such a detrimental effect on all elements of the circuit.
The preparatory work can be considered completed.
The last detail that completes the first stage of installation is the lighting element. In our example, it will be a light bulb with a socket, clearly, simply and clearly. Therefore, we will move its installation to stage number two.
Model overview
To illustrate the range of such devices, we will provide an overview of models with different designs that were produced by leading manufacturers in this area:
Combined block from the manufacturer Makel
The design of which included one socket and a switch with one key . It has compact dimensions of 12.3x7.3x5.9 cm, strong and durable ABS plastic was used to make the case, and has an IP protection level
The price of such a device is about 300 rubles.
There is a modified version of such a unit, in which an increased degree of protection IP55 was implemented, and a special protective cover for the socket was added to the design, which allows this device to be used in outdoor conditions.
The modification price is 450-480 rubles.
If we consider two-key units from Makel, then the technical characteristics and dimensions correspond to those of the single-key version, but the price for such a device is higher and amounts to about 350-380 rubles.
A modified version of the two-key device, with additional grounding and degree of protection IP55, costs about 500-550 rubles.
Viko
Used for outdoor installation of the unit. If we compare them with the reviewed Makel models, the external devices have increased dimensions with similar technical parameters, and their cost is lower. So, a two-key Viko outdoor unit will cost about 300 rubles.
Etude
Domestic products manufactured by Schneider Electronics. The socket fully complies with European standards; a combination of metal and durable plastic was used to make the case; the device has an IP protection rating. At the same time, a two-key unit intended for internal installation costs about 240-300 rubles, which is much cheaper than imported analogues.
Bella
A domestic version with low cost, which is produced by the Russian company. The organization offers a wide range of models, which, among other things, differ in shape and different colors.
For example, you can take a three-key switch combined with a socket, brand BKVR-212. Taking into account its functionality and design features, the unit was manufactured and installed not in the classic horizontal, but in a vertical position, which simplifies the operation process. The device is intended for indoor installation and has a degree of protection IP20, the price does not exceed 190 rubles.
Video description
About errors in installing wiring in a wooden house, watch the video:
Completion time and approximate cost of some work
Turnkey electrical installation in a cottage is completed on average in 4-6 days. Complex installation will cost 18-60 thousand rubles, replacement of wiring - 15-36 thousand rubles.
Electricians will carry out wiring on the floor of a private house for 9-12 thousand rubles.
A comprehensive replacement of wiring in a wooden house will cost 18-29 thousand rubles.
Laying a cable with a cross-section of up to 4 mm in a groove - 25-30 rubles. for m/p.
Laying a cable with a cross-section of more than 4 mm in a groove - 42-55 rubles. m/n.
Grilling gypsum walls – 75-85 rubles. for m/p, brick - 92-100 rubles. for m/p, concrete – 105-112 rubles. for m/p.
Assembling an electrical panel (meter + 3 machines) – 980-1100 rubles.
Connecting an electric meter with installation (220 volts) – 665-720 rubles.
Connecting an electric meter (380 volts) – 1050-1130 rubles.
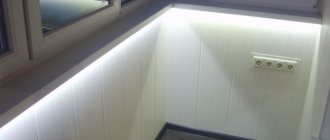
Loft style interior with exposed ceiling wiring