Types of installation of roller shutters (overhead, external, combined)
Depending on the location of the box, installation of roller shutters can be of three types:
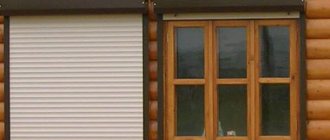
- External installation is the most common; it does not require labor-intensive preparation of slopes associated with creating a niche for the box. For the external type of installation, a roller shutter box with a roller blade is installed above the opening, and guide rails are installed on both sides of it. Closed roller shutters completely cover the opening and are almost flush with the surface of the walls.
- Built-in installation allows you to place all the elements of the roller shutters in the niche of the window or doorway. With a built-in installation, doors and windows should open in the direction opposite to its installation.
- For combined installation, a special recess is needed in the upper part of the opening. It is performed during the construction or reconstruction of a building, initially included in the project. The combined installation method allows you to place the roller shutters inside the opening, and when open they do not prevent the windows from opening in any direction.
What are roller shutters
Fabric roller blinds (roller blinds, blinds) are a window decorative sun protection system. It is a rectangular sheet of fabric wound on a tubular shaft attached at the top of the window. The cloth is impregnated with a special compound, which ensures resistance against fraying of the edges and settling of dust.
Roller shutters are metal products that rise and fall vertically and, when opened, are wound up at the top in the form of a roll.
In addition to traditional rectangular sizes, there are:
- trapezoidal;
- arched:
- triangular.
Non-traditional ones can follow the shapes of windows and roofs. Roller shutters are very popular when equipping window units on the first floors. In winter gardens, the roofs are covered with inclined structures. The control of fabric and metal products is carried out manually or using an electric drive.
Scope of application
Often, private individuals and commercial enterprises become clients of roller shutter manufacturing companies. The popularity is explained by the wide scope of application of roller shutter systems.
Owners of country houses strive to protect their homes from theft and burglary. Apartment owners install decorative elements to protect them from bright daylight. Roller shutters are installed in retail and office premises for security purposes.
An approximate list of roller shutters by method of application:
- window;
- door;
- on glass roofs;
- gate;
- wicket;
- plumbing.
Almost all retail outlets are equipped with roller shutters, which protect huge glass display cases from mechanical impact at night. In boutiques located in large shopping centers, grilles are the most popular.
Rolling gates are made of more durable metal and are installed in garages, parking lots, warehouses and factory workshops. In production premises, large openings are closed with roller shutters equipped with additional gates. Plumbing structures hide utilities and engineering networks in niches.
Advantages
Until recently, metal bars performed protective functions on windows. Such structures were not aesthetically pleasing, required annual painting, and did not meet fire safety requirements. To replace them, designers created roller shutter systems. They reliably protect glass, are easy to use and durable.
The undeniable advantages of roller shutters are:
- reliable protection;
- soundproofing;
- energy saving;
- thermal insulation;
- protection from weather precipitation;
- maintainability;
- safety in operation;
- ease of use.
The presence of such structures on the windows provides residents with comfort and convenience, protecting the home from prying eyes. They fully comply with the standards of fire and security services.
Flaws
Despite a number of advantages, roller shutter designs have minor disadvantages. If you follow the operating rules and gentle care methods, you can avoid many undesirable moments.
Disadvantages include:
- icing due to temperature changes;
- friction and wear of mechanisms;
- corrosion of locks;
- restrictions on the width of the opening;
- reduction of light opening.
Decorative products are less durable due to the soft structure of the material. Basically, all the disadvantages relate to protective fabrics. To extend their service life, it is necessary to carry out a technical inspection of all blinds more often to timely detect and correct deficiencies.
Preparatory work
Before installing roller shutters with your own hands, you must:
- Measure and compare the diagonals of the opening. The difference should be no more than 5 mm.
- Check the verticality of the side slopes and the horizontality of the top. Deviations should not exceed 1.5 mm per meter of length.
- Make sure that there are no unevenness, crumbling plaster or chips on the slopes.
If the opening does not meet these requirements, it must be plastered or finished in another way.
Prepare the necessary tools:
- Hammer and drill, drill bits for concrete and metal (set);
- Screwdriver and set of bits;
- Riveting gun;
- Metal scissors;
- Pliers and wire cutters;
- Screwdrivers and wrenches (set);
- Hammer;
- Level and roulette;
- Marker;
- When installing roller shutters at a height of more than 1.5 meters, a stable stepladder is required.
To connect the drive you will need an indicator screwdriver and a multimeter. To seal the joints between the guides and the wall, use any suitable sealant and mounting gun. When unpacking the roller shutters, you should immediately check that the elements are complete and that they are not damaged.
Methods for installing protective roller shutters
There are three ways to install protective roller shutters: external, internal and combined. To understand which technology to use, it is necessary to study the design of the system before installation.
Roller shutter components include:
- canvas;
- box;
- guides;
- control mechanism;
- locks.
With any installation method, certain requirements must be met, the fulfillment of which will determine the performance and durability of protective roller shutters. The box must be fixed strictly horizontally, the guides must be fixed vertically, at right angles; bends and deviations are not allowed.
Outer
External, which installers sometimes call overhead, is the simplest method of attaching roller shutters, which does not require making a niche for the cassette. The box with slats is installed above the window opening, and the guide rails are attached to the wall.
Characteristic features of this installation:
- used in already constructed buildings;
- suitable for all types of control;
- does not occupy the light opening of the window;
- when closed, it fits tightly to the surface of the walls.
The overhead technique can be used from the street and indoors. If the windows are inserted and the finishing work is completed, then this method will be the only correct solution.
Interior
With the internal method, the guide rails and the box are mounted directly into the window between the slopes. The slats and cassette are attached with hardware to the window profile and to the wall.
The internal method has its own distinctive features:
- reduces the light opening;
- for the drive you have to drill a hole in the frame;
- limits the possibility of installing a mosquito net;
- belongs to a higher class of anti-burglary.
Sometimes this fastening method is used directly during construction.
Combined
The combined installation method is used when reconstructing premises or in new buildings under construction. At the design stage, architects provide special niches above the window openings into which the boxes with the canvas will be fixed.
This is the most reliable method of fastening: to open such a structure, you will have to disassemble the wall. Therefore, it is very important to install protective roller shutters before finishing the façade. Installation of such systems must be carried out by installers with special training.
Installation on a window opening
To install roller shutters on a window, you will need a simple set of tools - a building level and a tape measure for measuring work, as well as power tools for making holes and fastening elements: a set of screwdrivers, fasteners, a hammer drill and a screwdriver.
Installation occurs in the following sequence:
- First of all, we measure the window. If overhead installation is assumed, then we add the width of the guides to the width of the window opening. When measuring the height of the window, take into account the height of the box. When installing in an opening, 10 mm must be subtracted from the width and height of the window opening.
- Based on the measurements obtained, an order is placed for the production of roller shutters, during which it is possible to choose the required color - the most common colors are white and brown, and the method of controlling the curtain - manual or automatic.
- When the finished roller blinds have been delivered, you can begin making holes in the wall. First, 6 mm holes are drilled through the guides, after which the hole is drilled out with a 12 mm drill for a self-tapping screw. When installing roller shutters with automatic control, a 10 mm hole is drilled through the guide into the room to lead the cable to the wall switch. It is better to fix the roller blinds with an assistant - the structure must be fixed on the wall strictly according to the level.
- Then the canvas is secured by throwing it over the shaft and securing it with automatic locks on top.
- Take out the cable and connect the drive switch - it should be in the off position.
Adjustment of the canvas is carried out according to the instructions supplied by the manufacturer complete with roller shutters.
Please note: When installing a structure powered by an electric motor, the process of connecting the mechanism to the general network must be performed by an experienced electrician.
Decorative
Decorative samples serve as window decorations instead of curtains or are combined with curtains. Particularly relevant in rooms located on the south side. Indispensable in educational institutions and kindergartens. In the daytime, putting children to sleep can be very problematic, but once the roller shutters are lowered, the necessary darkness will be created in the sleeping area.
This type is made from:
- plastic;
- fabrics;
- aluminum
Plastic and aluminum lamellas are folded at the top into a cassette box (closed type), fabric (open type) are screwed onto a roller. A variety of colors allows you to choose models that match any design solution. The fabric from which the canvases are formed is divided according to light transmission. These models can be controlled using a cord and a cane handle or with an electric drive.
With open design
Roller blinds with an open design (MINI) are the easiest to manufacture and operate. They are always located indoors. Perform aesthetic and protective functions. During the day, when deployed, they regulate the flow of sunlight, and in the evening they provide a certain atmosphere of privacy and tranquility.
They are a textile fabric wound on a roller; a wooden or plastic strip is sewn underneath as a weighting agent. The lift cord hangs on the side.
The main advantage is its low weight, so it can be attached to:
- sash window;
- wall;
- ceiling.
Now the market has begun to offer models that are hung on the doors with hooks. There is no need to drill extra holes in the profile, you can quickly move it to another room - all these points influenced the increase in sales. For roof windows, the canvases are supplemented with side guides.
Closed
Closed (UNI) cassette-type structures are distinguished by the fact that when open, the shaft and lamellas are completely hidden from view by the box. The curtain or canvas fits tightly to the glass, closing the opening as much as possible. Sliding is carried out along guides to which a weighting agent is attached. Adjustable using a cord, rotary cane or electric drive.
The box body performs a decorative function and is made of:
- plastic;
- wood;
- metal
Mini-blinds (isolight and isotra) with slats 16 mm wide are also equipped with a cassette frame.
Varieties according to the level of light protection
What level of light protection to choose will depend on the type of room and the functional purpose of the curtains. Therefore, the textile industry offers fabrics with different levels of light transmission.
Varieties according to light transmission:
- Transparent - perform a diffusion function. Evenly distributes sunlight throughout the entire room. Usually they act as a decorative element of a window opening.
- Dim-out - combines two missions: transparency and dimming. Very often installed in winter gardens and greenhouses to protect flowers and plants from sunburn.
- Black-out - used when 100% blackout is needed. They are used in cinema halls, bedrooms and diagnostic centers.
- Day-night are fabric or perforated curtains consisting of strips of different light transmittance. One strip is transparent, the second is black-out. By adjusting their position, you can provide or limit the access of light.
Perforated canvases are mainly installed on plastic windows of shops, offices and country houses. In residential apartments they cover unglazed openings of loggias and balconies on the lower floors.
Types by type of control
The type of control for decorative roller shutters will depend on the functional purpose and weight of the product. If a mini roller blind is installed, then there is no need to install an expensive electric drive.
The following types of adjustment are available:
- plastic chain cord or cable;
- spring holder;
- electric motor.
Chain mechanisms are the simplest and inexpensive. By pulling the cord, you can easily roll the fabric. The spring holder is used to secure the weight strip in a certain position between the window glazing beads. With the help of a relaxed spring, the curtain rises up by inertia.
Heavy models are raised and lowered using an asynchronous motor. The motor is turned on and off using a stationary switch or remote control.
Installing a roller shutter frame onto a closed opening
Surface mounting
Place on the frame of the opening.
Built-in installation
Install inside the opening.
The roller shutter frame must be level. The guide rails and protective box of the roller shutter must fit tightly to the plane of the opening along the entire height and width.
Action for structures with surface-mounted installation.
After you have leveled the structure, mark the location of the hole for further output of the controls:
- for the electric drive cord - hole O 12 mm
- for tape - hole Ø 16 mm
- for cord, cardan - hole O 14 mm.
Install a safety spring for the cord or a tube (Fig. 10) for the cord into the drilled hole.
Installation technology
When you unpack the roller shutters, make sure that all the necessary parts and components are in place, and you also need to make sure that there is no damage anywhere.
Attaching the side rails
First, the side guides are attached.
- Use a marker or tape measures to mark the holes on the guide rails. To mark the holes, the guides are placed on a flat surface. The holes are marked ten or fifteen centimeters from the edges, guides and along the entire length with the same distance of forty or fifty centimeters.
- For surface mounting, the holes are moved closer to the outer edge of the edge of the guides. Next, holes with a diameter of eight millimeters are drilled.
- If the installation is external, then drill through both guide rails, and in the upper rail an additional hole with a diameter of eleven and eight millimeters is made to install a special plug.
- The lid is applied to the box and two holes with a diameter of 4.2 millimeters are drilled through the lid on each side.
- After the installation of the roller shutters is completed, rivets will be inserted into these holes. To secure the box, drill holes. The holes are located depending on the type of installation. For example, for surface mounting they are positioned at the back, for a recessed hole they are positioned at the top, and for a combination hole they are positioned on both sides.
- A hole of the required size is drilled for the drive. In the case of surface-mounted installation, the boxes are cut using wire cutters or pliers in the place where they connect to the guides. Next, connect the box and guides.
Mounting holes and their markings
The assembled roller shutter frame is applied to the opening.
All elements must lie on the wall during surface-mounted installation; if the installation is built-in, then the structure must be located on the side and top slope.
It is very important to check the verticality of the guides and the horizontality of the box; you also need to check the diagonals.
Using a drill or marker, mark the mounting holes on the wall and slopes.
Drilling mounting holes
The roller shutter frame is removed from the opening. Using the markings, holes are made on the wall or in the opening. If the wall is concrete, then dowels are installed in it, and holes are also made for the drive.
The diameter of the drive is 12-20 millimeters and this depends on the type of roller shutters; such information can be found in the product data sheet. And so you need to install a protective spring in the hole. If external locking parts are designed for roller shutters, then holes are made in the lower part of the guides.
Fastening the frame
Next, the protective films are removed from the back wall of the frame, then the finished frame is placed and leveled in place. Join the holes and check again the horizontality of the box and the verticality of the guides and the distance between them. The frame is attached with self-tapping screws using a screwdriver.
If the installation is external, then the roller shutter control is attached indoors. First, holes are marked on the wall with a marker, then the guides and tape layer are drilled and secured.
Required Tools
If you decide to assemble and install roller shutters yourself, then there is nothing difficult about it. To work, you will need the usual tools that almost every home craftsman has:
- hammer drill or powerful impact drill;
- drills for concrete;
- screwdriver with a set of bits;
- pliers;
- metal scissors;
- wire cutters;
- a set of keys;
- Screwdriver Set;
- building level;
- plumb lines or laser level;
- measuring instruments;
- marker;
- a multimeter, it is needed if the roller shutters have an automatic drive;
- ladder;
- mounting gun and sealant.
To install roller shutters you will need simple and accessible tools.
The advantages of this type of curtains
- Unlike, for example, blinds, fabric roller blinds, which are installed on plastic windows, can be made from any fabric, which makes it possible to choose them to suit a variety of interiors. Unlike conventional blinds, roller blinds do not fade in the sun, since the fabrics for their manufacture are impregnated with special compositions. Thanks to such impregnations, fabric roller blinds have dust-repellent properties. Using darkening fabrics, you can protect yourself from the penetration of daylight into the room. This is especially true for children's rooms. Roller blinds allow you to cover only a certain part of the window to protect yourself from direct sunlight.
System classification
The material used to manufacture the structure remains a key criterion for choosing roller shutter systems. This parameter directly affects the reliability and durability of these products. Facade blinds are classified into 8 groups, focusing on burglary resistance:
- P1-P2 - this is how classic, or plumbing, systems are designated. First of all, they protect from noise, wind and dust. These models do not protect against vandalism and unauthorized entry into the territory. Roller shutter systems are usually roller rolled.
- P3-P5 - extruded or steel profiles. Provide additional protection against vandalism. Gates and window grilles are often made from the same material.
- P6-P8 - improved protection is provided thanks to these models. These systems are armored and bulletproof. There are manual and automatic modifications, according to the control method.
Models can be opened and closed by hand or using a mechanical handle. These systems are equipped with an external lock to lock the roller shutters. The location is automatically controlled by pressing the sound button on the control unit.
The canvas is most often made from steel and aluminum lamellas. Each of these materials has both its pros and cons. Steel modifications have good thermal insulation and noise absorption properties. Their internal void is filled with polyurethane foam. What are the disadvantages of steel roller shutters:
- Large dimensions. This is an additional load on the entire system if only automation is used;
- Possibility of corrosion formation on steel lamellas. The issue is resolved if decorative impregnation is used.
Aluminum structures are characterized by excellent decorative qualities. They are easy to manage. In addition, roller shutters protect premises from dust, noise, sun and unauthorized entry. Additionally, they boast the advantage of low specific gravity.
Advantages and disadvantages
The table will present the main pros and cons of installing roller shutters.
| Advantages | Flaws |
| Quick installation of the product. | The entire structure is heavy, which creates a fairly large load on the load-bearing elements of the building. |
| Beautiful appearance. | Devices are highly susceptible to moisture and will begin to rust over time. |
| When done correctly, it is reliable protection against enemies. | High cost. |
| They have good soundproofing properties. | Be afraid of severe icing. |
| They do not require annual painting or complex maintenance. | Installation of an electric drive is required, since lowering and raising the shutters on your own is quite difficult. |
| Large selection of different colors. | |
| Not bad impact-resistant and heat-repellent properties. |
Roller shutters are a reliable method of protecting your home from bad weather and from unauthorized burglary. They are easy to control using a remote control, easy to care for and attractive.
Selection of fastening materials
It is necessary to decide how the roller shutters will be attached to the windows: the installation of certain fasteners depends on what the window or doorway is made of.
If the opening consists of materials without cavities (monolithic brick, concrete or natural stone), then the best fastening would be plastic dowels with a screw or nail screw, as well as steel expansion anchors.
Installing roller shutters yourself
The depth of penetration of the fastening into the walls should be at least 3 cm. If the opening is made of materials with internal voids, it is best to use steel expansion anchors. The anchoring depth is not less than 6.5 cm.
Fastening to metal structures is carried out using self-tapping screws. To wooden structures - using screws or through tie rods.
For fastening it is best to use self-tapping screws with a press washer.
Roller shutter controls are secured with plastic dowels and screws or nail screws. To seal cracks, polyurethane foam is used, as well as silicone or acrylic-based sealant.
Carefully read the instructions for the sealant - it must be suitable for the materials adjacent to it. The entire installation of roller shutters depends on the correct selection of connecting elements: the instructions for them may also include important recommendations.
Preparing the opening for installation of roller shutters
An essential prerequisite for installation at the lowest cost is high-quality preparation of the frame of the opening for the installation of roller shutters. It is very important at the initial stage to accurately measure the opening, indicating the material of the walls and their thickness.
Prepared openings must meet the following requirements:
- openings must have a rectangular shape or another shape agreed upon by the customer and the contractor
- the surface of the framing planes must be flat and smooth, without sagging plaster and cracks
- deviations of working surfaces from vertical and horizontal should not exceed 1.5 mm/m, but not more than 5 mm. The difference in diagonals is no more than 5mm. If the openings are prepared by the Customer with deviations from the stated requirements, the Customer is obliged to eliminate the deviations or enter into an additional agreement for the performance of these works by a subcontractor.
General principles for installing roller shutters
- Surface mounting external
- Built-in external installation
- Combined installation, box facing out
- Combined installation, box inside
- Surface mounting internal
- Built-in installation internal
- Combined installation internal
During installation, the roller shutter guide rails must be leveled in vertical planes, the protective box must be leveled in the horizontal plane.
- The roller shutter should be located symmetrically relative to the opening.
- The frame and guide rails must be adjacent to the frame of the opening along its entire length. Local gaps of no more than 5 mm are allowed. The difference in the lengths of the diagonals, measured at the extreme points of the guide rails, should not be more than 2 mm.
Installation and alignment of product elements on the wall before fixing them can be done using metal spacers installed in the area of the fastening points. Seams and gaps after installation of products must be sealed with sealing materials.
The accuracy of product installation during installation is controlled by the construction level of standard sizes USB-1 /USb-4 of the 1st accuracy group GOST 9416-83 and a 1-5 m tape measure GOST 7502-89 of the 2nd accuracy group. It is allowed to use building levels and tape measures of other types, but not lower than the specified accuracy group.
Roller shutters must be securely fastened and thus not pose a potential danger to human life and health. The fastening points of the products must ensure a uniform distribution of forces acting on the products and their reliable transfer to the elements of the building structure.
During the installation process, you should pay attention to the correct and uniform tightening of fasteners in order to avoid distortions of the product and ensure its performance.
When attaching roller shutter guide rails, the maximum permissible distance between the fastening elements is 500 mm, and the distance from the edge of the rail to the fastening point should not exceed 150 mm.
The choice of fastening element is carried out taking into account the distribution of loads, the strength of adjacent building elements (brickwork, concrete, gas silicate blocks, etc.). When using expansion dowels, the building elements must be able to withstand the pressure of the expansion dowel.
Wooden plugs, polyurethane foam, and silicone are prohibited from being used as fasteners.
When fastening products with dowels, you should work with long drills so as not to damage the surface of the roller shutter elements with the drill chuck. The drilled hole should match or be slightly smaller than the diameter of the dowel.
When sealing installation seams and gaps, sealants in tubes (silicone, polyurethane foam, acrylic) should be used.
When sealing individual seams and gaps larger than 3 mm, plaster solutions should be used (except for the installation of unpainted aluminum guide rails) that are compatible with the opening material and approved for use by the customer.
After hardening, the sealing materials protruding beyond the plane of the tires and boxes are removed and, if necessary, the final sealing of the seams is carried out. When using polyurethane foam, you should pay attention to ensure that the elements of the roller shutter box do not become deformed.
After completing the installation work and finishing the façade of the building, the protective film should be removed from the roller shutter frame. Clean and wipe contaminated areas
Choosing accessories for roller shutters
For successful fastening of the structure, it is very important to choose the right fittings and secure them correctly. Often from the photo it seems that roller shutters are easy to make with your own hands without any help. But it is important to be careful when performing all stages. Determine what material the walls are made of. If the walls are built of dense material (concrete, stone, monolithic brick), then use plastic dowels with a screw or nail screw. In this case, the depth of penetration into the wall should be at least 3 cm.
But for walls with voids it is necessary to use steel expansion anchors. In this case, the depth of insertion of the anchor must be at least 6.5 cm. To reliably assemble roller shutters installed on a metal wall, use self-tapping screws, and for wooden houses - screws or through tie rods.
Stages of installation of the structure
First of all, the frame is assembled, which includes a box and guides. To attach roller shutters, holes are made in the frame. They retreat 10 cm from the edge, and then every 50 cm they cut another hole for fasteners with a diameter of 8 mm. Don't forget to make a hole for the drive. Its diameter will depend on the selected control system.
Now we attach the frame to the opening and, through the holes made, mark the places for installing the dowels. After this, we attach the structure to the opening. The canvas is assembled from existing lamellas and attached to the shaft. To properly make roller shutters yourself, you need to correctly secure the clamps in the open and closed positions. At the end, they install a lock and configure the drive system.
It is very important to check the operation of homemade roller shutters. To do this, you need to open and close the canvas up to ten times and make sure that nothing interferes with its movement. No extraneous sounds should be heard during operation of the structure. If the work is set up correctly, the canvas will move easily. And you can enjoy a reliable and practical design that will protect your property.
Equipment service
In order for the device to function fully, it is necessary to regularly clean the canvas and guides from dust, ice and other foreign objects (small stones, branches, leaves, etc.).
If the structure is icy, before putting it into operation, you need to clean the canvas. To do this, you need to gently tap the lamellas both outside and inside.
To remove dirt and dust particles, use a soap solution and a soft cloth. Experts recommend annual inspection of roller shutter systems for damage and deformation. It is advisable that craftsmen from the supplier’s company participate in this process.
Equipping rooms with roller shutter systems is one of the best ways to protect. If you follow the step-by-step instructions exactly, even a novice craftsman can install roller shutters with his own hands. The process will not take much time, and the result will certainly please you.
Rules for the care and maintenance of the roller shutter system
Caring for the product involves regularly cleaning it from dirt. In winter, adhered snow and ice must be removed from the canvas. System parts must be lubricated in a timely manner with machine oil or special lubricant. If there are problems with the operation of the roller shutter mechanisms, the roller shutters cannot be used.
The mechanism and guide bars should be regularly inspected and checked for any damage. If a fault is noticed in time, it can be easily fixed.
Features of fabric roller shutters
Fabric roller curtains are the fastest and most effective way to decorate a window opening in any room. They can be attached to a wall or ceiling, and with this method they completely close the opening.
There are models that are placed separately on each sash. They save space, are easy to install and maintain - thanks to these qualities they have gained popularity among consumers.
Fabric roller curtains are made from:
- cotton;
- polyester;
- flax;
- bamboo
Thanks to the wide range of colors, they practically match any decorative style. Manufactured in standard and custom sizes. The fabric is treated with special compounds that protect the fabric from fading, moisture absorption and dust settling.
Design and principle of operation
The mechanism of window roller blinds (photo) includes:
- Protective box
- Canvas
- Guides
- Special devices protecting against vertical shift.
The principle of operation of the roller shutter system is reduced to winding the blinds onto a shaft in a protective box during the day, and unwinding it using guides attached to the wall at night. Special locking devices make it impossible to open the roller blinds from the outside.
Installing roller shutters yourself
To install roller shutters indoors, you should read the step-by-step installation guide.
Preparation rules
The first stage begins with preparing tools for the upcoming work. It includes the following devices:
- Screwdriver.
- Roulette.
- Pencil or marker.
- Laser meter or building level.
- Scissors for cutting metal blanks.
- Pliers or pliers.
Assembly and installation of the box
The action is performed according to the following instructions:
- The guide bars are fixed on a flat surface. Through holes are made at a distance of 40-50 cm. Their diameter should be 8 mm. An indent of 10 cm is made from the cut.
- A cover is placed on the body, and 2 holes of 4.2 mm are drilled along the edges.
- Next, grooves are drilled to secure the box into the opening or onto the wall. If an outdoor installation is used, holes are made at the back of the box, and if built-in, at the top.
- The next step is to prepare the hole for the drive mechanism. The placement and diameter are determined by the design of the roll system.
- Then the body is aligned with the guide rails, and the roller shutters are placed at the installation site.
- Using a level, you should check the horizontal placement.
- The frame is removed from the wall, and holes are made for dowels at the designated points.
- Having secured the dowels, you need to put the frame in place and secure it with self-tapping screws.
Stages of manufacturing roller shutters
Roller shutters consist of thin and long (the length of the opening) slats - these are strips of durable steel or aluminum, they are connected with special fasteners, which allows them to be a flexible but dense fabric. And the most important thing is the mechanism thanks to which the roller shutters open and close - an electrically driven shaft that winds the canvas around itself.
We must not forget about the equipment that will be needed both for creating and installing the structure:
- Table;
- Machines for cutting blanks;
- Miter saw;
- Crafting table;
- Compressor;
- Roulette;
- Level;
- Slope;
- Punch drill;
- Hammer;
- Keys;
- Scissors;
- Screwdriver.
In order to correctly design the system, you need to make a drawing with all the measurements; such a “cheat sheet” will help you not make mistakes in the work at all stages. First comes the selection of suitable material. Cutting the material into slats from which the door leaf will be made. It is important to polish the cut workpieces in order to avoid the presence of burrs. Insert the seal into the final profile, install the lock and locking strips. Cut the guide bars and install the seal; the workpieces are polished at all stages. Make a box that serves to protect the entire mechanism from precipitation, scorching sun or physical impact.
Don't forget to leave a window for the controls.
Cut the octagonal shaft and grind it. Assemble the canvas from lamellas. Assemble the box and install additional drives. Before you begin installing the finished system, you need to make sure that the opening complies with the standards; it should be as straight and even as possible. To do this, all irregularities, both visible and identified using a level, must be eliminated. Most often, to do this, it is enough to plaster the areas of obvious defects, and then level and plaster the entire opening.
Preparing the opening
When carrying out preparatory work, it makes no difference whether roller shutters are installed in a window or doorway. The principle and procedure for performing the work will be the same in any case:
- Taking measurements. In order to purchase roller shutters, you first need to measure the opening in which they are planned to be installed.
- Checking the evenness of the opening. Using measuring tools, the diagonals of the opening are measured; they can differ by no more than 5 mm. If this condition is not met, then it will not be possible to achieve the required tightness and safety when installing roller shutters.
The diagonals of the opening can differ by no more than 5 mm - Checking the horizontal and vertical slopes. To do this, use a building level and plumb lines. Deviations should not be more than 1.5 mm per linear meter.
- Elimination of irregularities, cracks and chips. To do this, use plaster or special overlays to achieve a smooth surface of the opening.
Protective roller shutters
These roller shutters (roller shutters) consist of a metal profile sheet that is screwed onto a shaft hidden by a protective cassette box. There are guides on the sides; lamellas slide along them; the side covers of the cassette provide rigidity to the entire box and protect the roller from dust.
The thickness of the profile will depend on the required protection class. A wide range of colors allows you to create a large variety of protective systems suitable for any architectural style. Such models are mainly installed outside buildings. Anti-vandal and armored samples are in demand in museums and financial institutions. For country houses, systems with a lower degree of protection are used.
What materials are they made from?
In order for roller shutters to truly perform a protective function, it is necessary to use reliable, strong materials such as steel and aluminum in production. Roller shutters according to the degree of burglary resistance are divided into classes from P1 to P8. The resistance time to illegal actions ranges from 10 to 50 minutes.
Depending on the category, metal lamellas are made from the following profiles:
- Roller rolling, resistance class P1 - intended for private houses, country cottages and shopping pavilions that do not require increased protection against intrusion.
- Extruded double-walled, for degrees of protection up to P4. Installed in pharmacy, bank and museum storage facilities.
- Special thick-walled armored profiles are used in anti-burglary roller shutter systems of the highest classes, in weapons and jewelry stores. In the banking industry, they are installed at cash desks.
To confirm the protection class, products are subjected to static and shock loads. Anti-vandal systems are reinforced with metal thickness and additional stiffening ribs. All metal strips are treated with an anti-corrosion coating and painted with special paints. This two-layer coating ensures the durability of the roller shutters.
Control methods
The method of controlling roller shutters can be done manually or using an electric drive. When installing an electric mechanism, a manual lifting device is additionally installed to protect against unforeseen events.
Approximate list of manual mechanical drives:
- tape;
- corded;
- cord;
- collar;
- spring-inertial.
You can manually operate roller shutters weighing from 15 to 80 kg. Electric drives significantly increase the cost of the entire structure, so they are most often used in high-rise buildings with many windows, where the manual method is physically impossible.
The automated system can be controlled using a remote control. In modern office premises, a method of blocking window openings using a timer is used. This is very convenient and safe: all protective roller shutters close at the same time.
Rules for installing roller shutters on various openings
Brick house
A brick wall is the most convenient surface for installing roller shutters or roller shutters. Brick, unlike concrete, is easy to drill with a conventional drill. At the same time, the brick wall is strong and does not require additional reinforcement.
The only thing you should pay attention to is the choice of fasteners, which differ depending on the characteristics of the brick. For walls made of hollow bricks, only steel expansion anchors are suitable, the depth of which starts from 6.5 cm. Solid brick walls allow plastic dowels with screw-in screws or expansion anchors with a length of 3 cm or more.
There are several ways to install roller shutters on a brick opening:
- The most popular option is the overhead installation of a protective box on the facade of the house. It is also called “overlap”. The outer frame is mounted above the window or doorway. If you do everything according to the instructions, installing the roller shutters will not take more than three hours.
- Built-in installation, when the protective box is located inside the opening, is a more complex option. Roller shutters must fit perfectly to the size of the opening. Gaps that you can close your eyes to during overhead installation are unacceptable here.
House made of timber
Wooden and timber frames have one significant drawback. The walls of such houses “walk”.
If special measures are not taken, roller shutters will “walk” along with the walls of the house.
- We need to give the new house time to settle. This may take several years. And all this time your home will not be protected.
- In advance, during the process of building a house, provide for window and door openings. The window frame allows you not to wait for shrinkage and immediately install windows and roller shutters in the house.
Only the presence of a frame guarantees that the roller shutters will not “walk” with the house. This technology provides not only surface-mounted installation of roller shutters, but also built-in installation. The box can be safely placed inside the opening and not be afraid that it will be crushed or warped.
Frame house
Frame houses, despite their external resemblance to wooden ones, are not classified as such. The technology for constructing frame frames is completely different and completely eliminates the “walking” of walls and shrinkage of the house. In terms of their technical characteristics, frame houses are closer to brick than wooden.
The thickness of the external walls of frame houses is about 20 cm, so both installation options for roller shutter structures are acceptable - overhead and built-in. The overhead option, as always, is easier to implement. In addition, there is an opinion that the outer box is good because it eliminates the formation of a “cold bridge”. However, if the built-in box is installed in compliance with all standards, no freezing will occur at the attachment point.
Siding house
Installing roller shutters on a siding-clad house is the most labor-intensive process. If we are talking about overhead installation, it is quite obvious that roller shutters cannot be mounted on top of the siding.
You will need to first remove the trim to make room for the frame and guides. Part of the sheathing is carefully removed and, upon completion of the work, put back, part is trimmed. Plastic siding is fairly easy to cut. The main thing is not to cut off too much, so as not to spoil the appearance of the facade.
Now, as for the installation itself. There are two options for the development of events:
- There is no insulation between the wall and the sheathing
In this case, roller shutters are mounted directly on the wall of the house. The installation technology corresponds to the material from which the house is built (brick, concrete, wood).
- Insulation is laid between the wall and the sheathing
Taking out the insulation to attach roller shutters to the wall of the house is stupid, to say the least. Just like trying to install a roller shutter frame on top of the insulation. The correct thing to do would be to fill the mortgages from timber and place the box and guides on them. Then all that remains is to return the sheathing strips to their place to give the structure a finished look.
Why do you need roller shutters for a garage?
Initially, roller shutters were used to protect window openings, replacing the usual bars on windows.
Accordingly, the main function of the mechanism is to protect against burglary. Subsequently, this method of protection gained popularity in the field of cargo transportation, in particular, warehouses, in the retail industry, as protection of window and door openings from burglary and theft. Most importantly, people realized that this design could be expanded to the size of a garage door, provided that the materials from which the roller shutters would be made stronger.
Having “tested” the technology on small openings, I became confident that such a device is not only durable, but also practically not susceptible to precipitation.
Roller shutters have:
- Long service life;
- Not heavy;
- Quite reliable;
- Adequate in price;
- You can make any design on them and choose almost any color;
- And most importantly, they are very easy to care and use.
In addition to all the above advantages, roller shutters can be either mechanical (the most inexpensive option) or automatic, opening and closing with one press of a button on the remote control, which is most convenient when driving a car to a house or garage. without leaving it.
Shop
The basic assembly of components requires special equipment - roller shutters are made to fit the size of the openings. Our employees in the workshops cut, fasten the slats, install plugs, and prepare the guides to size. We deliver four packages to our clients - guides, canvas, box with control system, components. The components are a small package of parts, so it is often attached with film to the guides.
Transportation requires proper packaging of roller shutters
The quality of roller shutters that will be installed on your windows depends on:
- components
- manufacturing
- competent installation
After the workshop employees who assemble consistently high-quality roller shutters, we are proud of the teams of installers who are on the company’s staff and regularly undergo training and advanced training.
Types of roller shutters
The main criterion for choosing roller shutter systems is the material used to make the structure. It is this parameter that determines the strength and reliability of roller shutters. According to the degree of protection, façade blinds are divided into eight burglary resistance classes:
- P1-P2 – sanitary (classic) roller shutters primarily serve as protection from wind, dust and noise. Such models do not protect against breaking and entering. Typically these are roller shutter systems.
- P3-P5 - steel or extruded profiles provide sufficient protection against vandalism. Window bars and gates are often made from the same material.
- P6-P8 – high degree of protection. Typically these are bulletproof and armored roller shutter systems.
Depending on the control method, roller shutters can be manual or automatic.
Types of roller shutter designs
Modern roller shutters are an improved version of conventional shutters. Their design is a metal sheet that is rolled up and hidden in a box.
Roller shutters help not only protect, but also decorate your home
Installing roller shutters in your home allows you to solve the following problems:
- Improve the protective functions of a window or door opening. Modern metal roller shutters are quite difficult to open, and if they do, they create a lot of noise, so they scare away thieves. To further increase the security of your home, it is recommended to install an alarm on your roller shutters.
- Increase the soundproofing characteristics of the room. This is especially important for houses that are located close to the roadway. With closed roller shutters, the noise level is reduced by 12–15 dB.
- Adjust the lighting intensity in the house. If the roller shutters are not closed completely, then the desired illumination in the room can be ensured.
- Increase the thermal insulation characteristics of the house. If you install roller shutters with slats with insulation, heat loss through doors and windows is reduced by 20%.
- Improve the appearance of the building. There is a large selection of colors. In addition, you can order lamellas with a pattern and thus decorate your house or any other building in an original way.
One of the main parameters that people pay attention to when purchasing roller shutters is the material from which they are made. There are the following burglary resistance classes of modern roller shutters:
- P1-P2 - classic roller shutters. They have low strength and can only protect from wind, sun and dust;
- P3-P5 - steel or extruded roller shutters. This option already provides fairly good protection against entry into the premises;
- P6-P8 - roller shutters with a high degree of burglary resistance. They are made from particularly durable materials, usually armored and bulletproof systems.
If you look at the way such devices are controlled, they can be:
- manual, in this case the closing/opening of the roller shutters is carried out using a mechanical handle;
Roller shutters are controlled using a mechanical handle
- automatic, here an electric motor is used to control the system, so you just need to press a button on the control panel or on the key fob.
Automatic roller shutters are controlled from a remote control or key fob
For the manufacture of lamellas, steel or aluminum is usually used. Steel structures have good heat and sound insulation properties, but they are heavier and susceptible to corrosion. Aluminum slats are much lighter, but their burglary resistance will be lower. Their advantage is light weight and high corrosion resistance.
According to the type of design, roller shutters are:
- External. This is a simpler and therefore more common option. The box is installed above the window or doorway. Such a solution can be installed both during the construction of a house and at any other time.
External roller shutters can be installed both during the construction of a house and at any other time
- Built-in. In this case, the box is hidden in a previously prepared niche. Such roller shutters, when they are raised, are practically invisible, but their installation is possible only at the construction stage of the building.
Built-in roller shutters can only be installed during the construction phase of the building
Video: types of roller shutters
Installation of the canvas
The final step in installing a roller shutter is the installation of the canvas. To do this, the plates are fixed to the shaft with bolts or, in other words, automatic locks. After this, we install stoppers to fix the canvas in extreme positions. We finish the work by connecting the control elements.
Now you need to check the operation of the roller shutter mechanism and, if any shortcomings are found, promptly eliminate them. It is especially worth paying attention to the tight movement during ascent and descent and unnecessary sounds. This can significantly reduce the life of the mechanism. Initially, problems may be easily fixable, but later, operating roller shutters under additional load will only lead to their aggravation.
In the photo there are plumbing roller shutters for the toilet
How to remove and wash blinds or roller shutters
Regular sliding blinds are quite easy to remove. First of all, they are opened to the full size of the canvas. Then they are removed from the wall along with the guide.
Roller shutters are more difficult to dismantle. First of all, you need to remove the protective cover from the drum. If it is secured with self-tapping screws, then there will be no special problems. Just take a screwdriver and unscrew the fasteners. If it is attached to rivets, then they must be drilled out with a drill.
After dismantling the protective cover from the shaft, proceed to the canvas. To dismantle it, you need to open it completely and remove the fastening strip. Then pull the fabric through the drum.
After removing the canvas, they begin to dismantle the frame. To do this, remove all the screws from the wall and carefully remove the frame.
Blinds and roller shutters are washed using a sponge and any household cleaner. After washing, they must be dried thoroughly.
Electric drive connection
Further installation consists of providing automation. You cannot install two switches to one electric drive. To install the electric motor, a double-insulated cable with a cross-section of at least 0.75 mm is used. When using several electric drives, the total power of the cables must be taken into account. Cable connections must be placed in junction boxes. Electric motors need to be divided into groups, and groups, if there is a network with three phases, into phases.
Attention! If you have never dealt with electrical connections before or are not confident in yourself, hire a master electrician to do the work.
Video: do-it-yourself installation of electric roller shutters externally on the windows and veranda of a wooden house. From the video you will also learn what is the difference between anti-vandal and foam-filled roller shutters and what you should pay attention to when choosing roller shutters.
There are several types of automatic roller shutters:
- automation using a switch;
- group control system;
- automation with wireless control.
Automation using a switch is a budget solution designed for those people who do not need technological innovations.
The group control system is suitable for those who want to remotely control a large number of roller shutters.
Wireless controlled automation is often used in smart home systems. There are also technological solutions using programming of light sensors, rain sensors, timers, and so on.
Setting up an internal roller shutter motor: step-by-step video instructions:
Fabric blinds
Blinds or roller blinds are gaining popularity. They are beautiful and practical. Their only drawback, like many other roller blinds, is their high cost. Not everyone can afford to buy or have such roller blinds made to order, especially for windows in all rooms. But it is possible to make fabric roller blinds for windows with your own hands. This is not a very complicated matter, and the cost is much cheaper. The design of such curtains is simple and clear.
The fabric for making blinds must be dense and intended specifically for such products. Regular and other curtain fabrics are not suitable for use in roller blinds - they complicate the normal functioning of the mechanism.
To make such a design yourself, you need to prepare the necessary material and tools:
- canvas;
- double-sided adhesive tape;
- fabric winding shaft;
- weight for fabric - bar (wood, plastic, aluminum);
- The roller blind mechanism consists of a driving and driven element, a chain with a weight and a lock; the set may include additional brackets for lower fixation.