0
8429
30.03.2014
Roller shutters are a type of blinds that perform not only a decorative, but also a protective function. Roller shutters are widely used as window shutters, garage doors, blinds and protect against unauthorized access, dust, sunlight, provide sound insulation and comfort in the home. Installation of roller shutters by specialists is not cheap, but at the same time it is not particularly difficult and can be done with your own hands.
Installation of roller shutters on windows
Recommended set of tools and accessories required for installing roller shutters.
Expand
| Tool name | Quantity |
| Electric hammer drill | 2 |
| Electric drill | 1 |
| Cordless screwdriver | 1 |
| Electric corner cutting machine | 1 |
| SDS adapter with keyless chuck | 2 |
| Rivet gun | 2 |
| Construction block level 1.5m | 1 |
| Tool box | 2 |
| Bench hammer 400 gr | 2 |
| Sledgehammer | 1 |
| Set of percussion instruments (chisel, bolt, punch, punch) | 1 |
| Hacksaw for metal | 1 |
| Metal scissors | 1 |
| Pliers | 1 |
| Medium side cutters | 1 |
| Set of files | 1 |
| Carbide screwdriver set | 1 |
| Set of wrenches | 1 |
| Universal ladder 4 folds | 1 |
| Universal ladder, 3 sections (more than 6m) | 1 |
| Silicone gun | 1 |
| Tester device | 1 |
| Electric soldering iron 60 W | 1 |
| Electrical extension cord no less than 30 m | 1 |
| Screwdriver el. indicator | 1 |
| Tape measure 5 m | 1 |
| Vernier caliper 125 mm | 1 |
| Safety glasses | 2 |
| Construction helmet | 3 |
| Universal first aid kit | 1 |
| Standard set of metal drills | 1 |
| Concrete drill O 6 mm L=160-200 mm | 2 |
| Concrete drill O 8 mm L=200-260 mm | 2 |
| Concrete drill O 10 mm L=550 mm | 2 |
| Concrete drill O 12 mm L=550 mm | 2 |
| Concrete drill O 14 mm L=750 mm | 2 |
| Concrete drill O 16 mm L=950 mm | 1 |
| Concrete drill O 18 mm L=550 mm | 1 |
| Concrete drill O 20 mm L=550 mm | 1 |
| Note: The recommended size of the installation team is 3 people: electrician - 1 person, fitter - 2 people. | |
Before you begin installing the roller shutter, you need to check that all the equipment is included.
Preparatory work
Before installing roller shutters with your own hands, you must:
- Measure and compare the diagonals of the opening. The difference should be no more than 5 mm.
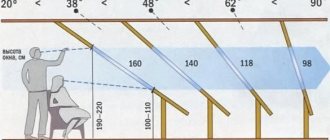
- Check the verticality of the side slopes and the horizontality of the top. Deviations should not exceed 1.5 mm per meter of length.
- Make sure that there are no unevenness, crumbling plaster or chips on the slopes.
If the opening does not meet these requirements, it must be plastered or finished in another way.
Prepare the necessary tools:
- Hammer and drill, drill bits for concrete and metal (set);
- Screwdriver and set of bits;
- Riveting gun;
- Metal scissors;
- Pliers and wire cutters;
- Screwdrivers and wrenches (set);
- Hammer;
- Level and roulette;
- Marker;
- When installing roller shutters at a height of more than 1.5 meters, a stable stepladder is required.
To connect the drive you will need an indicator screwdriver and a multimeter. To seal the joints between the guides and the wall, use any suitable sealant and mounting gun. When unpacking the roller shutters, you should immediately check that the elements are complete and that they are not damaged.
Roller shutter elements
Preparing the roller shutter
Preparing roller shutter guide rails for surface-mounted installation
Fig.1 Surface mounting.
For surface mounting, you need to take the guide rails and attach them to each other with their blind sides. Mark the places for fastening with a marker, the distance between the fastenings is approximately 450-550 mm, the upper and lower fastenings should be located at a distance of 100-150 mm from the edges of the tires. Drill holes Ø12 mm for subsequent installation of plugs.
Note: do not drill through the tire!!!
Preparing roller shutter guide rails for built-in installation
Fig.2 Built-in installation.
For built-in installation, lay the busbars on edge and drill holes in the stiffener at the same distance as for surface-mounted installation, using the same distance of 450-500mm between holes, with an O 12mm drill.
Note: do not drill through the tire!!!
Depending on the type of installation, drill a hole in both side covers of the box for further fastening to the opening.
- For installation on the opening, the holes are located in the rear part of the sides of the side cover (Fig. 3).
- If the roller shutter is installed in an opening, drill in the upper part of the sides of both covers (Fig. 4).
- For a combined type of installation of the structure, drill two holes in the top and rear sides of each side cover.
Fig.3 Surface mounting. Fig.4 Built-in installation.
From the side of the drive mechanism, it is necessary to drill a hole in the side cover of the box (Fig. 5) to remove the drive elements.
Note: action (Fig. 5) for external type of installation for the output of a cardan, tape, cord, cord or electric drive wire.
Fig.5
The next step is to install two guide devices in the side covers, and insert the guide bars into the legs of the side covers (Fig. 6). Fig.6
A simple solution
It is OBVIOUS that it is IMPOSSIBLE and makes no sense to tell ALL the technical information about roller shutters. It's hard to imagine that you will study this information for several weeks. In order to understand this variety of technical solutions, specialists undergo long training, both theoretical and practical.
The simplest, most reliable and profitable option for you is to call a specialist (expert) to the installation site of the product. Already on site, the Expert will explain all the possible options, their advantages and disadvantages specifically for your case.
All you have to do is choose the option you like best in terms of price and quality.
Installing a roller shutter frame onto a closed opening
Surface mounting
Place on the frame of the opening.
Fig.7
Built-in installation
Install inside the opening.
Fig.8
The roller shutter frame must be level. The guide rails and protective box of the roller shutter must fit tightly to the plane of the opening along the entire height and width.
Action for structures with surface-mounted installation. rice. 9 After you have leveled the structure, mark the location of the hole for further output of the controls:
- for the electric drive cord - hole O 12 mm
- for tape - hole Ø 16 mm
- for cord, cardan - hole O 14 mm.
Install a safety spring for the cord or a tube (Fig. 10) for the cord into the drilled hole. rice. 10
Key switch
It belongs to the group of embedded equipment. It is part of the automatic roller shutter control system.
In order to raise or, conversely, lower the blade, you will need to turn the key to one side. This will activate the electric drive, which will move the crossbar plates.
The key switch can be mounted on both the internal and external walls of the facility. In the latter case, it is lowered into a metal housing.
In fact, it was made from a connection from a lock to reduce the likelihood of illegal entry into the premises and starting equipment for the movement of the canvas.
Attaching the roller shutter frame to the opening
Surface mounting
Fig.11
Built-in installation
rice. 12
Remove the protective film from the roller shutter frame and install the frame at the installation site. It is recommended to drill holes for installing dowels with a long drill to avoid damage to the roller shutter elements.
When carrying out fastening, it is necessary to periodically check the correct installation using a mounting level.
The frame must be securely fastened and not pose a potential danger to the health and life of people. Do not use silicone, wooden plugs or polyurethane foam for fastening.
When installing a roller shutter with an electric drive, it is necessary to connect the cable to the switch terminals in accordance with the instructions for connecting the roller shutter motor.
When installing a mechanical type of roller shutter drive, thread the tape, cord or cord into the guides.
rice. 13
rice. 14 Thread the motor cable or tape into the previously drilled hole in the wall (for surface-mounted installation). The cord rope or cord must be threaded into the safety spring or tube and secured.
Secure the drive mechanisms: cardan, cord, cord or belt.
rice. 15
rice. 16
During built-in installation, the drive mechanisms are fastened to the guide rail using self-tapping screws or rivets.
Selection of fastening materials
It is necessary to decide how the roller shutters will be attached to the windows: the installation of certain fasteners depends on what the window or doorway is made of.
If the opening consists of materials without cavities (monolithic brick, concrete or natural stone), then the best fastening would be plastic dowels with a screw or nail screw, as well as steel expansion anchors.
Installing roller shutters yourself
The depth of penetration of the fastening into the walls should be at least 3 cm. If the opening is made of materials with internal voids, it is best to use steel expansion anchors. The anchoring depth is not less than 6.5 cm.
Fastening to metal structures is carried out using self-tapping screws. To wooden structures - using screws or through tie rods.
For fastening it is best to use self-tapping screws with a press washer.
Roller shutter controls are secured with plastic dowels and screws or nail screws. To seal cracks, polyurethane foam is used, as well as silicone or acrylic-based sealant.
Carefully read the instructions for the sealant - it must be suitable for the materials adjacent to it. The entire installation of roller shutters depends on the correct selection of connecting elements: the instructions for them may also include important recommendations.
Installation of roller shutter leaf
The installation of the blade must be inserted behind the shaft from the rear of the protective box into the guide bars (Fig. 17). To avoid damaging the blade coating, wrap the shaft with a rag.
rice. 17 When installing roller shutters with mechanical drives, fasten a cord, tape or cord to the pulley (Fig. 18). By rotating the shaft, wind the traction element onto the pulley for further control of the blade. rice. 18 The next step is to secure the roller shutter leaf with the hanging mechanism (Fig. 19, 20) (crossbars or traction springs). Place them from the side into the upper lamella of the fabric. rice. 19 fig. 20
Bolt fastening
Attach the locking bolt to the shaft and secure it with the crossbar rings, bring the rings together until they stop. The bolt must fit into the mounting holes of the rings. In this position, the rings must be secured with self-tapping screws. There is no need to drill the shaft to install a self-tapping screw; the self-tapping screw is installed in the hole of the crossbar ring and screwed until it stops against the shaft wall.
Fig.21 Fig. 22
Traction spring attachment
The traction spring is attached to the perforations of the shaft. You need to compress the end of the traction spring and insert it into the shaft.
rice. 23 To limit the lifting of the canvas, you need to install a stopper in the bottom bar. Drill through holes in the end strip at a distance of 50-100 mm from the guide rails. Install a locking bolt into the holes through the lining and screw the stopper to it. rice. 24
Connection diagrams
Subsequent installation of roller shutters with your own hands continues by ensuring automation of the opening and closing of the curtain. All connections of the electrical circuit must be in junction boxes; components should not be left outside, even in an isolated state.
General connection diagram for roller shutter system drives
The automation is connected using wires with a cross-section of at least 0.75 mm2. Regardless of which roller shutter connection diagram is used, wires with a polyethylene sheath should not be used.
Despite the fact that the minimum cross-section of the wires is known (0.75 mm2), this does not eliminate the need to calculate it - when calculating, it is necessary to take into account the total power of all drives.
Electric motors must be divided into groups, using a separate cable for each group. When connected to a three-phase network, the groups can be separated into different phases.
Other profile options
Single-wall Economy profile option for anti-burglary roller shutters
from 12,000 rub./m2
Extruded anti-vandal profile for burglary protection
from 14,000 rub./m2
Lattice Robust and beautiful profile for protection and visibility
from 16,000 rub./m2
The requirements for internal roller shutters are not as high as for external ones, so almost 100% of customers choose a foam-filled profile for these purposes.